Sensors Architecture and Overview
This overview explains how sensors operate within the Keyfactor AgileSec Platform, including what is scanned, how data flows through the system, and how scans can be executed using the UI, API, or remote CLI. It also introduces incremental scanning and post-scan processing.
Overview
Sensors integrate a target system with Keyfactor’s AgileSec Platform. They enable you to discover, inventory, and analyze cryptographic assets across one or more data sources within that target system.
What Gets Scanned
What a sensor scans depends on the sensor type and the target system, but in general sensors can analyze content and/or metadata to discover:
X.509 Certificates: TLS/server certificates, code signing certificates, client authentication certificates, and other X.509 identities.
Private Keys: RSA, DSA, EC private keys in common encodings (PEM/DER/PKCS#8), including encrypted keys where supported.
Keystores and Bundles: JKS/JCEKS, PKCS#12, PEM bundles, and other container formats.
Tokens and Credentials: JWT/JWE tokens and other token formats (as supported).
Cryptographic Libraries and Implementations: Common crypto libraries/frameworks and indicators of crypto usage (ecosystem-dependent).
Container and Package Artifacts: Certificates/keys embedded in Docker/OCI images and packaged artifacts (where applicable).
Compiled and Archived Artifacts: Embedded certificates/keys in binaries and archives (for example, JAR/WAR/EAR and other supported formats).
Architecture and Data Flow
High-Level Architecture
Individual sensor types operate as a unified sensor plugin. For example, the Git Sensor uses the Git client to clone and fetch the target repository locally (extracting archives if necessary). It then passes the repository to the unified sensor core for scanning and then securely transmits the findings to the Keyfactor AgileSec Platform.
Scan Flow
The following uses the Git Sensor as an example, but the flow follows the same path for all sensors operating as a unified sensor plugin.
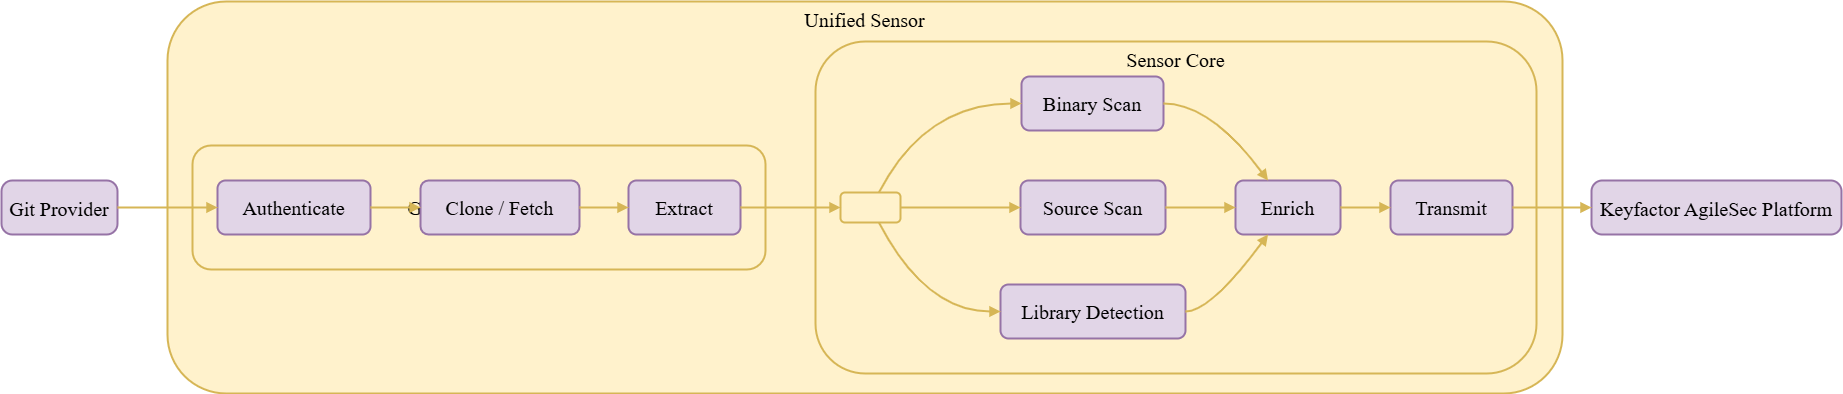
Scan Flow Description
Authenticate: Sensor establishes secure connection to GitHub using provided access token.
Enumerate: Queries the GitHub API to list repositories matching include/exclude patterns
Clone/Fetch:
Initial Scan: Performs a shallow clone of the specified branch to minimize bandwidth and storage
Incremental Scan: Fetches only the commits since the last scan and identifies changed files
Scan: All files downloaded from the repository are passed to the unified sensor core that performs the following types of scans:
Binary Scan: Analyzes binary files to discover cryptographic objects.
Source Scan: Performs static analysis of source code files to detect cryptographic implementations, API calls, and embedded cryptographic objects.
Library Detection: Scans source code and dependencies to identify cryptographic libraries being used.
Enrich: Performs following:
Transformation: Normalizes and standardizes scan results into a consistent format for processing.
Enrichment: Enhances scan result with additional metadata like labels.
Transmit: Sends the enriched scan results to Ingestion Service on Keyfactor AgileSec Platform for inventory and policy-based analysis.
Post-Scan Flow

Post-Scan Flow Description
Scan: The Unified Sensor performs scan the as described in previous sections.
Send Findings: Upon scan completion, the sensor transmits all discovered cryptographic findings to the AgileSec Platform, where they are stored in OpenSearch. All new findings are initially marked with a "pending" status.
Execute Policies: The platform executes configured policies on the data stored in OpenSearch. Policies calculate a risk score for each finding and save it alongside the finding data. At this point, findings are no longer considered pending, and each is assigned a score classification displayed as: compliant, high risk, medium risk, or low risk.
Execute Processes: After policy execution completes, backend processes run to read data from OpenSearch and perform operations such as de-duplication and auto-resolution on the findings.
Running the Sensor
Sensors can be executed using following methods:
Platform UI: Configure and execute scans directly though the Keyfactor AgileSec web UI with on-demand or scheduled execution options.
Using API: Programmatically trigger scans through REST API calls, enabling integration with CI/CD pipelines and automation workflows.
Remote execution: Deploy and run the sensor via CLI on customer-managed infrastructure for scenarios such as: scanning air-gapped or internal repositories that the platform cannot directly reach, or when customers want to manage their own scheduling and execution environment.
Platform Scan Execution
Running the sensor through the user interface is the simplest and fastest way to get started. It enables on-demand or scheduled scans that run in a dedicated environment.
Runs on Keyfactor AgileSec Platform
For on-premise deployments, scans run on scan nodes, or backend nodes.
For Kubernetes environments:
Leverages automatic resource provisioning and auto-scaling
Creates ephemeral sandbox pods for performing each scan.
Platform Scan Configuration
Step 1: Navigate to Sensors Setup Page
Open your browser and navigate to the Keyfactor AgileSec Platform Web URL
Log in with your credentials
Click on "Sensors" in the left navigation menu under Scan
Step 2: Select a Sensor
Click the "Choose a Sensor" button

Browse or search for sensor
Click on the sensor card
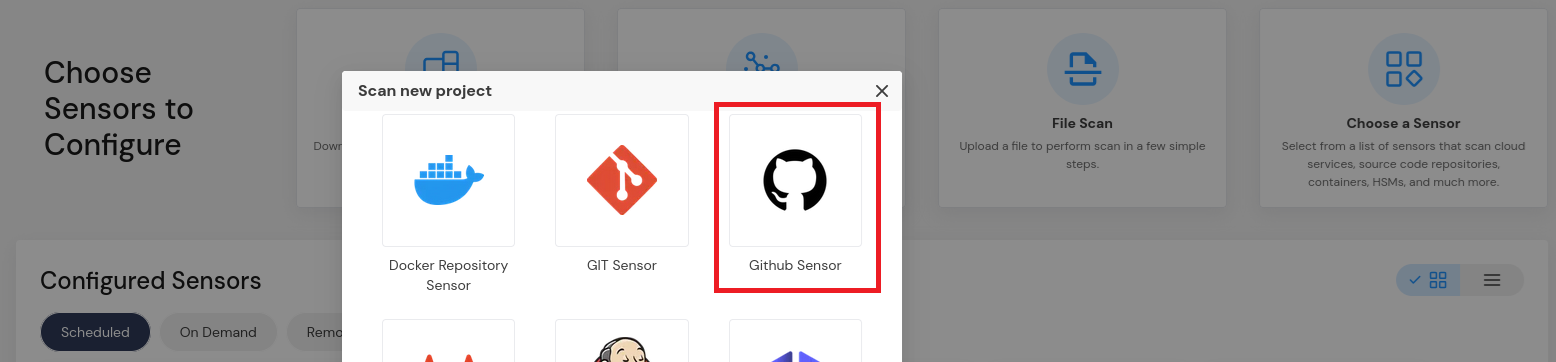
This will open the sensor configuration interface.
Step 3: Configure Sensor Parameters: Each sensor will have sensor specific configuration screen.
Platform Scan Execution Flow Diagram
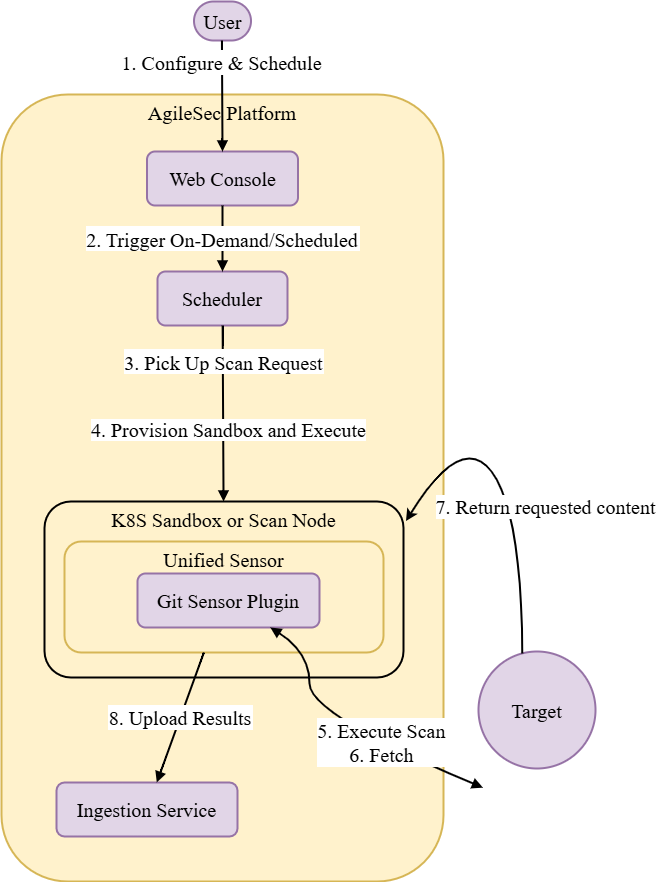
Platform Scan Execution Flow Description
Configure & Schedule: User accesses the Web Console to configure the GitHub sensor settings, specify target repositories, and define scan execution as either on-demand or scheduled.
Trigger On-Demand/Scheduled: The trigger event to run on-demand or scheduled scan is sent to the Scheduler.
Pick Up Scan Request: The Scheduler picks up pending scan request from Kafka queue for processing.
Provision Sandbox and Execute Scan: The Scheduler executes the sensor based on the deployment environment:
On-premises: Executes on available scan nodes or backend nodes
Cloud: Provisions an ephemeral sandbox pod and launches the Unified Sensor with the Git (or other) Sensor Plugin
Fetch: The Sensor Plugin authenticates and connects to the target system to fetch content for scanning.
Target: The target system returns the requested content to the Sensor Plugin running in the sandbox.
Upload Results: After scanning and enriching the results, the Unified Sensor uploads the results to the Ingestion Service for storage and analysis.
Scan Execution Using API
Programmatically trigger scans through REST API calls, enabling seamless integration with CI/CD pipelines, automation workflows, and custom applications. API execution provides flexibility for developers to incorporate cryptographic scanning into their existing development and deployment processes.
Ideal for automated workflows and CI/CD integration
Supports both asynchronous scan execution
Enables batch scanning of multiple repositories
Provides programmatic access to scan status using callback.
Note: For complete API reference see the API document.
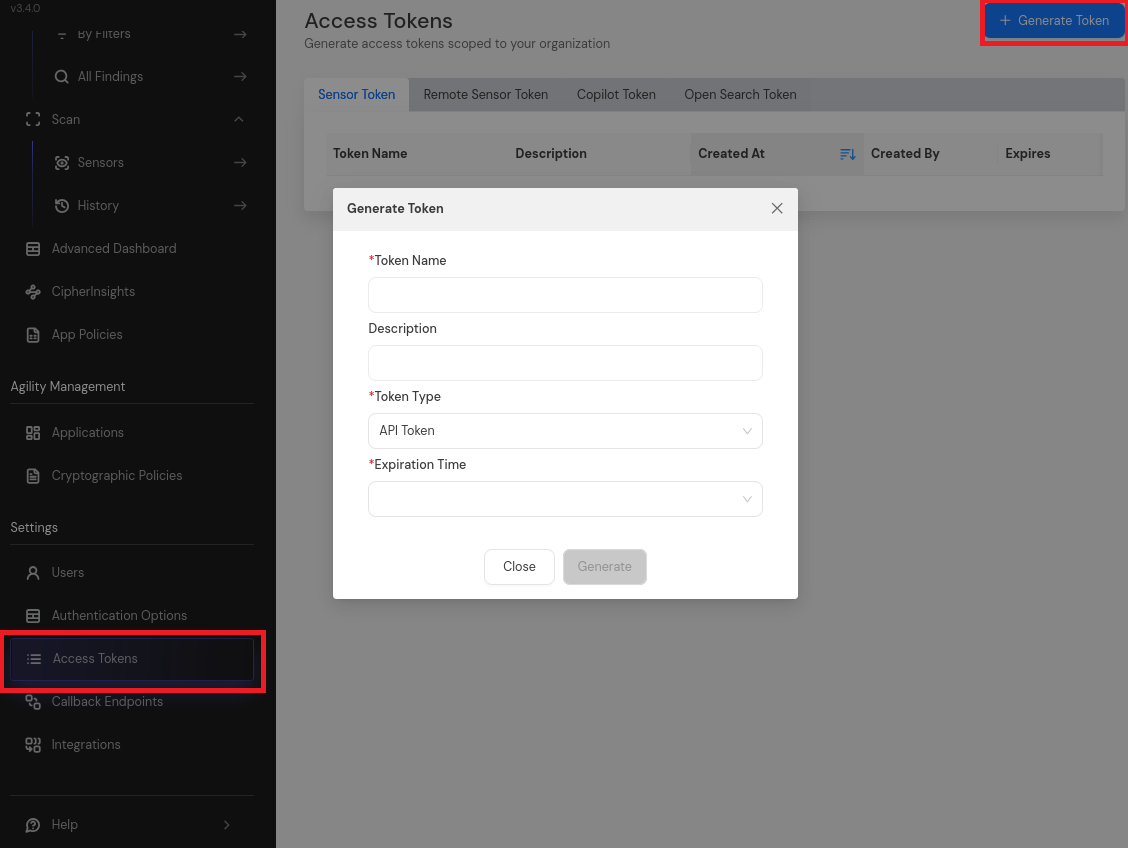
API Access Token
Open your browser and navigate to AgileSec Platform UI
Log in with your Keyfactor credentials
Click "Access Tokens" in the main navigation menu
Click "Generate Token" button
Set Token Type to API Token and provide the required details
Click "Generate" and copy the generated token
API Endpoint
POST https://<platform-url>/v1/sensors/
Request Format
Headers
Content-Type: application/json
isg-api-token: <your-api-token>
Request Body
Refer to the sensor user guide for a sensor-specific example of the request body to send.
API Scan Flow Diagram

API Scan Flow Description
POST /v1/sensors/ (with config): API client sends a POST request to the API endpoint with sensor configuration and scan parameters.
Create Sensor & Put in Queue: The API endpoint validates the request, creates a sensor instance with the provided configuration, and places the execution request in the Kafka queue.
Pick Up Scan Request: The Scheduler picks up pending scan request from Kafka queue for processing.
Provision Sandbox & Execute: The Scheduler executes the sensor based on the deployment environment:
On-premises: Executes on available scan nodes or backend nodes
Kubernetes: Provisions an ephemeral sandbox pod and launches the Unified Sensor with the GitHub Sensor Plugin
Execute Sensor & Scan: The sensor plugin authenticates to the target system, retrieves relevant content, and then performs cryptographic scanning.
Upload Results: After scanning and enriching the results, the Unified Sensor transmits the cryptographic findings to the Ingestion Service.
Notify: The Ingestion Service notifies the Manager that the scan has been completed and results have been stored.
Callback: The Manager executes the configured callback to notify the API client of the scan completion status.
Remote Scan Execution
Remote Execution Flow allows you to run the sensor on a VM using the unified sensor binary.
Advantages:
Full control over execution environment
Can access internal GitHub Enterprise instances behind firewalls, if they are not accessible from Keyfactor AgileSec Platform
Configurable batch size and threading
Best For: Security-sensitive environments with complex network restrictions, or very large repositories
Remote Execution Requirements
If running the unified sensor remotely using CLI :
Component | Requirement |
|---|---|
Operating System | Linux (x86_64, x86_64): Ubuntu 18.04+, RHEL 8+, CentOS 8+, Debian 10+ |
RAM | 3 GB minimum, 4 GB recommended for large repositories |
Disk Space | Minimum 2 x Size of your repository. overhead. |
Permissions | Read/write access to working directory |
Remote Scan Execution Configuration
Step 1: Download Unified Sensor
Navigate to AgileSec Platform UI → Sensors → Remote Scan

Download the sensor binary for your operating system
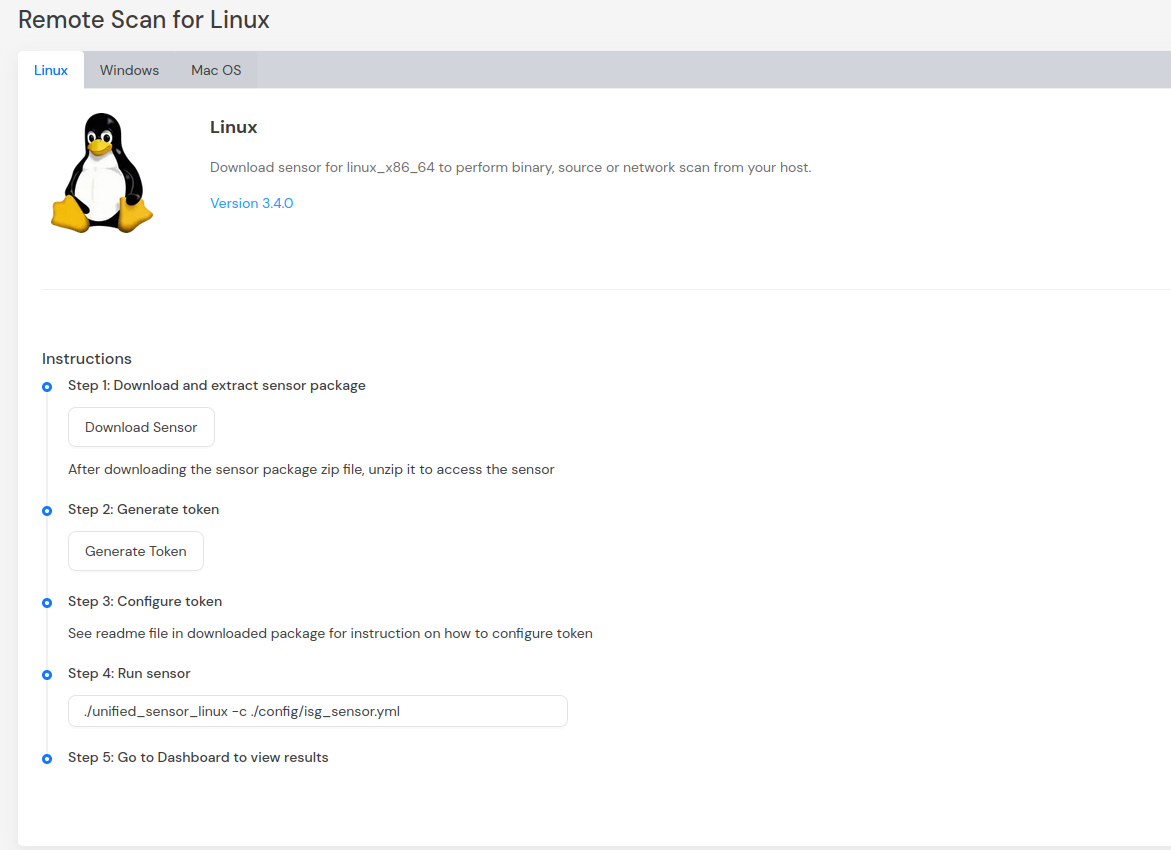
Step 2: Generate Platform Token
In the Remote Scan UI, click "Generate Token"
Copy the generated token
Store securely in environment variable:
CODEexport SENSOR_TOKEN="your-generated-token"
Step 3: Create Configuration File
Create a YAML configuration file (e.g.,
github-config.yml) with your scan settings. An example configurations can be found inconfig/sample-configs/directory.Step 4: Run the Sensor Execute the sensor with your configuration file:
Linux/macOS
CODE# Set environment variables export SENSOR_TOKEN="your-sensor-token" export GITHUB_TOKEN="your-github-token" # Run sensor ./unified_sensor_linux -c github-config.ymlWindows (PowerShell)
CODE# Set environment variables $env:SENSOR_TOKEN = "your-sensor-token" $env:GITHUB_TOKEN = "your-github-token" # Run sensor .\unified_sensor_windows.exe -c .\github-config.yml
Remote Scan Execution Configuration Examples
Refer to the sensor user guides for a sensor-specific example of the remote execution configuration.
Remote Scan Execution Flow Diagram

Remote Scan Execution Flow Description
Configure & Execute: User configures the sensor settings and executes the sensor via CLI on their own infrastructure.
Fetch: The Sensor Plugin authenticates, fetches the content.
Upload Results: After scanning and enriching the results, the Unified Sensor transmits the cryptographic inventory findings to the platform's Ingestion Service for storage and analysis.
Incremental Scanning (Optional)
Note: Incremental scanning is an optional feature. You can choose to use standard full scans for every scan cycle, or enable incremental scanning to optimize scan efficiency for repositories that are scanned regularly.
Incremental scanning enables the sensor to efficiently scan only changes since the last scan, significantly reducing scan time and resource usage for repositories that are scanned regularly.
How Incremental Scan Works
When you choose to enable incrementalScan with an autoResolutionInterval (e.g., 5), the scanning follows a cyclical pattern:

Scan Cycle:
Full Scan (count = 0): The first scan is always a full scan resulting in a scan of all files. No auto-resolution runs on the first full scan.
Incremental Scans (count = 1 to N): The next N scans (where N =
autoResolutionInterval- 1) are incremental. Each incremental scan:Compares the current context with the stored context
If unchanged, exits early (no new files)
If changed, fetches only new or modified files since the last scan
Scan count increments with each scan
Full Scan + Auto-Resolution (count wraps to 0): After N incremental scans, the count resets to 0 and triggers a full scan. After this full scan, the backend process also triggers Auto-Resolution.
Cycle Repeats: This flow continues for subsequent scans.
How Auto-Resolution Works
Auto-resolution runs only at the end of a full scan (when the scan count wraps back to 0). It automatically marks findings as "resolved" when they were detected in previous scans but are no longer present in the latest full scan.
This is an example of an incremental scan.

After the auto-resolution process completes, open the findings tab of the original scan history in which the findings were first discovered. You will see that the findings have been marked as "Resolved".
Important Notes:
Auto-resolution does not run for each incremental scan. It only for subsequent full scans
Findings removed during incremental scans will be auto-resolved at the next full scan
Benefits of Incremental Scanning
If you choose to enable incremental scanning, you gain the following benefits:
Efficiency Gains:
Reduced scan time - Only scans changes since the last scan rather than all files
Lower resource usage - Minimizes computational overhead for regularly scanned repositories
Early exit optimization - If no changes detected, scan exits immediately without processing files
Smart Scanning Pattern: The system balances efficiency with thoroughness through a cyclical approach. After an initial full scan, it performs multiple incremental scans that only check new or modified files. Periodically, it conducts a full scan with auto-resolution to ensure findings are up-to-date and any findings no longer present are auto-resolved.
Automatic Cleanup: Auto-resolution automatically marks findings as "resolved" when they no longer appear in full scans, keeping your findings list current .