The following provides an example of deploying EJBCA to a Kubernetes cluster, integrating it with an external MariaDB database, and utilizing Ingress with TLS passthrough or LoadBalancer to expose HTTPS routes from outside the cluster to the EJBCA service.
If your cluster does not support Ingress with TLS pass-through or LoadBalancer, see Deploy CA in Kubernetes with Ingress NGINX.
This guide assumes the use of the EJBCA Helm Charts and the Ingress with TLS passthrough or LoadBalancer.
Prerequisites
Before you begin, you need a functioning Kubernetes cluster with the tools Helm and kubectl installed. For details, see Prerequisites.
Step 1 - Prepare database
These instructions assume that a database has already been provisioned. You must update the database connection settings in the following steps to reflect your specific configuration.
Step 2 - Deploy EJBCA
External access to EJBCA can be configured using either an Ingress or a LoadBalancer Service. This guide covers both options. Most steps are identical for each approach, and any differences are explicitly indicated in the section headings (Ingress or LoadBalancer).
To deploy EJBCA, first prepare the deployment parameters by creating a YAML configuration file, and then use the Helm Chart with your values file to install EJBCA to a Kubernetes cluster.
This example illustrates a deployment with two EJBCA instances.
You can deploy a single instance or scale to any number of replicas depending on your requirements.
Alternatively, you may use autoscaling instead of manually defining a fixed replica count.
Prepare deployment parameters
Prepare a secret for sensitive data
For information on creating the imagePullSecrets and license, see Container Registry and EJBCA License.
Create a Kubernetes secret with the following:
-
Database password (Exception when password-less authentication is used).
-
Session encryption key for EJBCA session synchronization. This is an optional parameter and must have the name
SESSION_REPLICATION_KEY_SECRET. (Exception only one instance is deployed)
kubectl create secret generic ejbca-passwords \
                --from-literal=SESSION_REPLICATION_KEY_SECRET=foo123 \
                --from-literal=database-password=bar123
With Ingress
Create an ejbca.yaml configuration file with the following content:
ejbca:
  license: ejbca-license-secret
  env:
    DATABASE_JDBC_URL: "jdbc:mariadb://mariadb-mariadb-galera:3306/ejbca?characterEncoding=utf8"
    DATABASE_USER: ejbcauser
    # this parameters enable EJBCA to synchronize session data among the cluster
    HIGH_AVAILABILITY: true
  envRaw:
    - name: DATABASE_PASSWORD
      valueFrom:
        secretKeyRef:
          name: ejbca-passwords
          key: database-password
    - name: SESSION_REPLICATION_KEY_SECRET
      valueFrom:
        secretKeyRef:
          name: ejbca-passwords
          key: SESSION_REPLICATION_KEY_SECRET

replicaCount: 2

nginx:
  enabled: true
  host: "ejbca.example.com"
  # Self signed certificate will be removed in next step when EJBCA is initialized
  initializeWithSelfSignedTls: true

ingress:
  enabled: true
  # change it relevant class when NGINX ingress is not used
  className: "nginx"
  # this indicates Ingress has TLS pass through
  sslBackend: true
  # These annotations includes Ingress control specific configuration
  # to allow TLS pass through
  annotations:
    nginx.ingress.kubernetes.io/backend-protocol: HTTPS
    nginx.ingress.kubernetes.io/ssl-passthrough: "true"
    nginx.ingress.kubernetes.io/ssl-redirect: "true"
    # example: for HAProxy
    # haproxy.org/ssl-passthrough: "true"
  hosts:
    - host: "ejbca.example.com"
      paths:
        - path: /
          pathType: Prefix

imagePullSecrets:
  - name: keyfactor-registry
With LoadBalancer
ejbca:
  license: ejbca-license-secret
  env:
    DATABASE_JDBC_URL: "jdbc:mariadb://mariadb-mariadb-galera:3306/ejbca?characterEncoding=utf8"
    DATABASE_USER: ejbcauser
    # this parameters enable EJBCA to synchronize session data among the cluster
    HIGH_AVAILABILITY: true
  envRaw:
    - name: DATABASE_PASSWORD
      valueFrom:
        secretKeyRef:
          name: ejbca-passwords
          key: database-password
    - name: SESSION_REPLICATION_KEY_SECRET
      valueFrom:
        secretKeyRef:
          name: ejbca-passwords
          key: SESSION_REPLICATION_KEY_SECRET

replicaCount: 2

nginx:
  enabled: true
  host: "ejbca.example.com"
  # Self signed certificate will be removed in next step when EJBCA is initialized
  initializeWithSelfSignedTls: true
  service:
    type: LoadBalancer

imagePullSecrets:
  - name: keyfactor-registry
Parameter details
|
Parameter |
Value |
Details |
|---|---|---|
|
|
|
Secret containing EJBCA license |
|
|
|
Database connection string |
|
|
|
Database username |
|
|
|
Database password reference to a key in a Kubernetes secret. |
|
|
|
Flag that enables usage of Ingress |
|
|
|
Ingress host configuration Tip: When deploying to a local dev cluster, you can use |
|
|
|
Deploys NGINX as sidecar along with a Kubernetes service |
|
|
|
Set the type of associated service |
|
|
|
A temporary setting before the TLS setup is finalized |
|
|
|
Domain to access EJBCA |
|
|
|
Reference to an image pull secret. See Container Registry or use a private registry. |
For a list of all supported parameters, see EJBCA Helm Deployment Parameters.
Install EJBCA
Use the Enterprise or Community Helm Chart with your values file to install EJBCA to a Kubernetes cluster.
Enterprise
helm install ejbca -f ejbca.yaml oci://repo.keyfactor.com/charts/ejbca --version <version>
Community
helm install ejbca -f ejbca.yaml oci://repo.keyfactor.com/charts/ejbca-ce --version <version>
Wait for the installation to finish. You can use the following command to monitor the pod creation process:
kubectl get pods -w -l app.kubernetes.io/instance=ejbca
Proceed once all pods are ready (1/1).
NAME       READY   STATUS              RESTARTS   AGE
ejbca...   0/1     Pending             0          0s
ejbca...   0/1     ContainerCreating   0          0s
ejbca...   0/1     Running             0          20s
ejbca...   1/1     Running             0          40s
Step 3 - Configure EJBCA
The following sections demonstrate how to create an initial Management CA and issue certificates for secure access to EJBCA.
Initialize CA
Access EJBCA Admin Web by navigating your browser to:
-
In case of Ingress to the host configured in ejbca.yaml.
-
In case of LoadBalancer the EXTERNAL_IP address configured to
ejbca-nginxor{helm release name}-nginxservice.
The following uses https://ejbca.example.com as an example.
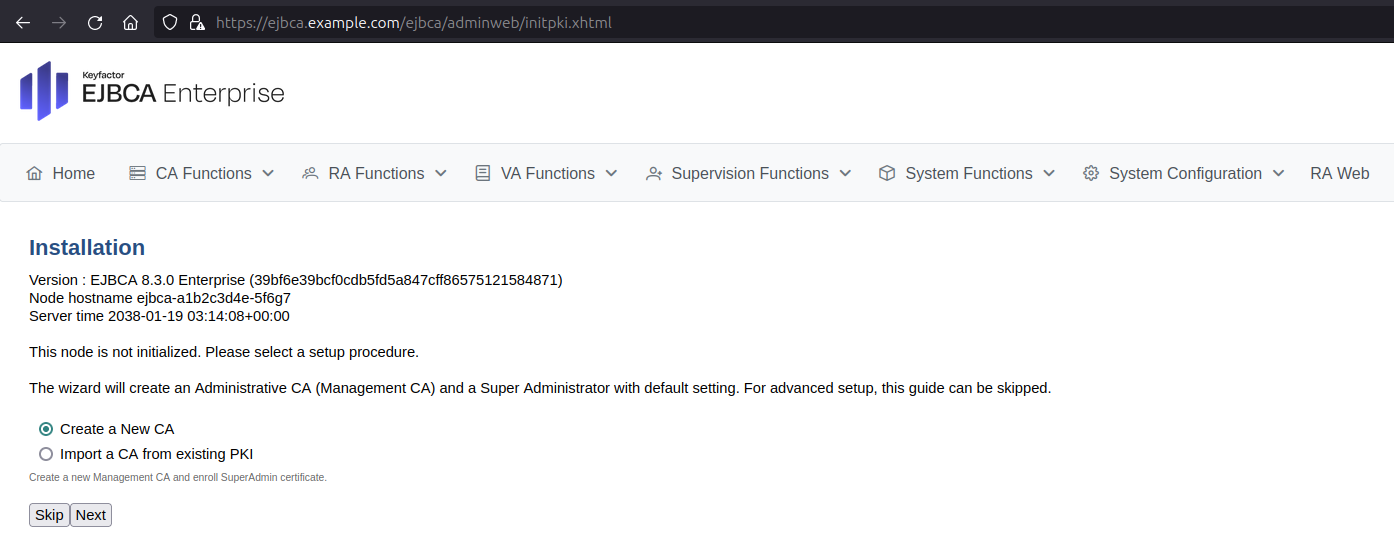
Next, follow the steps in the EJBCA setup wizard:
-
Select Create a New CA and click Next.
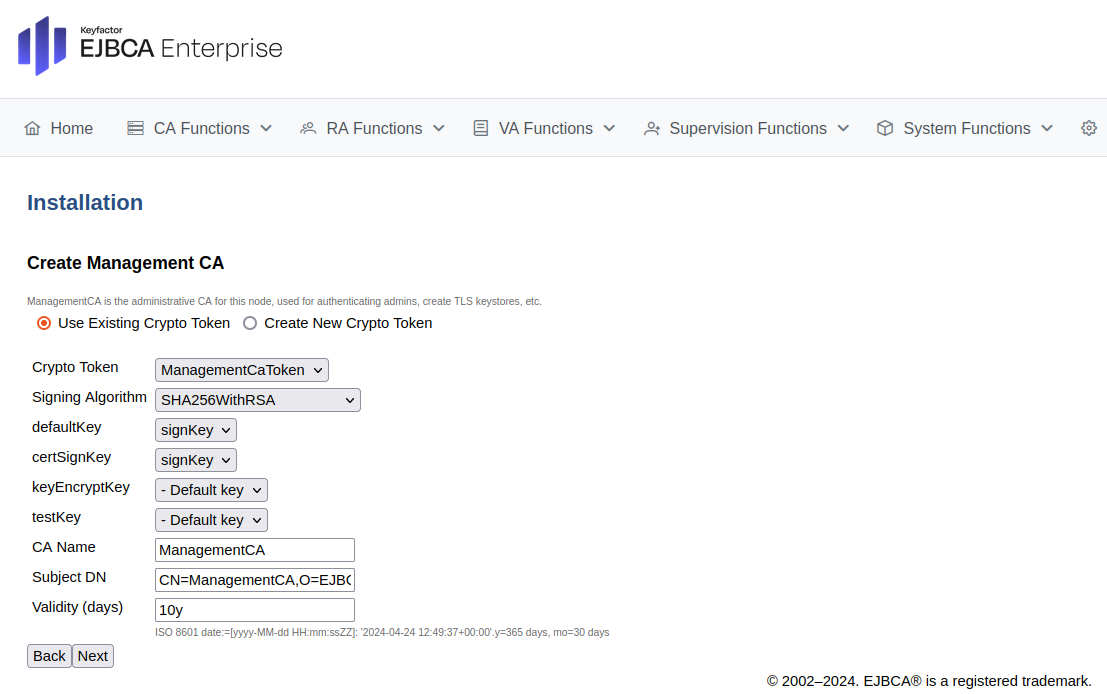
-
For Create Management CA, select Create New Crypto Token.
-
On the New Crypto Token page, specify the following:
-
Name: Specify a name for the crypto token, such as ManagementCaToken.
-
Type: Select SOFT.
-
Auto-activation: Select Use to allow EJBCA to save the password and reapply it after a restart so that the CA is always available.
-
Authentication Code: Enter a password to be used to activate the crypto token.
-
Repeat Authentication Code: Re-enter the password.
-
-
Click Save to create the crypto token.
-
On the Crypto Token: ManagementCaToken page, click Generate new key pair. A new signKey key pair is generated and displayed in the list of key pairs.
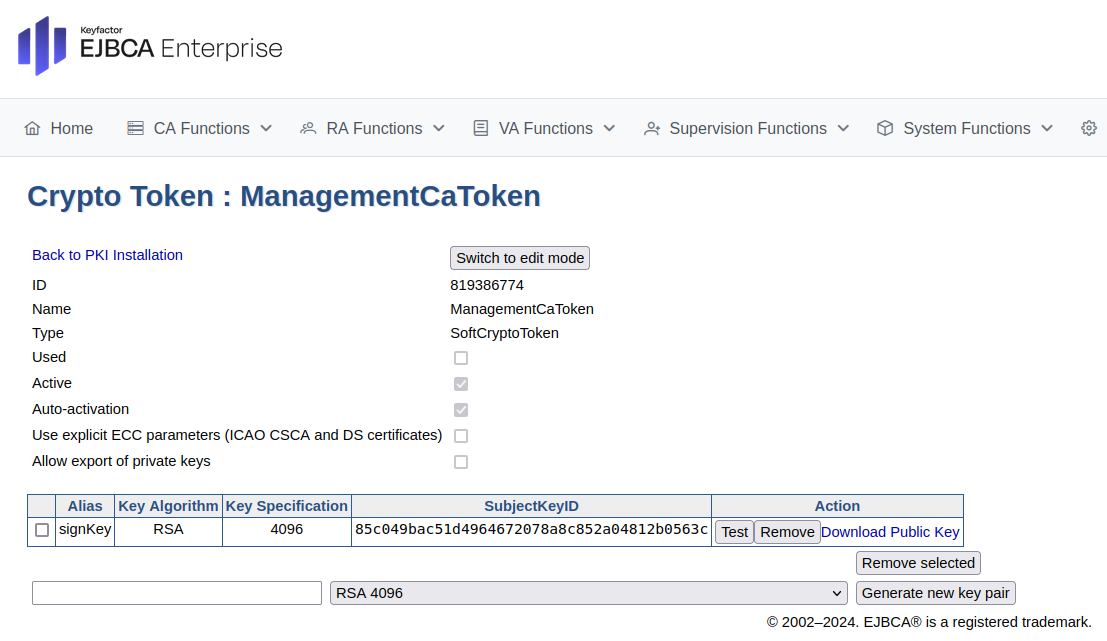
-
Click Back to PKI Installation.
-
On the Create Management CA page, click Next.
-
On the Create Super Administrator page, specify the following:
-
For Super Administrator DN, specify CN=SuperAdmin.
-
For Super Administrator Password, enter your password.
-
For Repeat Super Administrator Password, re-enter your password.
-
-
Click Next to create the super administrator.
-
Review the information on the Summary page and click Install to create the Management CA.
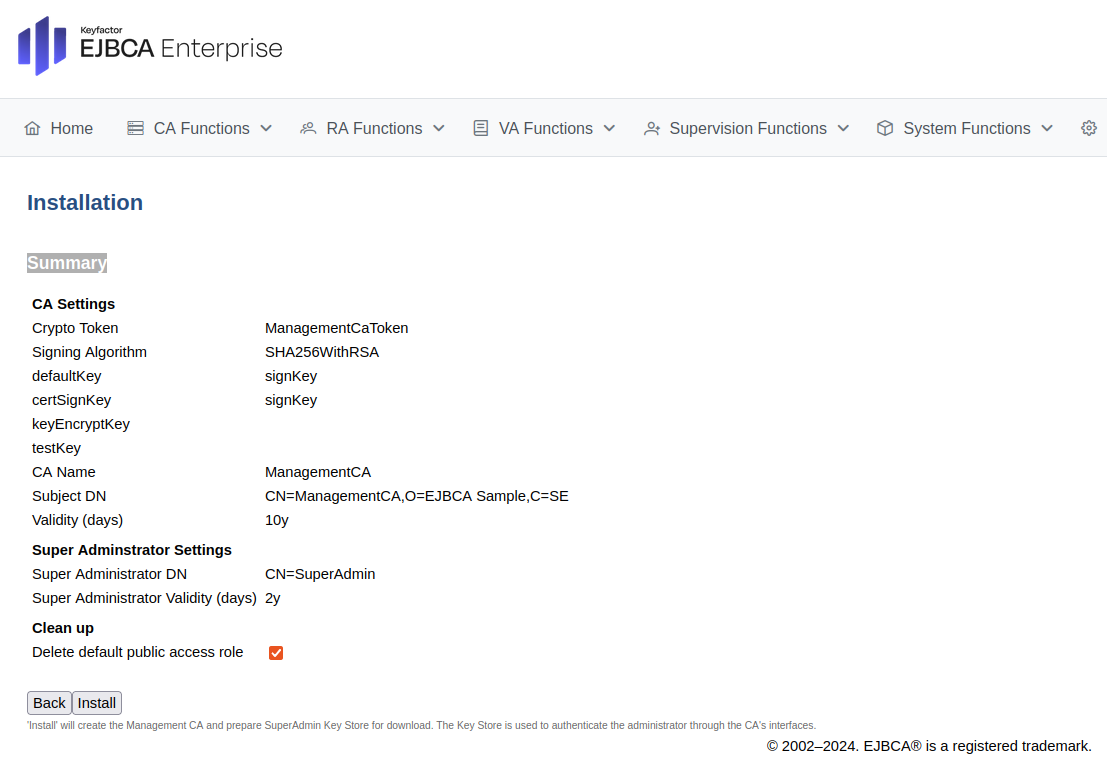
-
Click Enroll to retrieve the Super Administrator key store (
SuperAdmin.p12) file. -
Click Download CA Certificate.
-
On the CA Structure & CRLs page, click Download PEM file to download the
ManagementCA.cacert.pemfile.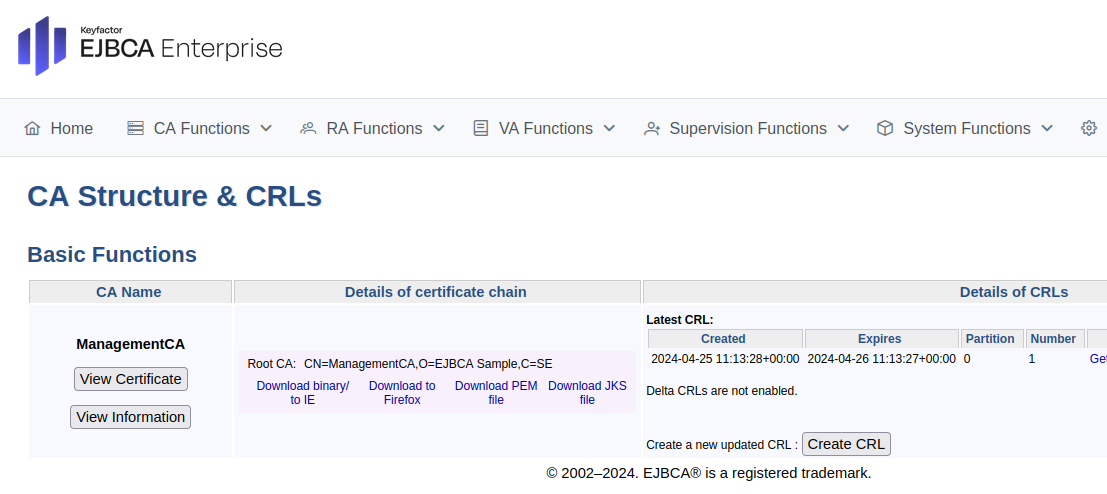
Enroll server TLS certificate
Use the EJBCA RA Web to enroll a server TLS certificate for Ingress.
-
In EJBCA, click RA Web to access the EJBCA RA user interface.
-
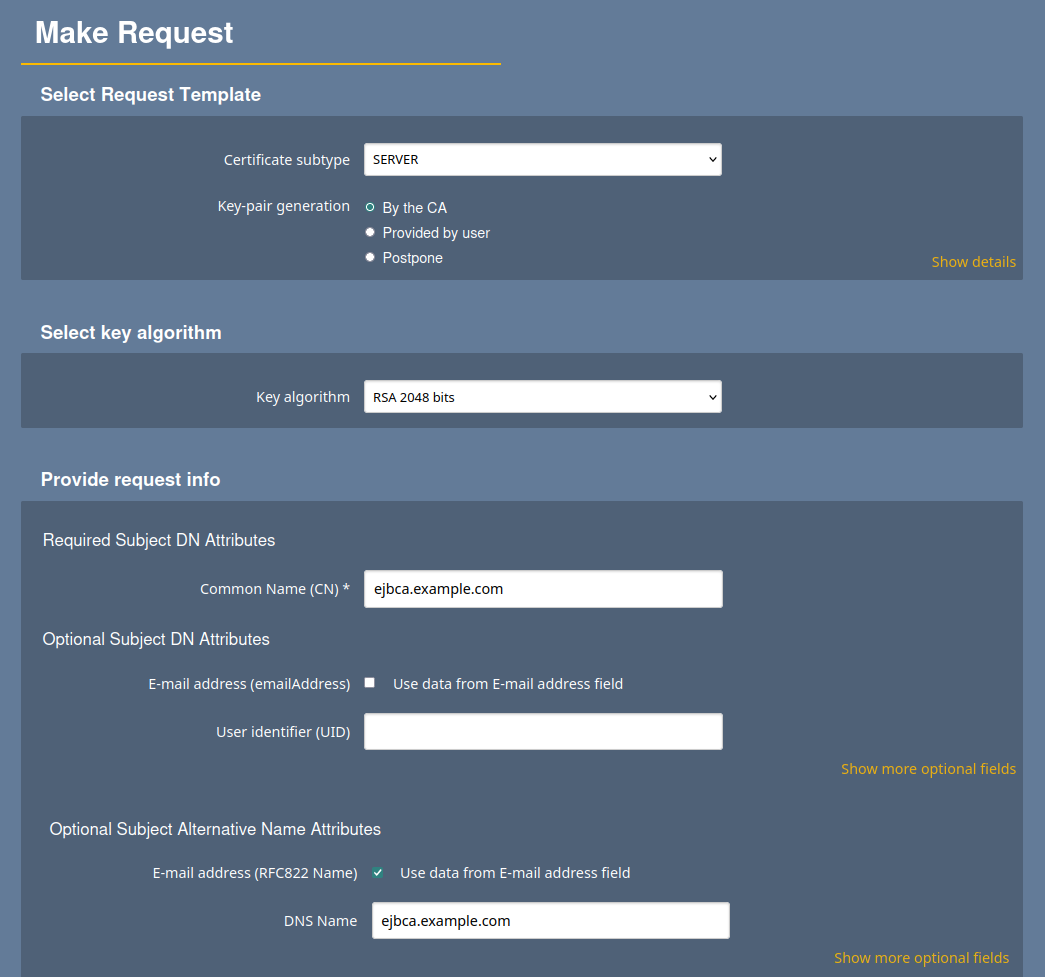
Select Enroll > Make New Request and specify the following:
-
For Certificate Type, select EMPTY.
-
For Certificate subtype, select SERVER.
-
For CA (if prompted), select ManagementCA.
-
For Key-pair generation, select By the CA.
-
For Key algorithm, select for example, RSA-2048, or P-256.
-
For the Required Subject DN Attributes, specify CN, Common Name=
ejbca.example.com. -
For Optional Subject Alternative Name Attributes, specify DNS Name=
ejbca.example.com-
In case of LoadBalancer, additionally specify IP Address=allocated EXTERNAL_IP
-
-
For Provide User Credentials, enter a username and password.
-
-
Click Download PEM to download the server certificate in PEM format.
-
Save the server certificate file.
Step 4 - Configure Server TLS Credentials
To configure client certificate authentication and TLS termination at the Ingress level, you need to create two secrets: one secret containing the full Certificate Authority chain, and another with the TLS certificate.
Prepare secrets
First, extract the certificate and private key components from the previously generated PEM file. Open the PEM formatted server certificate file in your favorite text editor, or use the provided AWK commands to extract the components into dedicated files.
Private key
Copy the content starting from -----BEGIN PRIVATE KEY----- till -----END PRIVATE KEY----- to a file named server_tls.key.
awk '/-----BEGIN PRIVATE KEY-----/,/-----END PRIVATE KEY-----/' \
    ejbca.example.com.pem > server_tls.key
Certificate
The downloaded PEM file contains two certificates: the server TLS certificate, and the issuer CA certificate.
Copy the content of the server TLS certificate (first entry) starting from -----BEGIN CERTIFICATE----- till -----END CERTIFICATE----- to a file named server_tls.pem.
awk '/-----BEGIN CERTIFICATE-----/ {found=1} found && !printed; \
    /-----END CERTIFICATE-----/ {printed=1}' \
    ejbca.example.com.pem > server_tls.pem
Now create a secret for the TLS certificate using the server_tls.key , server_tls.pem and ManagementCA.cacert.pem files:
ejbca.example.com is used as a prefix in all relevant files and is also specified in the nginx.host configuration. These values must match exactly.
Suffixes are also significant and case-sensitive:
-
.pem→ Server certificate -
-Key.pem→ Private key -
-CA.pem→ CA certificate
For details, see Configure Reverse Proxy for LoadBalancer access in EJBCA Helm Deployment Parameters.
kubectl create secret generic internal-nginx-credential-secret \
    --from-file=ejbca.example.com.pem=server_tls.pem \
    --from-file=ejbca.example.com-Key.pem=server_tls.key \
    --from-file=ejbca.example.com-CA.pem=ManagementCA.cacert.pem
Upgrade to enable TLS
Next, use your secrets to enable TLS and client certificate authentication by upgrading the EJBCA deployment.
Modify the nginx section of your ejbca.yaml according to the following example to specify the TLS credentials we created in last step:
nginx:
  enabled: true
  host: "ejbca.example.com"
  mountInternalNginxCert: true
  secretInternalNginxCert: "internal-nginx-credential-secret"
  #service:
  #  type: LoadBalancer
initializeWithSelfSignedTls is no longer used.
Finalize configuration with Ingress
TLS can be configured with Ingress in two ways:
-
TLS terminated at the Ingress – Currently, only NGINX Ingress is supported.
-
TLS terminated at the EJBCA pod – Any Ingress that supports TLS pass-through can be used.
In both cases, a sidecar (NGINX or Apache HTTPD) must be enabled and properly configured.
This section details the configuration where TLS is terminated at the Ingress. TLS termination at the pod is covered in the next section using a LoadBalancer deployment.
The following displays an example of the full content of ejbca.yaml file:
ejbca:
  license: ejbca-license-secret
  env:
    DATABASE_JDBC_URL: "jdbc:mariadb://mariadb-mariadb-galera:3306/ejbca?characterEncoding=utf8"
    DATABASE_USER: ejbcauser
    # this parameters enable EJBCA to synchronize session data among the cluster
    HIGH_AVAILABILITY: true
  envRaw:
    - name: DATABASE_PASSWORD
      valueFrom:
        secretKeyRef:
          name: ejbca-passwords
          key: database-password
    - name: SESSION_REPLICATION_KEY_SECRET
      valueFrom:
        secretKeyRef:
          name: ejbca-passwords
          key: SESSION_REPLICATION_KEY_SECRET

replicaCount: 2

nginx:
  enabled: true
  host: "ejbca.example.com"
  mountInternalNginxCert: true
  secretInternalNginxCert: "internal-nginx-credential-secret"

ingress:
  enabled: true
  sslBackend: true
  annotations:
    nginx.ingress.kubernetes.io/backend-protocol: HTTPS
    nginx.ingress.kubernetes.io/ssl-passthrough: "true"
    nginx.ingress.kubernetes.io/ssl-redirect: "true"
  hosts:
    - host: "ejbca.example.com"
      paths:
        - path: /
          pathType: Prefix

imagePullSecrets:
  - name: keyfactor-registry
Finalize configuration with LoadBalancer
Modify the nginx section of your ejbca.yaml according similar to:
ejbca:
  license: ejbca-license-secret
  env:
    DATABASE_JDBC_URL: "jdbc:mariadb://mariadb-mariadb-galera:3306/ejbca?characterEncoding=utf8"
    DATABASE_USER: ejbcauser
    # this parameters enable EJBCA to synchronize session data among the cluster
    HIGH_AVAILABILITY: true
  envRaw:
    - name: DATABASE_PASSWORD
      valueFrom:
        secretKeyRef:
          name: ejbca-passwords
          key: database-password
    - name: SESSION_REPLICATION_KEY_SECRET
      valueFrom:
        secretKeyRef:
          name: ejbca-passwords
          key: SESSION_REPLICATION_KEY_SECRET

replicaCount: 2

nginx:
  enabled: true
  host: "ejbca.example.com"
  mountInternalNginxCert: true
  secretInternalNginxCert: "internal-nginx-credential-secret"
  service:
    type: LoadBalancer

imagePullSecrets:
  - name: keyfactor-registry
Upgrade the EJBCA deployment
Enterprise
helm upgrade ejbca -f ejbca.yaml oci://repo.keyfactor.com/charts/ejbca --version <version>
Community
helm upgrade ejbca -f ejbca.yaml oci://repo.keyfactor.com/charts/ejbca-ce --version <version>
Step 5 - Finalize installation
Finalize the installation by importing the administrator certificate into your browser and then accessing EJBCA using the installed certificate.
Import the administrator certificate
The process of importing a certificate may vary depending on the web browser you are using. The following example outlines how to import a certificate into Mozilla Firefox.
To import the downloaded super administrator P12 keystore:
-
Open the Firefox application menu and click Settings.
-
Go to Privacy & Security and in the Security section, click View Certificates.
-
On the Your Certificates tab, select Import.
-
Browse to the downloaded P12 file, select the file, and click OK.
-
Enter the password you specified as the Super Administrator Password in a previous step, and click Sign in.
-
Click OK to close the Firefox Certificate Manager.
Access EJBCA
To access EJBCA using the certificate you just installed:
-
Navigate your browser to
https://<hostname>/ejbca/adminweb/. -
When prompted for the SuperAdmin certificate, select the one you just imported and click OK.
-
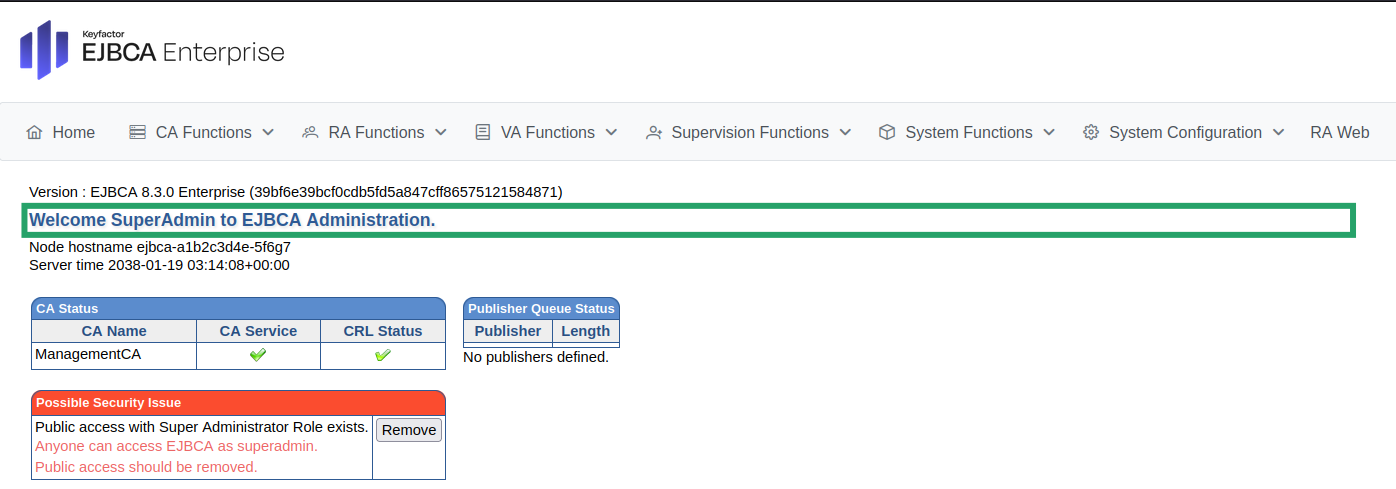
Verify that you are logged in as SuperAdmin which is shown in the text as highlighted in green rectangle in the picture below.
-
When using Ingress: The text highlighted in the green box may not display the SuperAdmin or the Common Name (CN) from your administrator certificate. Instead, it may show
Welcome to EJBCA Administration. This typically indicates that the Ingress is not forwarding the client certificate to EJBCA. For details, see Prerequisites. -
To remove public access and restrict access to EJBCA to only the Super Administrator, click Remove next to “Public access with Super Administrator Role exists”.
EJBCA is now successfully deployed.