This guide shows how to configure EJBCA Cloud with an AWS Application Load Balancer (ALB), enabling TLS termination and forwarding of client certificates to EJBCA.
Overview
This guide assumes a deployment with two clustered EJBCA nodes connected to an external database. The Management CA certificate must be trusted in the browser accessing the load-balanced endpoint.
The target configuration uses an AWS Application Load Balancer (ALB) to terminate TLS and pass the SuperAdmin certificate through to EJBCA, with the following flow:
Client (mTLS)
      ↓
AWS ALB (mTLS terminates)
      ↓  (X-Amzn-Mtls-Clientcert header)
Apache httpd
      ↓  (SSL_CLIENT_CERT header)
WildFly (Undertow proxy-http)
      ↓
EJBCA Admin Web
For additional information on mTLS setup on an ALB, refer to the AWS documentation Configuring mutual TLS on an Application Load Balancer - Elastic Load Balancing.
Step 1 - Configure Health Check
To configure EJBCA Health Check service, do the following:
-
Edit the
/opt/ejbca/conf/ejbca.propertiesfile on all the nodes to be load balanced, to allow health checks from external URLs. -
Add the following line to the
ejbca.propertiesfile:healthcheck.authorizedips=ANYYou can later change this to be the load balancer IP once you have it configured. You can get this from the AWS console or from the logs of Apache once the ALB is configured.
-
Restart EJBCA with:
systemctl restart wildfly -
To validate that the health check works, go to the URL:
http://<HOST_FQDN>/ejbca/publicweb/healthcheck/ejbcahealth
You should see “ALLOK” if the health check works and the node is healthy.
Step 2 - Create a Target Group in EC2
To create a target group in the EC2 Console, do the following:
-
In the EC2 Console, create a Target Group and specify the following:
-
Target group name
-
Protocol: HTTP
-
Port: 80
-
VPC: Same as EC2 Nodes
-
Health check protocol: HTTP
-
Health check path: Specify the path
/ejbca/publicweb/healthcheck/ejbcahealth -
Advanced health check settings:
-
Timeout: 60 seconds (health checks can slow when systems are under heavy loads - adjust accordingly).
-
Ensure the Interval is greater than the timeout value.
-
-
-
Click Next and then select the EJBCA nodes that will be load balanced to.
-
Click Include as pending below, then click Next and Create target group.
-
Once the target group is created, select the target group, click the Attributes tab, and select Edit.
-
Under Target selection configuration, select Turn on stickiness and select the duration for 1 hour.
Step 3 - Configure Apache
AWS ALBs send the certificate header as:
X-Amzn-Mtls-Clientcert
Encoded like:
-----BEGIN%20CERTIFICATE-----%0A...
Yet, EJBCA requires:
-----BEGIN CERTIFICATE-----
...
You need to add a configuration file to decode it by performing the following steps:
-
On each node to be load balanced, create the following file:
/etc/httpd/conf.d/alb-mtls.lua. -
Add the following configuration to the file:
function alb_mtls_fixup(r) local cert = r.headers_in["X-Amzn-Mtls-Clientcert-Leaf"] if cert and cert ~= "" then -- Do NOT URL decode here. -- Undertow/WildFly certificate-forwarding expects SSL_CLIENT_CERT -- and can handle the URL-encoded cert value. cert = cert:gsub("%%(%x%x)", function(hex) return string.char(tonumber(hex, 16)) end) r.headers_in["SSL_CLIENT_CERT"] = cert -- Optional debug r:warn("Set SSL_CLIENT_CERT from ALB mTLS header, first chars: " .. string.sub(cert, 1, 80)) end return apache2.DECLINED end -
Enable the following modules in the Apache configuration:
vim /etc/httpd/conf.modules.d/00-base.conf -
Uncomment the following:
LoadModule headers_module modules/mod_headers.so LoadModule setenvif_module modules/mod_setenvif.so -
Edit the following file:
vim /etc/httpd/conf.modules.d/00-lua.conf -
Uncomment the following:
LoadModule lua_module modules/mod_lua.so -
Edit the following file:
vim /etc/httpd/conf.modules.d/00-proxy.conf -
Uncomment the following:
LoadModule proxy_http_module modules/mod_proxy_http.so -
Edit the configuration file for Apache/EJBCA:
vim /etc/httpd/extra/httpd-vhosts-app-nossl.conf -
Replace the content with the following:
Listen 80 <VirtualHost *:80> DocumentRoot /var/www/html/ ProxyPreserveHost On # Treat ALB-forwarded HTTPS as HTTPS for rewrite logic SetEnvIf X-Forwarded-Proto https HTTPS=on <Directory "/var/www/html"> Header always set Content-Security-Policy "default-src 'self'" AllowOverride None Require all granted </Directory> LuaHookFixups /etc/httpd/conf.d/alb-mtls.lua alb_mtls_fixup RewriteEngine On # Disallow unsupported methods/protocols RewriteCond %{REQUEST_METHOD} !^(HEAD|GET|POST|PUT|DELETE)$ [NC,OR] RewriteCond %{THE_REQUEST} !HTTP/1\.[0,1]$ RewriteRule .* - [F,L] # Allow encoded slashes for OCSP GET AllowEncodedSlashes On # If you want to go back to using AJP (default config-uncomment the next two lines and comment the two after) #ProxyPass /ejbca/ ajp://localhost:8009/ejbca/ keepalive=On ping=500ms retry=1 timeout=300 nocanon #ProxyPass /ejbca/ http://127.0.0.1:8080/ejbca/ keepalive=On retry=1 timeout=300 nocanon ProxyPass /ejbca/ http://127.0.0.1:8080/ejbca/ keepalive=On retry=1 timeout=300 nocanon ProxyPassReverse /ejbca/ http://127.0.0.1:8080/ejbca/ ProxyPassReverse /ejbca/ http://127.0.0.1:8080/ejbca/ ProxyPass /.well-known/ ajp://localhost:8009/.well-known/ keepalive=On ping=500ms retry=1 timeout=300 # Keep these legacy redirects if you still want them RewriteRule ^/ejbca/publicweb/?$ / [R=302,L] RewriteRule ^/ejbca/?$ / [R=302,L] # Redirect admin and SOAP/API-style paths to HTTPS only when the original client request was not already HTTPS RewriteCond %{ENV:HTTPS} !=on RewriteRule ^/ejbca/adminweb(/.*)?$ https://%{HTTP_HOST}%{REQUEST_URI} [R=301,L] RewriteCond %{ENV:HTTPS} !=on RewriteRule ^/ejbca/ejbcaws(/.*)?$ https://%{HTTP_HOST}%{REQUEST_URI} [R=301,L] RewriteCond %{ENV:HTTPS} !=on RewriteRule ^/ejbca/ejbca-rest-api(/.*)?$ https://%{HTTP_HOST}%{REQUEST_URI} [R=301,L] # Redirect non-proxied/non-static URLs to / RewriteRule !(^/favicon.ico$|^/img/.*|^/css/.*|^/index.html$|^/$|^/ejbca/.*|^/\.well-known/.*) / [L,R=301] ErrorDocument 404 /index.html # This is temporary so we can see the certificate come through in a log LogFormat "%h %l %u %t \"%r\" %>s mtls_leaf=\"%{X-Amzn-Mtls-Clientcert-Leaf}i\" ssl_client_cert=\"%{SSL_CLIENT_CERT}i\"" mtlsdebug CustomLog logs/mtls_access_log mtlsdebug </VirtualHost> -
Restart apache with:
systemctl restart httpd
Step 4 - Configure WildFly
To configure WildFly, do the following:
-
Run the following command to edit the WildFly configuration to enable proxy-address and certificate forwarding:
/opt/wildfly/bin/jboss-cli.sh --connect <<'EOF'
/subsystem=undertow/server=default-server/http-listener=remoting:write-attribute(name=proxy-address-forwarding,value=true)
/subsystem=undertow/server=default-server/http-listener=remoting:write-attribute(name=certificate-forwarding,value=true)
reload
EOF
This command will reload WildFly. Ensure that the server reloads successfully after the third command.
-
Run the following commands to add a listener to WildFly for port 8080 so you can use http instead of AJP:
/opt/wildfly/bin/jboss-cli.sh --connect <<'EOF'
/socket-binding-group=standard-sockets/socket-binding=proxy-http:add(interface=public,port=8080)
/subsystem=undertow/server=default-server/http-listener=proxy-http:add(socket-binding=proxy-http,proxy-address-forwarding=true,certificate-forwarding=true,enable-http2=false)
reload
EOF
This command will reload WildFly. Ensure that the server reloads successfully after the third command.
-
Run the following to make sure the servlet request is marked as secure:
/opt/wildfly/bin/jboss-cli.sh --connect <<'EOF'
/subsystem=undertow/server=default-server/http-listener=proxy-http:write-attribute(name=secure,value=true)
reload
EOF
This command will reload WildFly. Ensure that the server reloads successfully after the third command.
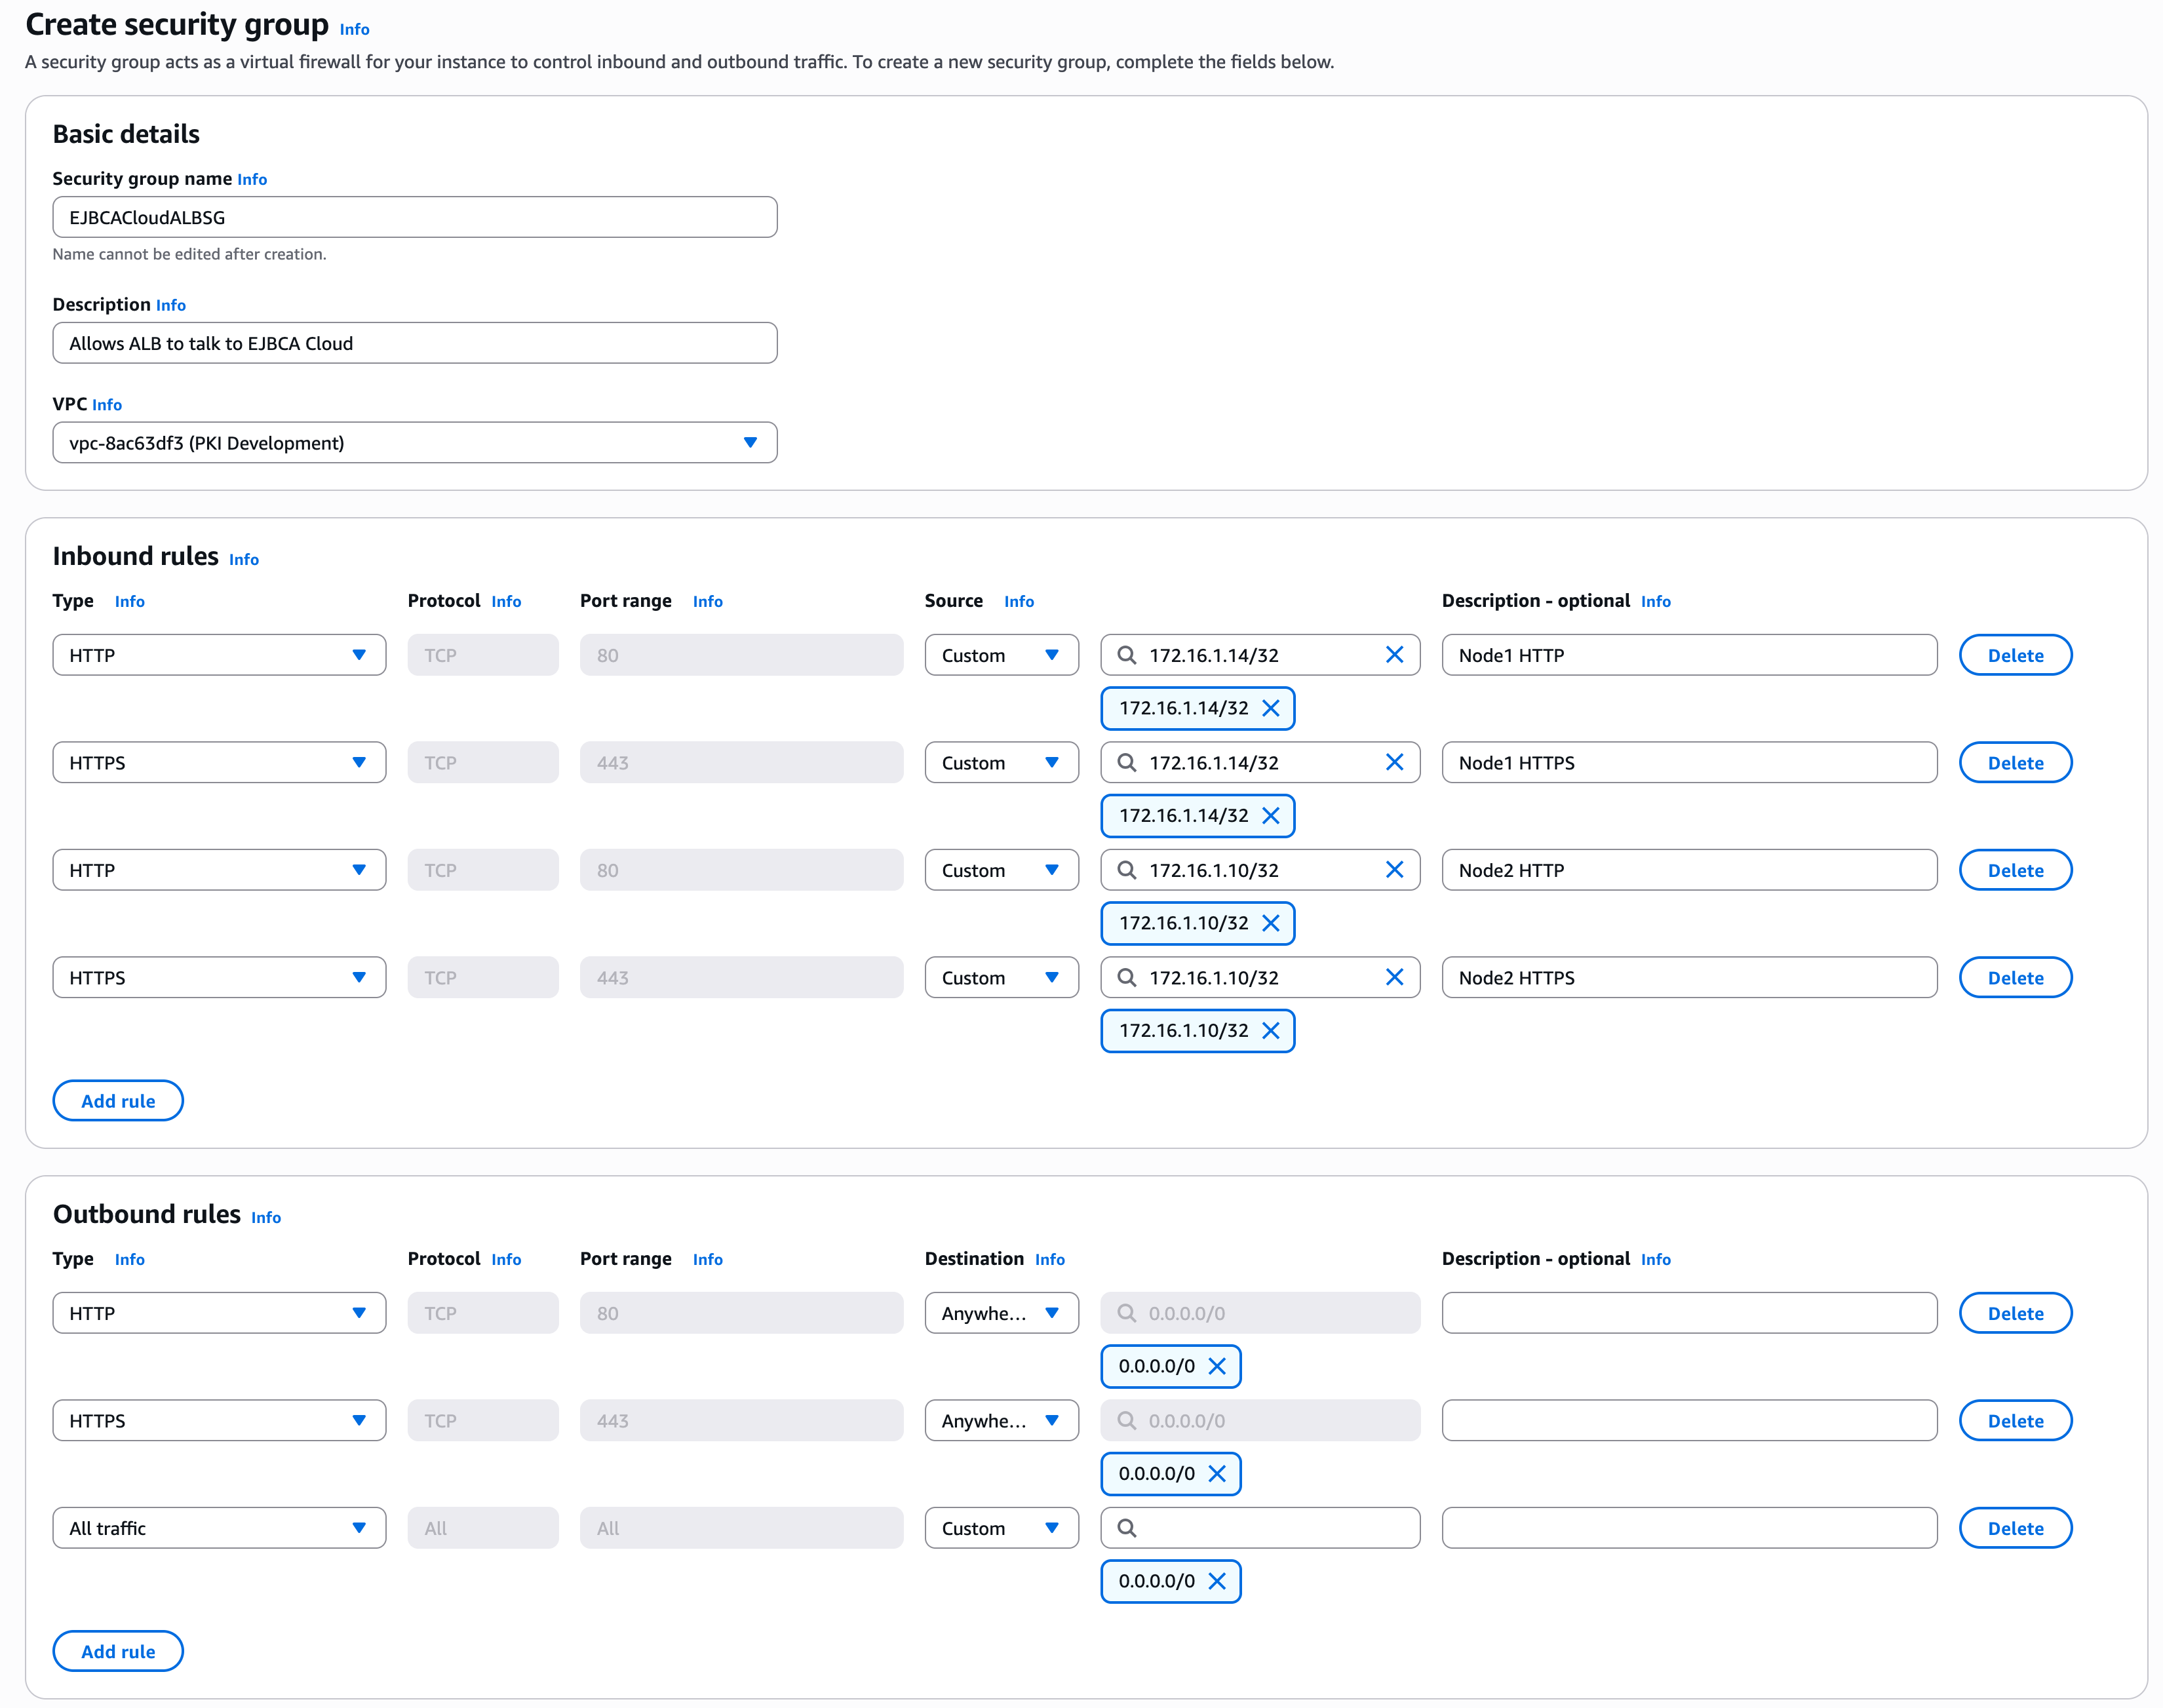
Step 5 - Create a Security Group
To create a Security Group to allow the Load Balancer to talk to the EJBCA nodes and allow outbound traffic, do the following:
-
Click Security Groups, then click Create.
-
Get the internal IP addresses for the EJBCA nodes to be load balanced to, in this example
172.16.1.10and172.16.1.14. -
Create the security group according to the following example, by adding
HTTPandHTTPSto each node.-
In Security Group Name, enter EJBCACloudALBSG.
-
In Description, enter a description, e.g., Allows ALB to talk to EJBCA Cloud.
-
In VPC, select the VPC of the EJBCA Cloud nodes.
-
-
Add the following Inbound rules:
|
Type |
Protocol |
Port range |
Source |
Description |
|---|---|---|---|---|
|
HTTP |
TCP |
80 |
Custom: 172.16.1.14/32 |
Node 1 HTTP |
|
HTTPS |
TCP |
443 |
Custom: 172.16.1.14/32 |
Node 1 HTTPS |
|
HTTP |
TCP |
80 |
Custom: 172.16.1.10/32 |
Node 2 HTTP |
|
HTTPS |
TCP |
443 |
Custom: 172.16.1.10/32 |
Node 2 HTTPS |
-
Add the following Outbound rules:
|
Type |
Protocol |
Port range |
Destination |
Description |
|---|---|---|---|---|
|
HTTP |
TCP |
80 |
Anywhere |
|
|
HTTPS |
TCP |
443 |
Anywhere |
|
|
All traffic |
All |
All |
Custom: 0.0.0.0/0 |
|
Step 6 - Create the Load Balancer
To create the load balancer, do the following:
-
In the EC2 Console, click Load Balancer > Create Load Balancer, and select Create under Application Load Balancer:
-
Provide values for the following:
-
Load balancer name: Specify a DNS name for the load balancer
-
VPC: Use current VPC the EJBCA Cloud nodes are on.
-
Select two Availability Zones.
-
Select the Security Group Created above.
-
Under Listeners and Routing:
-
Listener HTTP: 80.
-
Protocol: HTTP.
-
Port: 80.
-
Select the Target Group created previously.
-
Select Target Group Stickiness.
-
-
-
Click Create Load Balancer.
Step 7 - Create certificate for ALB in EJBCA
To create a certificate for ALB in EJBCA, do the following:
-
Go to the EJBCA RA Web and click Make new request.
-
For Certificate Type: select the SslServerProfile.
-
For Key-pair generation, select By the CA.
-
Select a Key Algorithm such as RSA 4096.
-
Locate the following FQDNs of the ALB and EJBCA nodes. For example:
-
ejbcacloud-15648816.us-east-1.elb.amazonaws.com -
ec2-54-80-249-79.compute-1.amazonaws.com -
ec2-98-93-144-174.compute-1.amazonaws.com
Enter those values into the RA Web interface. Use the ALB FQDN as the Common Name (CN) of the certificate.
-
-
Select Show more optional fields under Optional Subject Alternative Name Attributes section to allow for more DNS Names. Add the ALB FQDN as the first value in the SAN and the two EJBCA node FQDNs in the next two fields.
-
Enter a username and enrollment code.
-
Select Download as PEM once the values are complete.
Step 8 - Create a Trust Store Bucket in S3
When configuring the ALB’s trust store, the only selectable method is to select a certificate stored in an S3 bucket. In this section, you will add the Management CA certificate to an S3 bucket so that you can select it in the ALB.
To create a trust store bucket in Amazon S3, do the following:
-
Go to the AWS console and select Amazon S3.
-
Create an S3 bucket using the defaults.
-
To download the Management CA public certificate from the EJBCA Admin Web, select CA Functions > CA Structure and CRLs, and click Download PEM file.
-
Upload the downloaded certificate to the newly created S3 bucket.
Step 9 - Configure an HTTPS Listener
To configure an HTTPS Listener, do the following:
-
Select the Load Balancer previously created.
-
Click Add Listener.
-
Select the Protocol as HTTPS and ensure the Port = 443.
-
Select the Target Group created previously.
-
Under Target Group Stickiness, select Turn on target group stickiness.
-
In the secure listener settings, select Import Certificate.
-
Open the certificate generated in EJBCA in a text editor and paste the private key, certificate, and chain into the fields.
-
Under Client certificate handling, select Mutual authentication and then select Verify with trust store.
-
Under Trust store, select New trust store and provide a Trust store name.
-
Under Certificate authority bundle, click Browse S3.
-
Find and select the S3 bucket created, select the PEM file uploaded earlier, and click Choose.
-
Click Save Changes.
-
Load the ALB URL in your browser. It should prompt for a certificate and load the user interface.
-
Once all is working, comment out the log lines at the bottom of the
/etc/httpd/extra/httpd-vhosts-app-nossl.conffile and restart Apache.
After completing these steps, EJBCA Cloud is accessible through the AWS Application Load Balancer with TLS termination and client certificate forwarding enabled.