.png)
The following describes the actions to perform to create an OCSP key binding in the VA Hardware Appliance and then a publisher in the CA Hardware Appliance.
Creating a Key Binding in the VA Hardware Appliance
-
In the VA Hardware Appliance, go to the EJBCA Enterprise Administration.
-
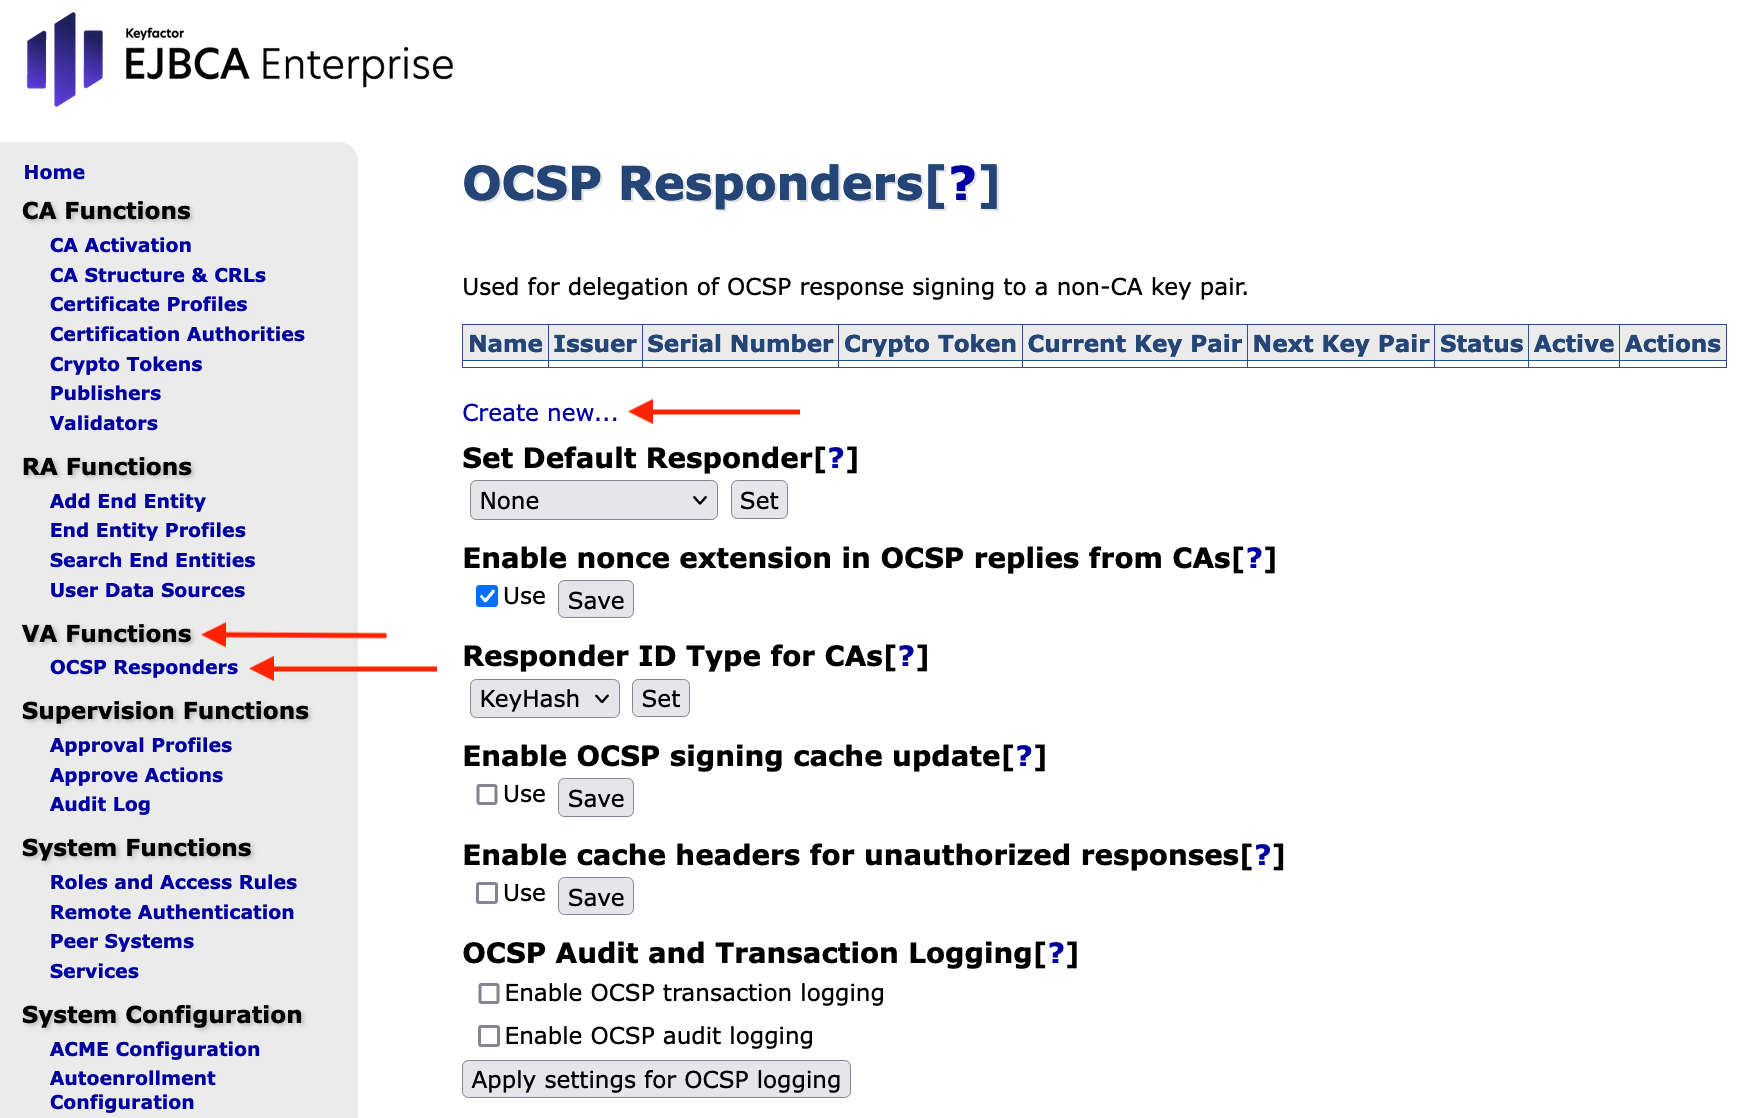
Navigate to VA Functions on the sidebar.
-
Select OCSP Responder.
-
Click Create new to create a new key binding.
-
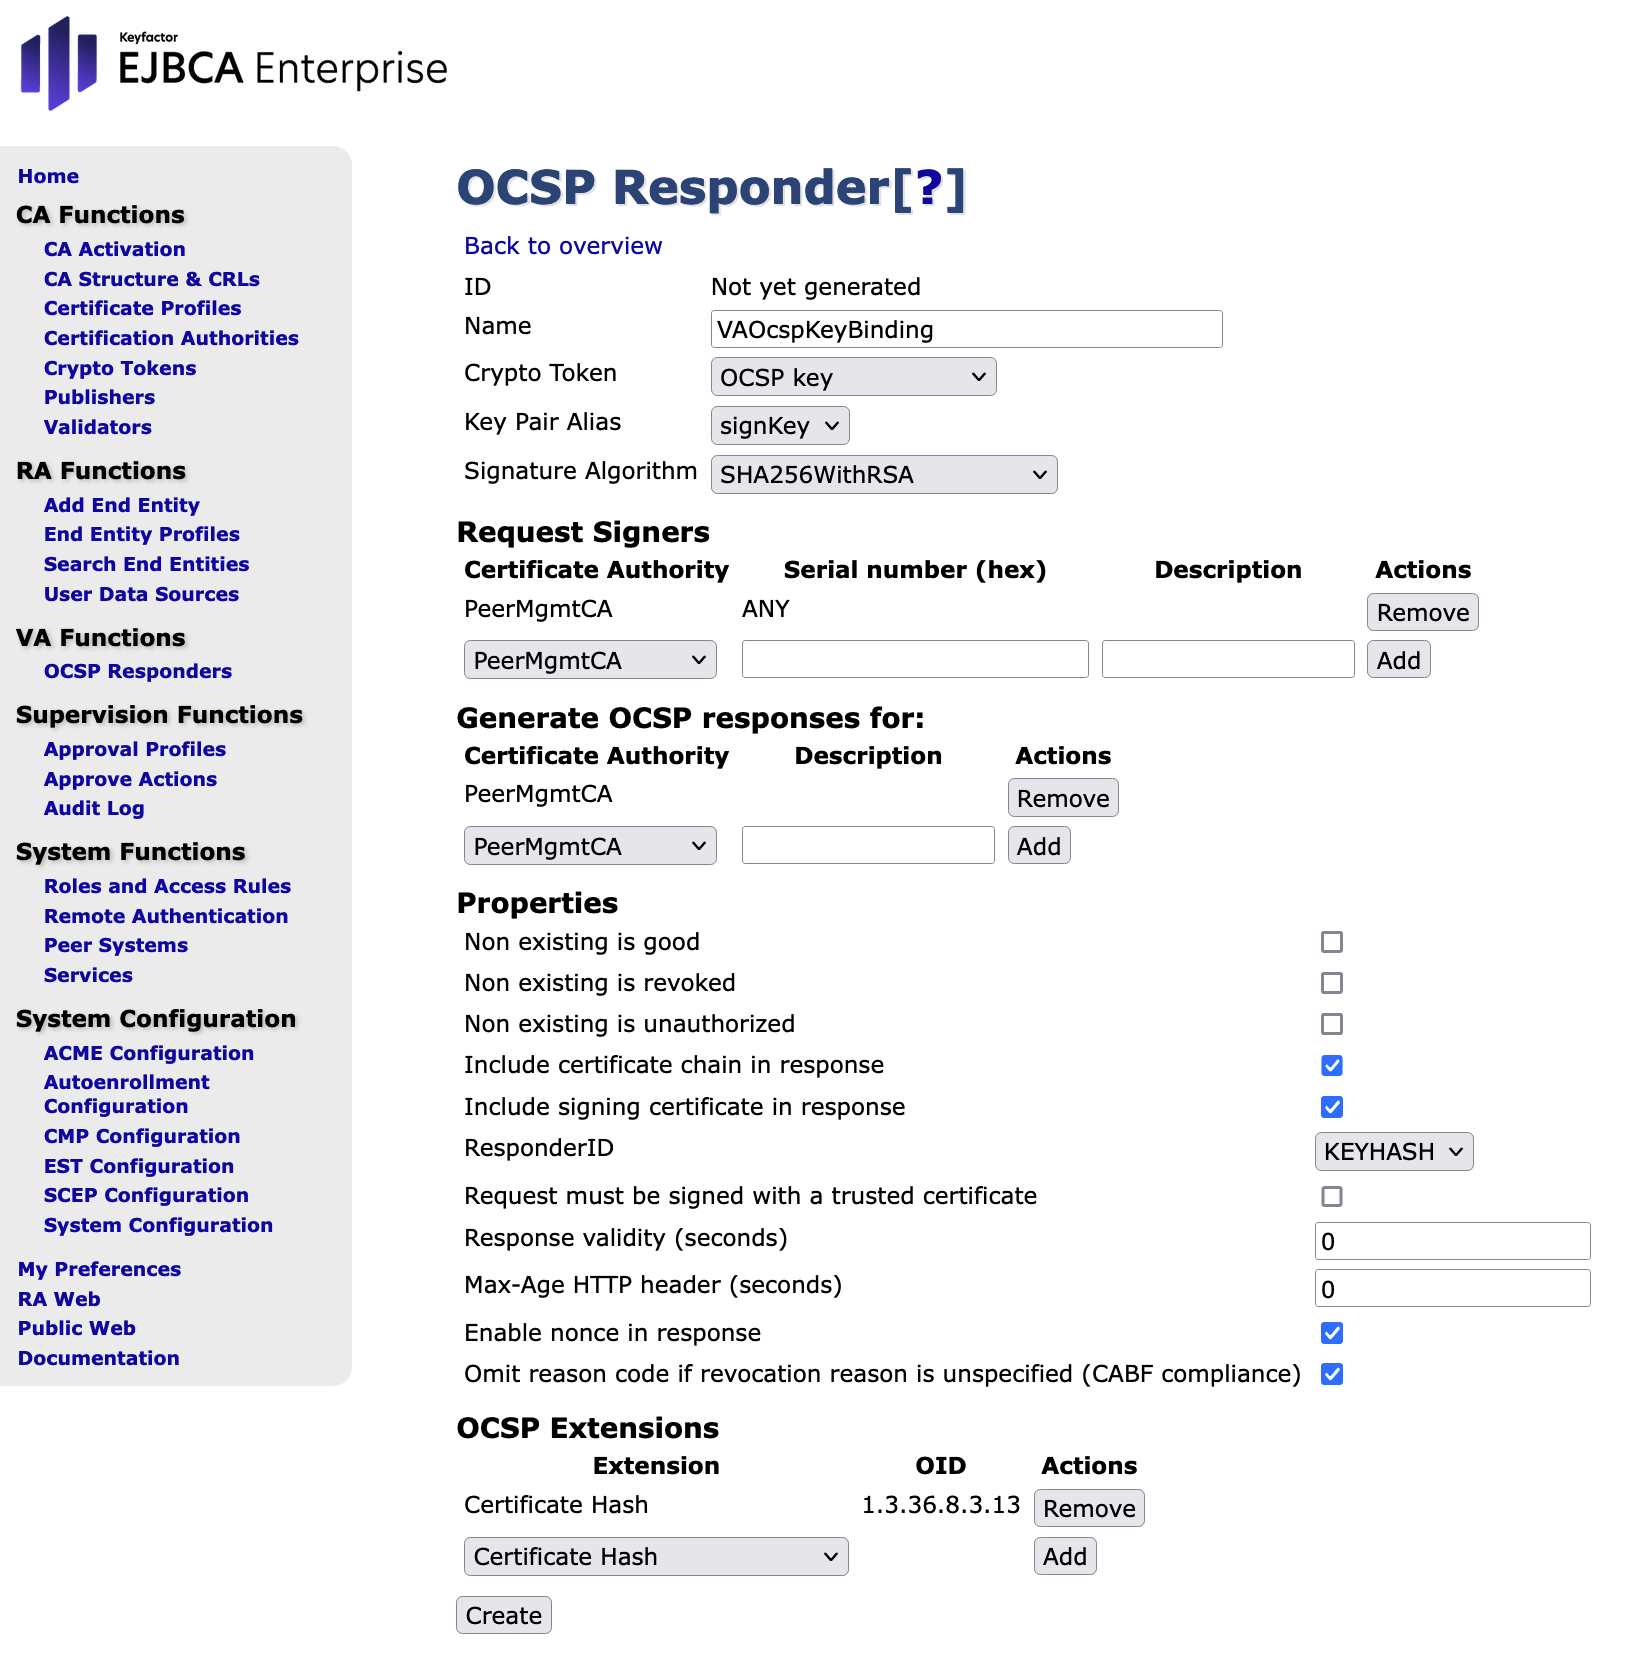
Enter the following values for the new key binding and click Create.
- Name: Enter VAOcspKeyBinding
- Crypto Token: Select OCSP key
- Key PairAlias: Select signKey
- SignatureAlgorithm: Select SHA256WithRSA
Request Signers - CertificateAuthority: Select PeerMgmtCA from the drop down list
- Click Add
Generate OCSP responses for:
-
CertificateAuthority: Select PeerMgmtCA from the drop down list
- Click Add
Properties - Include signing certificate in response: Enable this option
- Include certificate chain in response: Enable this option
- ResponderID: Select KEYHASH.
- Enable nonce in response: Enable this option
- Omit reason code if revocation reason is unspecified (CABF compliance): Enable this option
OCSP Extensions - Extension: Select Certificate Hash from the drop down list
- Click Add
-
Click Create
-
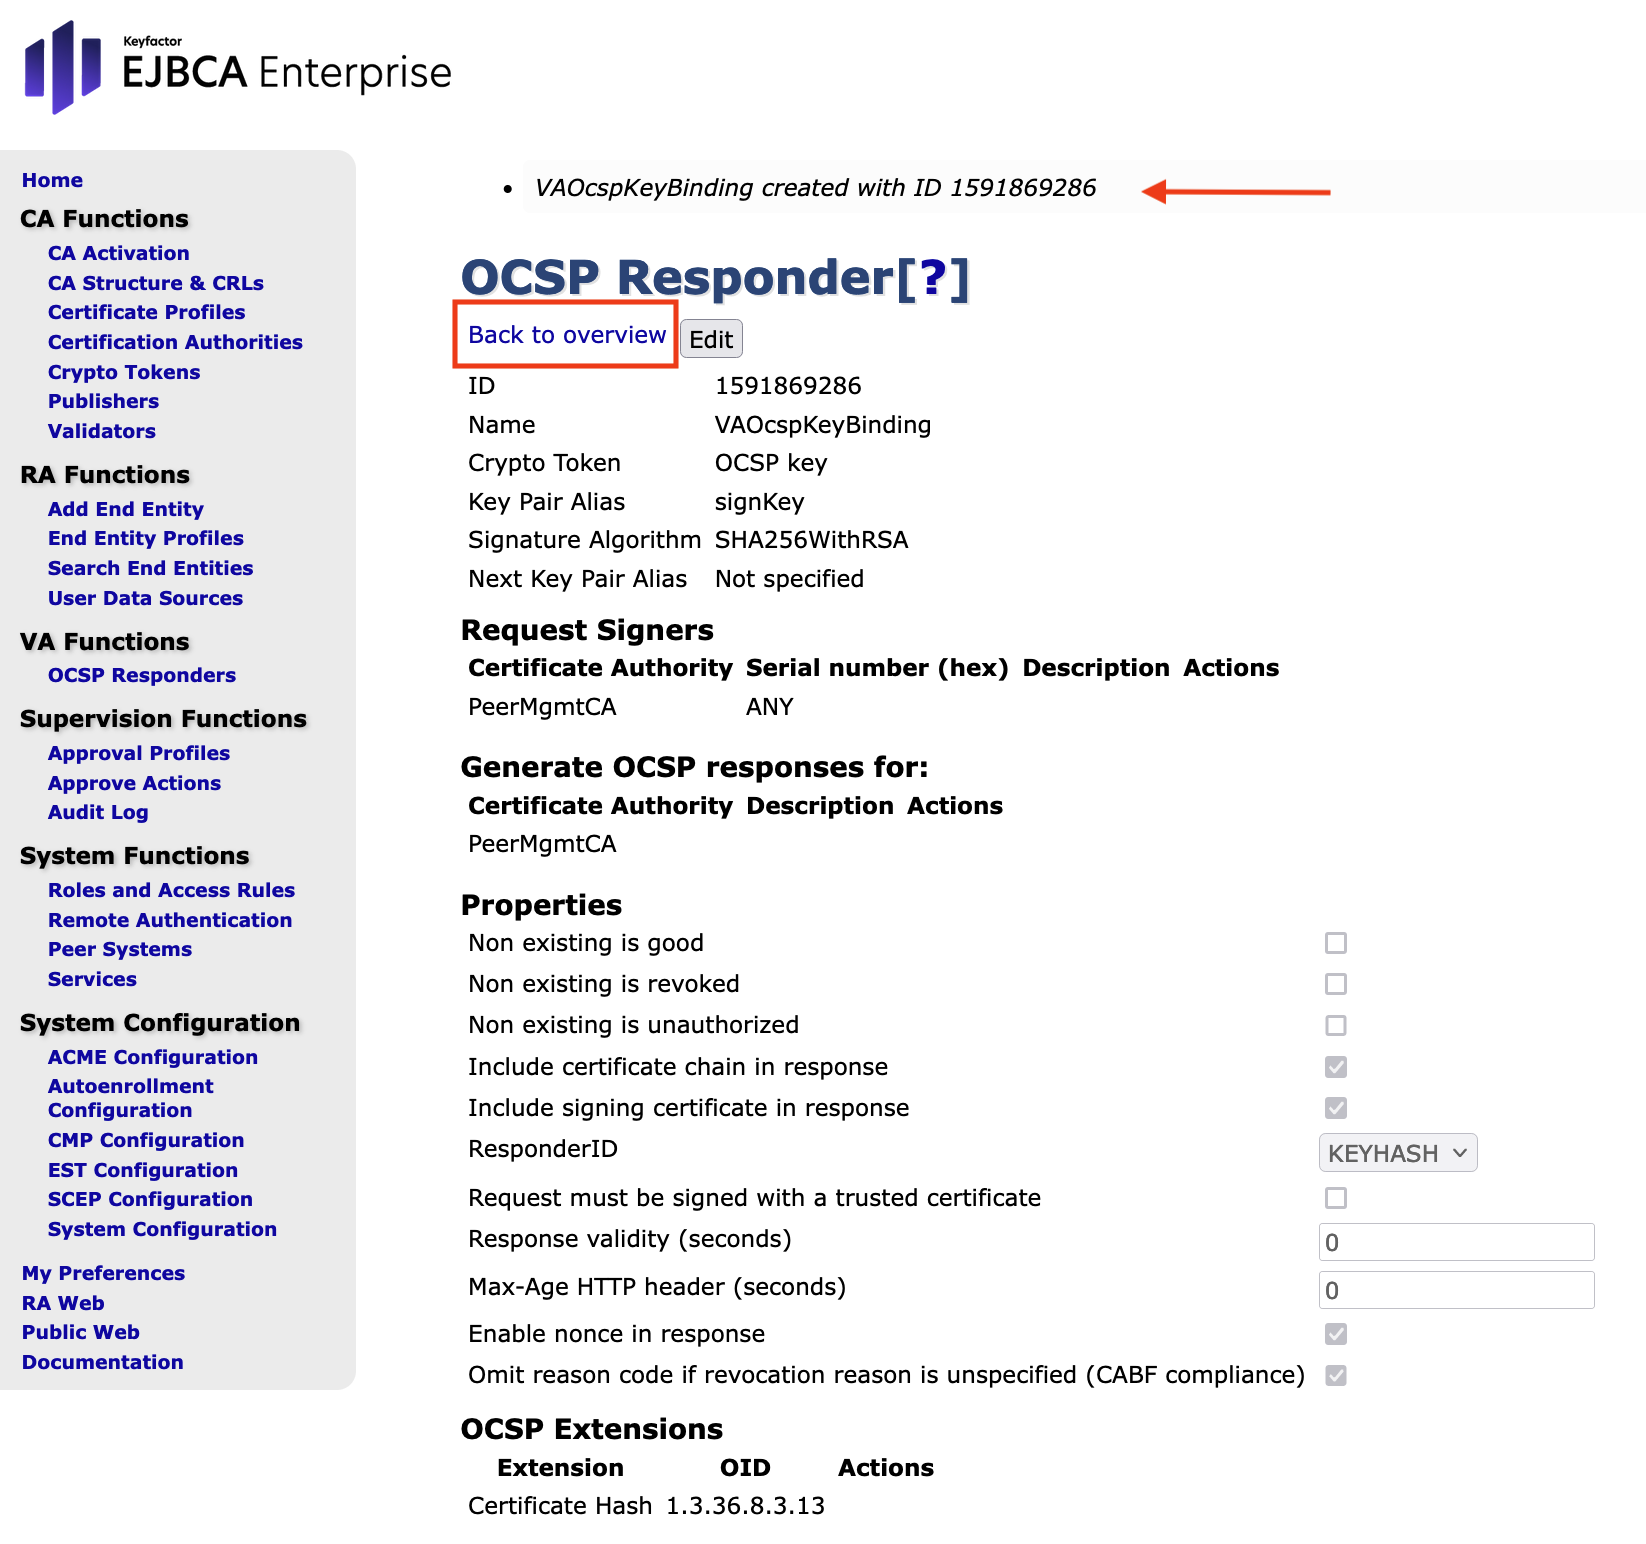
The key binding is created and the following message is displayed: VA OcspKeyBinding created with ID xxxxxxxxxx. (Depending on the database status, this ID could be set to any value.)
-
Click Back to overview.
-
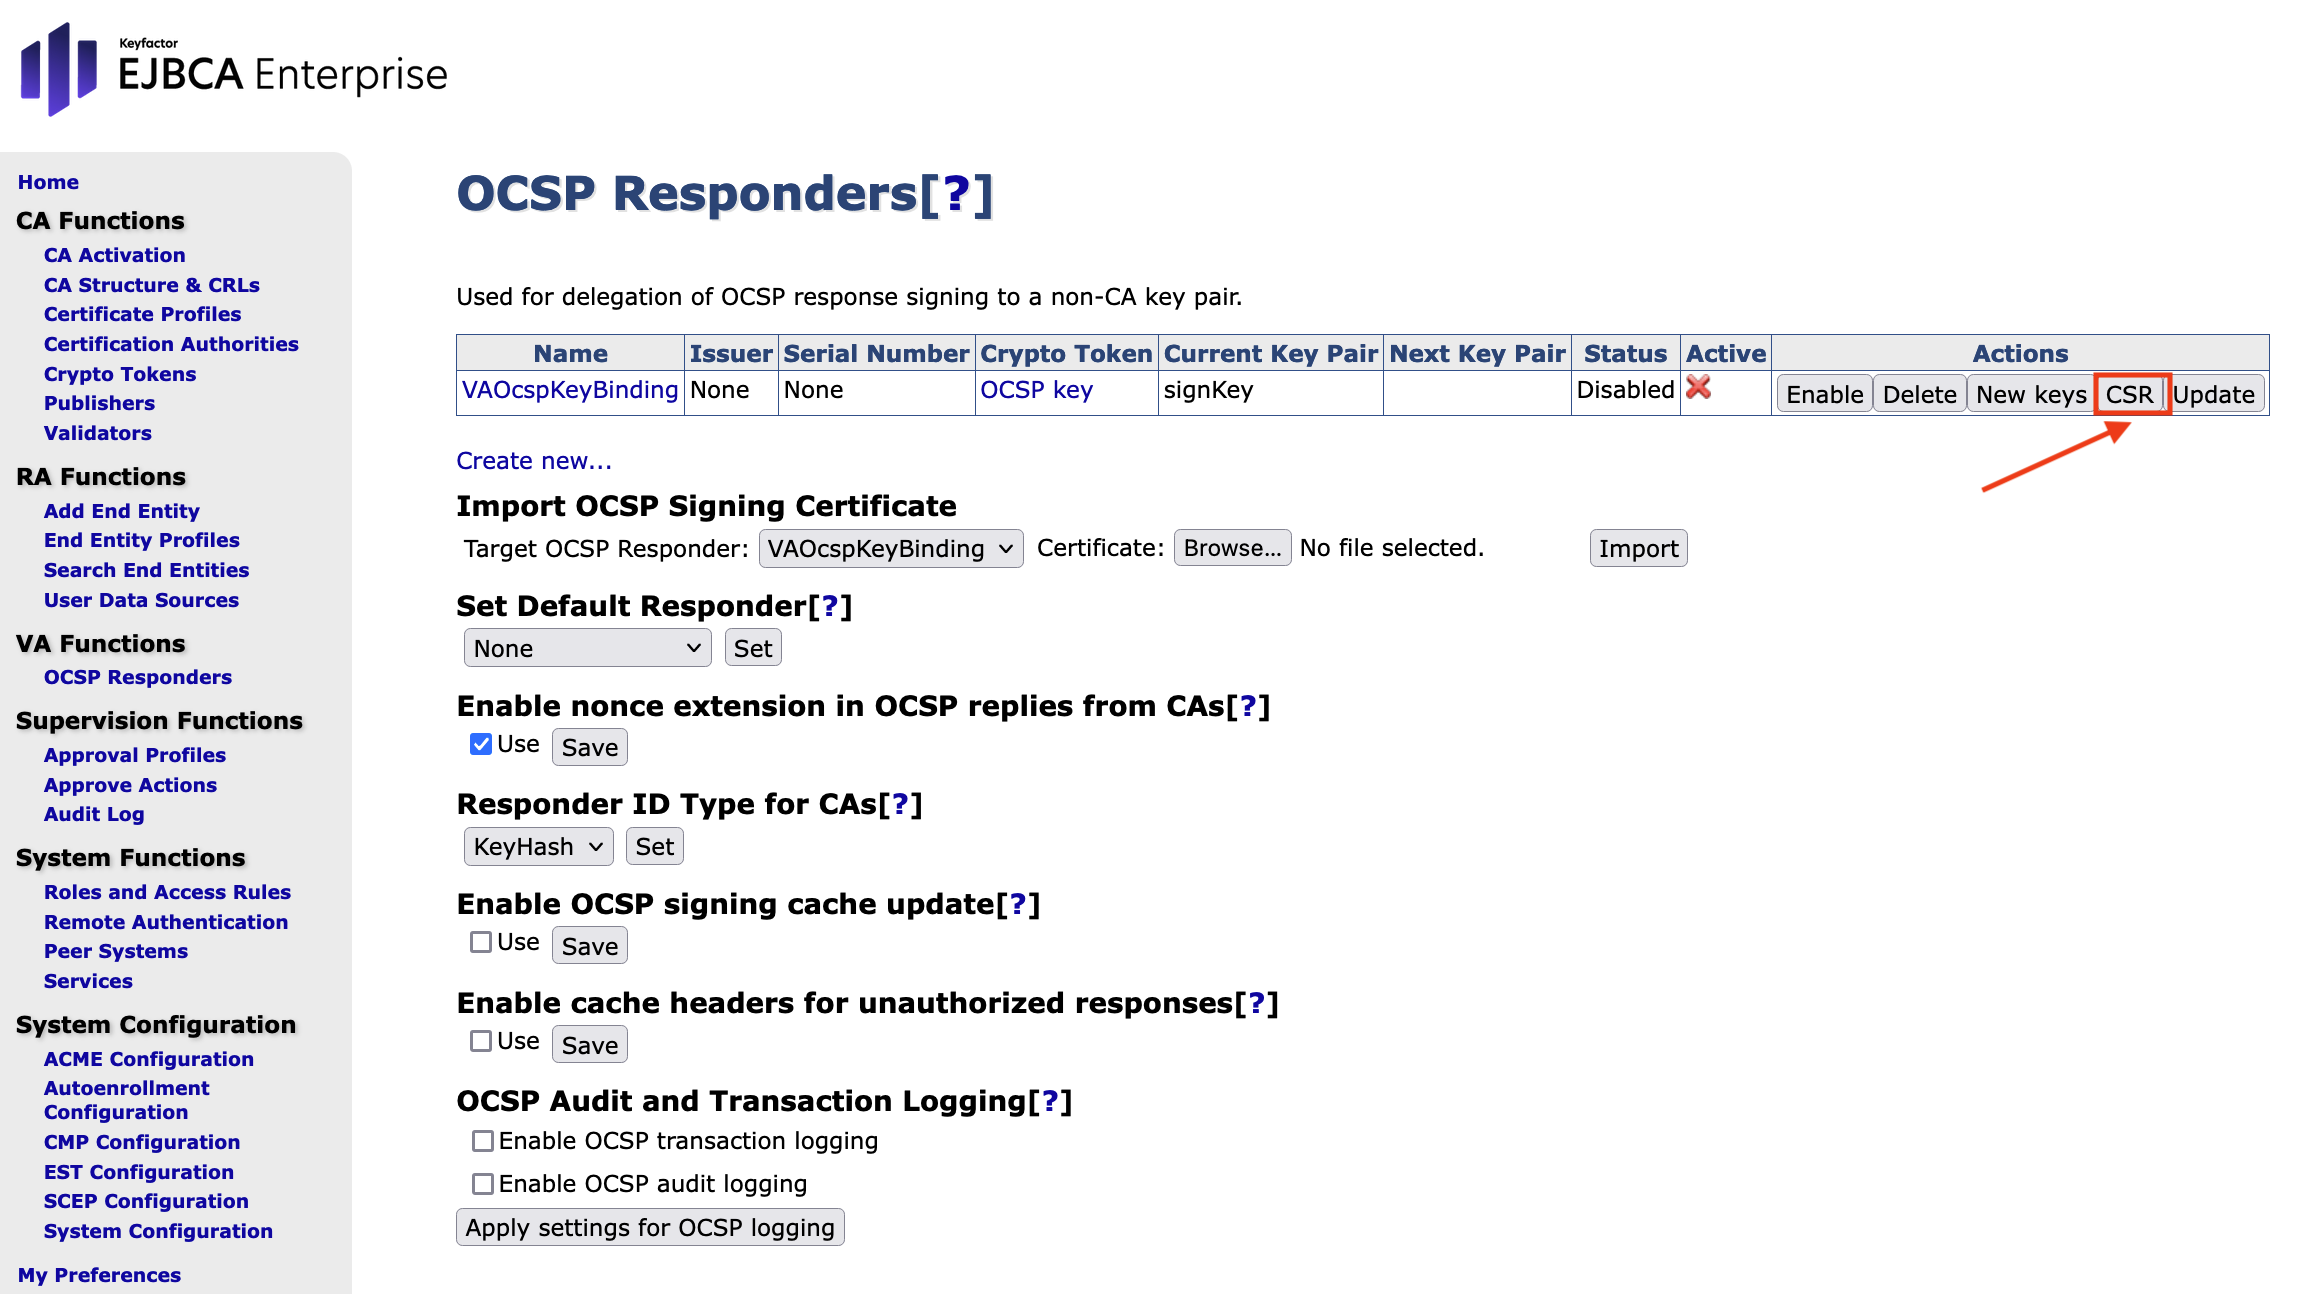
Chose CSR from the Actions to download the CSR and save the file.
Creating a Publisher in the CA Hardware Appliance
-
In the CA Hardware Appliance, go to the EJBCA Enterprise Administration.
-
Navigate to RA Functions on the sidebar.
-
Select End Entity Profiles.
-
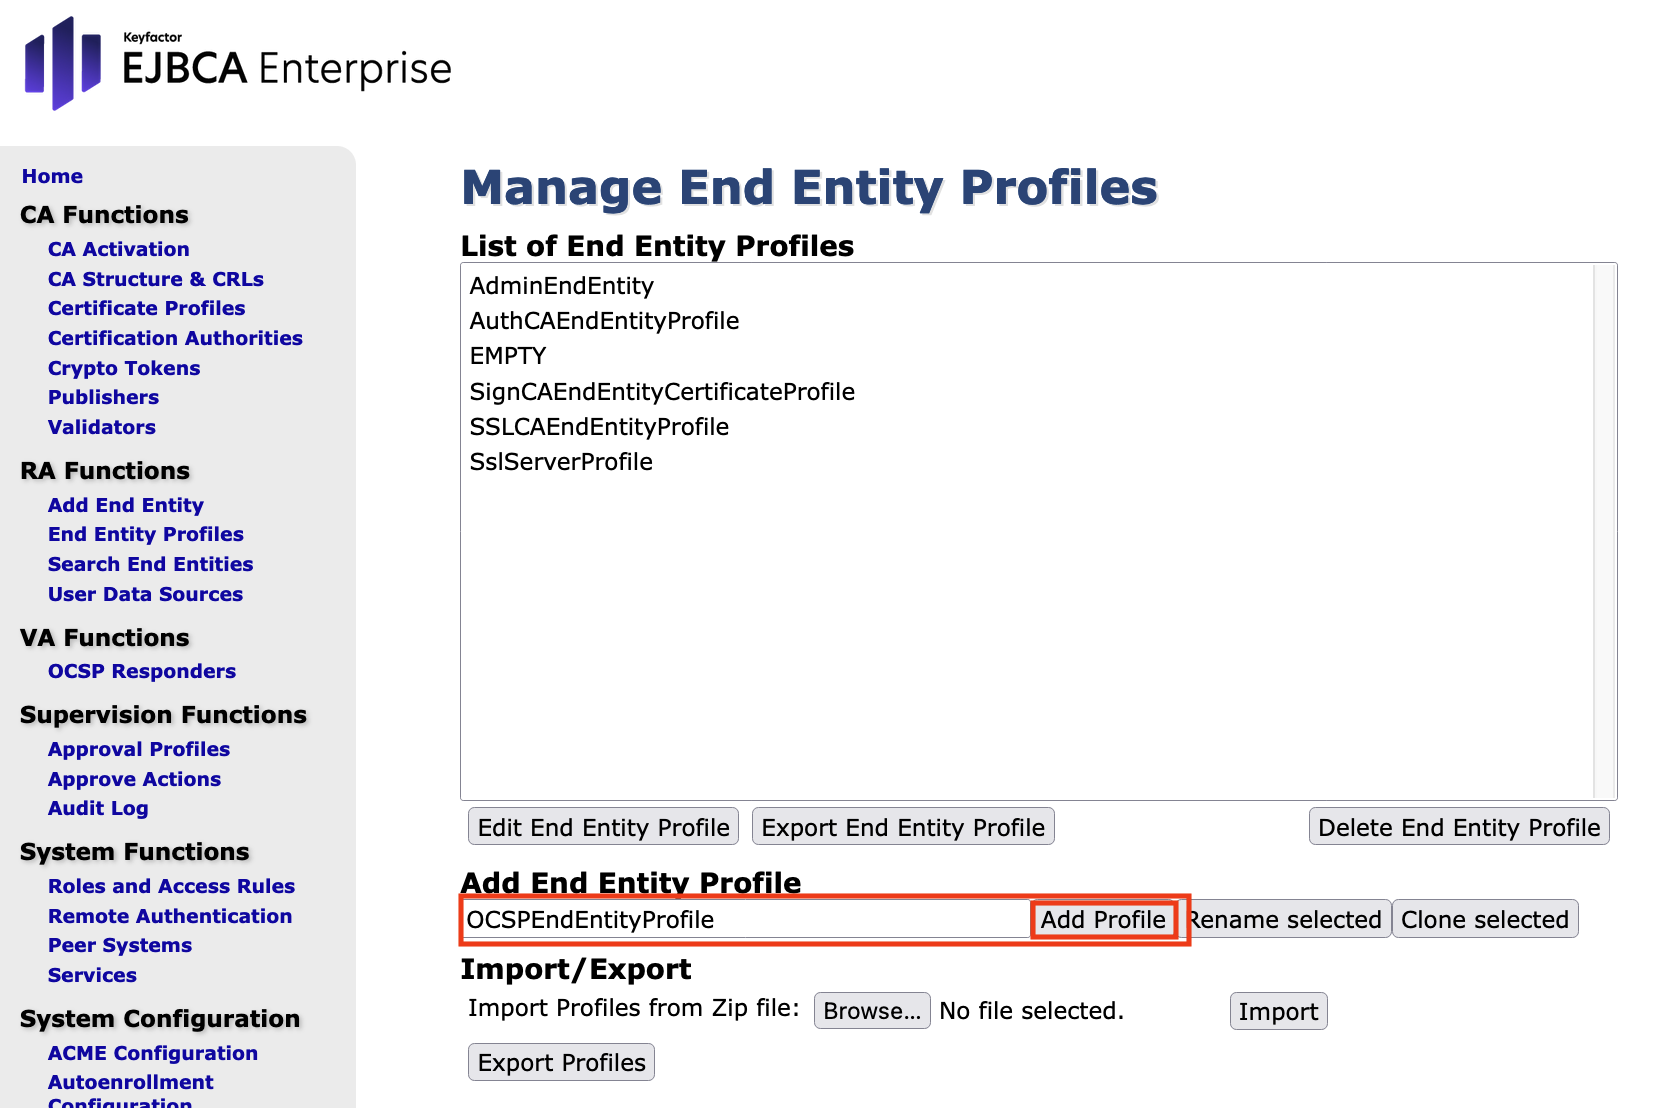
In Manage End Entity Profiles enter OCSPEndEntityProfile in the Add End Entity Profiles field.
-
Click Add Profile.
-
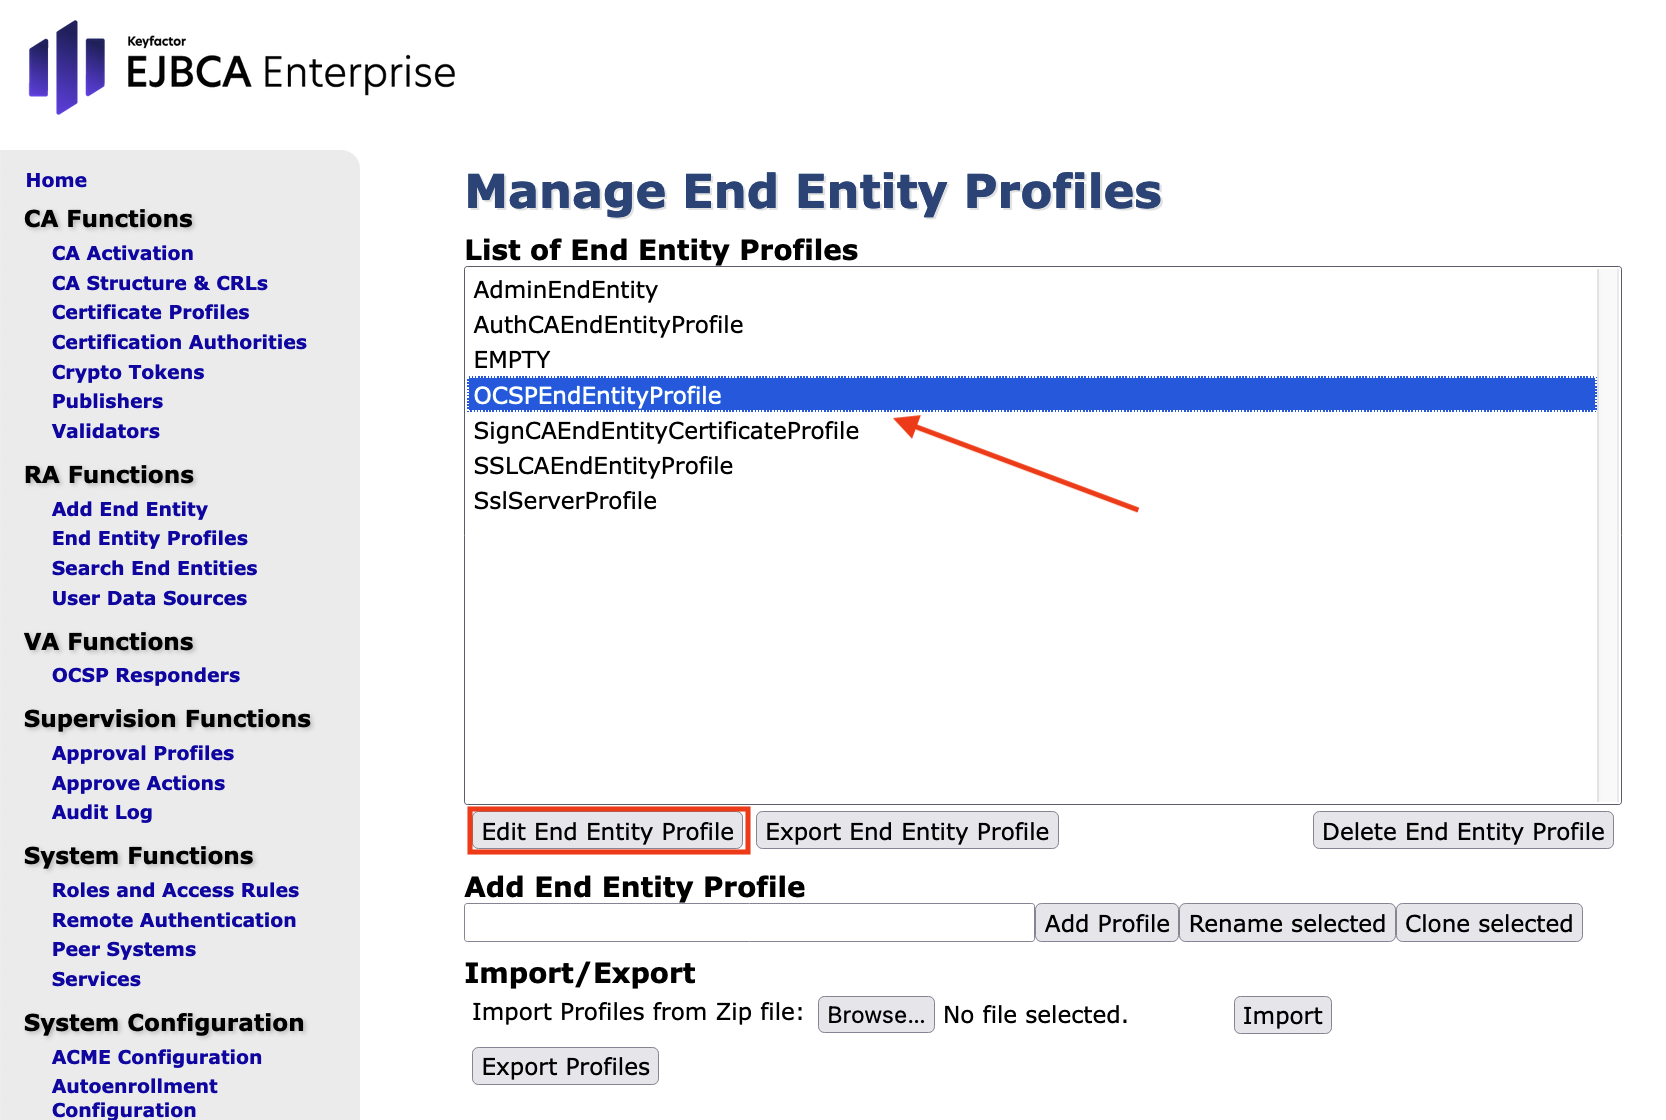
Select OCSPEndEntityProfile from the list.
-
Click Edit End Entity Profile.
-
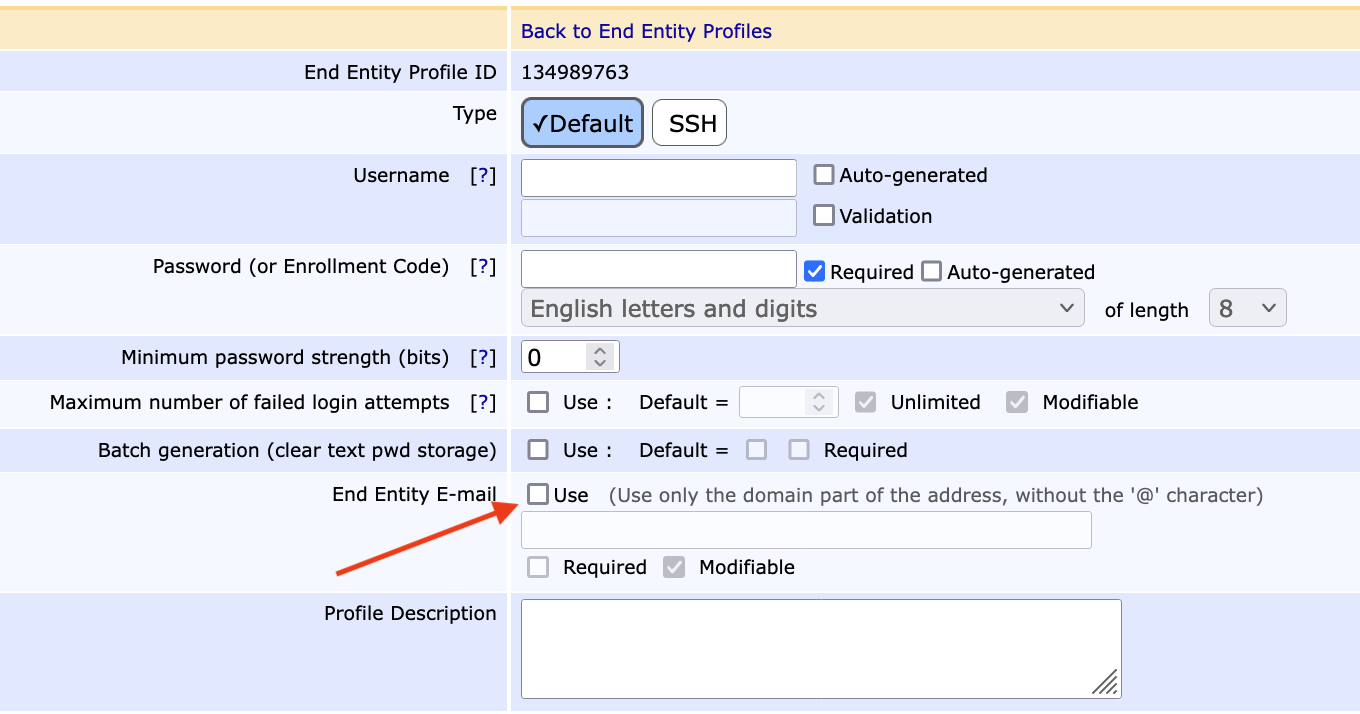
Edit End Entity Profile: OCSPEndEntityProfile as follows
- End Entity E-mail: Disable this option
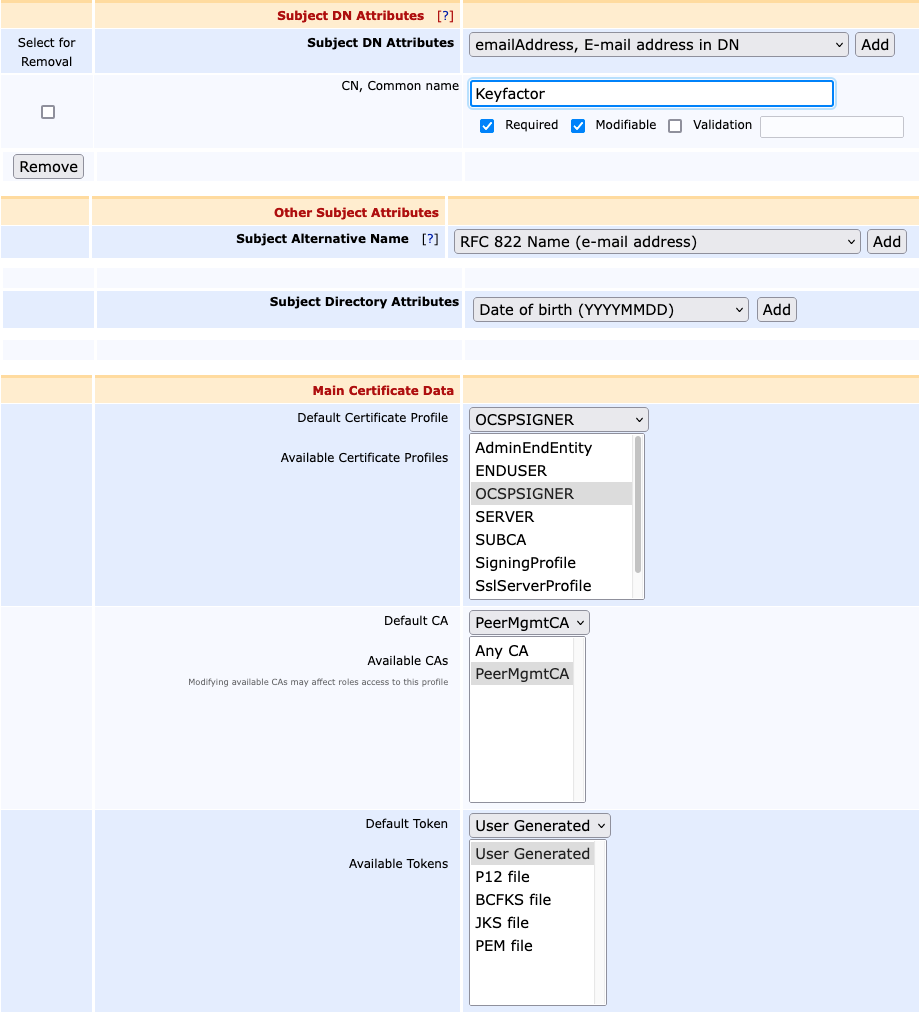
Subject DN Attributes: - CN Common Name: Select Required
- Enter Keyfactor
Main Certificate Data - Default Certificate Profile: Select OCSPSIGNER
- Available Certificate Profile: Select OCSPSIGNER
- DefaultCA: Select PeerMgmtCA
- AvailableCAs: Select PeerMgmtCA
- Default Token: Select User Generated
- AvailableTokens: Select User Generated
- End Entity E-mail: Disable this option
-
Click Save.
-
In the Manage End Entity Profiles overview the message End Entity Profile 'OCSPEndEntityProfile' saved will be displayed.
-
Return to the EJBCA Enterprise Administration.
-
Navigate to RA Functions on the sidebar.
-
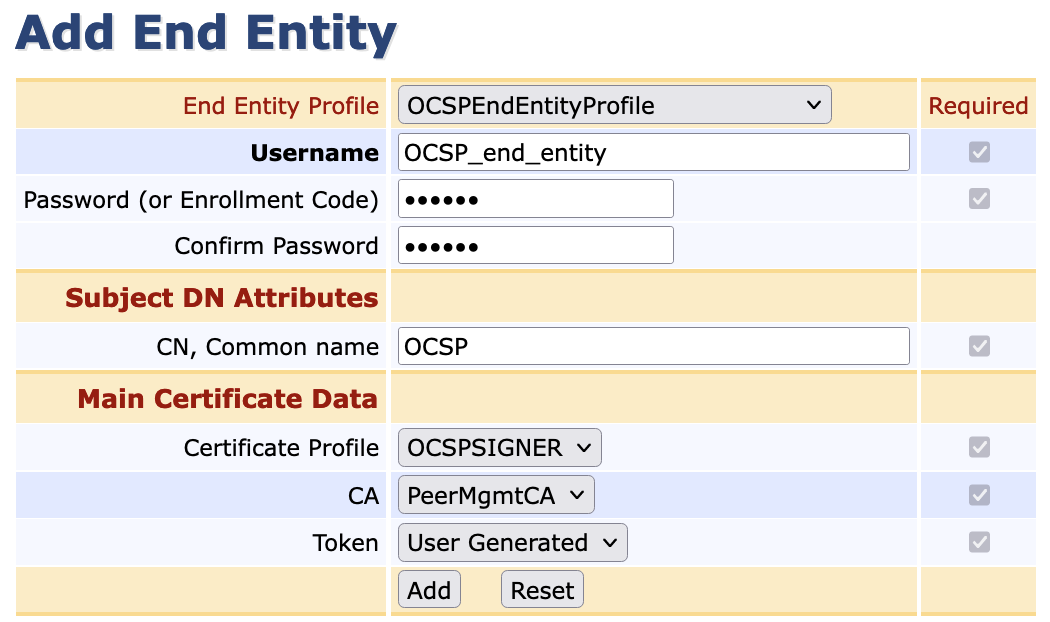
Select Add End Entity. Make the following entries:
- End Entity Profile: Select OCSPEndEntityProfile
- Username: Select OCSP_end_entity
- Password(orEnrollmentCode): Enter foo123
- Confirm Password: Enter foo123
- CN, Common Name: Enter OCSP
- Certificate Profile: Select OCSPSIGNER
- CA: Select PeerMgmtCA
- Token: Select User Generated
- Click Add
-
Open EJBCA RA Web.
-
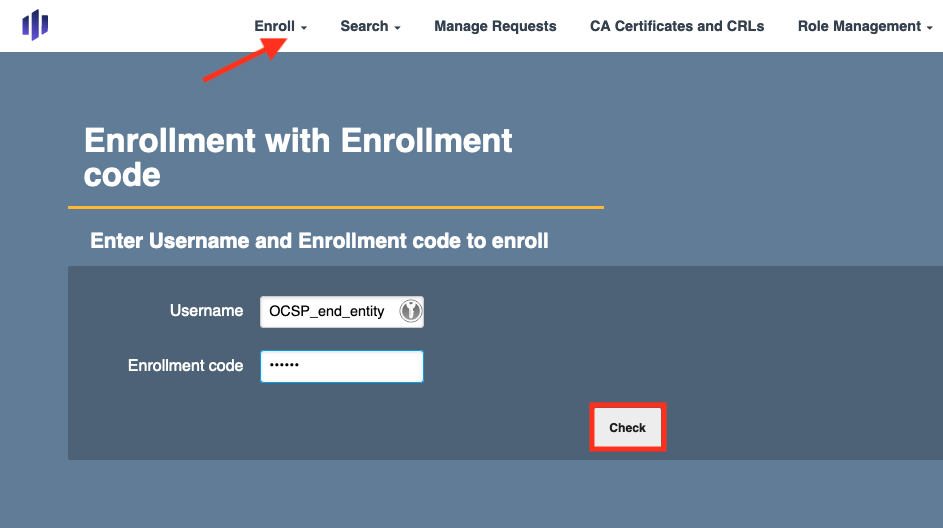
From the top menu click the drop-down menu for Enroll.
-
Chose Use Username from the drop down menu. Make the following entries:
- Username: Enter OCSP_end_entity
- Enrollment code: Enter foo123
- Click Check to continue
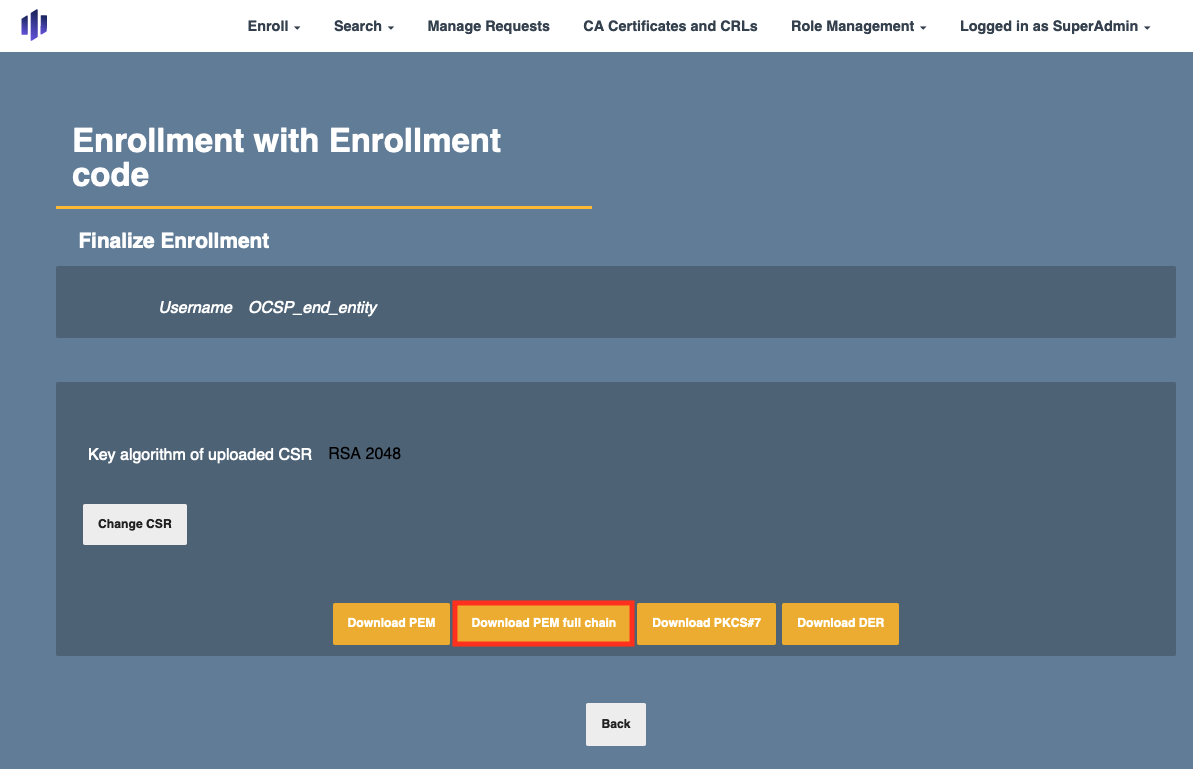
- Click Browse and select the CSR you downloaded in the previous step (VAOcspKeyBinding.pkcs10.pem)
- Click Download PEM full chain
-
Save the signed CSR.
-
In the VA Hardware Appliance, go to the EJBCA Enterprise Administration.
-
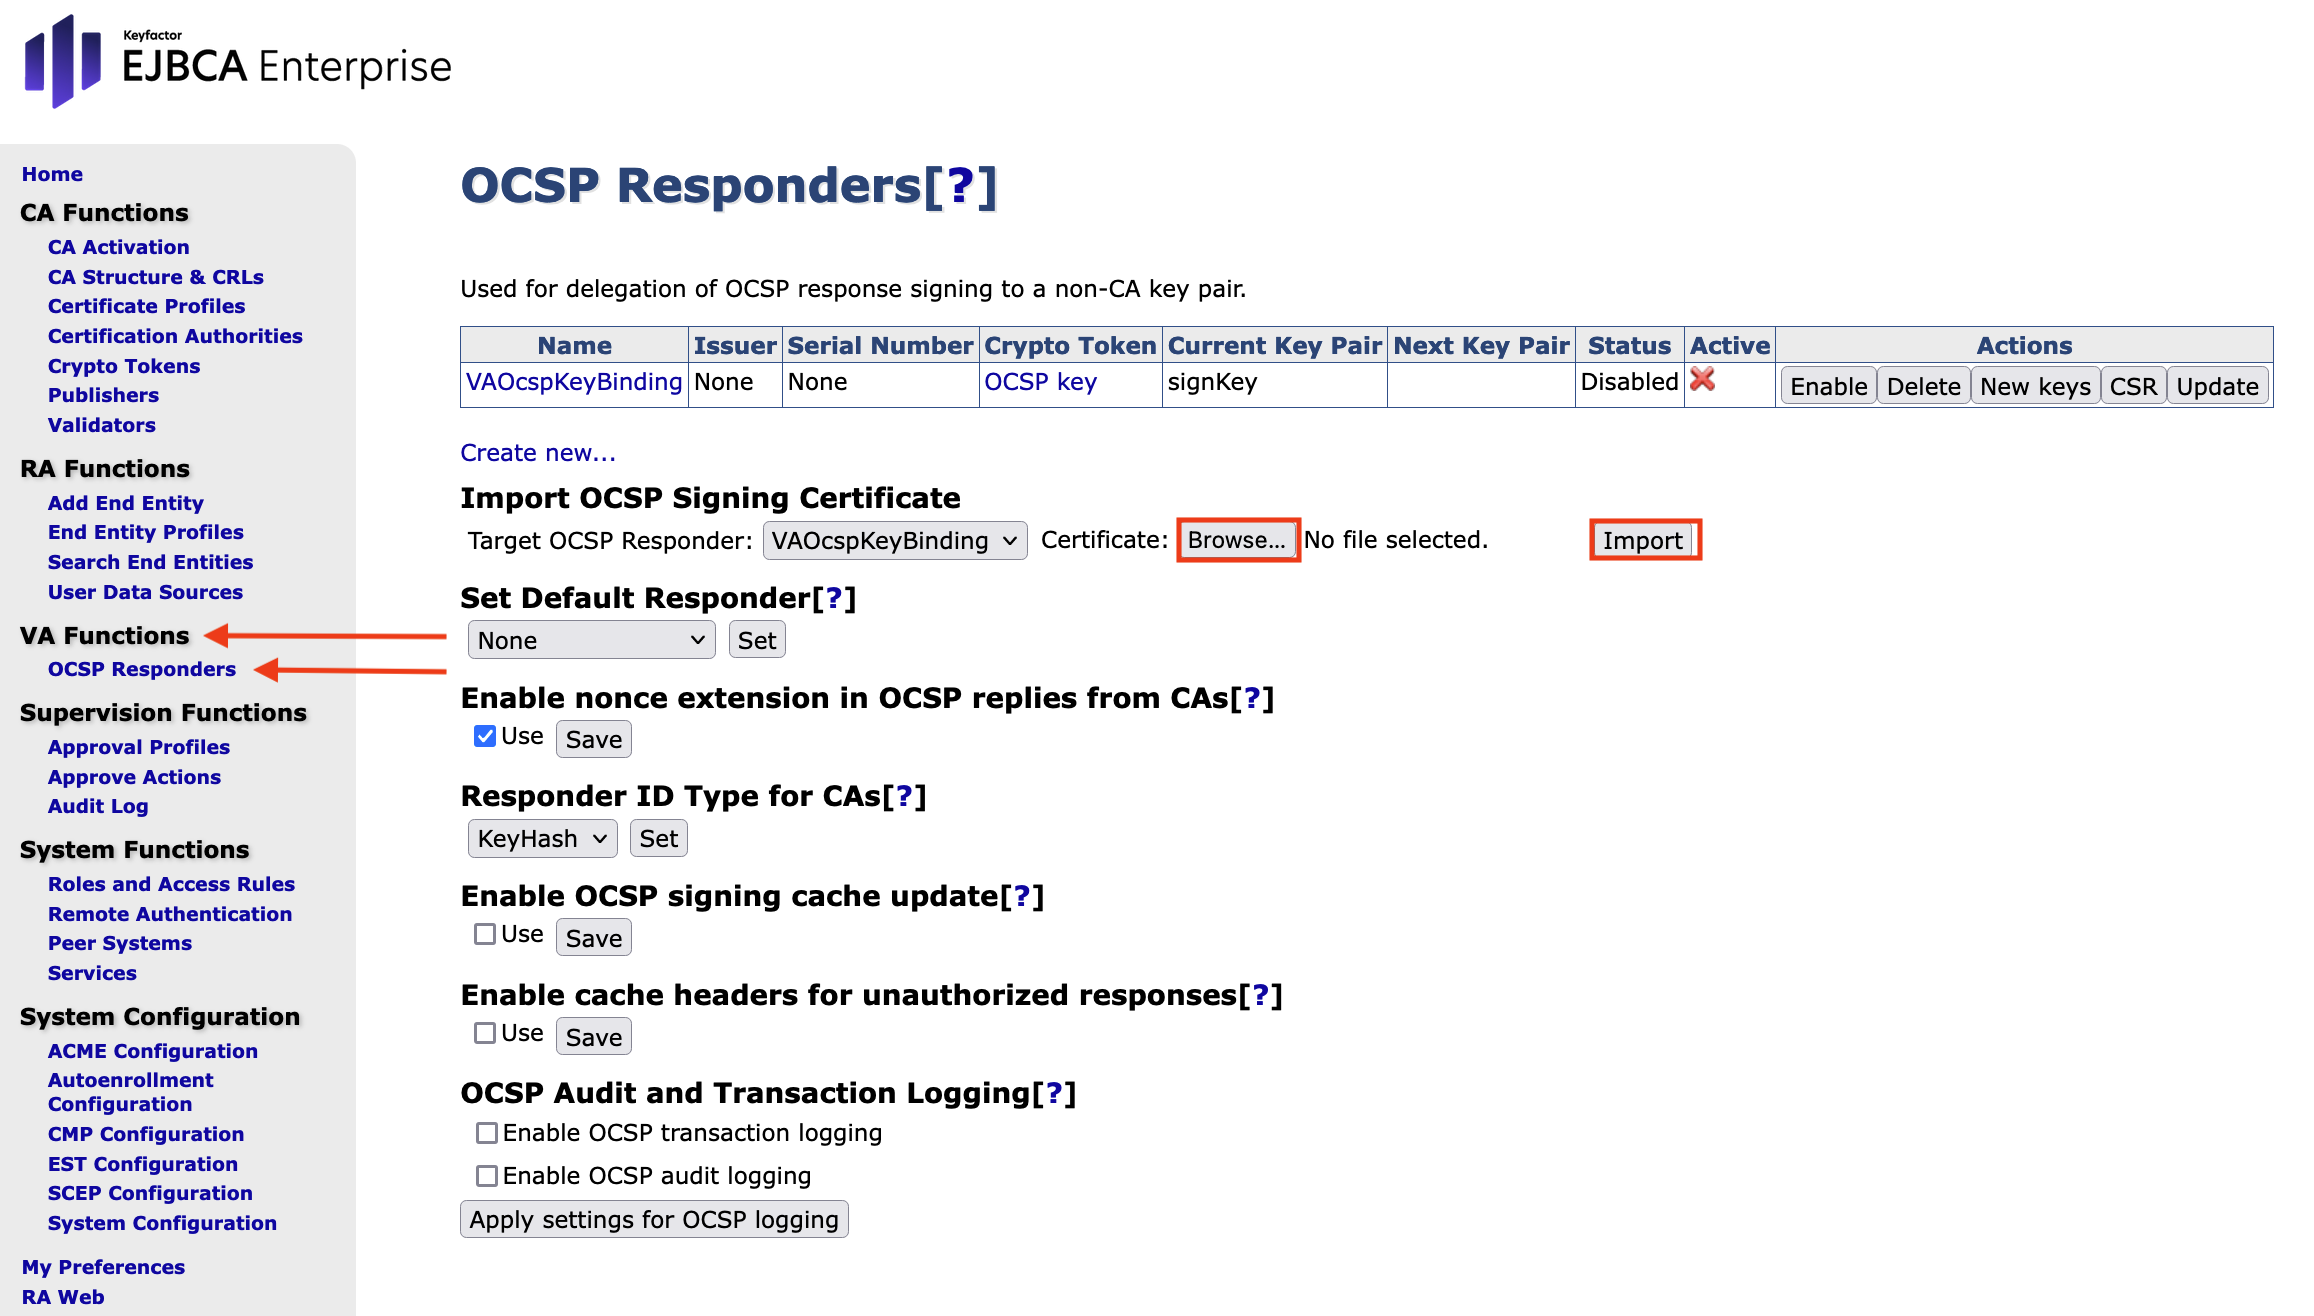
Navigate to VA Functions on the sidebar.
-
Select OCSP Responders.
-
In the section Import OCSP Signing Certificate, click Browse to upload the signed CSR.
-
Click Import.
-
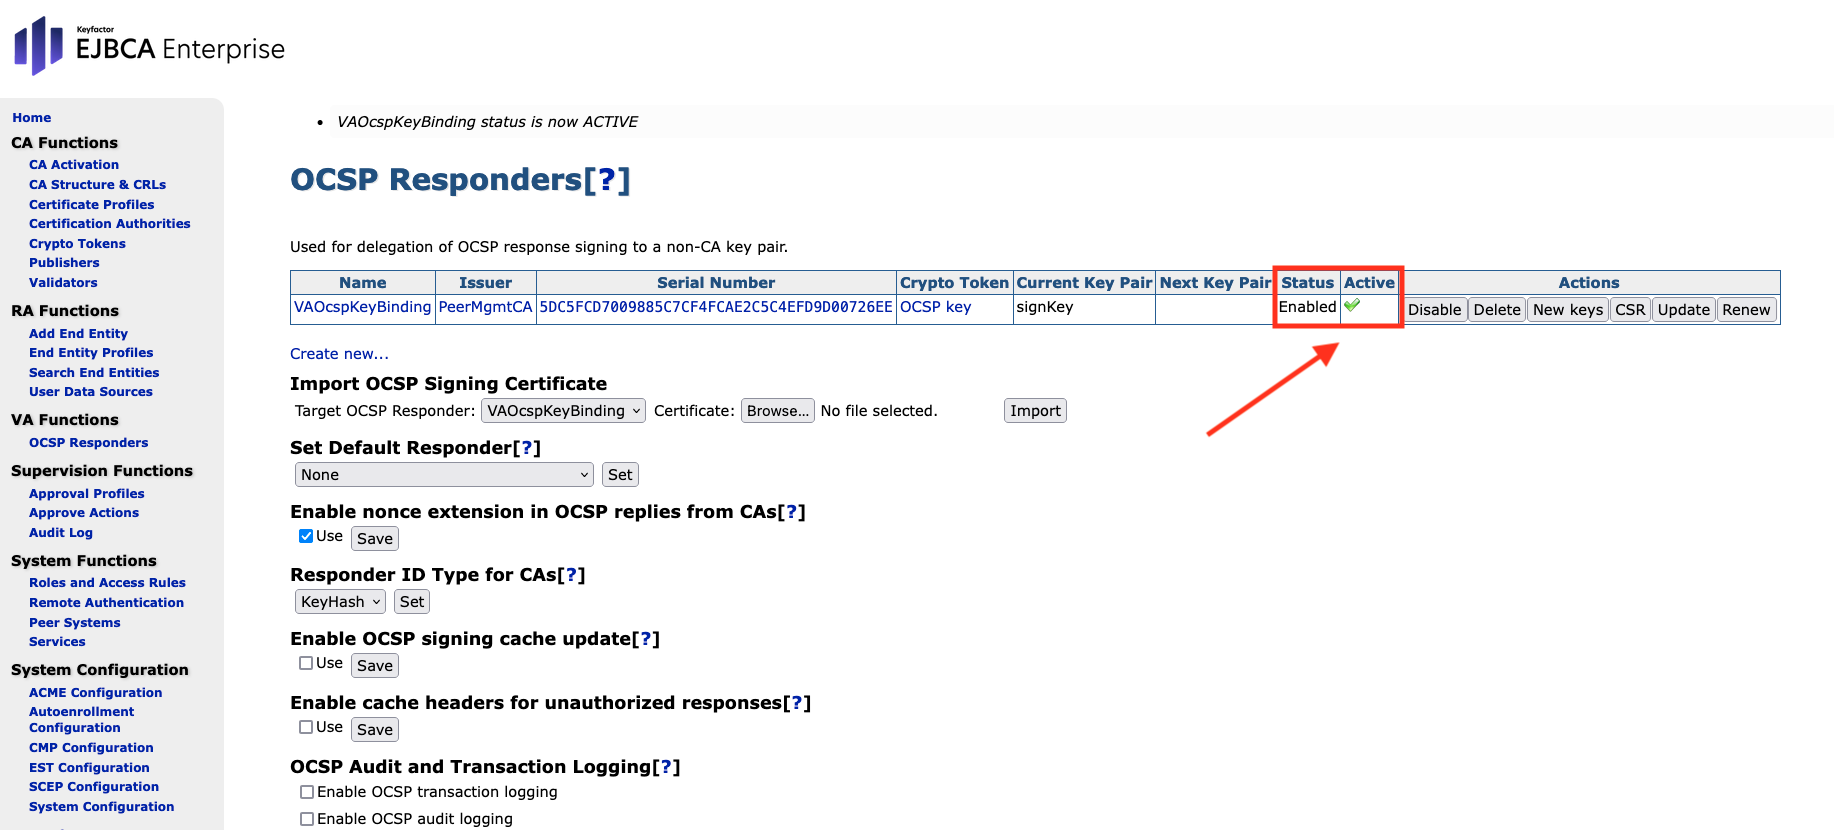
On the same page, select Enable in the Actions row to enable the key binding. The Status will change to Enabled and marked as Active.
-
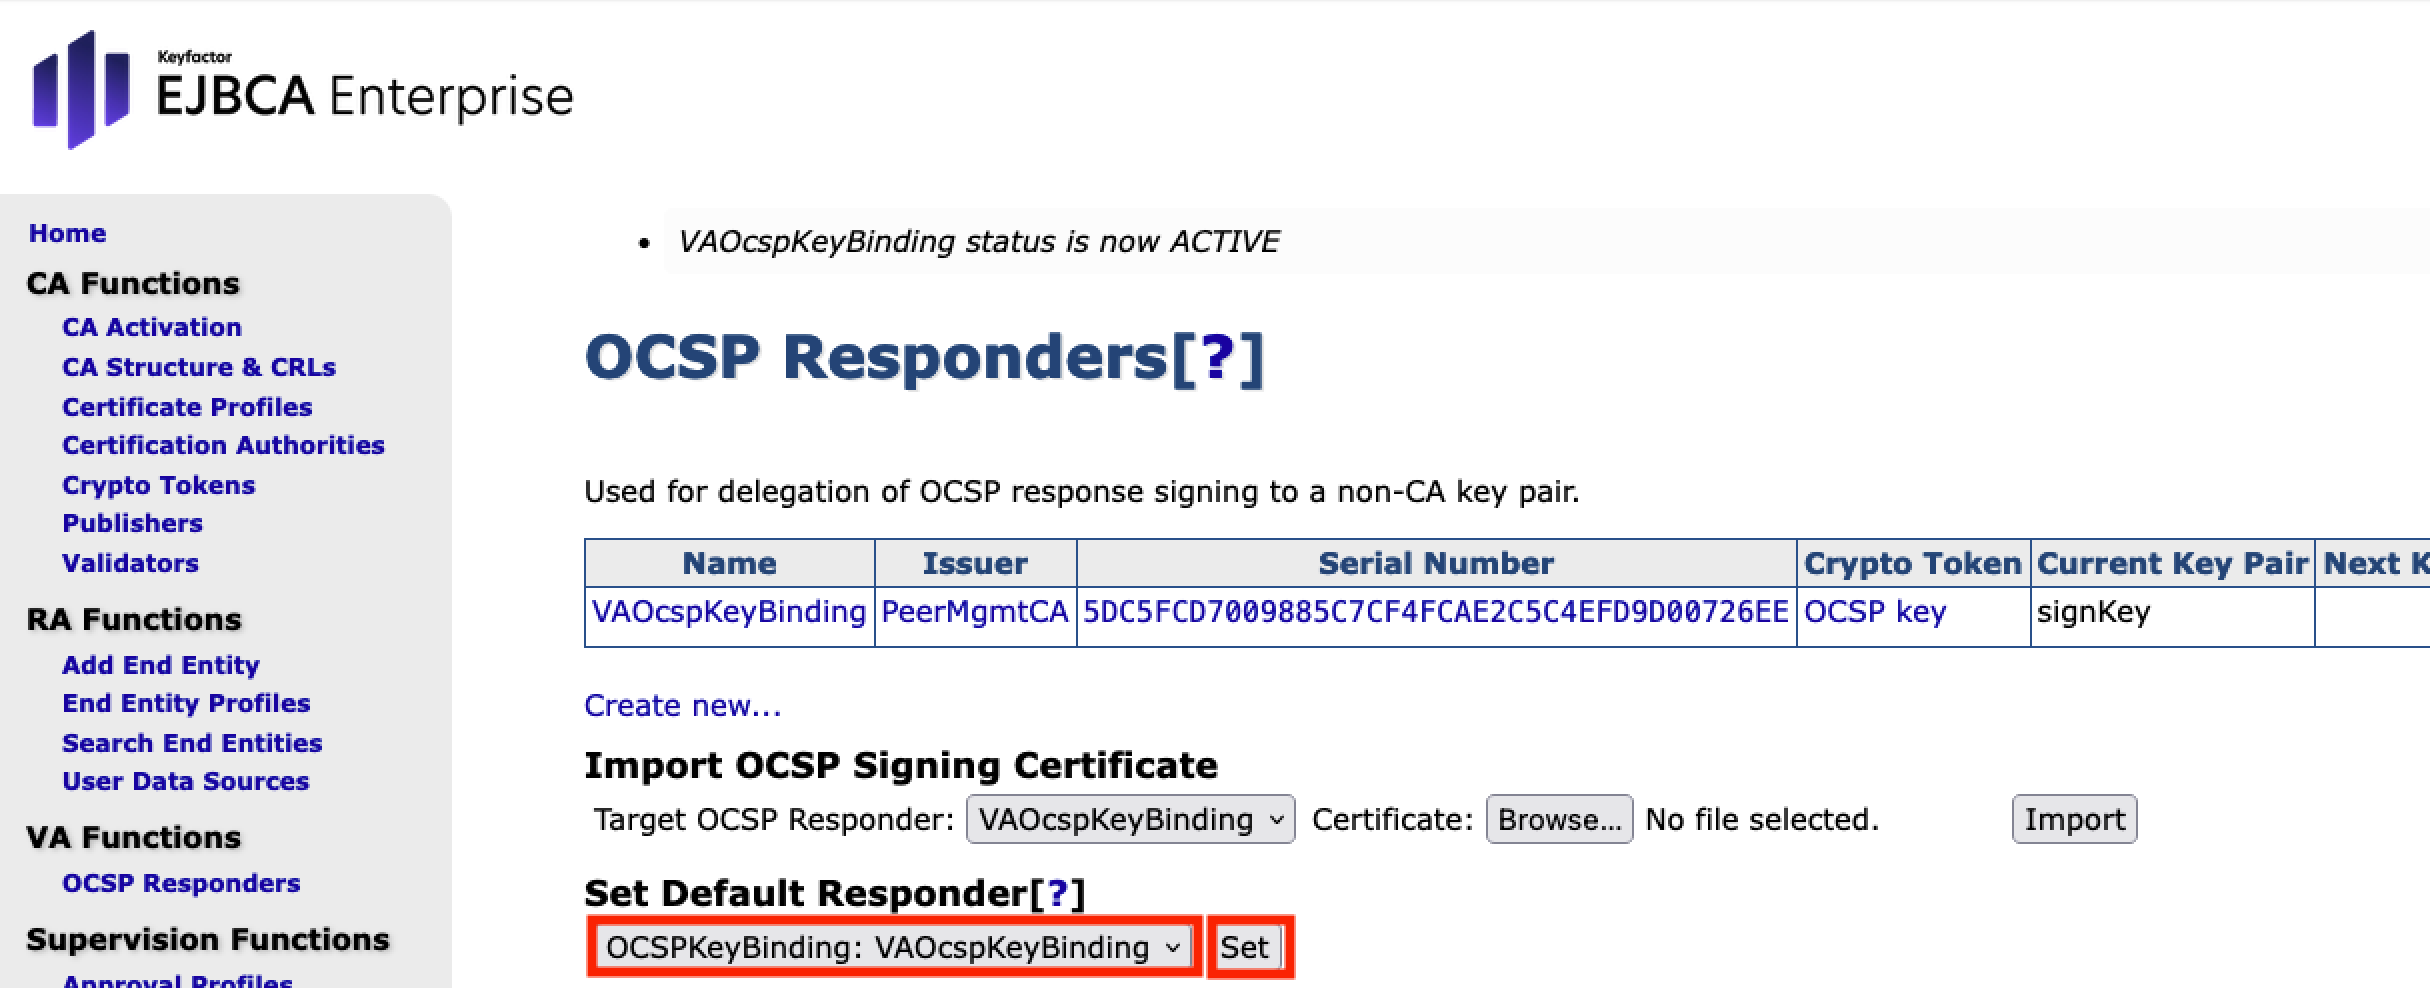
In the section Set Default Responder, select VA OcspKeyBinding from the drop down menu.
-
Click Set.
-
In the CA Hardware Appliance, go to the EJBCA Enterprise Administration.
-
Navigate to CA Functions on the sidebar.
-
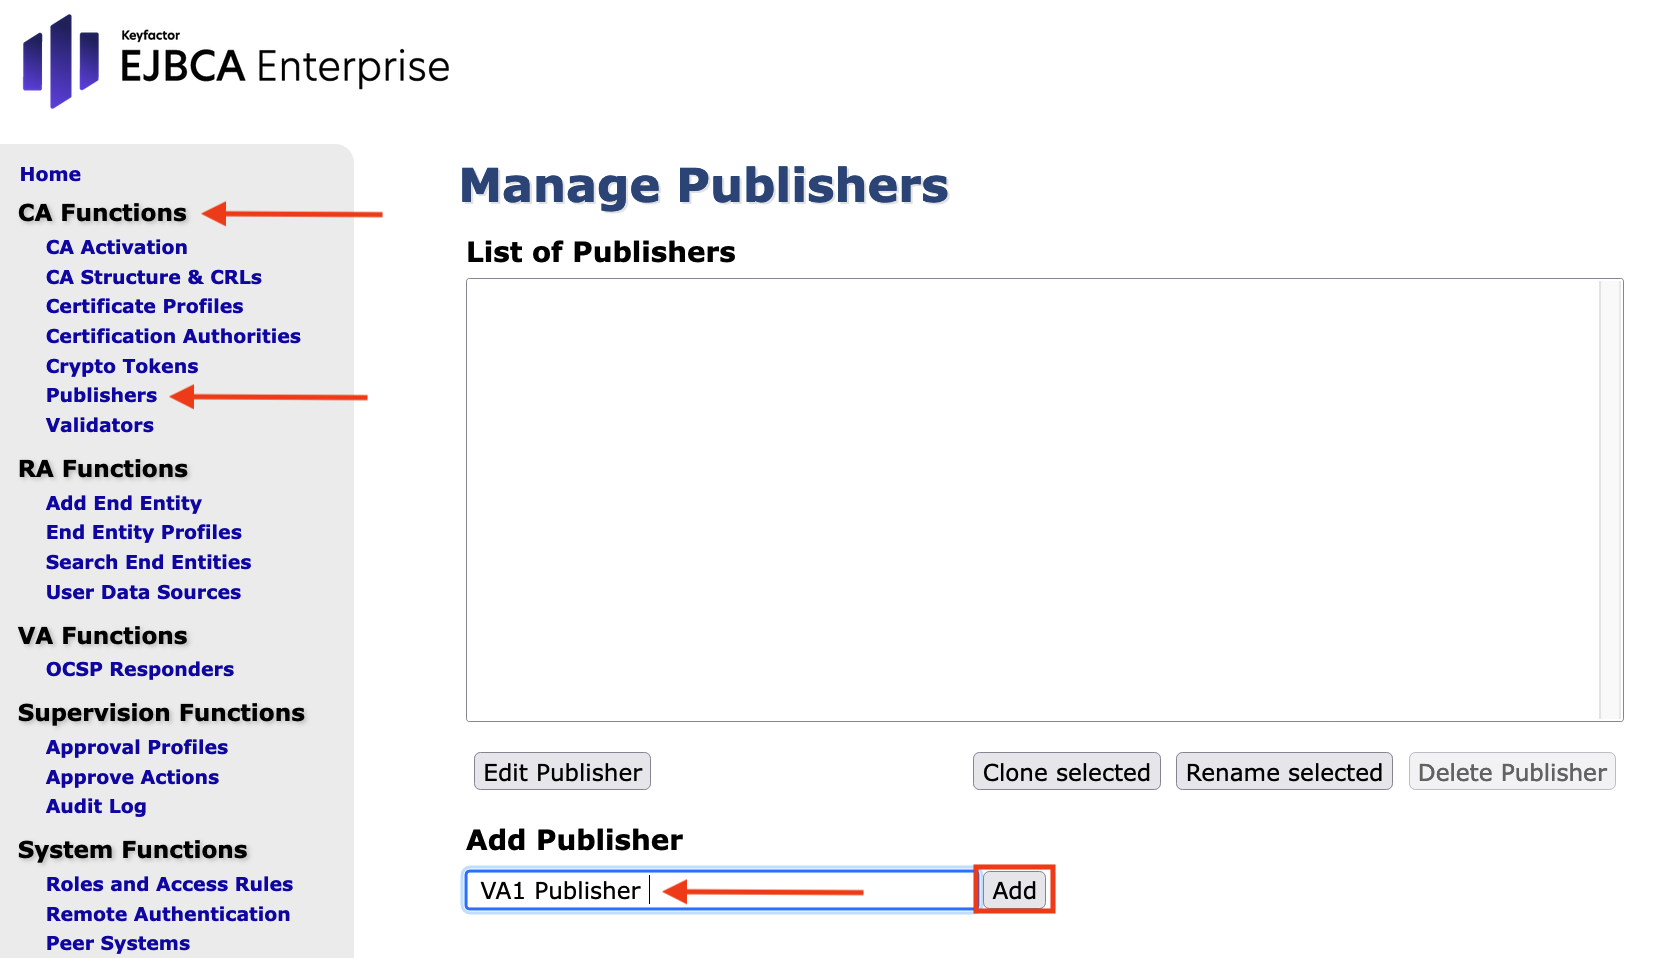
Select Publishers.
-
In the Manage Publishers overview enter VA1 Publisher in the Add Publisher field.
-
Click Add.
-
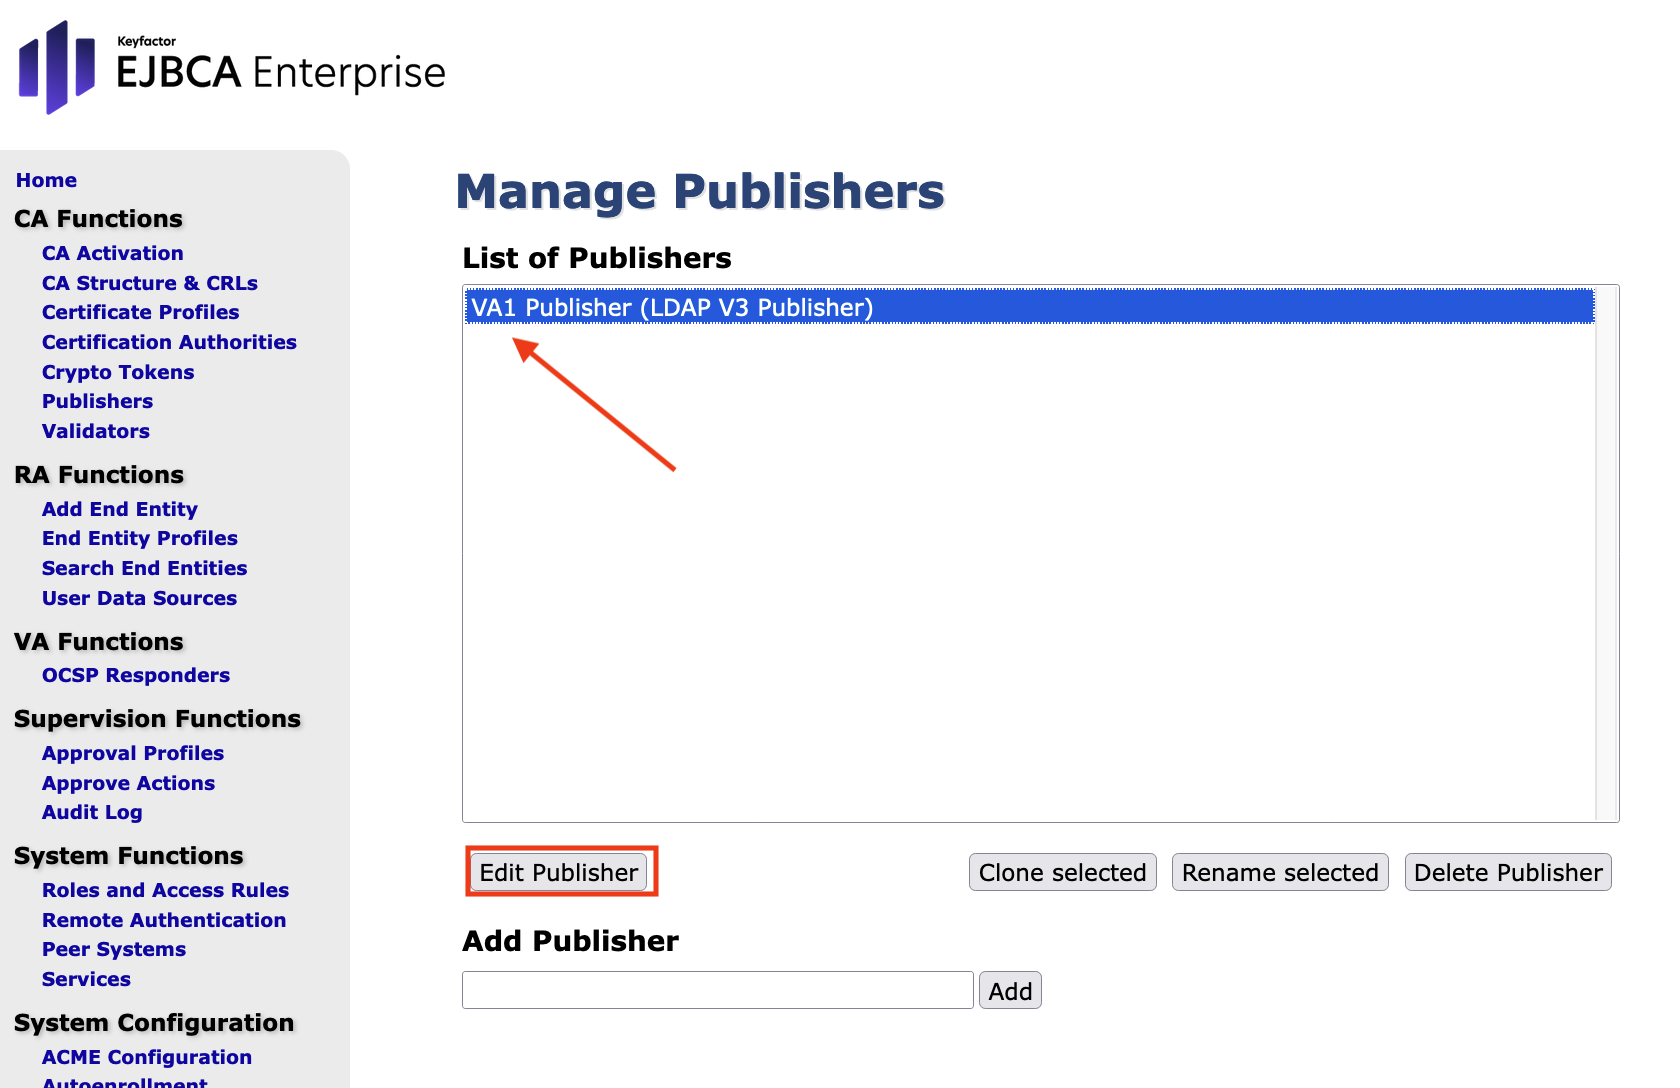
Select the entry VA1 Publisher in the List of Publishers and click Edit Publisher:
-
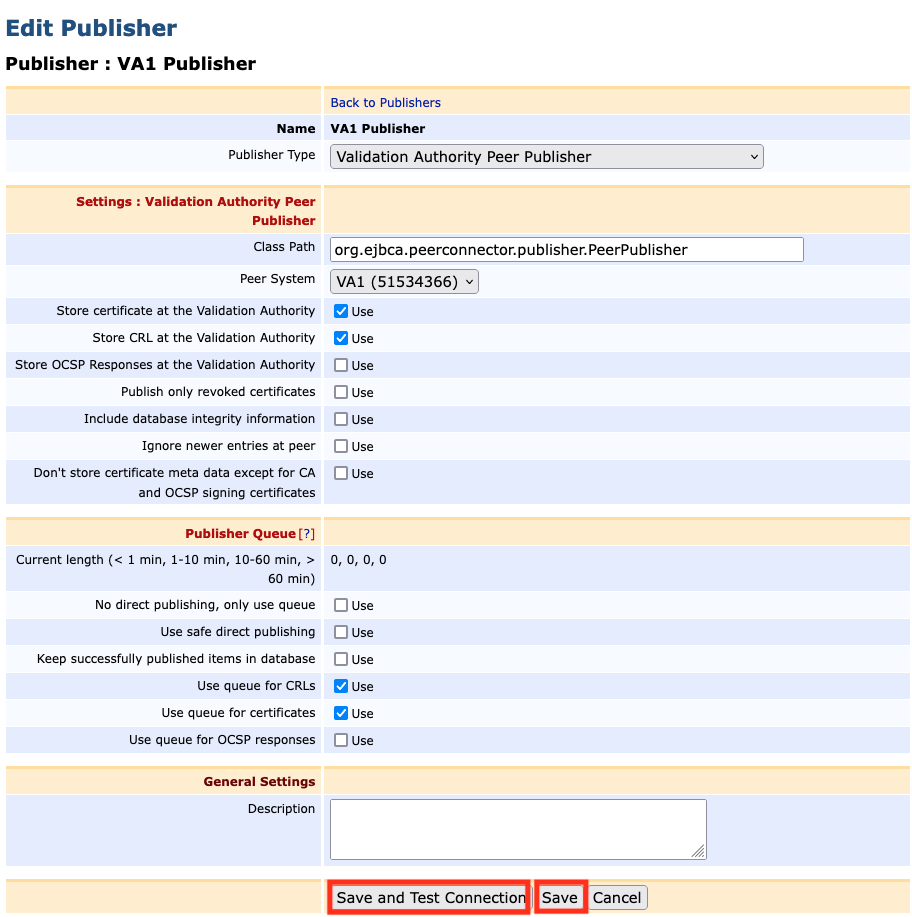
In the form Edit Publisher make the following entries in the Publisher : VA1 Publisher:
- Publisher Type: Select Validation Authority Peer Publisher
- Peer System: Select VA1 (xxxxxxx)
- Enable the following options:
- Store certificate at the ValidationAuthority
- Store CRL at the Validation Authority
- Use queue for CRLs
- Use queue for certificates
- Click Save and Test Connection
-
Click Save
-
In the CA Hardware Appliance navigate to RA Functions on the sidebar.
-
Select Search End Entities.
-
Enter ssl_app in the first line: Search end entity with username.
-
Click Search.
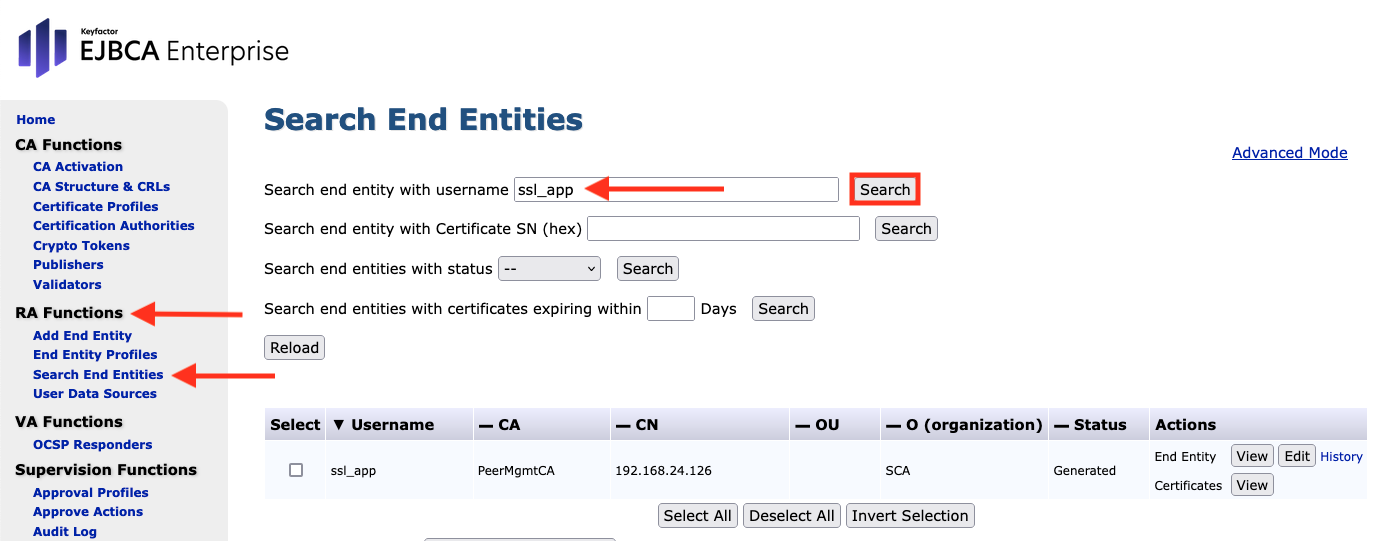
Search End Entities
-
The table in which ssl_app is listed then appears in the lower area. The End Entity can be navigated with the command buttons under the Actions column and with the commands arranged under the table.
Click View next to Certificates under the Actions column.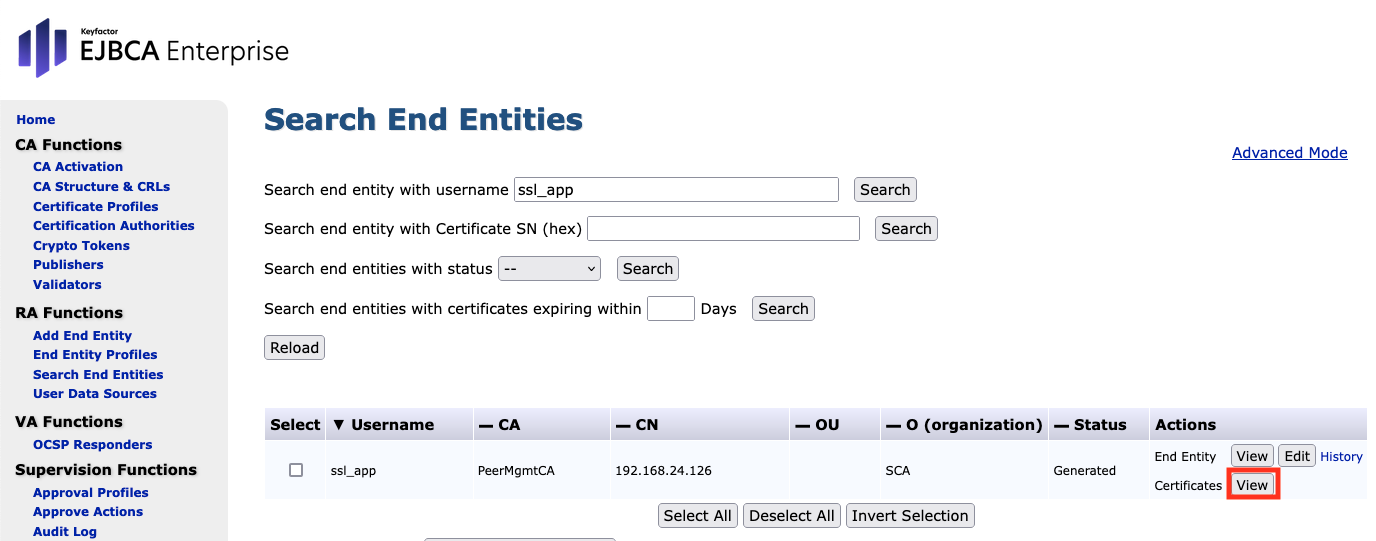
View Certificate of End Entity
-
The Certificate will appear.
Select Download PEM file.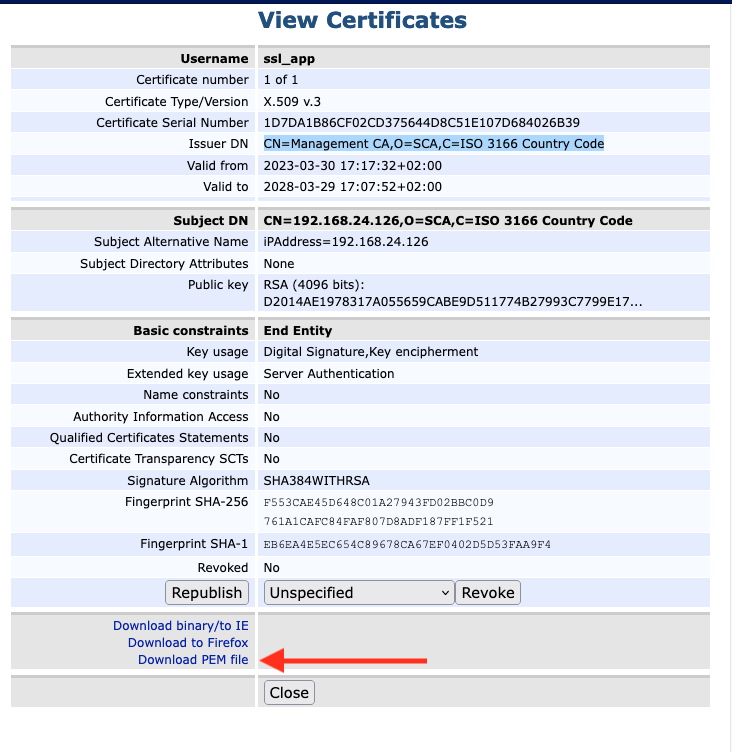
End Entity Certificate <certificate_to_be_controlled>.pem
-
The following is a command script that should be executed on a terminal.
openssl ocsp -issuer <issuer>.pem \
-CAfile <issuer>.pem \
-cert <certificate_to_be_controlled>.pem -req_text \
-url http://<VA_application_interface>:80/ejbca/publicweb/status/ocsp -resp_text
-
The output looks like the following:
OCSP Request Data :
V e r s i o n : 1 ( 0 x0 ) R e q u e s to r L i s t :
C e r t i f i c a t e ID :
Hash Alg o r i th m : sha 1
I s s u e r Name Hash : C45788773EDFD1434ED1D8A3C6E3CF176D78B82A I s s u e r Key Hash : EE5D0AE56A64E9001423A2F6FBFDBFF8BC4266E3
S e r i a l Number : 41DC620FBFCB39C6 Request E x te n s i o n s :
OCSP Nonce :
04104775 FF9F9A74069EE07ED378AEA83E99
OCSP Response Data :
. . .
Xu40z8I796Luq Zx99W7e Yy AutEir+ZLo31szYuDI+Q==
OCSP Response Data :
		...
		Xu40z8I796LuqZx99W7eYyAutEir+ZLo31szYuDI+Q==
		−−−−−END CERTIFICATE−−−−−
		Response verify OK
		ssl_app .pem: good
		This Update: Dec 4 14:22:17 2014 GMT