The default certificates for SignServer are generated upon installation and are self-signed. It is recommended to configure new certificates from a CA which EJBCA trusts. Running a script on the command line of EJBCA Cloud can make this a simple process.
To generate new TLS certificates for SignServer:
-
Start a shell session to the EJBCA instance:
# ssh -i <ssh public key> ec2-user@<ip address of EJBCA instance> # cd /opt/PrimeKey/support -
Run the script titled
create_ra_tls_certs.sh. Running this script with the-dand-iflags will generate certificates that Apache on the SignServer instance will use. In this demo environment example, our DNS and IP address for our SignServer instance are:-
ec2-54-165-63-62.compute-1.amazonaws.com
-
ip-172-16-2-98.ec2.internal
-
54.165.63.62
-
172.16.2.98
Running the script passing these addresses to the command line will look like the following:
# sudo ./create_ra_tls_certs.sh -d ec2-54-165-63-62.compute-1.amazonaws.com -d ip-172-16-2-98.ec2.internal -i 54.165.63.62 -i 172.16.2.98 -
-
Answer y to the prompt about copying the certificates with proper names for Apache. This will output them to.
/home/ec2-user/pem. -
Copy this pem folder to the SignServer instance. This should be done over a secure channel between the nodes, via SSH or whatever method meets the organizations security needs.
-
Copy these files to
/home/ec2-user/pem,then move them into the appropriate position in/etc/httpd/sslon the SignServer node and restart apache with the following commands:# cd /home/ec2-user/pem # sudo cp * /etc/httpd/ssl/. # sudo service httpd restart -
Run the following command to allow the EJBCA Superadmin access to SignServer:
# cd /opt/signserver # bin/signserver wsadmins -allowany -
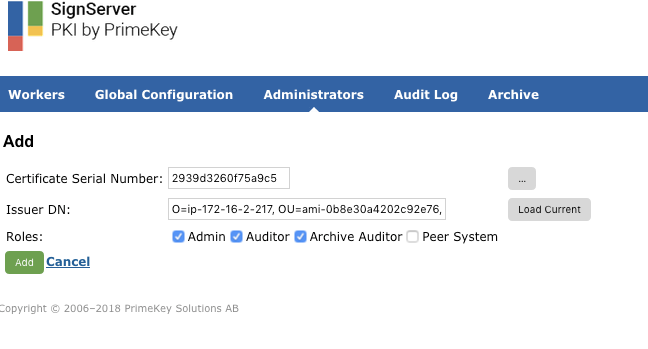
Go to the SignServer Administrators tab and click Add.
-
Click Load Current and add the Roles: Admin, Auditor, and Archive Auditor for the EJBCA SuperAdmin, and then click Add.
-
On the SignServer Administrators tab, change the Current Setting: Allow any to Only Listed by clicking Switch to "Only Listed".
