Connecting an RA to a CA over Peers
Setting Up a New RA
To use EST over CoAPs on the EJBCA LRA Software Appliance follow the steps described below.
- The EJBCA LRA must have a TLS Certificate issued by a Certification Authority that is trusted by the standard EJBCA.
- Therefore create a valid Certificate for the EJBCA LRA
- Please see Managing TLS Certificates for more details.
- If you use an external Vendor CA (the CA that signs the Birth certificate for IoT devices) you must import it to the EJBCA CA.
To set up a new RA polled by the CA, perform the following steps:
Step 1: Set up the TLS Connection from CA to LRA
Configure on the standard EJBCA:
First, set up an /wiki/spaces/EJBCADS/pages/238900603 to identify the CA to the RA:
- On the Overview page of the EJBCA Software Appliance click Admin Web in the Application Overview section.

- The EJBCA Enterprise opens.
- Create a Crypto Token, or use an existing Crypto Token.
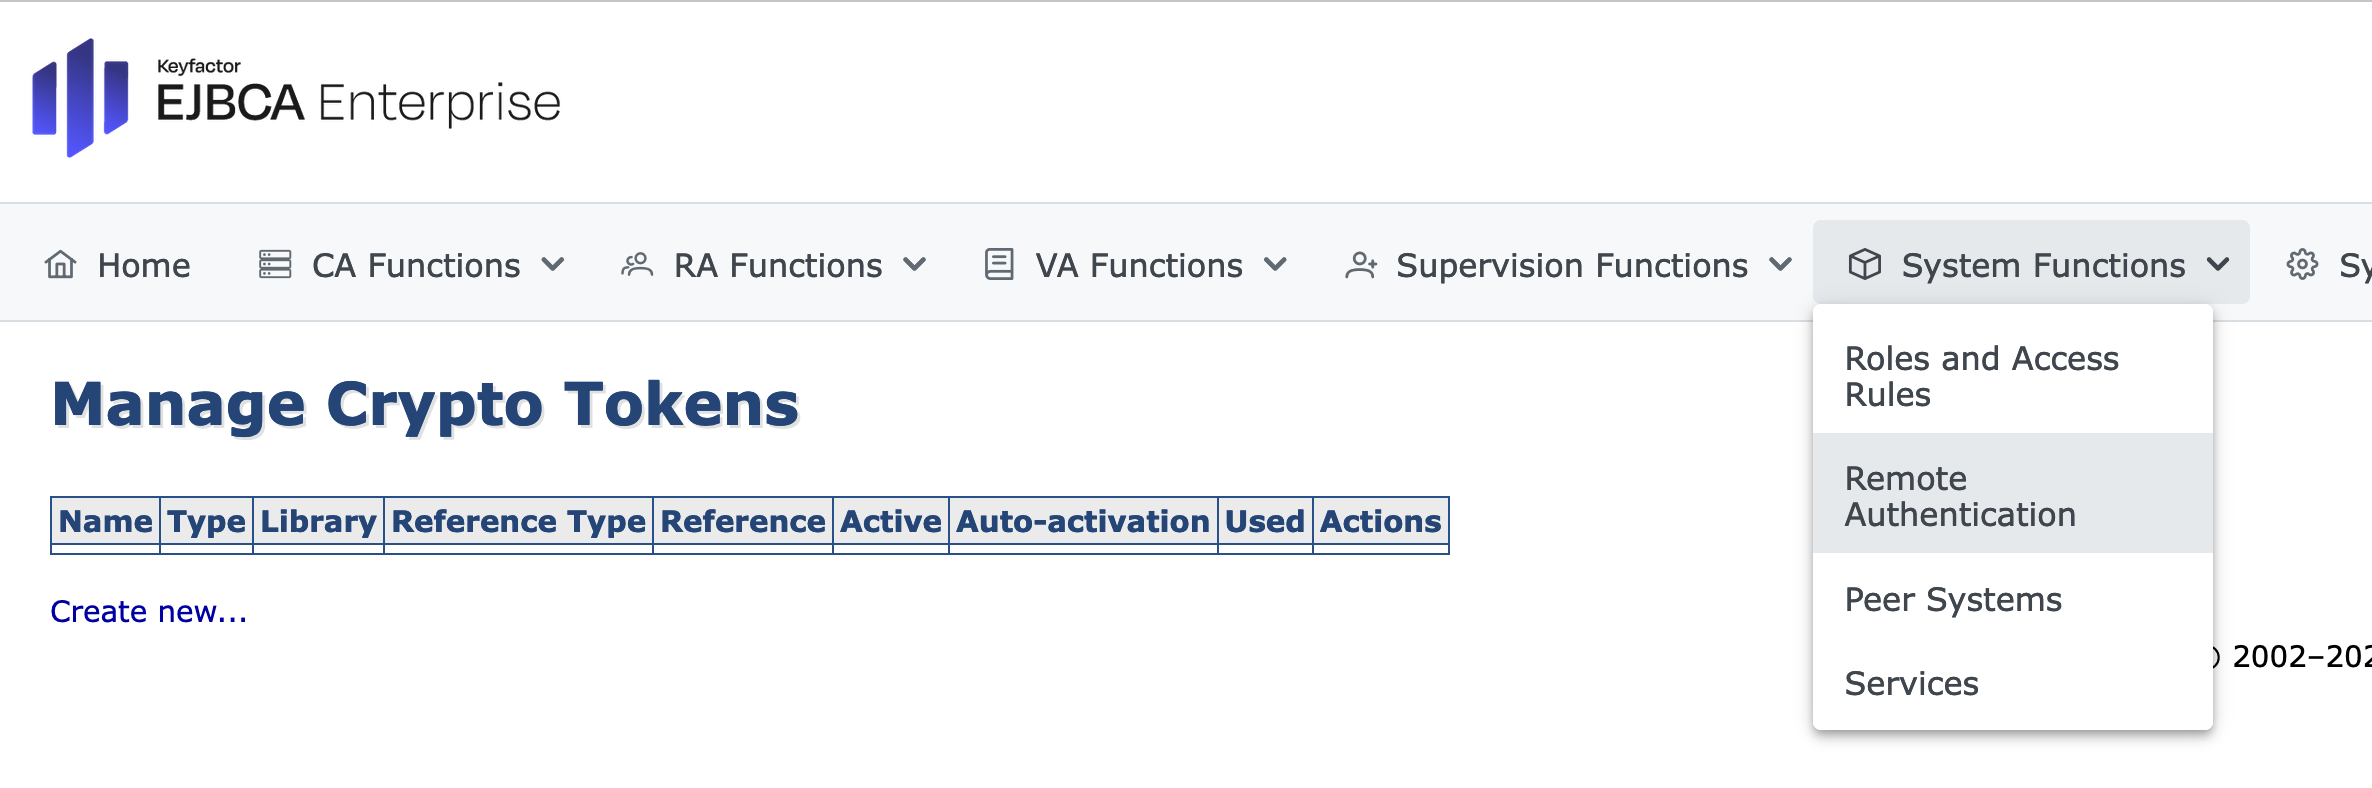
- Open the System Functions drop-down menu in the top menu.
- Select Remote Authentication.
- Click Create new...
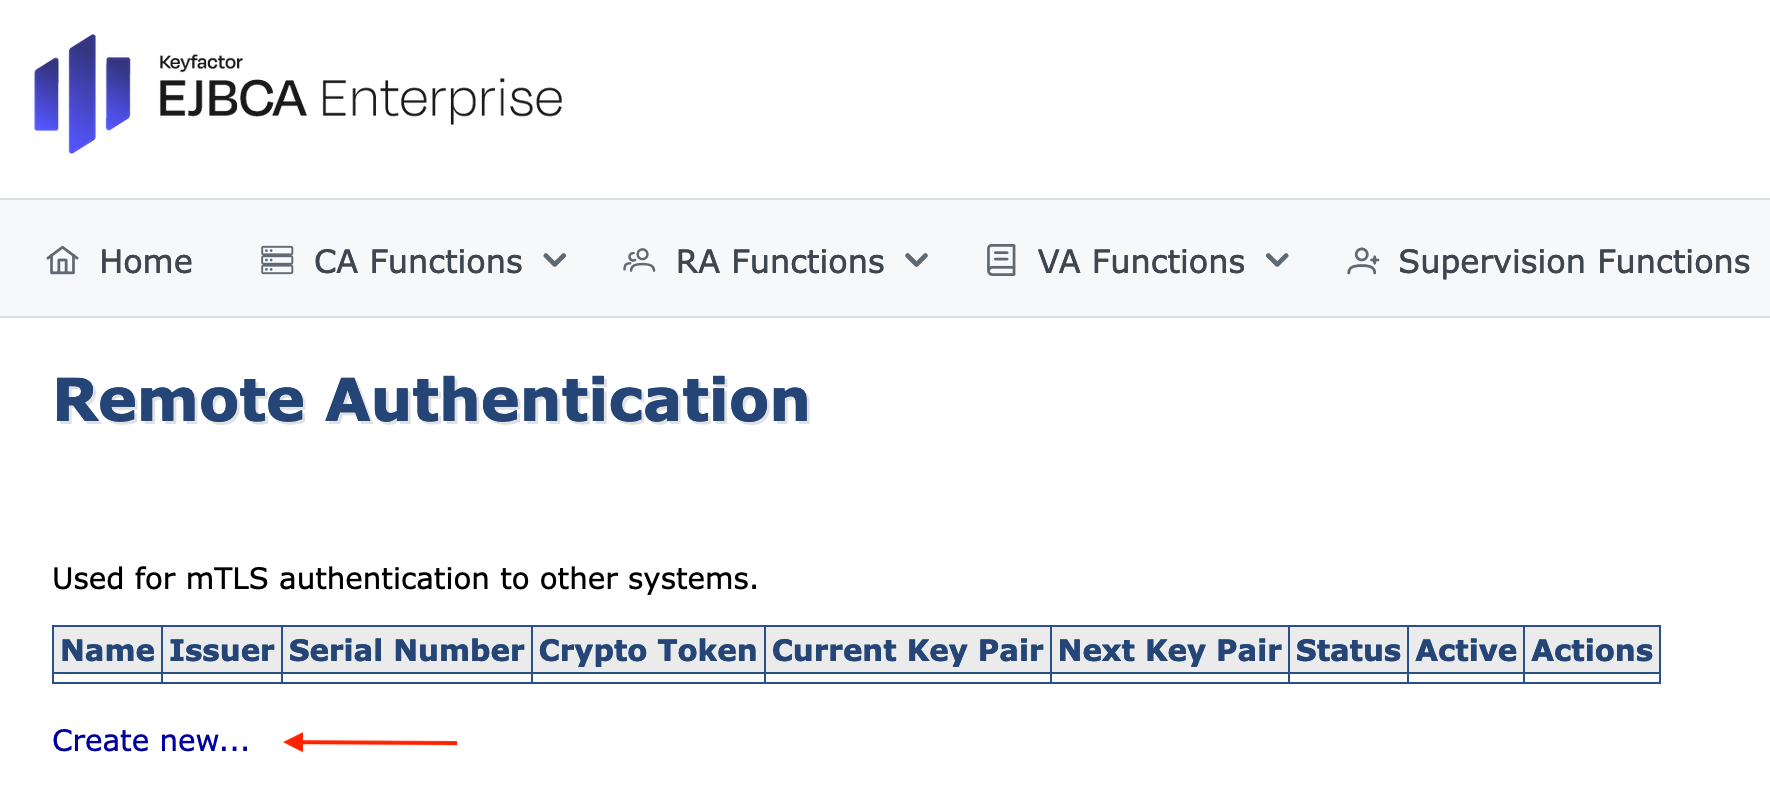
Enter a Name: in this example we named the Remote Authenticator: RemoteAuthenticator.
Select Crypto Token: choose the newly created or the existing Crypto Token you want to use.
Set the Key Pair Alias to any Key of your choice, in this example we used: auto select with defaultKey.
This comes from the crypto token we created.
Signature Algorithm: select Signature Algorithm from the drop-down menu.
Make sure to select the same algorithm that was used to create the Crypto Token and the Certificate Authority.
We selected SHA256WithRSA.
In the section Properties > Protocol and Cipher Suite: select any of your choice.
We have selected TLSv1.2TLS_ECDHE_ECDSA_WITH_AES_256_GBC_SHA384 from the drop-down menu.Confirm the setting with Save.
Important!
Make sure that the protocol and the Cipher Suite match the algorithm of the generated key pair.

Optional
Add the trusted CA of the remote LRA instance.
- Return to the Remote Authentication overview page. Click in the column Actions > CSR to create a new certificate signing request for the TLS key pair. If you click CSR , the pem file for remote authentication will be downloaded. Sign the remote authentication CSR to obtain a client certificate with a trusted CA.

Important
The CA used to sign the CSR must be trusted by the LRA and the default EJBCA CA.
Optional
This step is only necessary if you are already using a trusted CA under Access > Trusted CA.
The CA used to sign the CSR must be uploaded to WebConf of the EJBCA LRA. For more details see Access: Managing Trusted CAs. - Go back to Remote Authentication.
In the section Import Client Certificate, click Browse... for the CSR that is downloaded and signed before (Step 7).
Click Import to obtain the TLS certificate for the key binding. in the corresponding column Name, Issuer and Serial Number are displayed, but Status is still Disabled and the column Active is check-marked with a red cross.
In the column Actions click Enable.
The RemoteAuthenticator becomes active. A green check mark is displayed in the Active column. In the LRA EJBCA Enterprise, open the System Functions drop-down menu in the top menu.
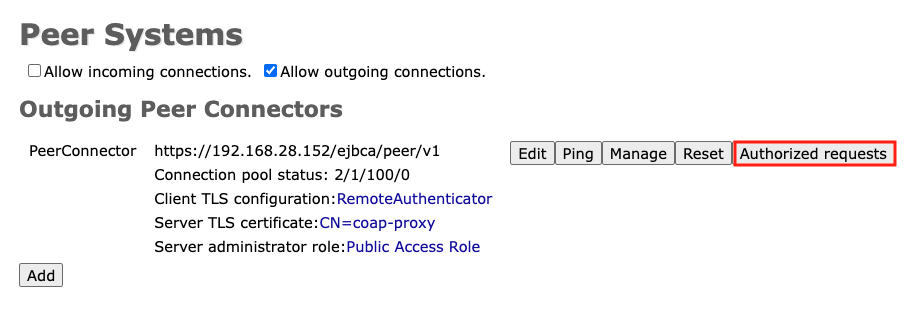
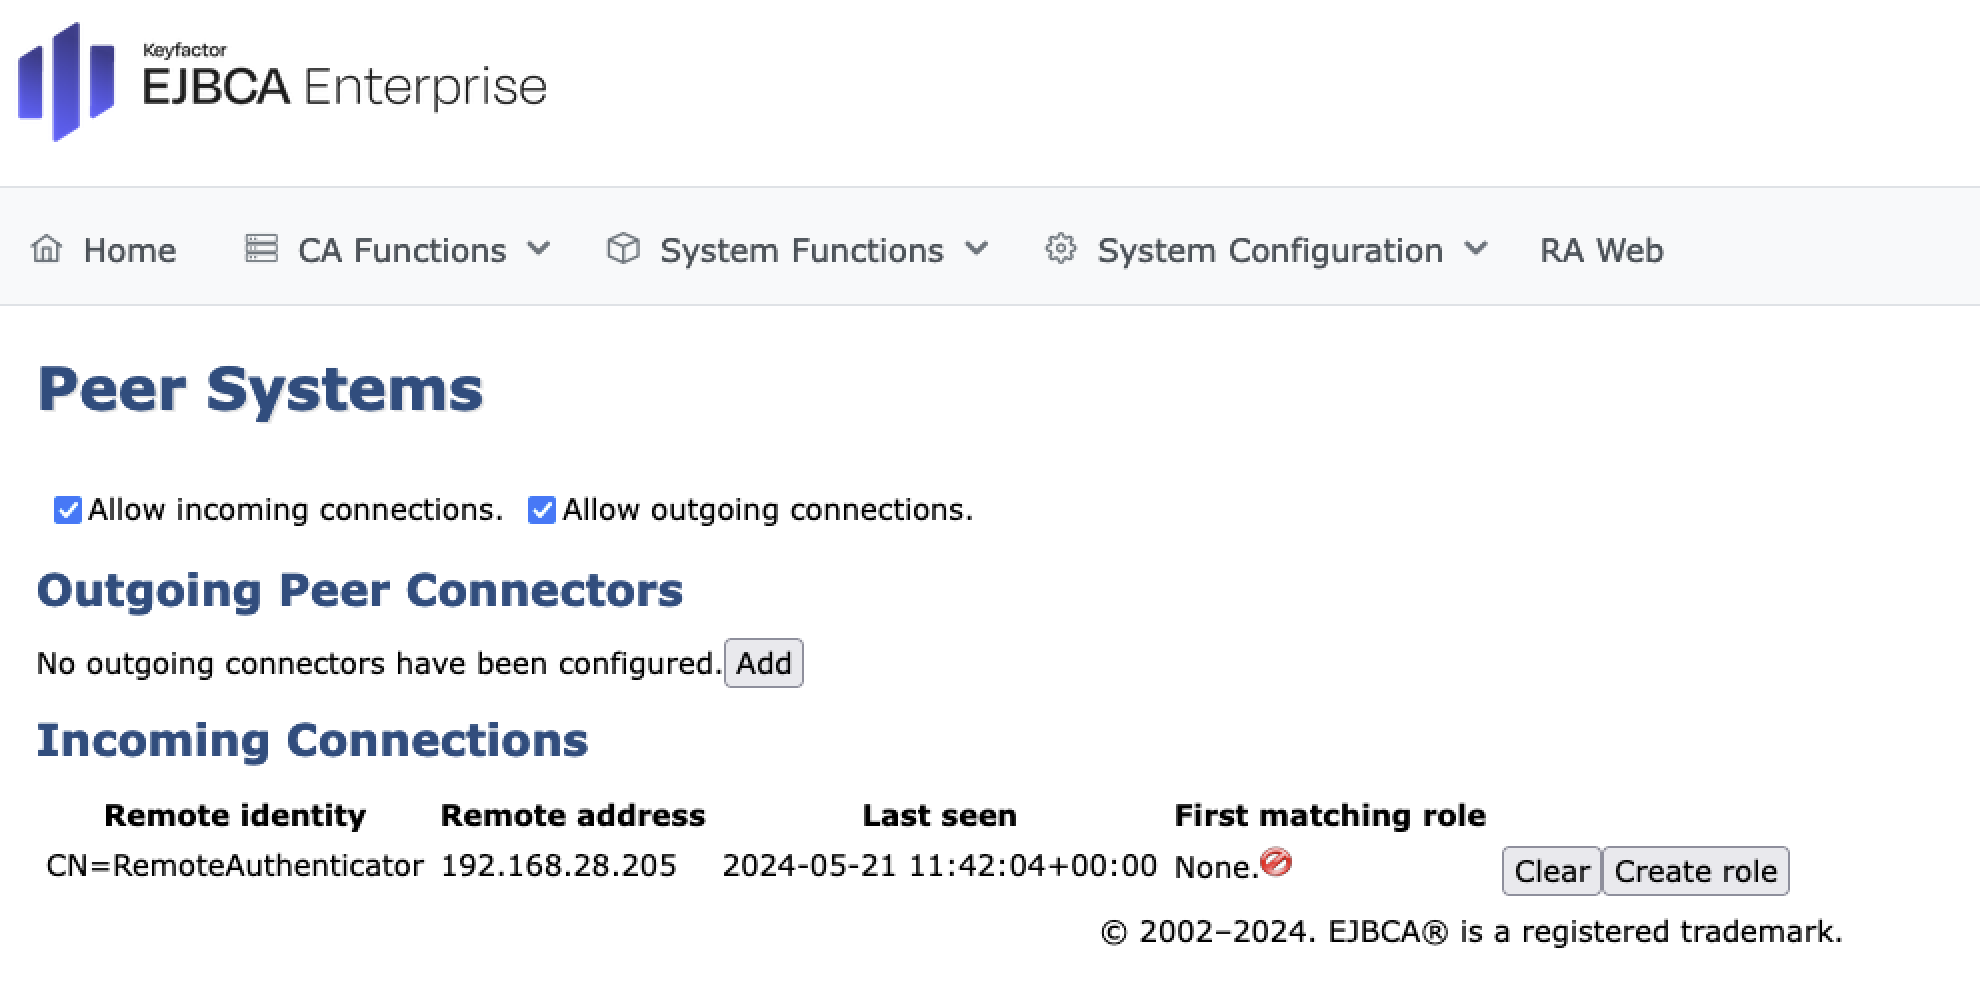
Select Peer Systems.
In the section Peer Systems activate Allow outgoing connections. Leave Allow incoming connections unchecked.
In the section Outgoing Peer Connectors.
Click Add.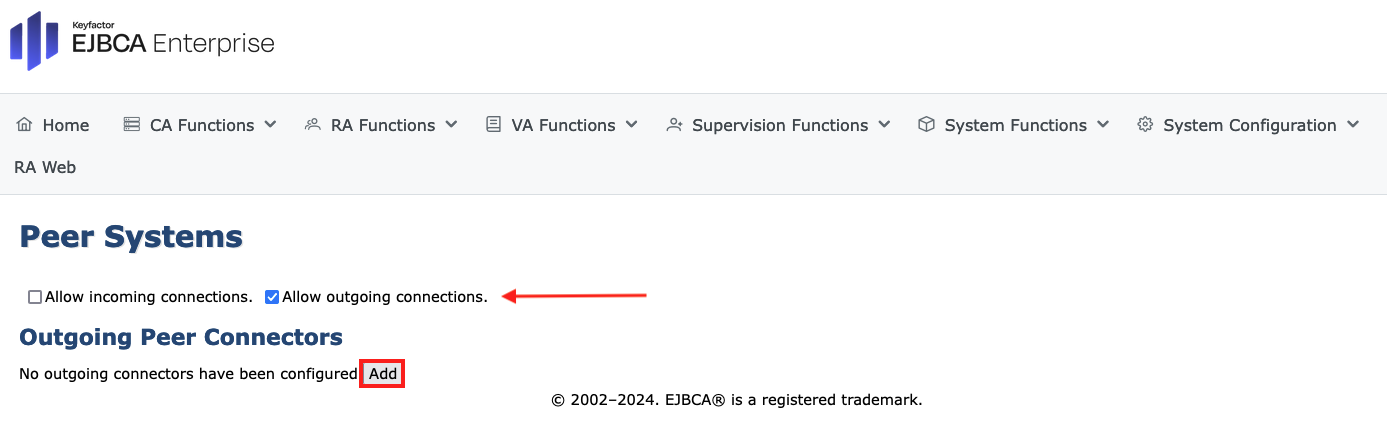
Create Peer Connector opens:
Name: choose a name for the Peer Connector. In this example we named it PeerConnector.
URL: a URL is preselected. Adjust the URL to the EJBCA LRA IP address you want to connect to.
Authentication Key Binding: select the remote Authentication from Step 5 and 6 from the drop-down menu. Make sure it is active otherwise you cannot select it.Open the System Functions drop-down menu in the top menu.Enabled: select
Incoming requests: Process incoming requests: enable Minimum parallel requests: 2 Maximum parallel requests: 2
Click Create.
Click Ping for the new Outgoing Peer Connection to open the initial connection.
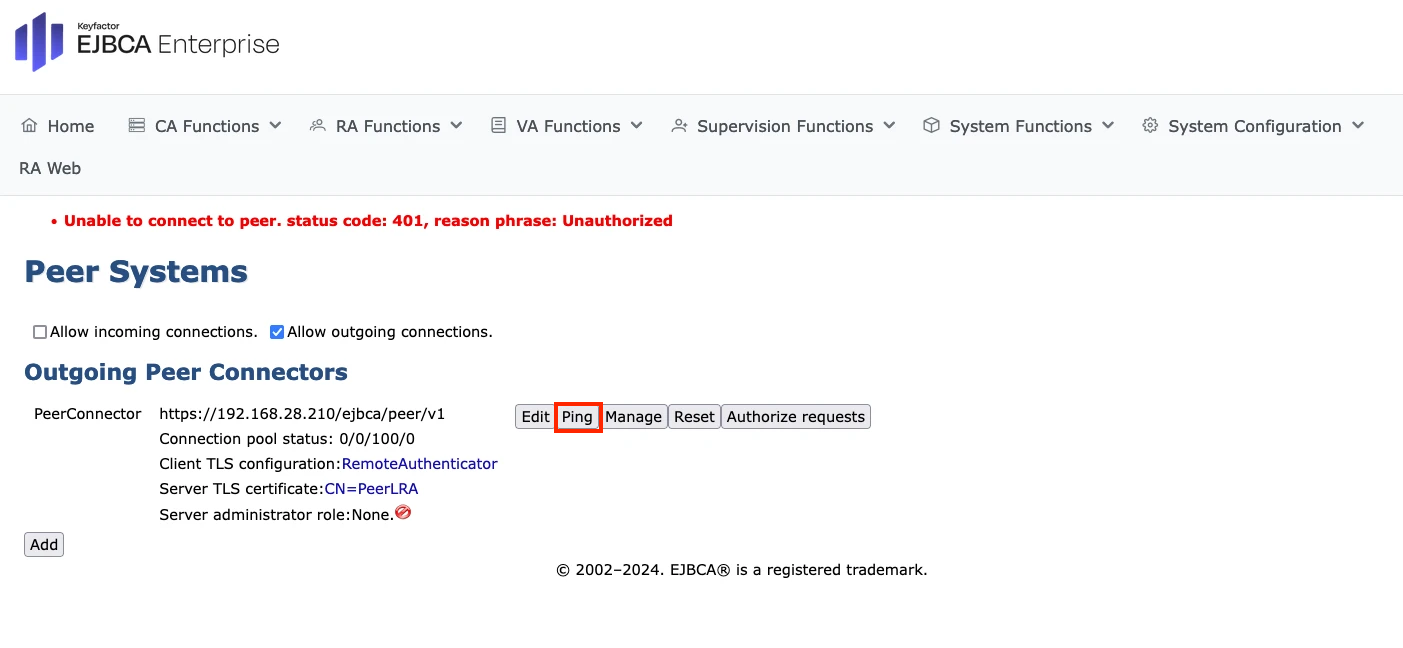
It is expected that the error message `Unable to connect to peer. status code: 401, reason phrase: Unauthorized ` will be displayed because we have not yet configured the LRA side.
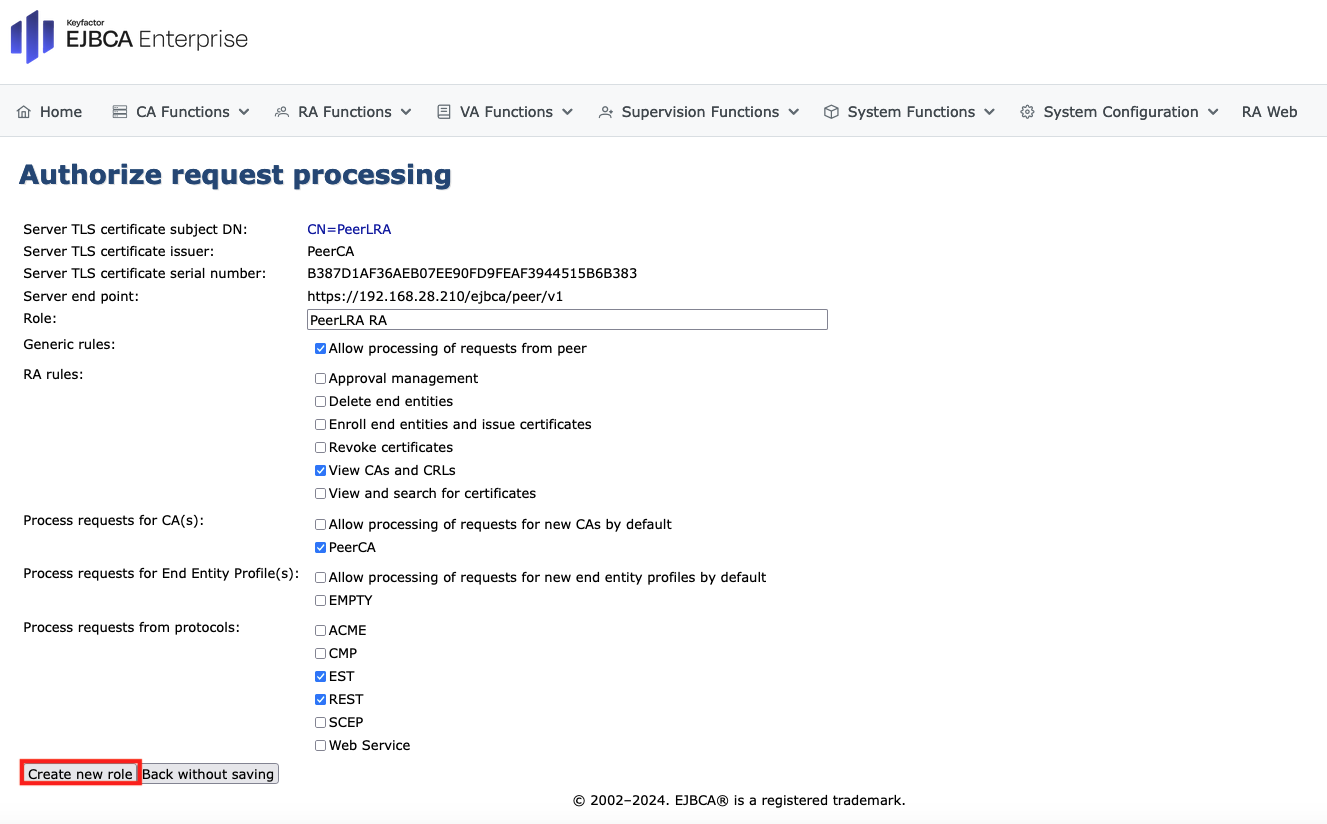
- Click Authorized requests.
A new form opens. In the role list, select Create New Role. Enable- Allow processing of request from peer
- View CAs and CRLs
- Choose your CA (here PeerCA)
- under process requests from the Protocols check-mark EST and REST
- Click Create new role to continue.
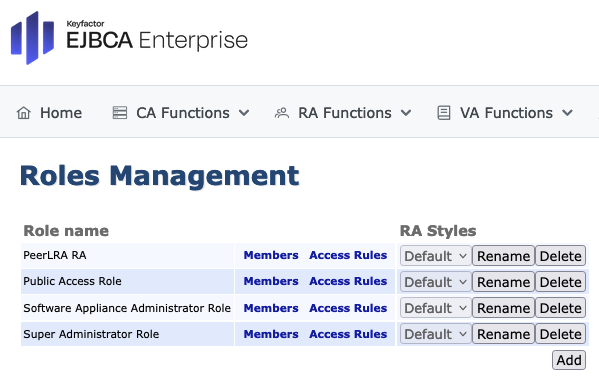
- Open the System Functions drop-down menu in the top menu.
Select the Roles and Access Rules page.
Click Access Rules of the just created access rule.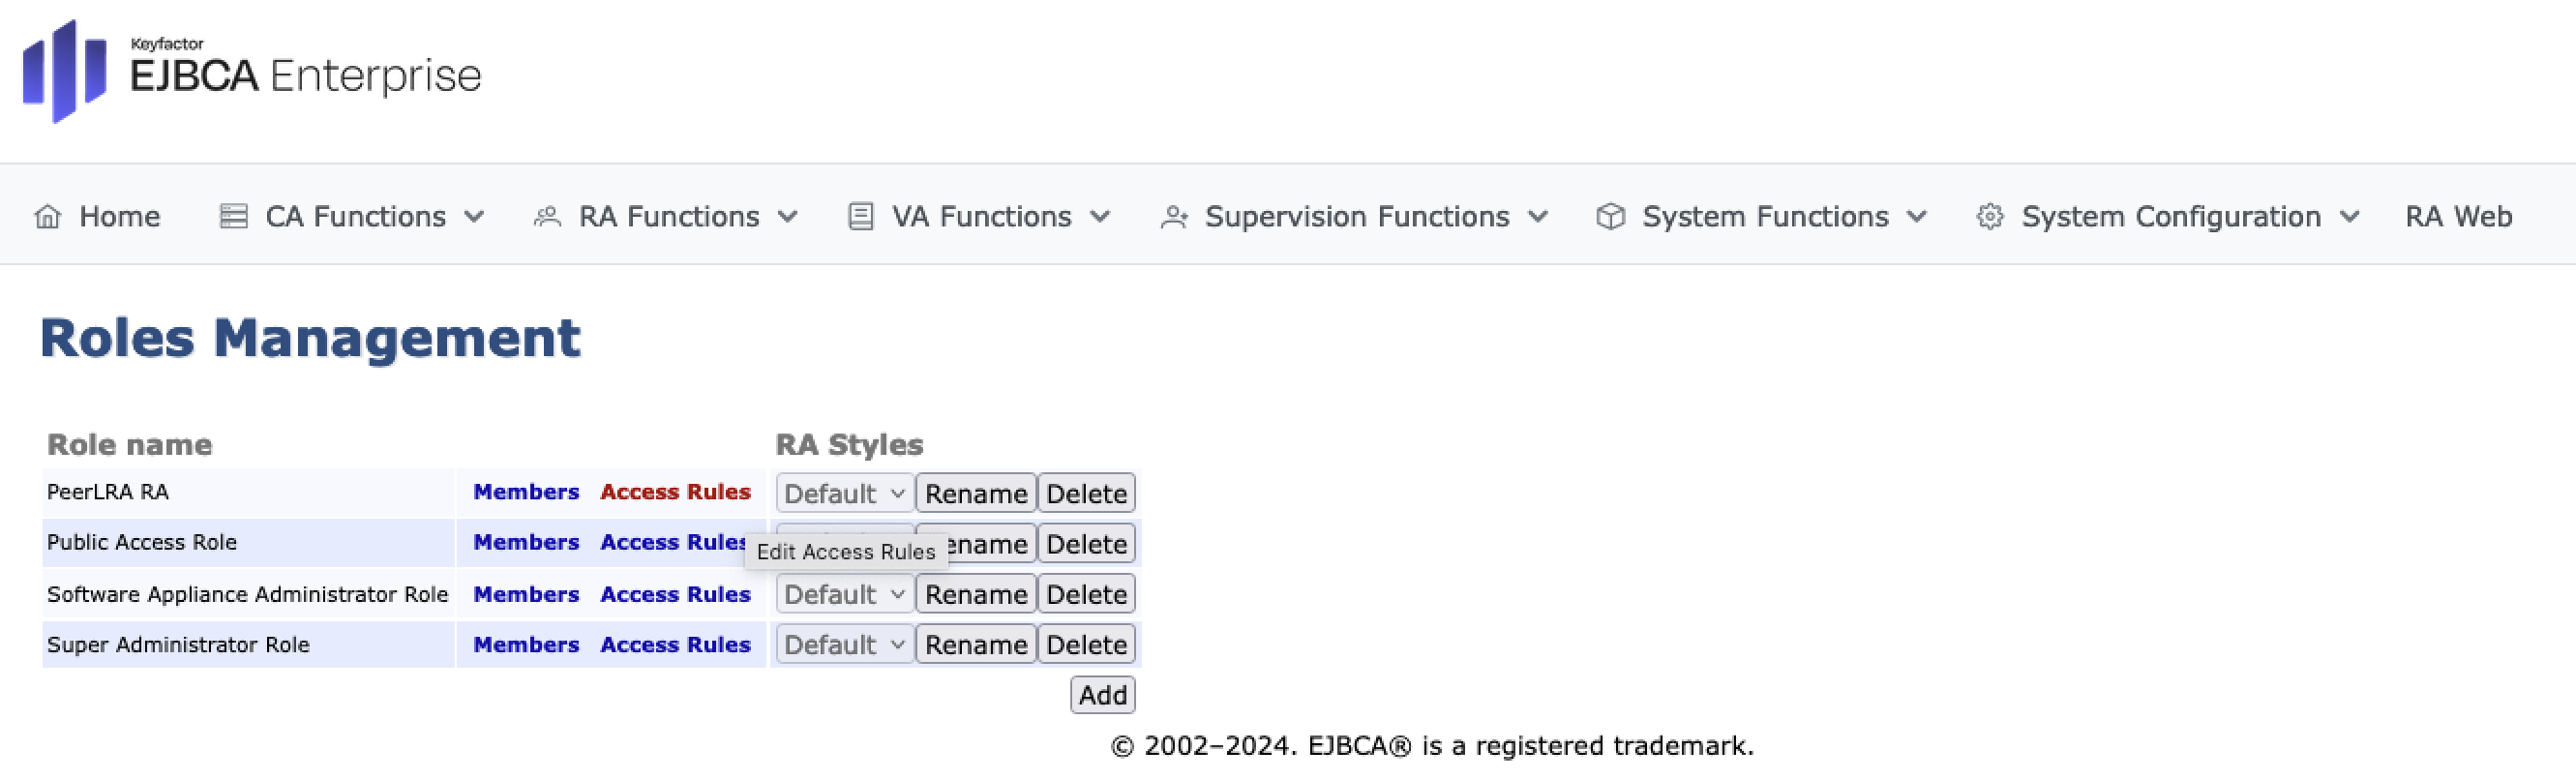
- The Edit Access Rules page opens. Click Advanced Mode.
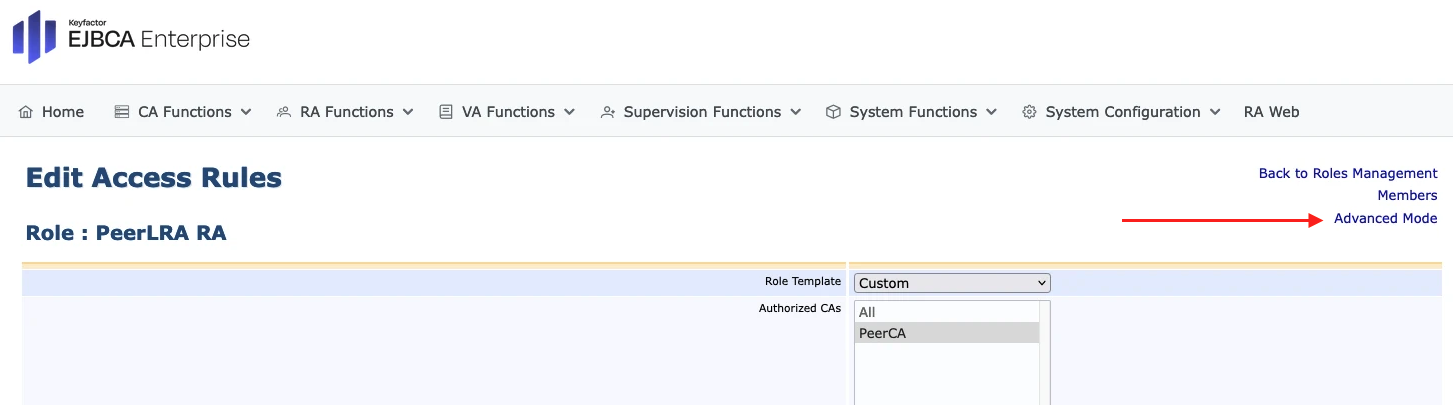
- Under CA Access Rules make sure to give Access to the Vendor CA (The CA that was used to sign the Birth certificates.)
Step 2: Set up the Incoming Peer Connection on the LRA
Configure the EJBCA LRA side:
Incoming Peer Connections are enabled by default on the EJBCA LRA Software Appliance additionally the EST and REST CoAP Management protocols are enabled.
To set up the incoming peer connection, do the following:
- In the LRA EJBCA Enterprise open the System Functions drop-down menu in the top menu.
- Select Peer Systems.
- The incoming connection from the CA should appear in the Incoming Connections section. The CA can connect, but the RA has been given no rights.
- Click on Create Role, and either select a predefined role for the peer connection or have EJBCA create on automatically (suggested).
Select:- Role is intended for peer connection
- Accept long hanging connections
- Ensure that Accept RA Requests is cleared.
- Accept 'Internal CoAP-Proxy CA'
- Access 'PeerCA' (for our example)
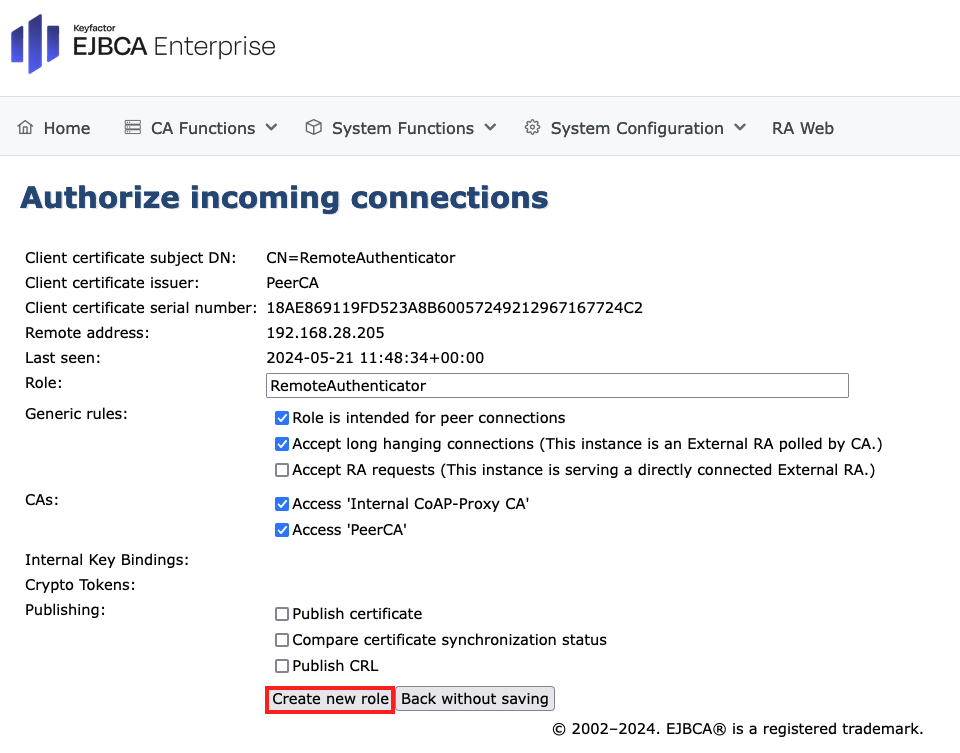
- Click Create new role.
- To verify that the connection is working, try pinging the LRA again as described in Step 1, item 11. No more error message should be displayed.
The role has now been created on the CA for use by the RA.
Step 3: Allow CoAP Proxy to access the EJBCA CA
Configure on the EJBCA LRA side:
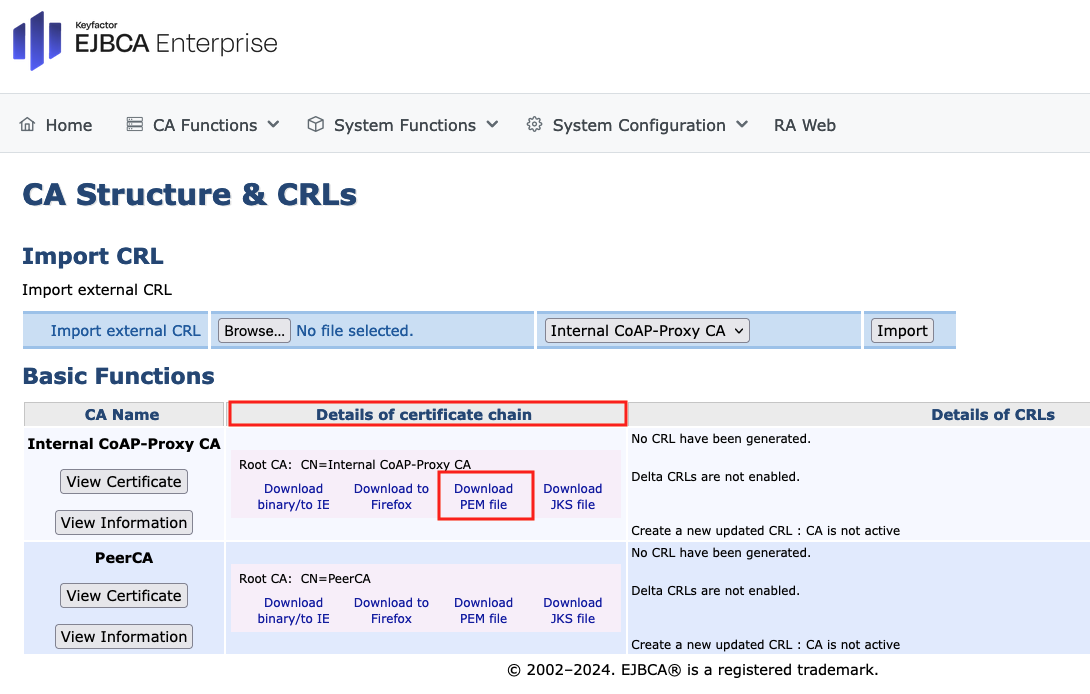
- In the EJBCA LRA Enterprise open the CA Functions drop-down menu in the top menu.
- Select CA Structure and CRLs.
- In the column Details of certificate chain click Download PEM file of the Internal CoAP-Proxy CA.
Configure on the standard EJBCA LRA side:
- In the standard EJBCA LRA open the CA Functions drop-down menu in the top menu.
- Select Certificate Authorities. Click Import Ca certificate.
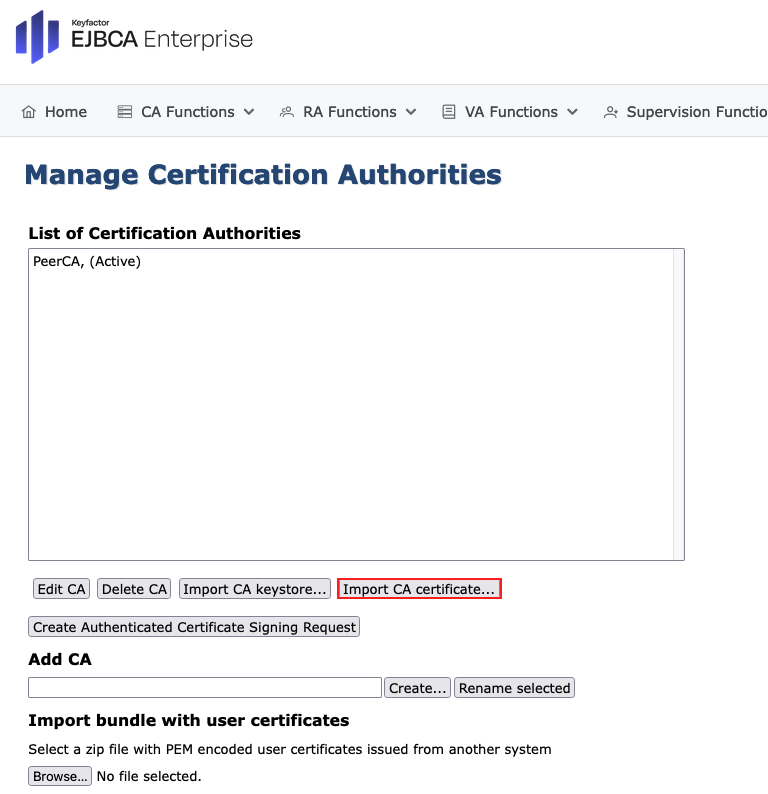
Upload the just downloaded Internal Coap-Proxy CA. - In the standard EJBCA LRA Enterprise open the System Functions drop-down menu in the top menu.
- Select Roles and Access Rules.
- Click Add to create a new role. Here we use 'CoAP Proxy Role' as a name.
- Click on Members next to the newly created role.
- The Members page opens:
- In the column Matching Value use coap-proxy as the Match Value for the common name.
- In the CA column choose the CA imported in Step 3.
If you have selected a different type, you must enter a different value. - Click Add within the Action column to continue.

- On the Roles and Access Rules page click on Access Rules next to the newly created role.
- On the Edit Access Rules page we select the Super Administrators as the role template initially but you should restrict the access of this role to your specific needs.
- Click Save.
- Finish the setup of the EST configuration according to EST Client Mode Configuration.