This guide describes how to configure SAML 2.0 Single Sign-On (SSO) for AgileSec Platform, including integration with Microsoft Entra ID and other SAML-compliant identity providers. It explains the required prerequisites, configuration steps, role mapping, and troubleshooting to enable secure federated authentication.
Overview
This guide provides instructions for configuring SAML 2.0 Single Sign-On (SSO) on the AgileSec Platform. AgileSec acts as the Service Provider (SP) and supports integration with SAML 2.0 identity providers.
SSO enables users to authenticate through your organization's Identity Provider and access the AgileSec Platform without maintaining separate credentials.
Prerequisites
Before beginning SSO configuration, ensure you have:
Required Permissions
On AgileSec Platform:
-
SaaS Deployment: Org Admin role
-
On-Premises Deployment: Platform Admin role
On Identity Provider:
-
Administrative access to create and configure applications
-
Ability to retrieve IdP metadata URLs
-
Permission to manage user groups and assignments
Web Configuration
To enable the SSO button on sign-in pages for on-premise, non-saas deployments, configure the following environment variables for AgileSec Frontend Web in config_envs/webui:
|
Variable Name |
Description |
|---|---|
|
|
Add |
|
|
Organization SAML ID from Service Provider Information. |
Restart the web service to apply the above settings changes.
Gather Service Provider Information from AgileSec
Step 1: Log into AgileSec Platform
Log into AgileSec Platform with your privileged role:
-
SaaS: Log in as Org Admin
-
On-Premises: Log in as a Platform Admin (e.g.,
adminuser)
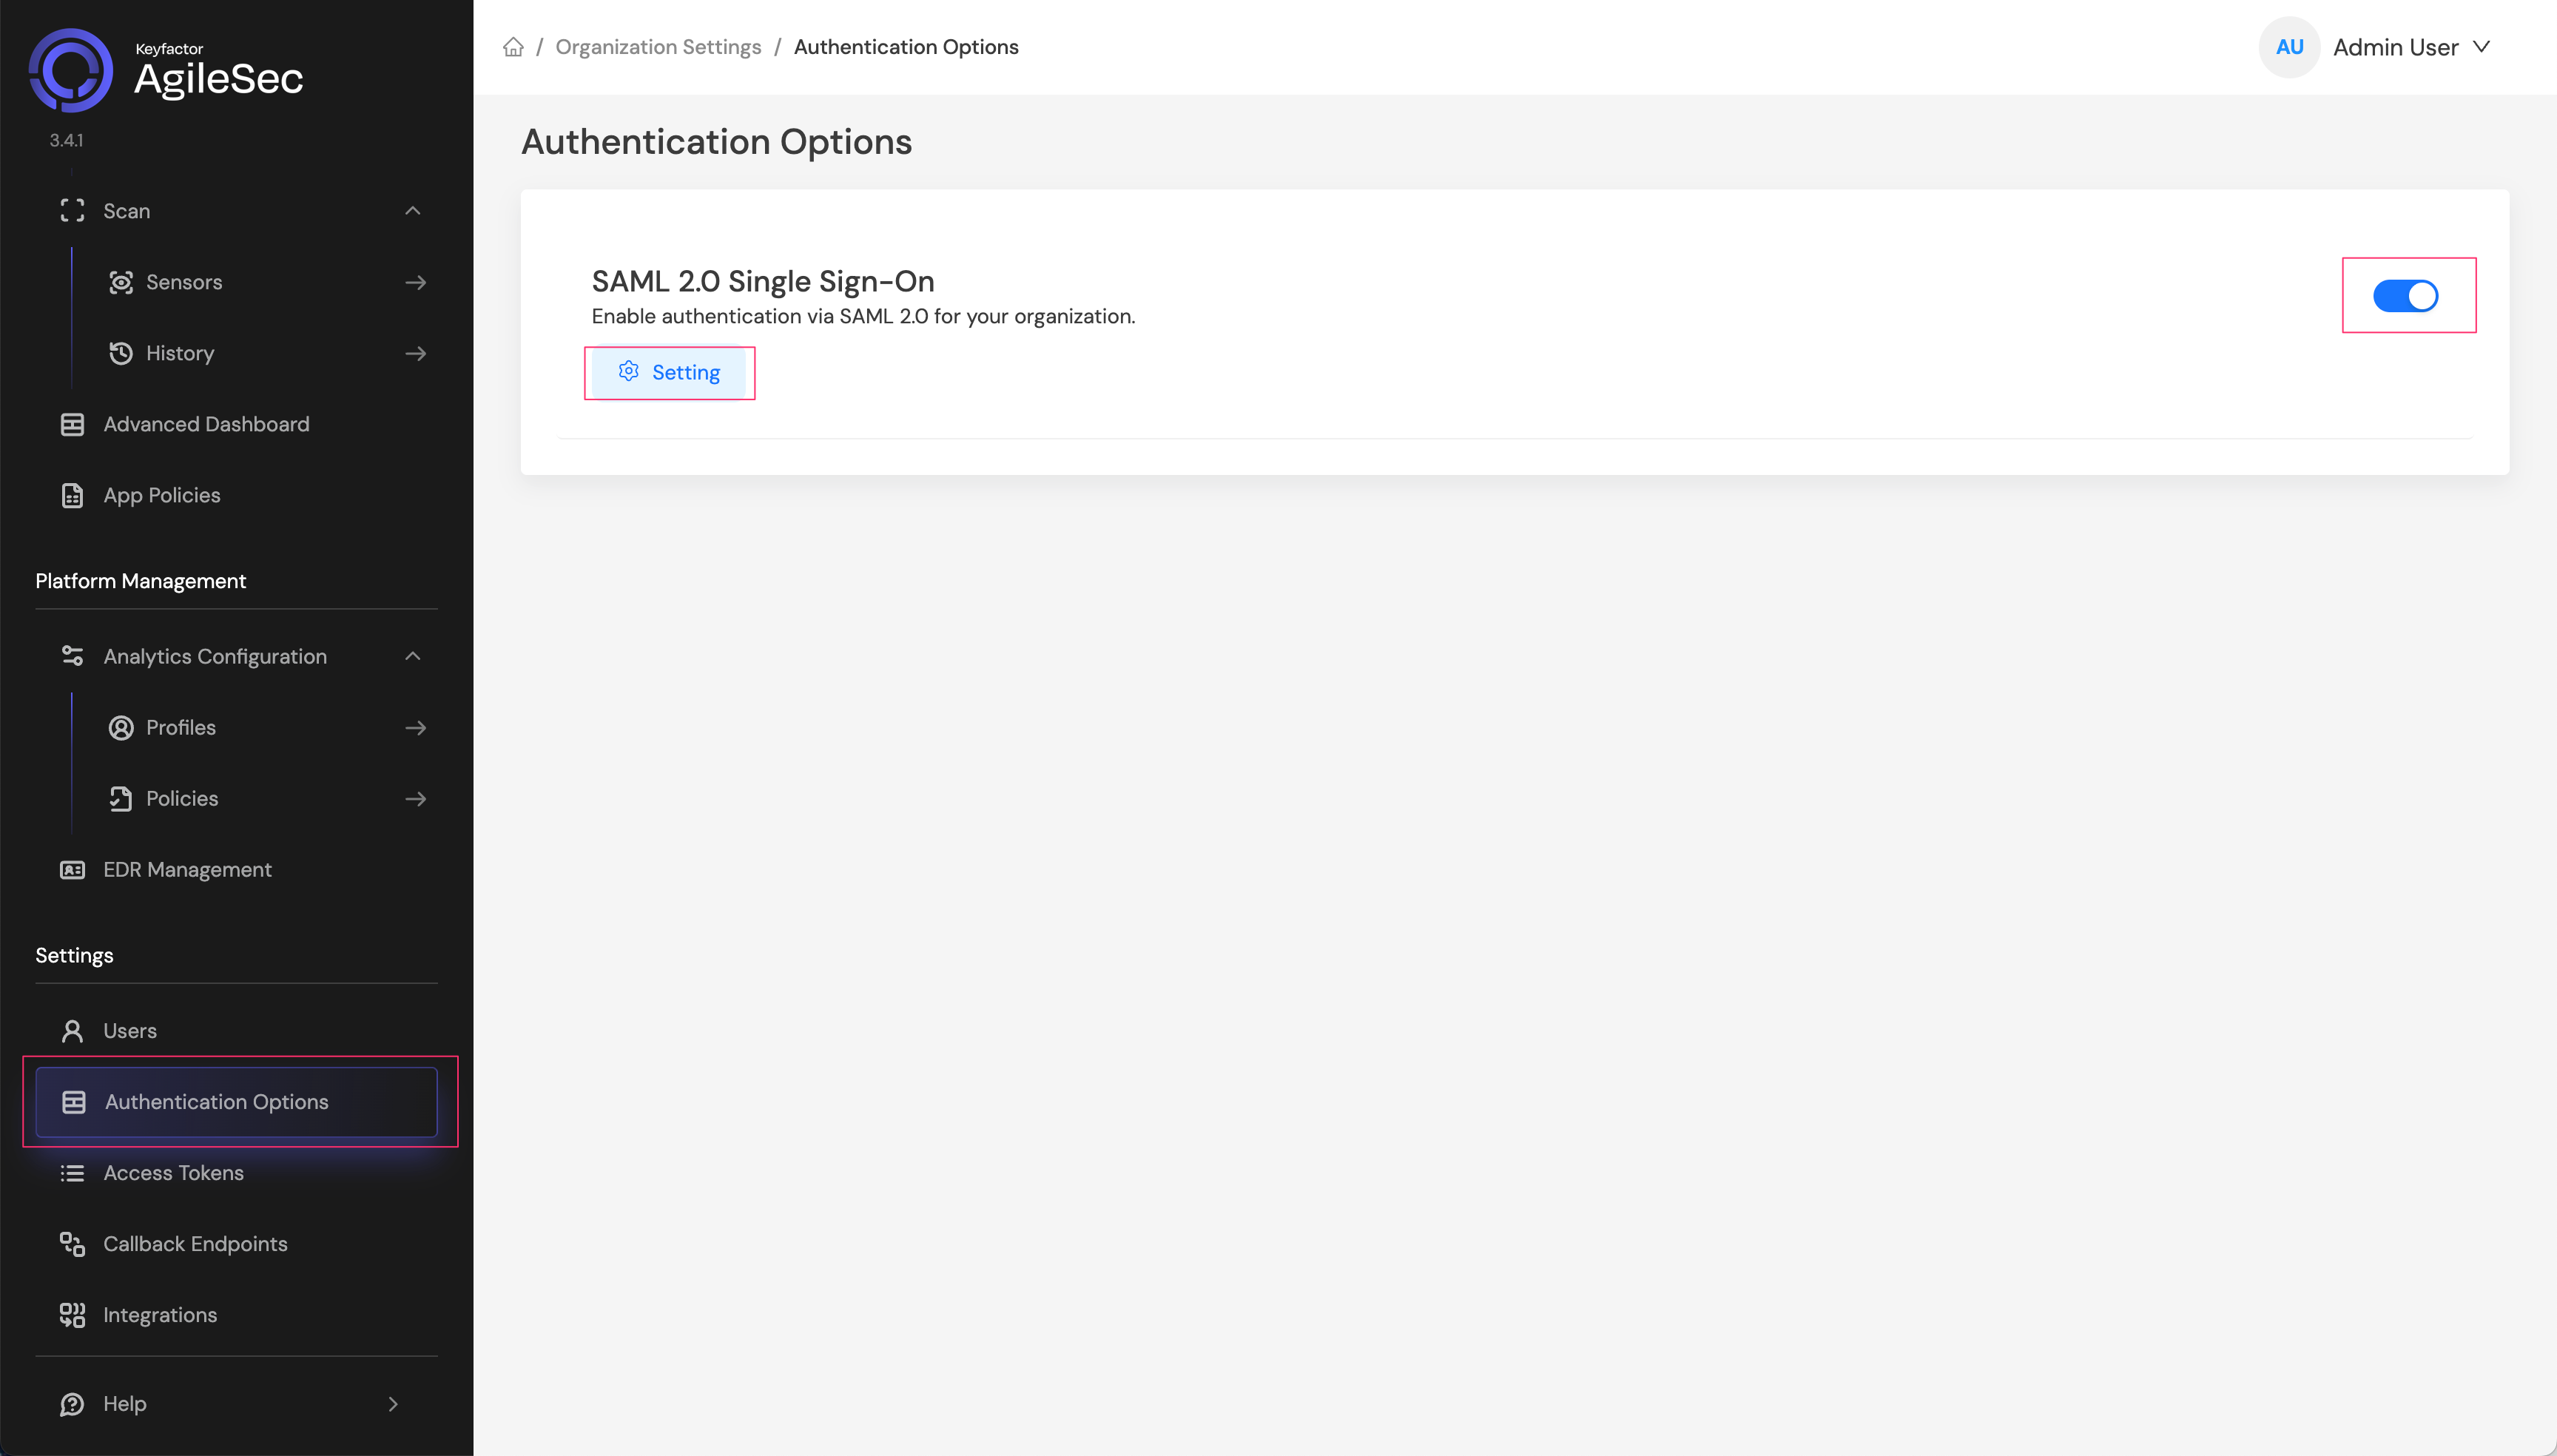
Step 2: Navigate to Authentication Options
Navigate to Settings > Authentication Options , toggle enable SAML 2.0 Single Sign-On , and click Settings:
Step 3: Get Service Provider Information
On SAML2.0 Single Sign-On Configuration screen locate the Service Provider Information section
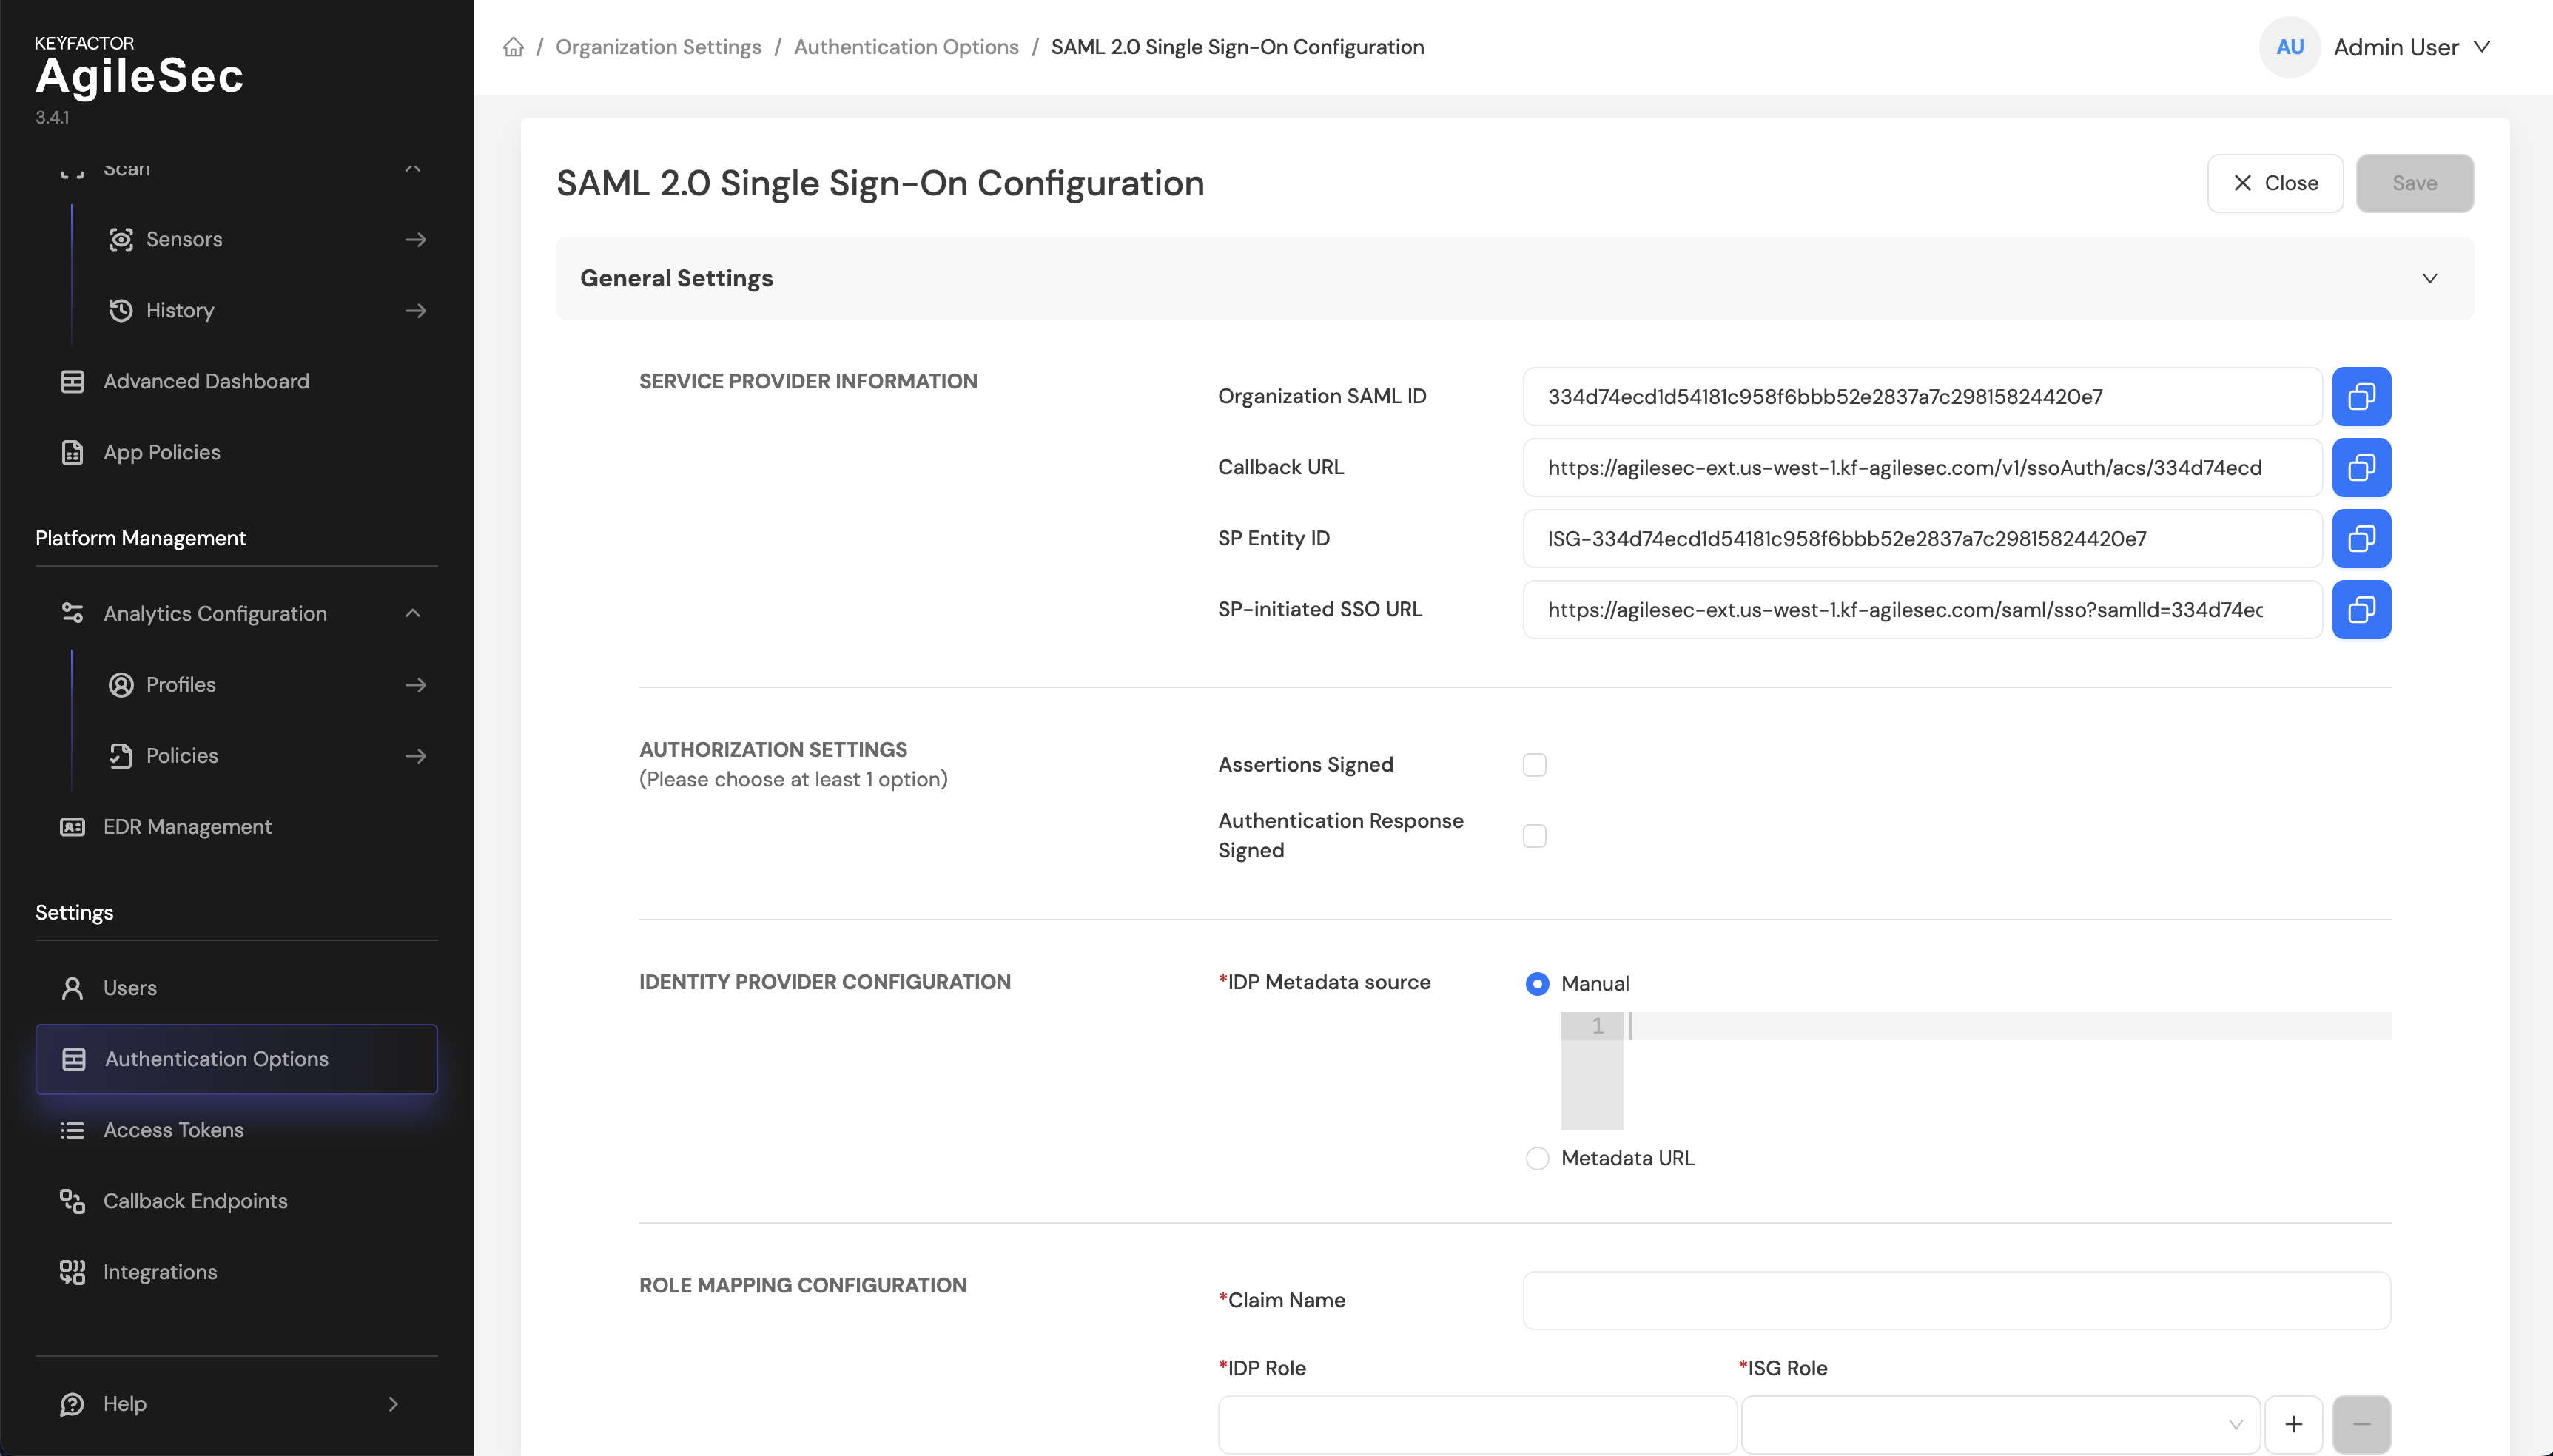
Note: If all fields under Service Provider Information are not filled, close and open settings again
Step 4: Copy Service Provider Information
Copy the following values exactly as displayed for later. Alternatively, keep this browser window open as you complete the remaining steps:
|
Field in AgileSec UI |
Description |
|---|---|
|
Organization SAML ID |
Your organization's unique SAML identifier in AgileSec |
|
SP Entity ID |
Unique SP identifier for AgileSec (format: Also known as Identifier (Entity ID). |
|
Callback URL |
Endpoint where Entra ID sends SAML responses. Also known as Reply URL. |
|
SP-initiated SSO URL |
(Optional) URL for initiating login flow. Also known as Sign on URL. |
SAML 2.0 SSO Setup
In order to configure SAML 2.0 SSO for AgileSec, this section goes through the following instructions:
-
Configuring your SAML 2.0 SSO Identity Provider
-
Configuring AgileSec Platform to trust your IdP
-
Testing the SSO configuration
Configure Your SAML 2.0 SSO Identity Provider
Step 1: Create SAML Application
-
Create a new SAML 2.0 application in your identity provider.
-
Use AgileSec Platform as the name or customize as needed.
Entra Example: Create Enterprise Application
-
Navigate to Azure Portal > Entra ID > Enterprise applications.
-
Click New application.
-
Click Create your own application.
-
Enter application name:
Keyfactor AgileSec. -
Select Integrate any other application you don't find in the gallery
-
Click Create.
Step 2: SAML Configuration
Configure the following SAML attributes in your IdP:
|
Setting |
Value |
Notes |
|---|---|---|
|
Single Sign-On URL / ACS URL |
Paste the Callback URL from Service Provider Information. |
This is where the IdP sends SAML responses |
|
Recipient URL |
Same as ACS URL |
Some IdPs require this separately |
|
Destination URL |
Same as ACS URL |
Some IdPs require this separately |
|
Audience URI / Entity ID |
Paste the SP Entity ID from Service Provider Information. |
Format: |
|
Name ID Format |
|
Use email address format |
|
Application Username |
Email address |
User's email should be sent as NameID |
Entra Example: Configure Basic SAML Settings
-
In your new Enterprise Application, go to Single sign-on.
-
Select SAML as the single sign-on method.
-
In the Basic SAML Configuration section, click Edit.
-
Configure the following with the gathered prerequisite Service Provider Information:
-
Identifier (Entity ID): Paste the SP Entity ID
-
Reply URL (Assertion Consumer Service URL): Paste the Callback URL
-
Sign on URL: (Optional) Paste the SP-initiated SSO URL
-
-
Click Save.
Step 3: Configure Group/Role Claim Attributes
For role mapping, configure your IdP to send user group memberships with the following:
-
Attribute Name: Configure a name for the group attribute (e.g.,
groups,roles,memberOf) -
Attribute Value: Configure to send user group memberships
-
Format: Set group names or identifiers to map to AgileSec roles
Important:
-
Document the exact attribute name you use (e.g.,
groups) – this will be yourcustomKey(API) or Claim Name (UI) in when submitting the configuration. -
Note the exact group names/identifiers your IdP sends – these must match exactly in role mapping (case-sensitive).
-
Ensure the attribute sends all relevant groups for each user.
Entra Example: Configure Group Claims for Role Mappings
-
In the Attributes & Claims section, click Edit.
-
Click Add a group claim.
-
Configure the group claim:
-
Select Security groups
-
Source attribute: Group ID
-
-
Click Save.
-
Note the group Claim name for use later. It is typically
http://schemas.microsoft.com/ws/2008/06/identity/claims/groups
Step 4: Configure User Attributes
Your IdP must send the following attributes in the SAML response for user profile mapping:
|
Attribute Name |
Attribute Value |
Purpose |
|---|---|---|
|
|
User's first name |
Maps to user profile first name |
|
|
User's last name |
Maps to user profile last name |
Note: The exact attribute names may vary by IdP. Some providers use givenName and surname. Document the attribute names you configure—you will need them when submitting the configuration.
Entra Example: Verify Name Attributes (optional but recommended)
To map first and last names to user profiles:
-
Verify the following claims are present in Attributes & Claims:
-
givenname→ User's first name -
surname→ User's last name
-
-
If not present, add them using the default mappings.
Step 5: Complete Application Setup
-
Save your SAML configuration.
-
Complete any additional provider-specific settings.
-
Ensure the application is enabled/active.
Step 6: Retrieve IdP SAML Metadata URL
Locate your Identity Provider's SAML metadata:
-
Find the SAML metadata section in your application configuration
-
Copy the SAML Metadata URL (also called Federation Metadata URL)
-
The URL typically ends with
/metadataorfederationmetadata.xml
Example formats:
-
Generic:
https://idp.example.com/app/app-id/sso/saml/metadata -
Okta:
https://dev-xxxx.okta.com/app/exk.../sso/saml/metadata -
Azure AD:
https://login.microsoftonline.com/{tenant}/federationmetadata/2007-06/federationmetadata.xml
Verify the metadata URL:
-
Open the URL in a browser
-
Confirm it returns XML content containing certificates and endpoints
-
If the URL is not publicly accessible, check if you need to whitelist AgileSec IP addresses
Save this URL - you will need it for submitting the configuration.
Entra Example: Retrieve IdP SAML (Federation) Metadata URL
-
In the SAML Certificates section locate App Federation Metadata URL.
-
Copy and save the complete URL for later.
-
Example format:
https://login.microsoftonline.com/{tenant-id}/federationmetadata/2007-06/federationmetadata.xml.
Step 7: Assign Users and Groups
-
Navigate to your identify provider’s user/group assignment section.
-
Assign the users or groups who should have access to AgileSec Platform.
-
Verify assigned users are members of groups you plan to map to AgileSec roles.
-
Ensure at least one test user is assigned with appropriate group membership.
Entra Example: Assign Users and Groups
-
Go to Users and groups.
-
Click Add user/group.
-
Select the users or groups who should have access to AgileSec Platform.
-
Assign and save.
Configure AgileSec Platform to Trust SAML 2.0 IdP
You may submit the configuration via AgileSec Platform’s UI or API.
Submit Configuration via UI
Step 1: Navigate to Configuration Page
-
Sign in to AgileSec with an Org Admin role (SaaS) or Platform Admin (On-Premises) role.
-
Navigate to: Settings > Authentication Options > SAML 2.0 Single Sign-On Configuration.
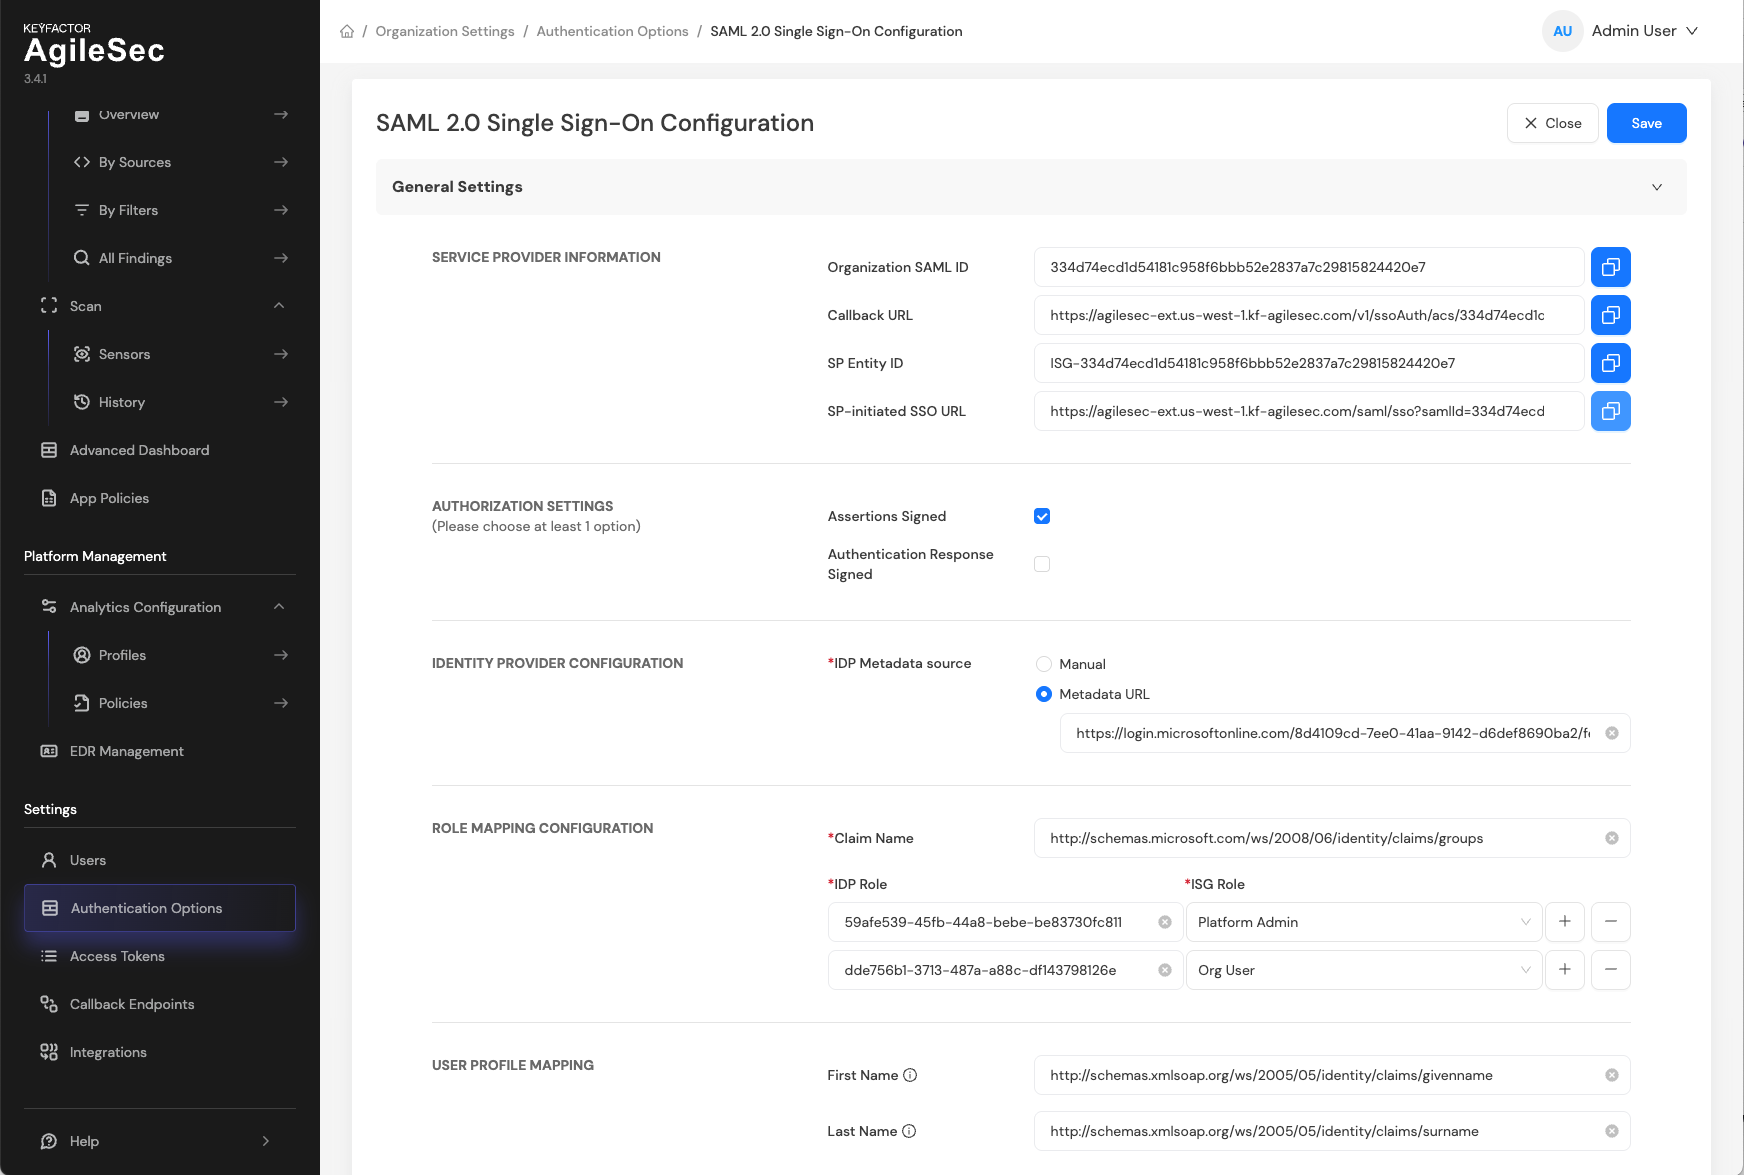
Step 2: Configuration
-
Authorization Settings
-
Assertions Signed: Enable (recommended)
-
Authentication Response Signed: Disabled (or enable based on your IdP configuration)
-
-
Identity Provider Configuration
-
Either paste IdP Federation metadata manually by selecting Manual or enter SAML Metadata URL to fetch information automatically.
-
-
Role Mapping Configuration
-
Claim Name: Enter the claim attribute name
-
For Entra groups, this is typically
http://schemas.microsoft.com/ws/2008/06/identity/claims/groups
-
-
Click + to add role mappings for each Azure AD group:
-
IDP Role: IdP Group/Role ID or name
-
For Entra, this is the Azure AD Group Object ID (GUID format)
-
-
AgileSec Role: Select the corresponding role (e.g.,
Platform Admin,Org Admin, orOrg User)
-
-
-
User Profile Mapping (Optional)
-
First Name Attribute: SAML attribute for user's first name
-
http://schemas.xmlsoap.org/ws/2005/05/identity/claims/givenname
-
-
Last Name Attribute: SAML attribute for user's last name
-
http://schemas.xmlsoap.org/ws/2005/05/identity/claims/surname
-
-
-
Click Save.
Submit Configuration via API
Step 1: Obtain Access Token
To submit configuration using the API, you first need to authenticate and obtain an access token.
Use the following curl command to get a web access token:
curl -X 'POST' \
  'https://<analytics external fqdn>/v1/organization/users/sign-in' \
  -H 'accept: */*' \
  -H 'Content-Type: application/json' \
  -d '{
  "staySignIn": true,
  "email": "admin@<agilesec-org-domain>",
  "password": "<admin password>"
  }'
Parameters:
-
<agilesec-platform-fqdn>: Your AgileSec Platform FQDN (e.g.,analytics.kf-agilesec.com). -
<agilesec-org-admin>: Your AgileSec Platform organization domain(e.g.,kf-agilesec.com). -
<admin-password>: The admin user password set during installation.
Example Response:
{
  "accessToken":"eyJhbGciOiJFUzM4NCIsInRva2VuVmVyc2lvbiI6IjAxIiwia2lkIjoiN2U5MDdlMGVlOTQwZGU5MmUyMTFlYzM3ZjZkNDQ2YWUifQ.eyJzdWIiOiIxNzcwNjYzODg0MTA3IiwiaXNzIjoic20tc2VydmljZSIsInR5cGUiOiJyb290IiwidXNlcklkIjoiNjk4NmIwYWUyNzFhZjFmMjliZWI1YzQ5Iiwib3JnSWQiOiI2OTg2YjBhZTI3MWFmMWYyOWJlYjVjMTciLCJhdWQiOiJpc2ctc2Vuc29yIiwiZmVhdHVyZXMiOlsiYW5hbHl0aWNzIl0sInJlZiI6IjE3NzA2NjM4ODQxMDciLCJuYmYiOjE3NzA2NjAyODQsImV4cCI6MTc3MDY2NTY4NCwiaXNnLXJvbGUiOiJrZi1hZ2lsZXNlY19jb20tYWRtaW4iLCJpYXQiOjE3NzA2NjAyODQsImVtYWlsIjoiYWRtaW5Aa2YtYWdpbGVzZWMuY29tIn0.AqpfE104NUeHvPZBlrbPDBXY3EJLMUK6Pt6qdRiPo8KACuy5QlTxDKrziXgqT1TWWf6rFQ_7WrFsOhAYcDCVF7j2NLoe69a7pCv0rYVshJdoO-6yr1_LwaVAZHCXW5NY",
  "refreshToken":"eyJhbGciOiJFUzM4NCIsInRva2VuVmVyc2lvbiI6IjAxIiwia2lkIjoiN2U5MDdlMGVlOTQwZGU5MmUyMTFlYzM3ZjZkNDQ2YWUifQ.eyJzdWIiOiIxNzcwNjYzODg0MTA3IiwiaXNzIjoic20tc2VydmljZSIsInR5cGUiOiJyb290IiwidXNlcklkIjoiNjk4NmIwYWUyNzFhZjFmMjliZWI1YzQ5Iiwib3JnSWQiOiI2OTg2YjBhZTI3MWFmMWYyOWJlYjVjMTciLCJhdWQiOiJpc2ctc2Vuc29yIiwiZmVhdHVyZXMiOlsiYW5hbHl0aWNzIl0sInJlZiI6IjE3NzA2NjM4ODQxMDciLCJuYmYiOjE3NzA2NjAyODQsImV4cCI6MTc3MDc1MDI4NCwiaXNnLXJvbGUiOiJrZi1hZ2lsZXNlY19jb20tYWRtaW4iLCJpYXQiOjE3NzA2NjAyODQsImVtYWlsIjoiYWRtaW5Aa2YtYWdpbGVzZWMuY29tIn0.gj6y-7OzDdB_Z_ieakN4QaqnTauTm554iiEVcX45jFfG_VDHaZRmjLRhz33_urxrxHpL1ytt-tiW1cIQzvPOFwjU2MPsn7JdoXWysUuBtA4Uj1oR_c7c1Y2ZgBZLUST-",
  "identifyToken":"eyJhbGciOiJFUzM4NCIsInRva2VuVmVyc2lvbiI6IjAxIiwia2lkIjoiN2U5MDdlMGVlOTQwZGU5MmUyMTFlYzM3ZjZkNDQ2YWUifQ.eyJzdWIiOiIxNzcwNjYzODg0MTA3IiwiaXNzIjoic20tc2VydmljZSIsInR5cGUiOiJyb290IiwidXNlcklkIjoiNjk4NmIwYWUyNzFhZjFmMjliZWI1YzQ5Iiwib3JnSWQiOiI2OTg2YjBhZTI3MWFmMWYyOWJlYjVjMTciLCJhdWQiOiJpc2ctc2Vuc29yIiwiZmVhdHVyZXMiOlsiYW5hbHl0aWNzIl0sInJlZiI6IjE3NzA2NjM4ODQxMDciLCJuYmYiOjE3NzA2NjAyODQsImV4cCI6MTc3MTI2ODY4NCwiaXNnLXJvbGUiOiJrZi1hZ2lsZXNlY19jb20tYWRtaW4iLCJpYXQiOjE3NzA2NjAyODQsImVtYWlsIjoiYWRtaW5Aa2YtYWdpbGVzZWMuY29tIn0.bQAxWAEaZ_biYxrAcJBkGgoqCbS7EhvrSvLc2j_zkcBLC_pZkDujbwEgpvcGoQvNZHzZ4_dptcI6dEkBSA4Bdy2bXlcaYioEAJ6to82nD2vmca833G48o6LMBp77Z17A",
  "tokenExpireAt":"2026-02-09T19:34:44.107Z",
  "refreshTokenExpireAt":"2026-02-10T19:04:44.124Z",
  "identifyTokenExpireAt":"2026-02-16T19:04:44.125Z",
  "type":"root",
  "name":"Admin User",
  "firstName":"Admin",
  "lastName":"User",
  "defaultOrg":true
}
Copy the accessToken value from the response. You will use this token when submitting the configuration.
Step 2: Create Configuration File
Create a json file named idp-config.json with your IdP SAML metadata URL and other SSO configuration details:
{
  "orgSamlId": "<orgSAMLId>",
  "idpMetadata": "metadata_url",
  "metadataUrl": "<metadata url>",
  "wantAssertionsSigned": true,
  "wantAuthnResponseSigned": false,
  "signatureAlgorithm": "sha256",
  "customKey": "http://schemas.microsoft.com/ws/2008/06/identity/claims/groups",
  "rolesMapping": [
    {
      "idp": "<group id of admin group from Entra ID>",
      "isg": "admin"
    },
    {
      "idp": "<group id of user group from Entra ID",
      "isg": "user"
    }
  ],
  "nameMapping": {
    "firstName": "http://schemas.xmlsoap.org/ws/2005/05/identity/claims/givenname",
    "lastName": "http://schemas.xmlsoap.org/ws/2005/05/identity/claims/surname"
  }
}
If the SAML Metadata URL is not accessible from the AgileSec Platform, you can configure the IdP metadata manually:
-
Go to your IdP's SAML metadata URL.
-
Copy the entire XML content.
-
Escape all double quotes (
") as\". -
Replace all line breaks with
\nto make it a single line string. -
Set
idpMetadata: "manual"and paste the escaped XML string intometadataUrl.
{
  "orgSamlId": "<orgSAMLId>",
  "idpMetadata": "manual",
  "metadataUrl": "<md:EntityDescriptor xmlns:md=\"urn:oasis:names:tc:SAML:2.0:metadata\" entityID=\"http://www.okta.com/exkz624hhp\">\r\n<script id=\"magic-eden-extension\" data-extension-id=\"mkpegjkblkkefacfnmkajcjmabijhclg\"/>\r\n<md:IDPSSODescriptor WantAuthnRequestsSigned=\"false\" protocolSupportEnumeration=\"urn:oasis:names:tc:SAML:2.0:protocol\">\r\n<md:KeyDescriptor use=\"signing\">\r\n<ds:KeyInfo xmlns:ds=\"http://www.w3.org/2000/09/xmldsig#\">\r\n<ds:X509Data>\r\n<ds:X509Certificate>MIIDtDCCApygAwIB...HRWpIiFO8H7Q==</ds:X509Certificate>\r\n</ds:X509Data>\r\n</ds:KeyInfo>\r\n</md:KeyDescriptor>\r\n<md:NameIDFormat>urn:oasis:names:tc:SAML:1.1:nameid-format:emailAddress</md:NameIDFormat>\r\n<md:SingleSignOnService Binding=\"urn:oasis:names:tc:SAML:2.0:bindings:HTTP-POST\" Location=\"https://sample.okta.com/app/sample_agilesec/exkz624hhp/sso/saml\"/>\r\n<md:SingleSignOnService Binding=\"urn:oasis:names:tc:SAML:2.0:bindings:HTTP-Redirect\" Location=\"https://sample.okta.com/app/sample_agilesec/exkz624hhp/sso/saml\"/>\r\n</md:IDPSSODescriptor>\r\n</md:EntityDescriptor>",
  "wantAssertionsSigned": true,
  "wantAuthnResponseSigned": false,
  "signatureAlgorithm": "sha256",
  "customKey": "http://schemas.microsoft.com/ws/2008/06/identity/claims/groups",
  "rolesMapping": [
    {
      "idp": "<group id of admin group from Entra ID>",
      "isg": "admin"
    },
    {
      "idp": "<group id of user group from Entra ID",
      "isg": "user"
    }
  ],
  "nameMapping": {
    "firstName": "http://schemas.xmlsoap.org/ws/2005/05/identity/claims/givenname",
    "lastName": "http://schemas.xmlsoap.org/ws/2005/05/identity/claims/surname"
  }
}
Parameter Descriptions:
The following parameters are used when submitting the configuration:
|
API Parameter |
Description |
Entra Example Value |
Other IdP Value |
|---|---|---|---|
|
|
Your organization's AgileSec SAML identifier from the Service Provider Information |
Organization SAML ID from the Service Provider Information |
Organization SAML ID from the Service Provider Information |
|
|
Metadata source type |
|
|
|
|
IdP federation metadata URL |
Example format: |
|
|
|
Require signed SAML assertions |
|
|
|
|
Require signed SAML response |
|
|
|
|
Signature algorithm |
|
|
|
|
Claim or group/role attribute name containing groups |
|
Examples:
|
|
|
Array mapping Entra ID groups to AgileSec roles |
See below |
See below |
|
|
Exact group name/identifier from IdP |
Group Object ID (GUID) of user group from Entra ID |
Must match exactly (case-sensitive) |
|
|
AgileSec Platform role |
|
|
|
|
Attribute mappings for user profile |
See below |
See below |
|
|
(Optional) SAML attribute for user’s first name |
|
Common values: |
|
|
(Optional) SAML attribute for user’s last name |
|
Common values: |
Step 3: Submit configuration
Submit the IdP configuration using the following curl command:
curl -X 'POST' \
  'https://<agilesec-platform-fqdn>/v1/organization/idp-config' \
  -H 'Content-Type: application/json' \
  -H 'Authorization: Bearer <access-token>' \
  -d @idp-config.json
Parameters:
-
<agilesec-platform-fqdn>: Your AgileSec Platform FQDN (e.g.,analytics.kf-agilesec.com) -
<access-token>: TheaccessTokenvalue obtained in Step 1. -
idp-config.json: The JSON configuration file created in Step 2.
Example:
curl -X 'POST' \
  'https://analytics.kf-agilesec.com/v1/organization/idp-config' \
  -H 'Content-Type: application/json' \
  -H 'Authorization: Bearer eyJhbGciOiJFUzM4NCIsInRva2VuVmVyc2lvbiI6IjAxIi...' \
  -d @idp-config.json
Expected Response:
Upon successful configuration, you will receive an HTTP 201 Created status code with a response payload containing the saved configuration:
Test SAML 2.0 SSO
-
Open an incognito/private browser window.
-
Go to SP initiate URL from Service Provider Information.
-
Verify successful login and correct role assignment.
SSO Flow Comparison
|
Aspect |
SP-Initiated Flow (URL) |
SP-Initiated Flow (One-click) |
IdP-Initiated Flow |
|---|---|---|---|
|
Starting Point |
URL |
AgileSec Sign-in Page |
Identity Provider portal |
|
User Action |
Enter SP Initiated URL in browser |
Click SSO sign-in button on Sign-in Page |
Select AgileSec application from your IdP |
|
Initial Request |
AgileSec sends AuthN Request to IdP |
AgileSec sends AuthN Request to IdP |
IdP directly sends SAML Response |
|
Best For |
Direct access to AgileSec |
Direct access to AgileSec |
Centralized app portal access |
|
URL Pattern |
|
Web redirection |
IdP app launcher |
|
Common Use |
Bookmarked access |
Quick access in Self-hosted application |
Daily workflow from IdP dashboard |
Troubleshooting
"CLAIM_NAME_NOT_FOUND" Error
Symptoms:
-
Login fails with error message about missing claim
-
User cannot complete authentication
Cause: The SAML attribute (claim) name configured in customKey for user roles is not returned by the Identity Provider in the SAML response..
Solution:
For Entra ID:
-
Verify the group claim is configured in Attributes & Claims.
-
Ensure the claim name in Entra ID matches the
customKeyin AgileSec configuration. -
Check the claim name includes the full URI if required.
For Okta or other SAML 2.0:
-
Verify the Group Attribute Statement is configured.
-
Ensure the attribute Name matches the
customKeyin AgileSec configuration. -
Check if the filter is returning groups for test users.
Issue: "INVALID_ROLE_MAPPING" Error
Symptoms:
-
Login fails with error about invalid role.
-
User authenticates but cannot access platform.
Cause: The SAML claim specified in customKey is present in the SAML response, but its value does not match any entry in the rolesMapping configuration.
Solution:
For Entra ID:
-
Use the Group Object ID (GUID format), not the display name.
-
Verify the Object ID is copied correctly (no extra spaces).
-
Check if test users are members of mapped groups.
-
Example correct format:
"idp": "a1b2c3d4-5678-90ab-cdef-1234567890ab"
For Okta or other SAML 2.0:
-
Use the exact group name as it appears in Okta.
-
Verify case-sensitivity:
Okta-Admins≠okta-admins. -
Check if test users are assigned to mapped groups.
-
Verify the group filter is including the correct groups.
Issue: Signature Validation Failed
Symptoms:
-
Login fails with signature or certificate error
-
Error message mentions signature verification
Cause: SAML signature cannot be verified against IdP certificate.
Solution:
-
Verify Metadata URL:
-
Ensure
metadataUrlis correct and accessible. -
Test URL in browser to confirm it returns XML.
-
Check for network/firewall issues.
-
-
Check Signing Configuration:
-
For
wantAssertionsSigned: true→ IdP must sign the Assertion element. -
For
wantAuthnResponseSigned: true→ IdP must sign the Response element. -
Verify signing is enabled in IdP configuration.
-
-
Verify Algorithm:
-
Ensure
signatureAlgorithmmatches IdP configuration. -
Most providers use
sha256.
-
Issue: User Profile Not Updated
Symptoms:
-
User login succeeds but name is missing or incorrect
-
User profile shows placeholder values
Cause: Name attributes are not being mapped correctly from SAML response.
Solution:
For Entra ID:
-
Verify
givennameandsurnameclaims are present in Attributes & Claims. -
Ensure
nameMappinguses full schema URIs inidp-config.json:
   "nameMapping": {
     "firstName": "http://schemas.xmlsoap.org/ws/2005/05/identity/claims/givenname",
     "lastName": "http://schemas.xmlsoap.org/ws/2005/05/identity/claims/surname"
   }
For Okta or other SAML 2.0:
-
Verify attribute statements for
firstNameandlastNameare configured -
Ensure attribute mappings match
idp-config.json:
   "nameMapping": {
     "firstName": "firstName",
     "lastName": "lastName"
   }
Issue: Access Denied After Successful Login
Symptoms:
-
User can log in but sees "Access Denied" or insufficient permissions
-
Dashboard or features not accessible
Cause: User's role is not granted required permissions.
Solution:
-
Verify Group Membership:
-
Check user is member of correct group in IdP.
-
For Entra ID: Check Security Group membership.
-
For Okta: Check Group assignments.
-
-
Verify Role Assignment:
-
Confirm mapped group grants appropriate AgileSec role.
-
Check
rolesMappingconfiguration includes user's group. -
Verify
isgrole value is valid (e.g.,root,admin).
-
-
Check Group Filter:
-
For Okta: Verify group filter regex includes user’s groups
-
Ensure filter pattern:
.*or specific pattern matches
-
Issue: Metadata URL Not Accessible
Symptoms:
-
Configuration fails when submitting to AgileSec
-
Error about unable to fetch metadata
Cause: AgileSec cannot access the IdP metadata URL.
Solution:
-
Verify URL Accessibility:
-
Test metadata URL from AgileSec server (not just your browser).
-
Check for network/firewall restrictions.
-
Ensure URL is publicly accessible or whitelisted.
-
-
Check URL Format:
-
Verify complete URL including protocol (
https://). -
Ensure no extra spaces or characters.
-
Confirm URL returns valid XML.
-
-
Network Configuration:
-
Check if AgileSec server can reach IdP endpoints.
-
Verify DNS resolution.
-
Check for proxy requirements.
-
-
Alternative: Manual Metadata Configuration
-
If the Metadata URL is not accessible from the AgileSec Platform (e.g., due to firewall restrictions), you can configure the IdP metadata manually by pasting the XML content directly.
-