Bull TrustWay Proteccio integration in Kubernetes
ENTERPRISE
The Bull TrustWay Proteccio HSM (also known as Atos or Eviden Trustway Proteccio) sidecar container enables integrating the application container to a network attached TrustWay Proteccio HSM. The following covers how to set up the integration in Kubernetes.
For more general information on the HSM integration with PKCS#11, see HSM Integration.
Prerequisites
Before using this container, you need the following:
TrustWay Proteccio HSM with fully configured secured network access. The EJBCA deployment will be configured with:
server certificates
client certificates
client public and private keys
Administrative access on the HSM for registering a client and assigning partitions to the client.
The P11 Proxy must have network access to the HSM service (security groups, network ACLs, etc)
An existing key pair credential for the client, i.e. the HSM driver container, to communicate with the HSM.
HSM driver container deployment parameters
The following lists parameters for the HSM sidecar container.
Volume mounts
The volume mount parameters are mandatory and need only be configured in the HSM sidecar container. These mounts are defined via the Helm chart under the hsm.bullproteccio section, using a combination of ConfigMap and Secret resources.
You can verify the configuration by checking the corresponding files inside the container after deployment.
Description | Mount point | Mandatory |
|---|---|---|
Client certificate to communicate with HSM |
| Yes |
Client private key for HSM communication |
| Yes |
Client public key for secure channel communication with HSM |
| Yes |
Client private key for secure channel communication with HSM Recommended to be configured as Kubernetes secrets. |
| Yes |
|
| Yes |
hsms.json file should have the following structure:
{
  "hsms": [
    {
        "id": "<id-of-first-hsm>",
        "hostname": "<hostname-or-ip-of-first-hsm>",
        "serverPem": "<PEM-encoded-server-certificate>",
        "serverSecChannelPem": "<PEM-encoded-ec-brainpoolP512r1-public-key>"
    },
    {
        "id": "<id-for-second-hsm>",
        "hostname": "<hostname-or-ip-of-second-hsm>",
        "serverPem": "<PEM-encoded-server-certificate>",
        "serverSecChannelPem": "<PEM-encoded-ec-brainpoolP512r1-public-key>"
    }
  ]
}
Prepare HSM configuration
The following assumes that the server certificate and client credentials are already available.
Configure the server and client credentials:
Create a Secret for
hsms.jsonThe file name inside the secret must be
hsms.json.Replace
<namespace>with your deployment's namespace.The name of this secret must be referenced later in the Helm
values.yaml.For an example using a single HSM, see hsms.json.
BASHkubectl create secret generic -n <namespace> hsm-bullproteccio-hsms-json-secret \ --from-file=hsms.json=hsms.json
Create a Kubernetes
Secretwith the client private keys to communicate with the HSM.The file names inside the secret must be
proteccio_client.keyandproteccio_client_sec_priv.key.Replace
<namespace>with your deployment's namespace.The name of this secret must be referenced later in the Helm
values.yaml.BASHkubectl create secret generic -n <namespace> hsm-bullproteccio-secret-client-key \ --from-file=proteccio_client.key=proteccio_client.key \ --from-file=proteccio_client_sec_priv.key=proteccio_client_sec_priv.key
Create a Kubernetes
ConfigMapto configure the HSM client certificate and client public key.The HSM client certificate and client secure channel public key values in the
values.yamlmay be adjusted in the next section.
Example (certificate contents truncated):
apiVersion: v1
kind: ConfigMap
metadata:
  name: hsm-bullproteccio-configmap
data:
  proteccio_client.crt: |
    -----BEGIN CERTIFICATE-----
    MIIDOTCCAiGgAwIBAgIBADANBgkqhkiG9w0BAQsFADBgMQswCQYDVQQGEwJDQTEQ
    .....truncated.....
    OaIJWeLzCzXw4bzKbl5VvfwXmrTyCh0wHgN+E1VOhv8s2HhA3/Mzujb1VhPDCT0Z
    LP1EfFulatVU0dtbQg==
    -----END CERTIFICATE-----
  proteccio_client_sec_pub.key: |
    -----BEGIN PUBLIC KEY-----
    MFkwEwYHKoZIzj0CAQYIKoZIzj0DAQcDQgAE0fs/mWyxvn+BpkKskSZEKu8Mh67x
    9wuk8a5oi+IBj9aPM/A6U4thxPhnDB3OQGbJC/Hmrtj5aLbhevLEg3IfCQ==
    -----END PUBLIC KEY-----
Configure Deployment
The following provides an example of customizing the deployment using Helm. Note that the Helm chart values file values.yaml describes an example test deployment and does not include:
Database connection.
Configured
imagePullSecretsthat may be required.EJBCA license as secret in
ejbca.licenseTLS connection required after the deployment and creation of the CAs.
Ensure that the deployment is allowed an Egress to the physical HSM.
Example configuration
Make sure to adjust the values for the HSM configmap and required secrets.
Mount hsms.json with hsm.bullproteccio.hsms_json_secret attribute. Note that the secret is created in the first step.
#imagePullSecrets: []
ejbca:
license: ejbca-license-secret
env:
TLS_SETUP_ENABLED: "later"
LOG_AUDIT_TO_DB: true
#################### HSM configuration - start ####################
hsm:
enabled: true
bullproteccio:
enabled: true
hsms_json_secret: "hsms-json-secret"
credentials:
certificates:
configMap: "hsm-bullproteccio-configmap"
privateKey:
secret: "hsm-bullproteccio-secret-client-key"
#################### HSM configuration - end ####################
podSecurityContext:
fsGroup: 10001
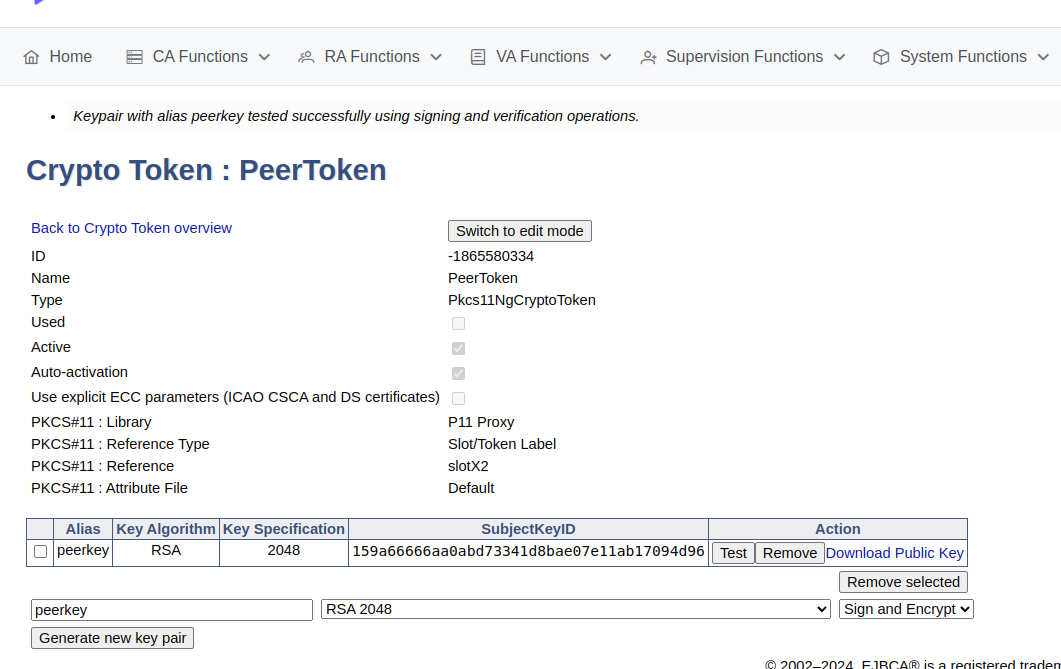
# Ingress or LoadBalancer configuration skippedCreate and verify HSM crypto token
To create a crypto token and then test the HSM key, do the following:
In the EJBCA menu, click CA Functions > Crypto Tokens.
Click Create new and specify the following on the New Crypto Token page:
Name: Specify a name for the crypto token.
Type: Select PKCS#11 NG.
Auto-activation: Select use to allow EJBCA to save the password and reapply it after a restart so that the CA is always available.
For PKCS#11 : Reference Type, select Slot/Token Label.
For PKCS#11 : Reference, select one of the listed slots available in the HSM.
Authentication Code: Enter a password for auto-activation, the same as provided for the slot or token in the HSM.
Click Save to create the crypto token.
Once created, you can generate new key pairs or view any existing key pairs on the HSM.
To verify that the HSM key is operational, click Test.
Advanced deployments
The EJBCA Enterprise configuration export/import tool EJBCA ConfigDump allows you to deploy EJBCA with automation. For information on deploying EJBCA with automation, using a soft HSM integration suitable for testing, see Deploy EJBCA as CA with automation with SoftHSM2.
Bull TrustWay Proteccio HSM (also known as Atos or Eviden Trustway Proteccio) installations can also be automated using the EJBCA ConfigDump tool. For information on how to configure the tool in Kubernetes, see EJBCA Configdump in Kubernetes.