Entrust nShield Connect integration in Kubernetes
ENTERPRISE
The nShield Connect HSM sidecar container enables integrating the application container to an Entrust nShield Connect HSM. The following covers how to set up the integration in Kubernetes.
For more general information on the HSM integration with PKCS#11, see HSM Integration.
Prerequisites
Before using this container, you need the following:
You can connect up to two HSMs to an EJBCA installation. These HSMs should be configured as a cluster beforehand.
nShield HSM: A functioning nShield HSM with fully configured secure network access. The EJBCA deployment will be configured with:
IP address/hostname
Port
Electronic Serial Number (ESN) of the HSM
HKNETI (Hash of the KNETI key of the HSM)
Remote File Server (RFS): A working RFS with secure network access. The EJBCA deployment will be configured with:
IP address/hostname
Port
Mode
HSM driver container deployment parameters
The following parameters are required for configuring the HSM driver container. Update these values based on your setup.
Name | Description | Comments |
|---|---|---|
HSM_IP | The IP Address or FQDN of the HSM that the client will connect to. | Default: None |
HSM_PORT | The port of the HSM. | Default: None |
HSM_ESN | Electronic Serial Number (ESN) of the HSM. | Default: None |
HSM_HKNETI | Hash of the KNETI key of the HSM. | Default: None |
HSM_IP2 | Similar for 2nd HSM | Default: None |
HSM_PORT2 | Similar for 2nd HSM | Default: None |
HSM_ESN2 | Similar for 2nd HSM | Default: None |
HSM_HKNETI2 | Similar for 2nd HSM | Default: None |
RFS_IP | The IP Address or FQDN of the Remote File Server (RFS). | Default: None |
RFS_PORT | The port of the Remote File Server. | Default: None |
RFS_MODE | The connection mode of the Remote File Server. Accepted values are | Default: None RFS_MODE Options:
|
Prepare HSM configuration
Create a Kubernetes secret to store the HSM and Remote File Server (RFS) parameters:
kubectl create secret generic nshield-secret \
	--from-literal=HSM_IP='192.168.34.101' \
	--from-literal=HSM_PORT='9004' \
	--from-literal=HSM_ESN='291F-03E0-8970' \
	--from-literal=HSM_HKNETI='dbbcb19108b208811dc2993ae7b8b878aee3f234' \
	--from-literal=RFS_IP='192.168.34.101' \
	--from-literal=RFS_PORT='9005' \
	--from-literal=RFS_MODE='readonly'
Or in case of two HSMs in cluster:
kubectl create secret generic nshield-secret \
	--from-literal=HSM_IP='192.168.34.101' \
	--from-literal=HSM_PORT='9004' \
	--from-literal=HSM_ESN='291F-03E0-8970' \
	--from-literal=HSM_HKNETI='dbbcb19108b208811dc2993ae7b8b878aee3f234' \
	--from-literal=HSM_IP2='192.168.34.102' \
	--from-literal=HSM_PORT2='9004' \
	--from-literal=HSM_ESN2='793A-02AB-2268' \
	--from-literal=HSM_HKNETI2='6fcdb1910af56be45b1910a8811e3f2348aee3f2' \
	--from-literal=RFS_IP='192.168.34.101' \
	--from-literal=RFS_PORT='9005' \
	--from-literal=RFS_MODE='readonly'
Replace the HSM_IP, HSM_PORT, HSM_ESN, HSM_HKNETI, RFS_IP, RFS_PORT, and RFS_MODE values with your actual configuration.
Configure Deployment
The following provides an example of customizing the deployment using Helm. Configure the hsm section to use the nshield HSM with the ConfigMap just created.
Note that the Helm chart values file values.yaml describes an example test deployment and does not include:
Database connection.
Configured
imagePullSecretsthat may be required.TLS connection required after the deployment and creation of the CAs.
ejbca:
  env:
    TLS_SETUP_ENABLED: "later"
    LOG_AUDIT_TO_DB: true
#################### HSM configuration - start ####################
hsm:
  enabled: true
  nshield:
    enabled: true
    hsmConfigurationSecret: "nshield-secret"
#################### HSM configuration - end ####################
# needed to make hsm volume mount to work
podSecurityContext:
  fsGroup: 10001
ingress:
  enabled: true
  className: "nginx"
  annotations:
    nginx.ingress.kubernetes.io/auth-tls-verify-client: "optional_no_ca"
    #nginx.ingress.kubernetes.io/auth-tls-secret: "default/ejbca-ingress-trust-secret"
    nginx.ingress.kubernetes.io/auth-tls-pass-certificate-to-upstream: "true"
    nginx.ingress.kubernetes.io/auth-tls-verify-depth: "1"
  hosts:
    - host: "nshield.ejbca.com"
      paths:
        - path: /
          pathType: Prefix
Create and verify HSM crypto token
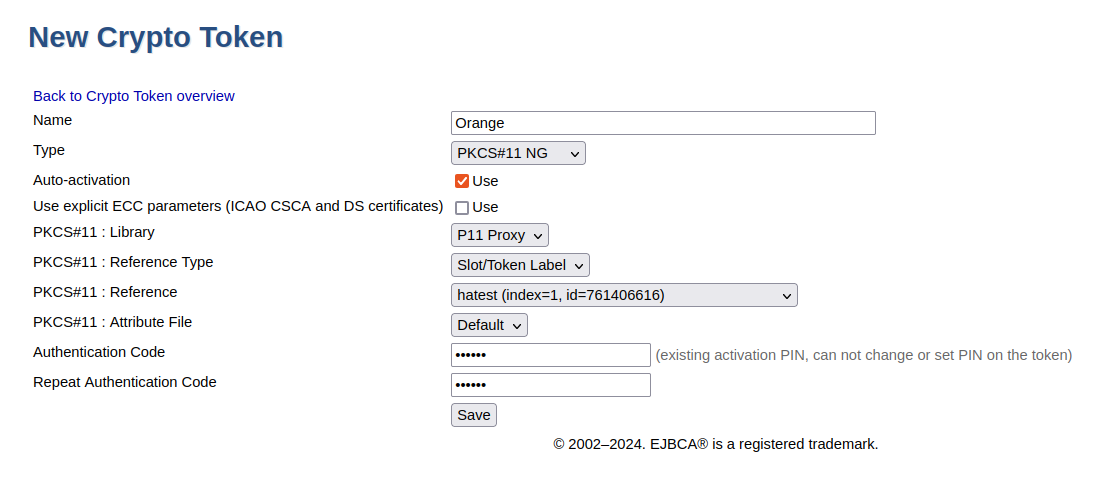
To create a crypto token and then test the HSM key, do the following:
In the EJBCA menu, click CA Functions > Crypto Tokens.
Click Create new and specify the following on the New Crypto Token page:
Name: Specify a name for the crypto token.
Type: Select PKCS#11 NG.
Auto-activation: Select use to allow EJBCA to save the password and reapply it after a restart so that the CA is always available.
For PKCS#11 : Reference Type, select Slot/Token Label.
For PKCS#11 : Reference, select one of the listed slots available in the HSM.
Authentication Code: Enter your HSM PIN code (provided by the HSM administrator).
Click Save to create the crypto token.
Once created, you can generate new key pairs or view any existing key pairs on the HSM.
To verify that the HSM key is operational, click Test.

Advanced deployments
The EJBCA Enterprise configuration export/import tool EJBCA ConfigDump allows you to deploy EJBCA with automation. For information on deploying EJBCA with automation, using a soft HSM integration suitable for testing, see Deploy EJBCA as CA with automation with SoftHSM2.
nShield Connect HSM installations can also be automated using the EJBCA ConfigDump tool. For information on how to configure the tool in Kubernetes, see EJBCA Configdump in Kubernetes.
.png)