Skip table of contents

Deploy EJBCA SaaS AWS


For EJBCA Software as a Service (SaaS), subscribe through AWS Marketplace and access the EJBCA SaaS in PrimeKey's environment.

EJBCA SaaS is offered in the AWS Marketplace pricing model as a SaaS contract, based subscription. The contract options allow users to select the duration of the contract and the size of the PKI to be deployed. After subscribing to EJBCA SaaS on the AWS Marketplace, users are directed to the EJBCA SaaS portal to register, create an account and select EJBCA SaaS configuration details.

The following steps outline how to deploy EJBCA SaaS AWS:

Step 1 - Select Product

Browse to the AWS Marketplace and search for "EJBCA SaaS" or "PrimeKey" to display the EJBCA SaaS product options.

The EJBCA SaaS products have different options with regards to location and key storage. 

  • EJBCA SaaS - KMS Backed CA in the US Region
  • EJBCA SaaS - KMS Backed CA in the AP Region
  • EJBCA SaaS - KMS Backed CA in the EU Region
  • EJBCA SaaS - CloudHSM Backed CA in the US Region
  • EJBCA SaaS - CloudHSM Backed CA in the AP Region
  • EJBCA SaaS - CloudHSM Backed CA in the EU Region

Note that the SaaS products are fully hosted and managed by PrimeKey and require no customer maintenance. If it is desired to launch a PKI in a private VPC within an owned environment, please refer to EJBCA Cloud.

Select the region desired to deploy in by clicking the Regional product listing desired. For example, if the U.S. region of AWS is desired to have the PKI deployed to, select the EJBCA SaaS - KMS Backed CA in the US Region product option and click Continue.

Step 2 - Configure EJBCA SaaS Contract

To configure the EJBCA SaaS contract subscription, select the following:

Contract Duration

Select the contract duration, that is the duration being subscribed to for the EJBCA SaaS PKI. The options are 1, 12, 24, and 36 months with each longer duration providing a larger discount than the one before it.

Renewal Settings

Select the renewal settings. Select Yes to allow AWS to automatically renew the contract for the same duration based on the previously selected subscription duration.

Contract Options

Select the contract options. This is effectively the size of the PKI that will be deployed which dictates processing power of certificates.

KMS

  • EJBCA Saas KMS XS: Two load-balanced nodes (2 cores, 2GB RAM each), db.t2.small 1000 IOPS RDS database with read replica, KMS backed CA Keys.
  • EJBCA Saas KMS S: Two load-balanced nodes (2 cores, 6GB RAM each), db.t2.small 2000 IOPS RDS database with read replica, KMS backed CA Keys.
  • EJBCA Saas KMS M: Two load-balanced nodes (2 cores, 8GB RAM each), db.t2.medium RDS 3000 IOPS database with read replica, KMS backed CA Keys.

CloudHSM

  • EJBCA Saas CloudHSM XS: Two load-balanced nodes (2 cores, 2GB RAM each), db.t2.small 1000 IOPS RDS database with read replica, CloudHSM backed CA Keys on a single CloudHSM.
  • EJBCA Saas CloudHSM S: Two load-balanced nodes (2 cores, 6GB RAM each), db.t2.small 2000 IOPS RDS database with read replica, CloudHSM backed CA Keys on a redundant pair of CloudHSMs.
  • EJBCA Saas CloudHSM M: Two load-balanced nodes (2 cores, 8GB RAM each), db.t2.medium 3000 IOPS RDS database with read replica, CloudHSM backed CA Keys on a redundant pair of CloudHSMs.

Each of these PKIs are capable of delivering a certain level of transactions per second that can scale to your organization's needs. AWS allows users to select a higher option at any time, billing the account the difference, but does not allow users to select a cheaper option. For example, you can select Small (S ) and then later Medium (M), but cannot go back to Small (S) until the current contract expires. For more information on EJBCA SaaS contract subscription options, see Contract Subscription Options.

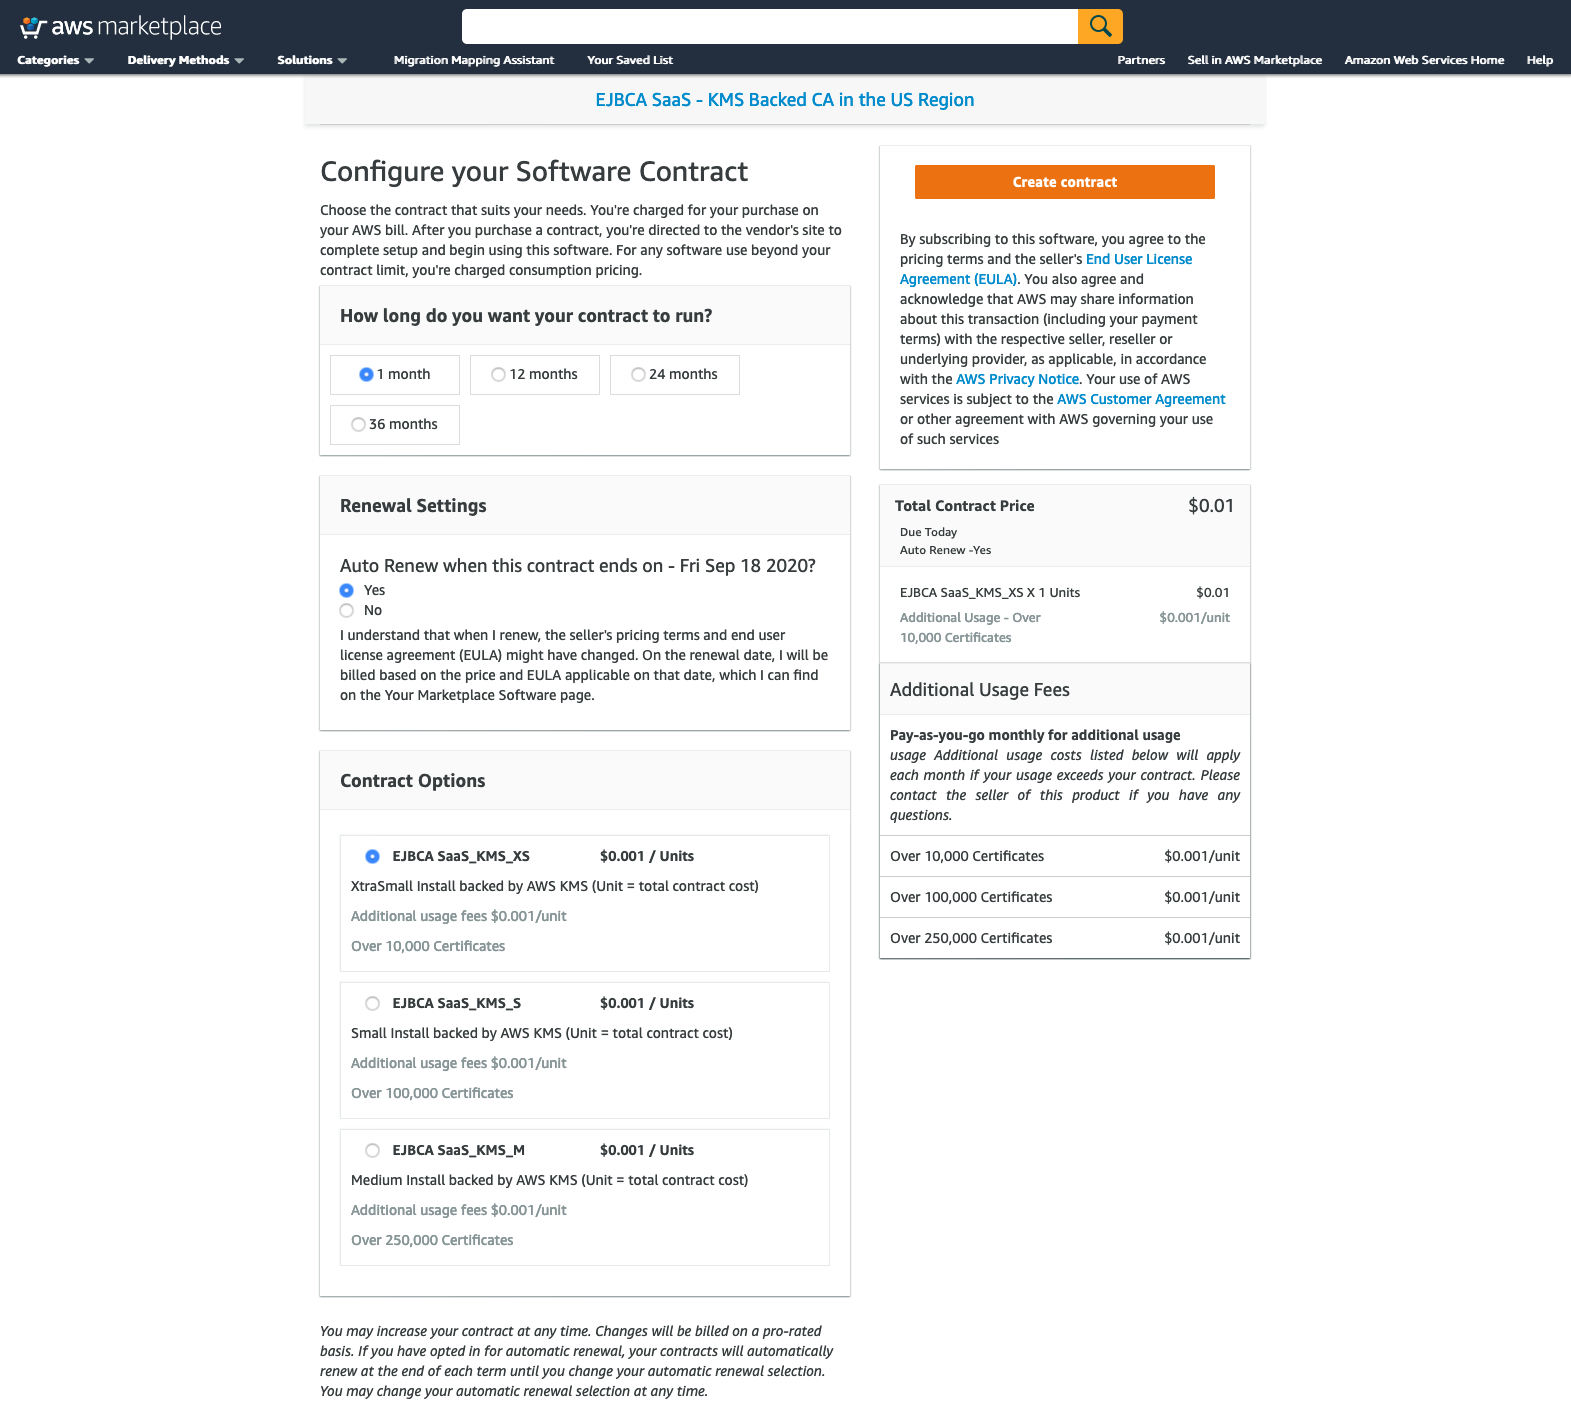
Step 3 - Create Contract

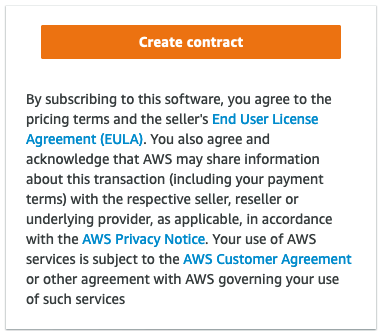
Click Create contract to create the contract and allow AWS to bill the account for the full contract duration.

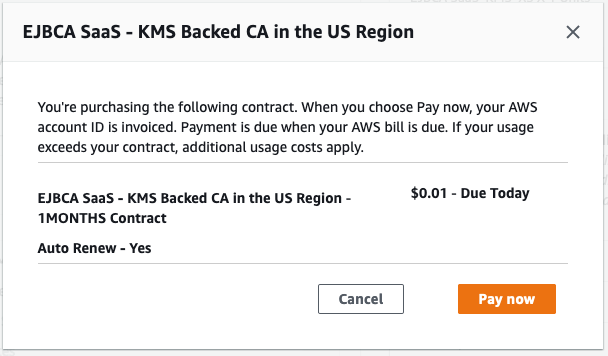
Review the confirmation displaying the full contract amount that will be billed to the AWS account subscribing and then click Pay now.

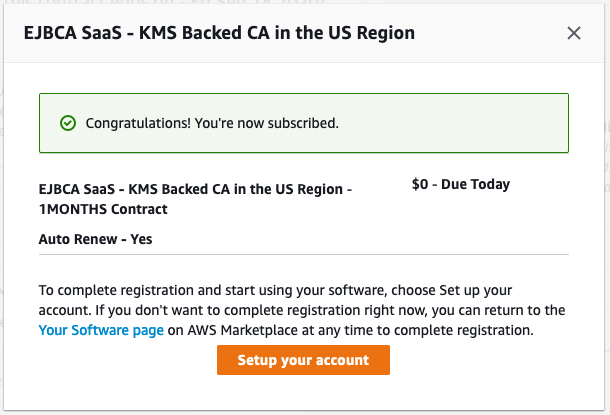
Review the confirmation showing that the subscription was successful and click Setup your account to be redirected to the EJBCA SaaS Portal.

Step 4 - Set Up the Portal Account

Specify the organization details on the EJBCA SaaS Registration page.

If your organization has more than one deployment, use the same organization name to make the different deployments all roll up to the same account. The specified names must match exactly and for example, "Acme, Inc." will not match "Acme Inc".

Choose to view the terms of use, and then click Register. A confirmation email will be sent to the account specified in the Email Address field and must be confirmed to continue.

A confirmation page confirms a successful registration.

In the Confirm Email, select Click Here to confirm registration.

Sign back into the EJBCA SaaS portal to continue the registration process. Enter the registration credentials and click Sign In.

Step 5 - Choose Options for PKI Deployment

Specify the following additional details required before PrimeKey can provision your PKI, and then click Deploy my PKI.

  • Domain Name: This domain name will be added to public DNS. All URLs end with “saas.primekey.com” and will be used for load balanced VIPS and CRL CDP URLs. These URLs can then be later used to configure URLs in your certificates.
  • ManagementCA Common Name: The name of the Management CA that will be generated upon installation. The Management CA is used to create the credentials that are used to access the EJBCA system. For more information on the ManagementCA, refer to the EJBCA Documentation on Managing CAs.
  • Organization: Optionally, specify the organization name to be added to the Full Subject DN of the ManagmentCA.

  • Country: Optionally, specify the ISO Country Code to be added to the Full Subject DN of the ManagmentCA.
  • Full Subject DN: Informational field that displays what the Full Subject DN of the ManagementCA will be created with. For more information, refer to the EJBCA Documentation on Subject Distinguished Names.
  • SuperAdmin Enrollment Code: User defined password that will be used to retrieve and password and protect the superadmin.p12 keystore that is used to access the EJBCA Administration interface.
  • Add Source IP: This IP range is allowed access to the EJBCA system. Simply google "What is my IP" or add the CIDR based address block to that will be allowed to access the EJBCA installation. This should be the external IP address you are using to access the internet and not an internal NAT'd IP. If unsure, enter "0.0.0.0/0" to change this later. This will allow all IPs access to the web pages of the EJBCA PKI, but not access to the admin portion of the system (this requires the SuperAdmin certificate).

After completion, users are redirected to the EJBCA SaaS portal and will see the provisioning progress bar start:

Depending on the options selected, this process can take approximately 30 minutes to process. In the background, the environment is being prepared from scratch based on the provided information. Once complete, the progress will show 100% and a panel will show allowing to access the newly created EJBCA installation. Clicking these links will open a new tab in the browser. The following Retrieve Superadmin Credentials panel will show only once, click X or Close to proceed. If this dialog is closed, the links and directions are available under the Support tab in the EJBCA SaaS Portal.

The Retrieve Superadmin Credentials panel links can later be accessed from the EJBCA SaaS portal EJBCA Links page, see Navigating EJBCA SaaS Portal.

Step 6 - Retrieve Credentials and Access EJBCA

To access the deployed EJBCA SaaS, the SuperAdmin credentials need to be retrieved from the server and installed on a system and/or browser. We recommend using Mozilla Firefox since it has self-enrollment capabilities and its own keystore separate from the operating system.

The Retrieve Superadmin Credentials panel provides links to retrieve and import the SuperAdmin certificate:

  1. Click the first link to go to the EJBCA Public Web. A browser warning about a potential security risk will be displayed since the browser is unaware of the certificate authority that was just created during the installation. Accept the browser warning shown.
  2. On the EJBCA Public Web Keystore Enrollment page, enter the username "superadmin" (case sensitive) and the previously specified SuperAdmin password and click OK to download the SuperAdmin credentials.
  3. On the EJBCA Token Certificate Enrollment page, click Enroll to download the p12 file certificate.
  4. Click the Certificate chain link and download the CA certificate with the issued the superadmin credentials.

Install Certificate in Browser

With the p12 file certificate downloaded, do the following to import the certificate in Mozilla Firefox:

  1. On the Firefox menu, select Preferences > Privacy & Security, scroll down to the Security section and click View Certificates.
  2. On the tab Your Certificates, select Import.

  3. Browse to the p12 file to import and enter your SuperAdmin password.
  4. A certificate will then be added to the local certificate store with the organization name if one was chosen during the configuration options.
  5. Change to the Authorities tab and click Import. Browse to the certificate that was downloaded from the Certificate chain link in step 4 of 113774635. It may be needed to switch to view "All file formats" to allow the certificate downloaded to be selected. Select the certificate and click open.
  6. Select the option Trust this CA to identify websites to ensure that the browser will trust the CA that issued the superadmin certificate and not display a browser warning going forward.
  7. Click OK and then OK again to go back to the browser and return to the EJBCA SaaS portal.

Access EJBCA

Access EJBCA using your previously specified domain name according to the following example:

https://<Domain Name>saas.primekey.com/ejbca/adminweb

Your browser should now recognize your new certificate and open EJBCA displaying the Administration page.

Next - Visit the EJBCA SaaS Portal

Next, visit the EJBCA SaaS portal to navigate EJBCA SaaS and display information regarding the EJBCA SaaS installation, see Navigating EJBCA SaaS Portal.


JavaScript errors detected

Please note, these errors can depend on your browser setup.

If this problem persists, please contact our support.