Enterprise
This page describes how to configure OpenID Connect (OIDC) authentication in EJBCA using Auth0 as the identity provider.
As of EJBCA 9.5, Auth0 is available as a predefined Trusted OAuth Provider type.
Prerequisites
Before you begin, you need:
-
EJBCA 9.5 or later
-
An Auth0 tenant
-
Administrative access to:
-
Auth0 Dashboard
-
EJBCA Admin Web (
/ejbca/adminweb)
-
Configure the Auth0 Tenant
To add a new application to Auth0, follow these steps:
-
Log in to the Auth0 Dashboard and select the Auth0 tenant.
-
In the left menu, click Applications → Applications.
-
Click Create application.
-
For Name, specify a name for your EJBCA instance (for example, EJBCA).
-
For Choose an application type, select Regular Web Applications.
-
Click Create.
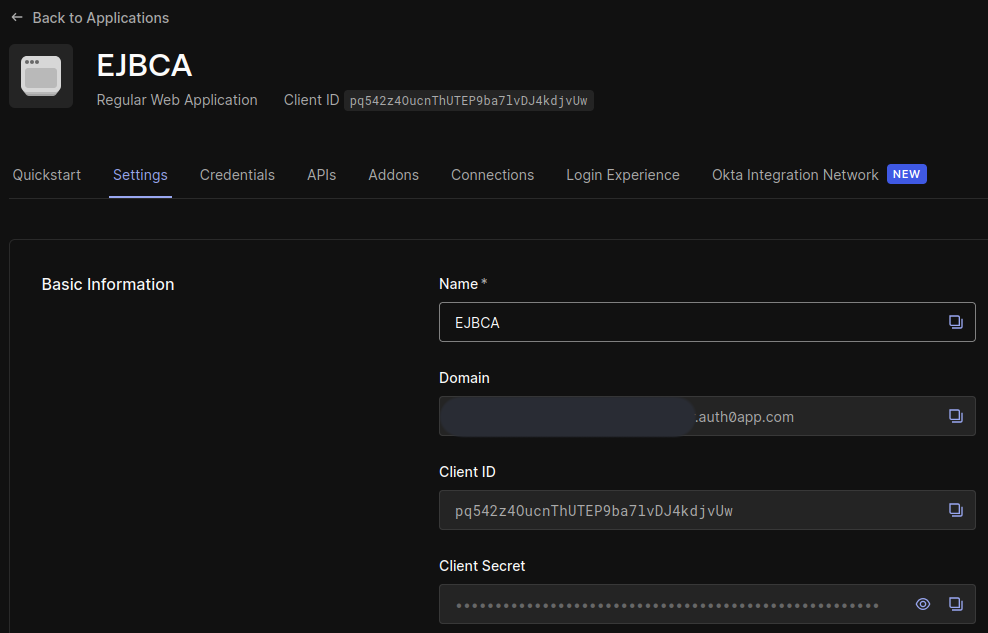
Application Settings
-
Open the Settings tab and make a note of the following values that will be required when later configuring EJBCA:
-
Domain
-
Client ID
-
Client Secret
-
-
Scroll down to Application URIs and set Allowed Callback URLs to:
https://<ejbca-domain>:443/ejbca/adminweb/,https://<ejbca-domain>:443/ejbca/ra/login.xhtmlReplace
<ejbca-domain>with the domain name used by your EJBCA instance. -
Click Save changes.
Enable Connection
-
Open the Connections tab.
-
Ensure that at least one connection is enabled.
Add a Provider for Auth0 in EJBCA
Create a Trusted OAuth Provider in EJBCA using one of the following methods:
-
Manual configuration using the Admin Web
-
Automated provisioning using ConfigDump
Add a Provider Using the Admin Web
To manually configure OIDC authentication to EJBCA using Auth0, follow these steps:
-
Open EJBCA (
/ejbca/adminweb) in your browser and log in as Super Administrator. -
Click System Configuration → System Configuration.
-
On the System Configuration page, select the Trusted OAuth Providers tab.
-
Under Add or remove Trusted OAuth Providers, click Add.
-
On the Add Trusted OAuth Provider page, specify the following:
-
For OAuth Provider Type, select Auth0.
-
For OAuth Provider Name, specify a descriptive name to be displayed on the EJBCA login page.
-
For Auth0 Tenant, enter the Domain from the Auth0 Dashboard (for example,
tenant.company.auth0app.com). -
Click Load OIDC configuration.
-
For Client Name, enter the Client ID from the Auth0 Dashboard.
-
For Client Secret, enter the Client Secret from the Auth0 Dashboard.
-
-
Click Add.
Add a Provider Using ConfigDump
To automatically provision EJBCA with an Auth0 provider, use the following Helm chart template:
Object Type: Trusted OAuth Provider
Version: 1
Name: {{ .Values.oidcProviderName }}
Type: 4
Url: https://{{ .Values.oidcTenant }}.{{ .Values.oidcOrganization }}.auth0app.com/authorize
Token Url: https://{{ .Values.oidcTenant }}.{{ .Values.oidcOrganization }}.auth0app.com/oauth/token
Logout Url: https://{{ .Values.oidcTenant }}.{{ .Values.oidcOrganization }}.auth0app.com/oidc/logout
UserInfo Url: https://{{ .Values.oidcTenant }}.{{ .Values.oidcOrganization }}.auth0app.com/userinfo
Skew Limit (ms): 60000
Client: {{ .Values.oidcClientId }}
Client Secret: ${CONFIGDUMP_OIDC_SECRET}
Realm: null
SCOPE: profile
AUDIENCE: {{ .Values.oidcClientId }}
Public Key URL: https://{{ .Values.oidcTenant }}.{{ .Values.oidcOrganization }}.auth0app.com/.well-known/jwks.json
Configure OAuth Key Update Worker
Additionally, create an OAuth Key Update Worker in EJBCA, as Auth0 may rotate its signing keys.
Object Type: Service
Version: 1
Name: {{ .Values.oidcProviderName }}
Worker Type: org.ejbca.core.model.services.workers.OAuthKeyUpdateWorker
Worker Properties:
  Providers To Update: {{ .Values.oidcProviderName }}
Interval Type: Periodical Interval
Interval Properties:
  Periodical Value: 60
  Periodical Unit: MINUTES
Action Type: No Action
Action Properties: {}
Description: Rotate the public keys for the {{ .Values.oidcProviderName }} OAuth provider.
Active: true
Hidden: false
Pin to Specific Nodes: []
Run on All Nodes: false
Configure Role-Based Access Control (RBAC)
To allow users registered with Auth0 to access EJBCA, map a role in EJBCA to a claim provided by Auth0.
-
In EJBCA, select System Functions → Roles and Access Rules.
-
Click Members for the EJBCA role you want to map to an OIDC claim.
Configure Individual Access Using User ID
To give access to an individual user based on their user_id, follow these steps:
-
In the Match with column, select OAuth 2 (JWT): Subject (“sub”) claim.
-
In the OAuth Provider column, select the Auth0 provider previously created.
-
In the Match Value column, enter the
user_idfrom Auth0. The value can be found in the Auth0 Dashboard under User Management → Users. -
In the Action column, click Add.
The user_id can be found in the Auth0 Dashboard under User Management → Users. It may also appear in the EJBCA logs after a login attempt.
Auth0 user IDs are random identifiers. Mapping by email address is often more convenient.
Configure Individual Access Using Email
To give access to an individual user based on their email, follow these steps:
-
In the Match with column, select OAuth 2 (JWT): Email (“email”) claim.
-
In the OAuth Provider column, select the Auth0 provider previously created.
-
In the Match Value column, enter the user’s email address.
-
In the Action column, click Add.
Enable Email Scope
By default, Auth0 does not include the email claim in the ID token.
-
Edit the Auth0 Trusted OAuth Provider in EJBCA.
-
Set Scope to
profile email(with a space betweenprofileandemail):
This will make EJBCA request both the
profileandemailscope from Auth0. -
Save the configuration.
If the email scope is not requested, the email claim will not be present in the token and RBAC matching on email will fail.
Configure Access for All Users
To grant access to all users authenticated by Auth0, follow these steps:
-
In the Match with column, select OAuth 2 (JWT): Audience (“aud”) claim.
-
In the OAuth Provider column, select the Auth0 provider previously created.
-
In the Match Value column, enter the Client ID from the Auth0 Dashboard.
-
In the Action column, click Add.
After completing these steps, users authenticated through Auth0 can log in to EJBCA according to the configured role mappings.
If authentication issues occur, verify the token claims returned by Auth0 and review the EJBCA logs to ensure that scopes and role mappings are configured correctly.