.png)
The GitLab Sensor User Guide provides instructions for deploying the GitLab Sensor to scan for cryptographic assets and deliver findings to the AgileSec Platform for processing and analysis.
Overview
The GitLab Sensor integrates GitLab (cloud or self-hosted) with Keyfactor's AgileSec Platform. This Sensor allows you to discover, inventory, and analyze cryptographic assets across multiple repositories within a GitLab organization or group.
What Gets Scanned
The GitLab Sensor downloads target repositories from GitLab and scans for use of cryptography algorithms and libraries in source code. The following cryptographic assets can be discovered:
-
X.509 Certificates: SSL/TLS certificates, code signing certificates, client authentication certificates
-
Public Keys: RSA, DSA, EC asymmetric public keys in PEM, DER, and PKCS8 formats
-
Java Keystores: JKS, JCEKS, PKCS12 keystores
-
Tokens: JWT and JWE tokens
-
Cryptographic Libraries: OpenSSL, BouncyCastle, cryptography.io, and other crypto implementations
-
Code Artifacts: Embedded certificates in compiled code (JAR, WAR, EAR files)
Prerequisites
Ensure you meet the following requirements to enable scanning.
Network Access
Ensure HTTPS network connectivity from AgileSec platform or remote execution machine to the GitLab server.
GitLab REST API v4 must be accessible.
Supported Authentication Methods
The GitLab Sensor supports token-based authentication.
Generate a Personal Access Token
-
Log in to GitLab.
-
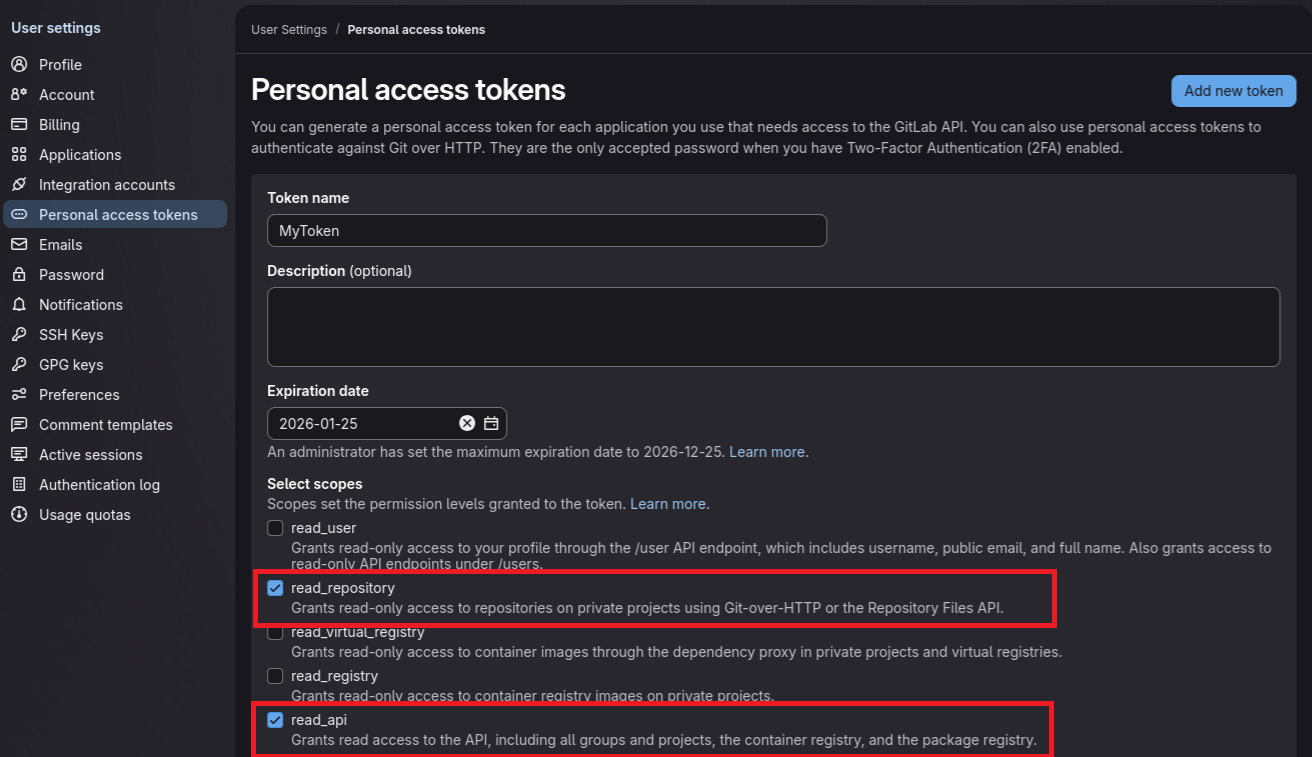
Go to User Settings → Access Tokens (or navigate to
https://gitlab.com/-/user_settings/personal_access_tokens). -
If asked to Select a role for the token, choose Reporter role or higher.
-
Create a new token with the following scopes:
-
read_api– Required for listing repositories -
read_repository– Required for downloading repository archives
-
-
Copy the token immediately — it will only be shown once.
-
Store the token securely.
-
Verify the token works:
Bash# set your token export GITLAB_TOKEN="your-token-here" export GITLAB_URL="https://gitlab.com" # or your self-hosted URL # test authentication curl -H "PRIVATE-TOKEN: ${GITLAB_TOKEN}" \ "${GITLAB_URL}/api/v4/projects?per_page=1" # expected: json array with project info
GitLab Required Access Rights
The GitLab access token must have the following permissions to successfully authenticate:
|
Permission |
Purpose |
Required |
|---|---|---|
|
Role: Reporter or above |
Required to view code. |
✅ Yes |
|
read_api |
Required for downloading repository. |
✅ Yes |
|
read_repository |
Required for enumerating repositories. |
✅ Yes |
Remote Execution Requirements
If running the Sensor remotely using CLI, the remote execution machine must meet these requirements:
|
Component |
Requirement |
|---|---|
|
Operating System |
|
|
RAM |
3 GB minimum, 4 GB recommended for large repositories. |
|
Disk Space |
Minimum 2x size of your repository. |
|
Permissions |
Read/write access to remote sensor working directory (remote sensor install location) |
Running the Sensor
AgileSec GitLab scans can be executed using the following methods:
-
Platform Scan Execution: Configure and execute scans directly through the Keyfactor AgileSec web UI with on-demand or scheduled execution options.
-
API Scan Execution: Programmatically trigger scans through REST API calls, enabling integration with CI/CD pipelines and automation workflows.
-
Remote Scan Execution: Deploy and run the Sensor via CLI on customer-managed infrastructure for scenarios such as:
-
Scanning air-gapped or internal instances the platform cannot directly reach.
-
Customers wanting to manage their own scheduling and execution environment.
-
Refer to Scan Execution Flows for additional scan execution information.
Configuration Fields
The following parameters are used to configure AgileSec GitLab scans.
|
Field Name |
UI Display Name |
Type |
Required |
Description |
|---|---|---|---|---|
|
|
GitLab Base URL |
String |
❌ No |
Only specify this field if self-hosting a GitLab instance. For http://GitLab.com , leave blank (defaults to https://gitlab.com). For self-hosted instances, use your GitLab URL (e.g., https://gitlab.company.com) |
|
|
Authentication Token |
String |
✅ Yes |
Authentication token for scanning private repos as configured in prerequisites. |
|
|
Branch |
String |
❌ No |
Branch to scan. Glob patterns are accepted for multi-branch selection. Default: default branch |
|
|
Accepted Paths |
List of Strings |
✅ Yes |
Repositories to include. Glob patterns are supported. Expected format is Examples: All projects in an org, including subgroups:
Specific project:
|
|
|
Excluded Paths |
List of Strings |
❌ No |
Repositories to exclude from the included set. Glob patterns are supported. Expected format is |
|
|
Incremental Scan |
Boolean |
✅ Yes Note: for Platform Scan Executions via UI, incremental scan defaults to Yes. |
Enable to scan only updates since last run. See Incremental Scanning. |
|
|
Auto-Resolution Interval |
Number |
✅ Yes
|
Only used when |
Platform Scan Execution
Running scans through the user interface is the simplest and fastest way to get started. The platform enables running on-demand or scheduled scans in a dedicated environment.
Platform Scan Configuration
-
Open your browser and navigate to the Keyfactor AgileSec Platform Web URL
-
Log in with your credentials
-
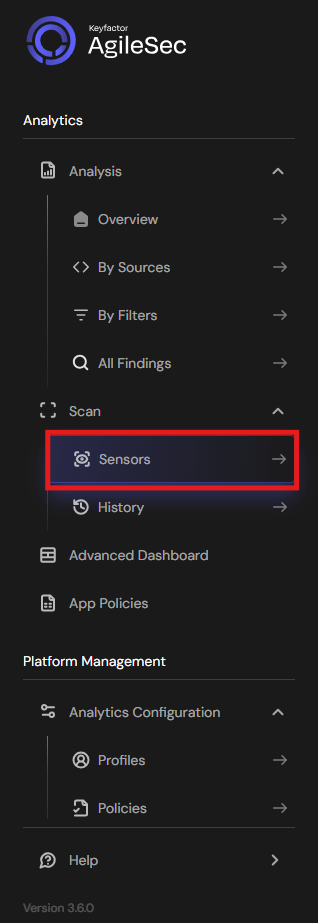
Click on "Sensors" in the left navigation menu under Scan
-
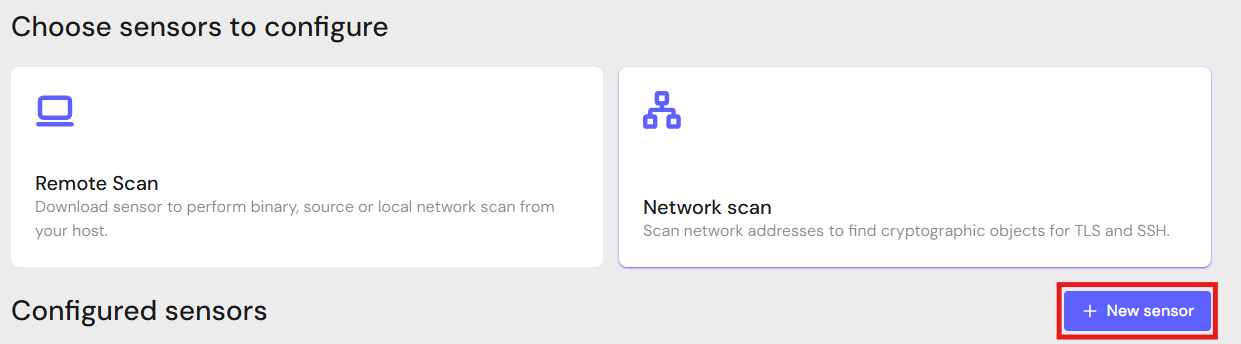
Click "+ New Sensor".
-
Click on the correct card to open the configuration interface.
Configure Parameters and Start Scan
-
Fill in the required configuration parameters.
-
Click Save.
-
Click Action then Scan to begin a scan.
Note: Click Edit to reconfigure parameters.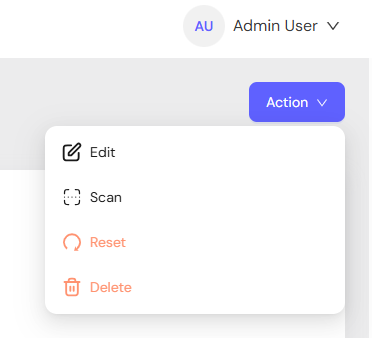
API Scan Execution
Scans may be programmatically triggered through REST API calls, enabling seamless integration with CI/CD pipelines, automation workflows, and custom applications. API execution provides flexibility for developers to incorporate cryptographic scanning into their existing development and deployment processes.
Note: For complete API reference, see API.
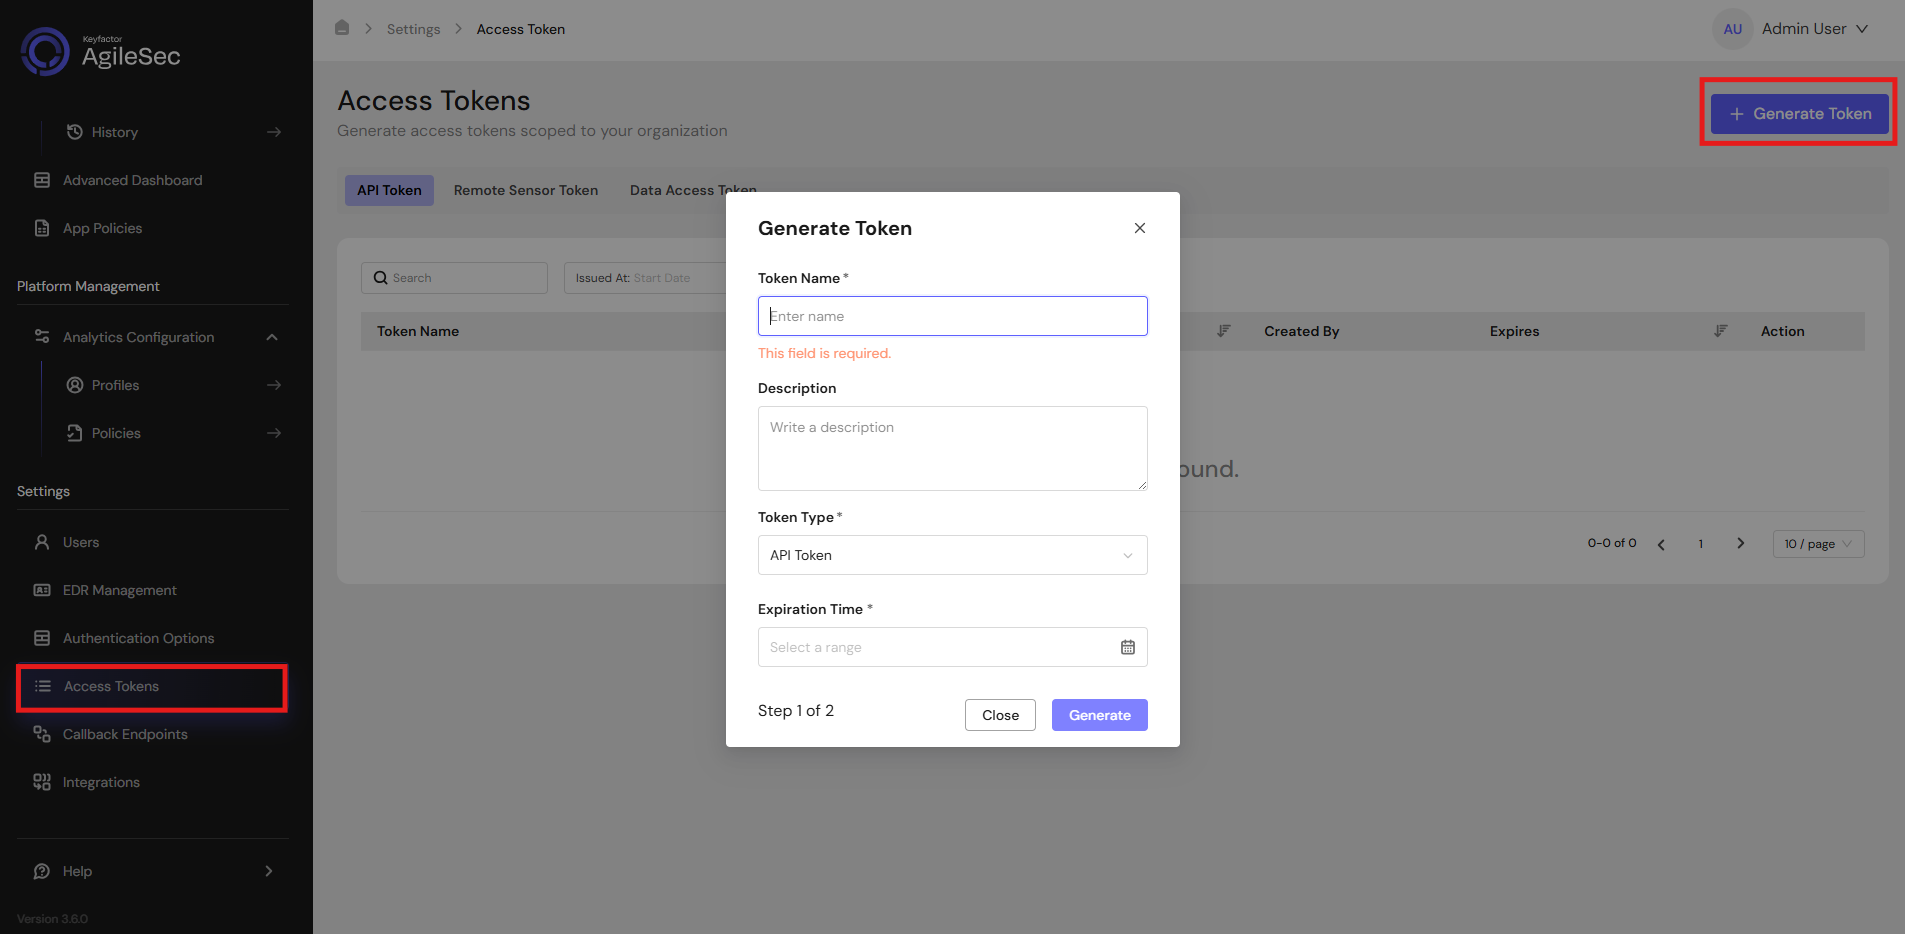
Generate AgileSec API Access Token
-
Open your browser and navigate to AgileSec Platform UI
-
Log in with your Keyfactor credentials
-
Click "Access Tokens" in the main navigation menu
-
Click "Generate Token" button
-
Set Token Type to API Token and provide the required details
-
Click "Generate" and copy the generated token
AgileSec API Endpoint
POST https://<platform-url>/v3/scan/create/
Request Format
Headers
Content-Type: application/json
isg-api-token: <your-api-token>
Request Body
  {
    "sensorName": "<sensor name>",
    "sensorType": "Gitlab Sensor",
    "sensorConfig": {
       "url": "<gitlab api url>",
       "branch": "<branch name>",
       "token": "<personal access token>",
       "include_paths": "<include patterns>",
       "exclude_paths": "<exclude patterns>"
    },
    "callbackId": "<callback id>",
    "labels": [
        {
            "<label name>": "<label value>"
        }
    ],
    "priority": "<priority>",
    "incrementalScan": true,
    "autoResolutionInterval": 5
  }
Remote Scan Execution
Scans may be run on remote host machines with the AgileSec Remote Sensor Package.
Download Remote Sensor Package
-
Open your browser and navigate to the Keyfactor AgileSec Platform Web URL
-
Log in with your credentials
-
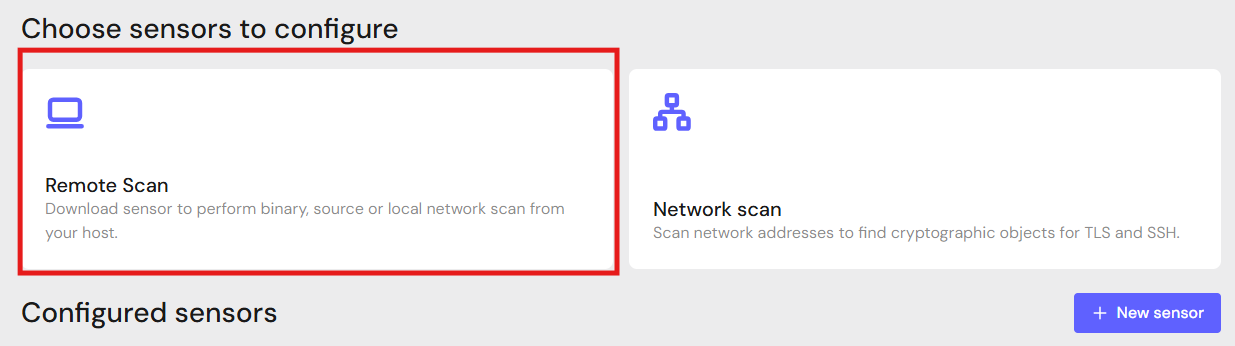
Click on "Sensors" in the left navigation menu under Scan
-
Click Remote Scan.
-
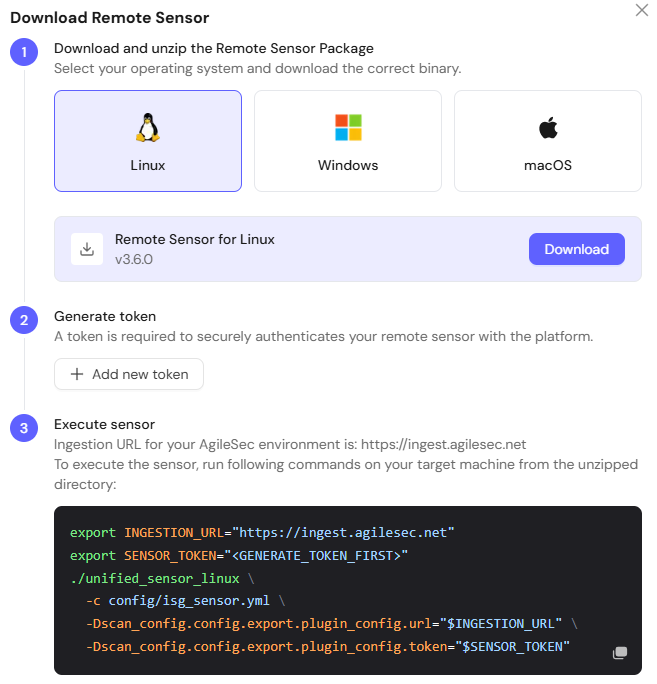
Click + Download Remote Sensor.

-
Download the sensor binary for your remote machine’s operating system
Generate Platform Token
-
In the Download Remote UI, click "Generate Token"
-
Copy the generated token
-
Store securely in an environment variable such as
SENSOR_TOKEN:export SENSOR_TOKEN="your-generated-token"
Create Configuration File
Create a YAML configuration file (e.g., gitlab-config.yml) with your scan settings. An example configuration can be found in config/sample-configs/gitlab.yml.
Step 4: Run the Sensor
Execute the Sensor with your configuration file:
-
Linux
Bash# Set environment variables export SENSOR_TOKEN="your-sensor-token" export GITLAB_TOKEN="your-gitlab-token" # Run Sensor ./unified_sensor_linux -c gitlab-config.yml
Remote Scan Execution Configuration Examples
-
Self-Hosted GitLab (With Auth)
YAMLscan_config: plugins: - isg_gitlab - trigger_discover - export config: isg_gitlab: name: gitlab plugin_config: url: "<https://git.mycompany.com>" token: "${env:GITLAB_TOKEN}" include_paths: - "internal-team/**" exclude_paths: - "internal-team/archived-*" -
Scan Specific Branch
YAMLscan_config: plugins: - isg_gitlab - trigger_discover - export config: isg_gitlab: name: gitlab plugin_config: url: "<https://gitlab.com>" token: "${env:GITLAB_TOKEN}" branch: "develop" include_paths: - "myorg/myrepo"
Known Limitations
Rate Limiting
GitLab enforces API rate limits. Large organizations with many repositories may hit rate limits. For individual repositories, use the Git Sensor.
Binary Files
While the Sensor scans files, opaque binary blobs without recognized headers may not be deeply analyzed.
Troubleshooting Common Errors
-
401 Unauthorized-
Cause: Invalid or expired Personal Access Token.
-
Fix: Verify the token is correct and has not expired. Regenerate if necessary.
-
-
403 Forbidden-
Cause: Token lacks required scopes (
read_api,read_repository). -
Fix: Generate a new token with the correct scopes.
-
-
404 Not Found-
Cause: Repository or group does not exist, or token does not have access.
-
Fix: Verify the include patterns are correct and the token has access to the target repositories.
-
-
unable to access(Connection Refused)-
Cause: Network connectivity issue.
-
Fix: Ensure the machine running the Sensor can reach the GitLab server URL. Check firewalls and proxies.
-
-
could not find remote branch-
Cause: The specified branch does not exist on the remote.
-
Fix: Verify the branch name matches exactly (case-sensitive), or leave blank to use the default branch.
-
Getting Support
Collect diagnostic information:
-
Sensor version
-
Configuration file (redact tokens)
-
Log output
-
GitLab details (cloud vs self-hosted, URL, version)
Contact Support
-
Portal: https://support.keyfactor.com