This guide includes key steps for executing actions with Sensors previously loaded to Tanium.
Additional information, including architecture, can be found on the AgileSec Tanium page.
Overview
There are two use cases covered in this document:
Use Case 1: Execute Run Without Dependencies. Run exports directly from end point hosts to AgileSec Server. Used to run AgileSec Run jobs for direct streaming.
Use Case 2: Execute Connect Job. Results are retrieved from hosts to Tanium server via Saved Question then exported from Tanium Server to AgileSec Server via Connect. Used to send real-time endpoint data out of Tanium to other systems.
Use Case 1: Execute Run Without Dependencies
Step 1: Select Target Systems
On the Tanium Home page, use Tanium’s Interact tool to Ask a Question or use the Question Builder to retrieve and group specific systems endpoints for cryptographic inventory.
AgileSec Tanium Actions run by OS, so it is recommended to group target endpoints by OS Platform.
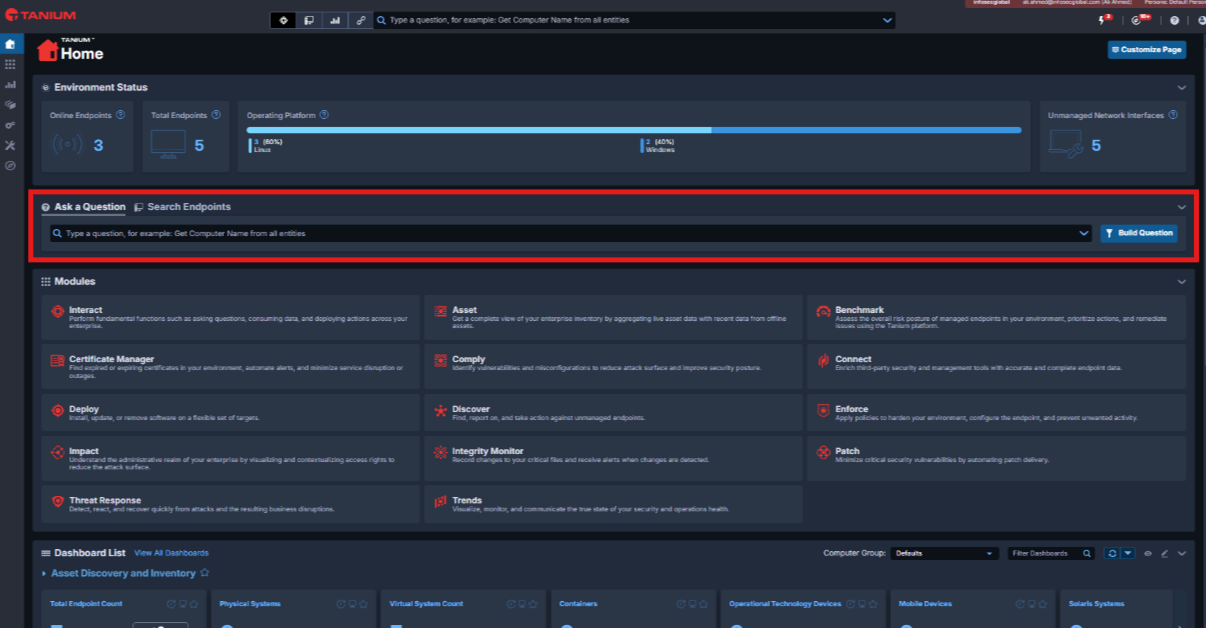
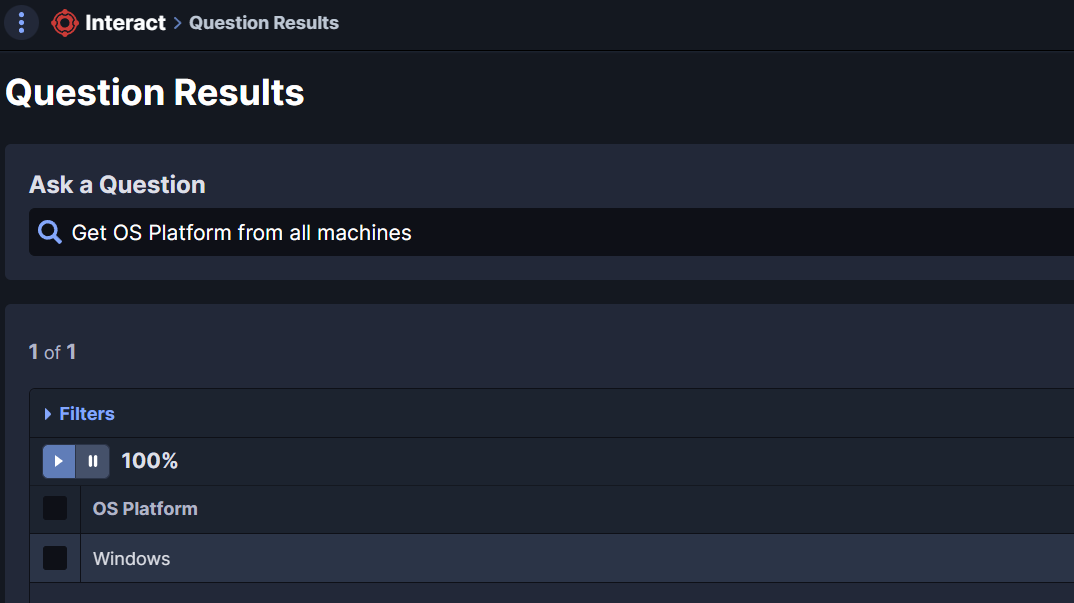
Example: Sort by OS with Ask a Question
As an example, you may sort by OS using Ask a Question as follows.

Or search for Windows OS specifically.
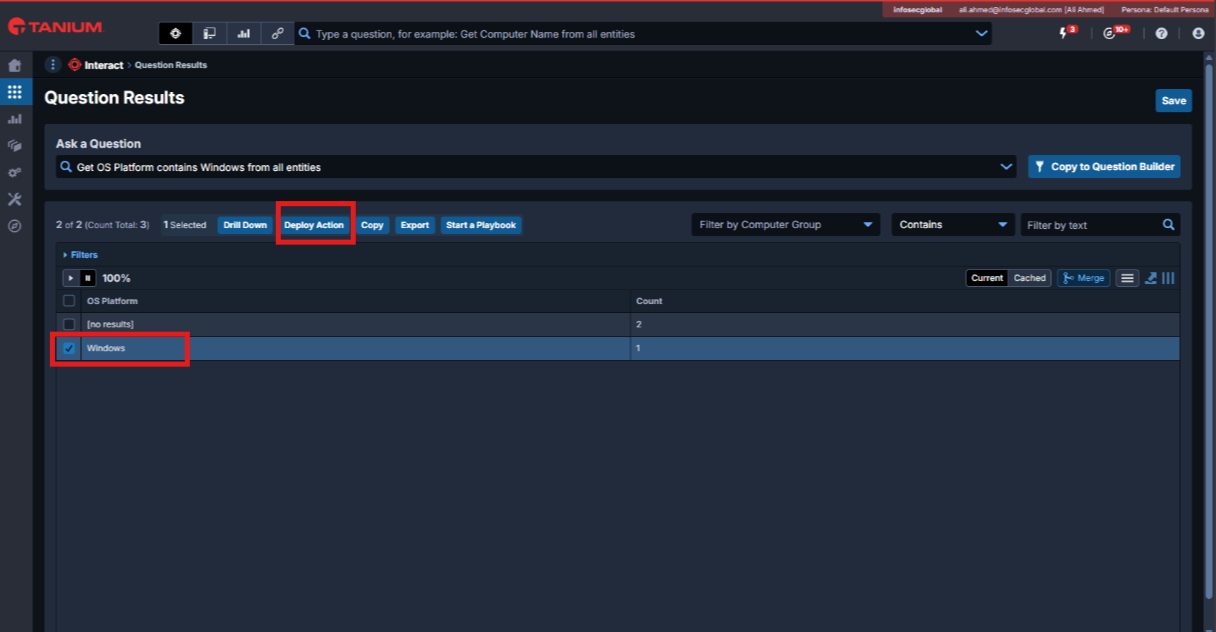
Check the box beside the results you want to target then click Deploy Action.
Step 2: Execute Deploy Action
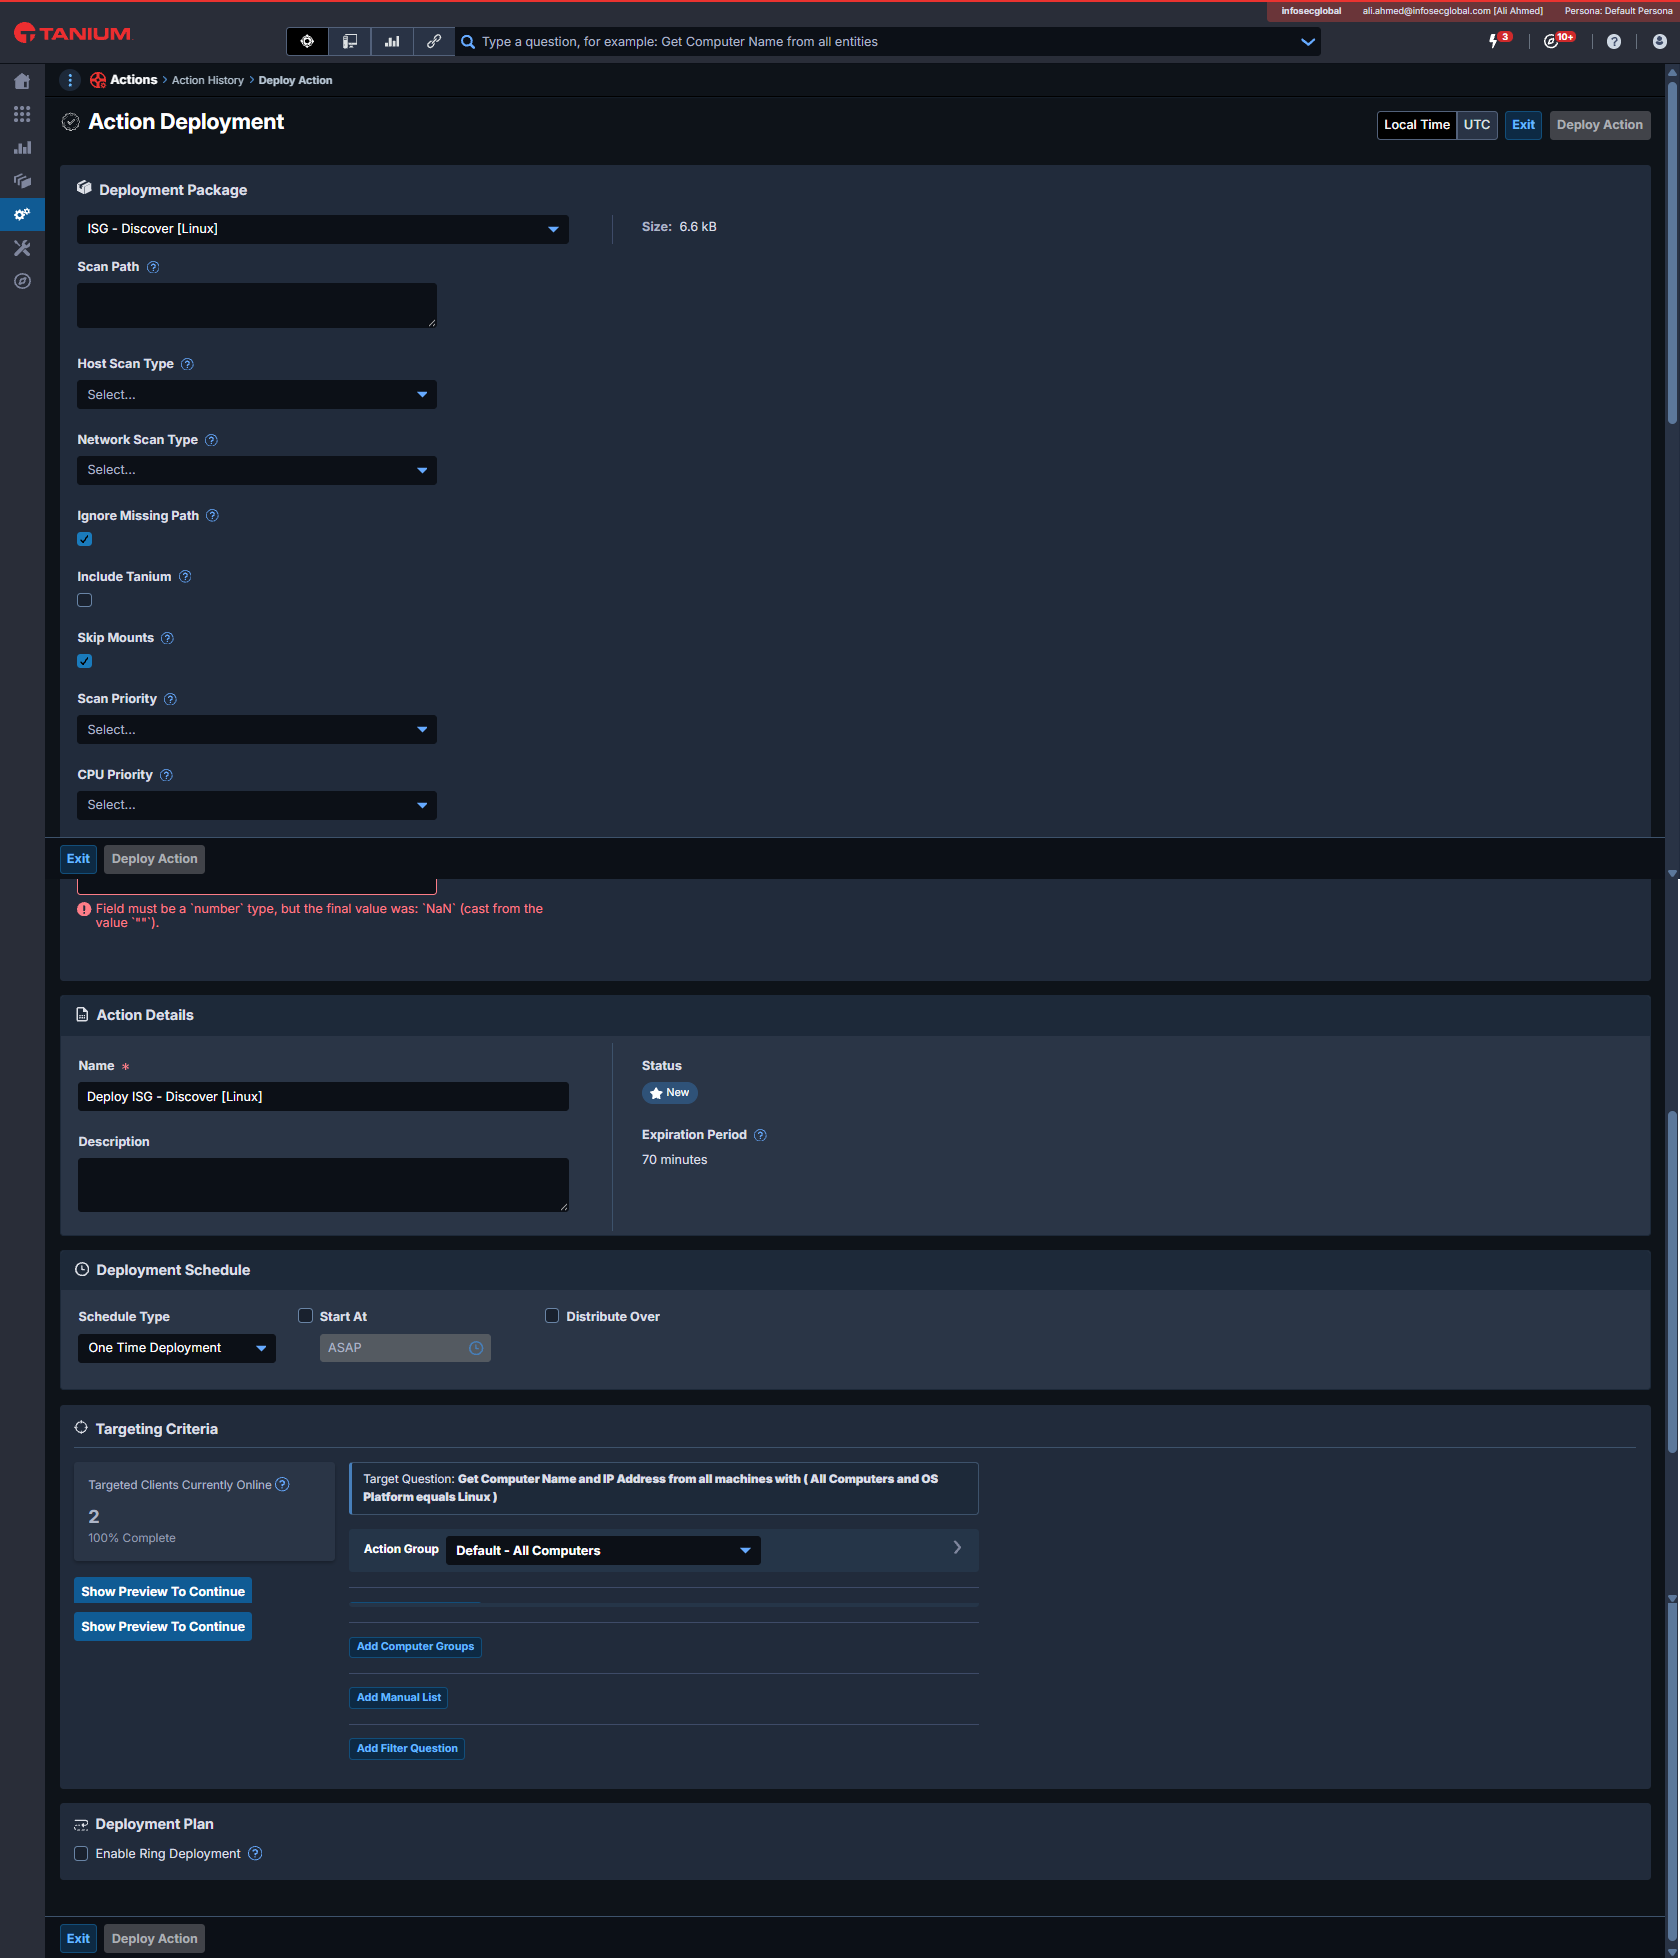
Select the ISG - Deploy action and execute it against the previously defined target systems.
|
Deploy Action Field |
Description / Notes |
|---|---|
|
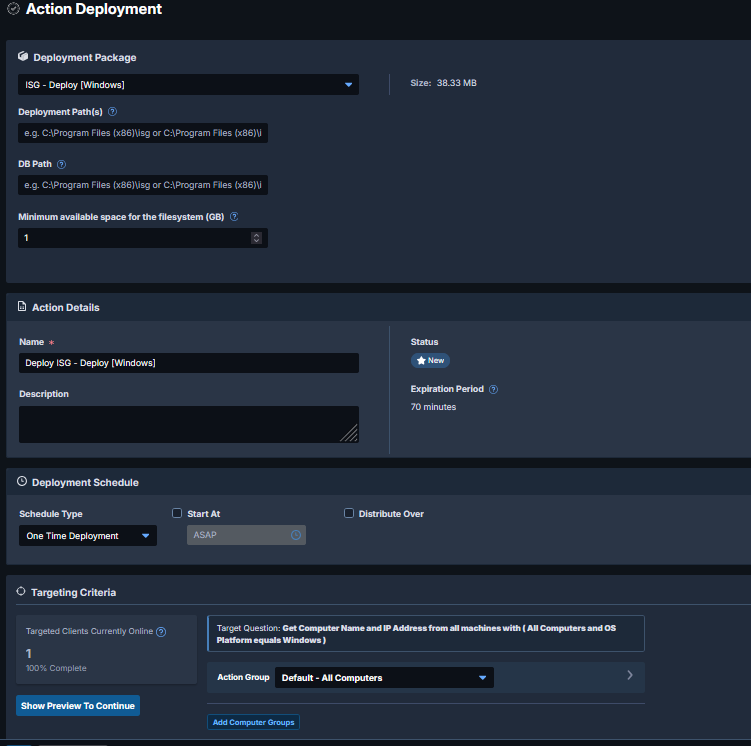
Deployment Package |
Specific Action to run. Example: |
|
Deployment Path |
Path to store the different AgileSec Discovery Packages on the Target Systems. Tanium provides default path suggestions in the Action Deployment UI. In most cases, users can rely on the default values unless they have a specific requirement to change them. |
|
DB Path |
Path to store the different AgileSec Local Databases on the target systems. By default, DB Path is the same as the Deployment Path. |
|
Minimum available space for the filesystem (GB) |
Deployment Path and DB Path must have at least the specified amount of free space or Action will fail. |
|
Action Details
|
|
|
Deployment Schedule
|
Schedule Type options:
One-Time Deployment is recommended for Deploy and Undeploy actions. Discover and Run actions use One-Time Deployment by default but may be configured with a Recurring Deployment. |
|
Targeting Criteria
|
Select the previously defined Target Systems from Step 1 to execute action on. |
After filling out the required fields, click Show Preview to Continue, review, then click Deploy Actions to proceed to action execution.
Step 3: Execute Run Action
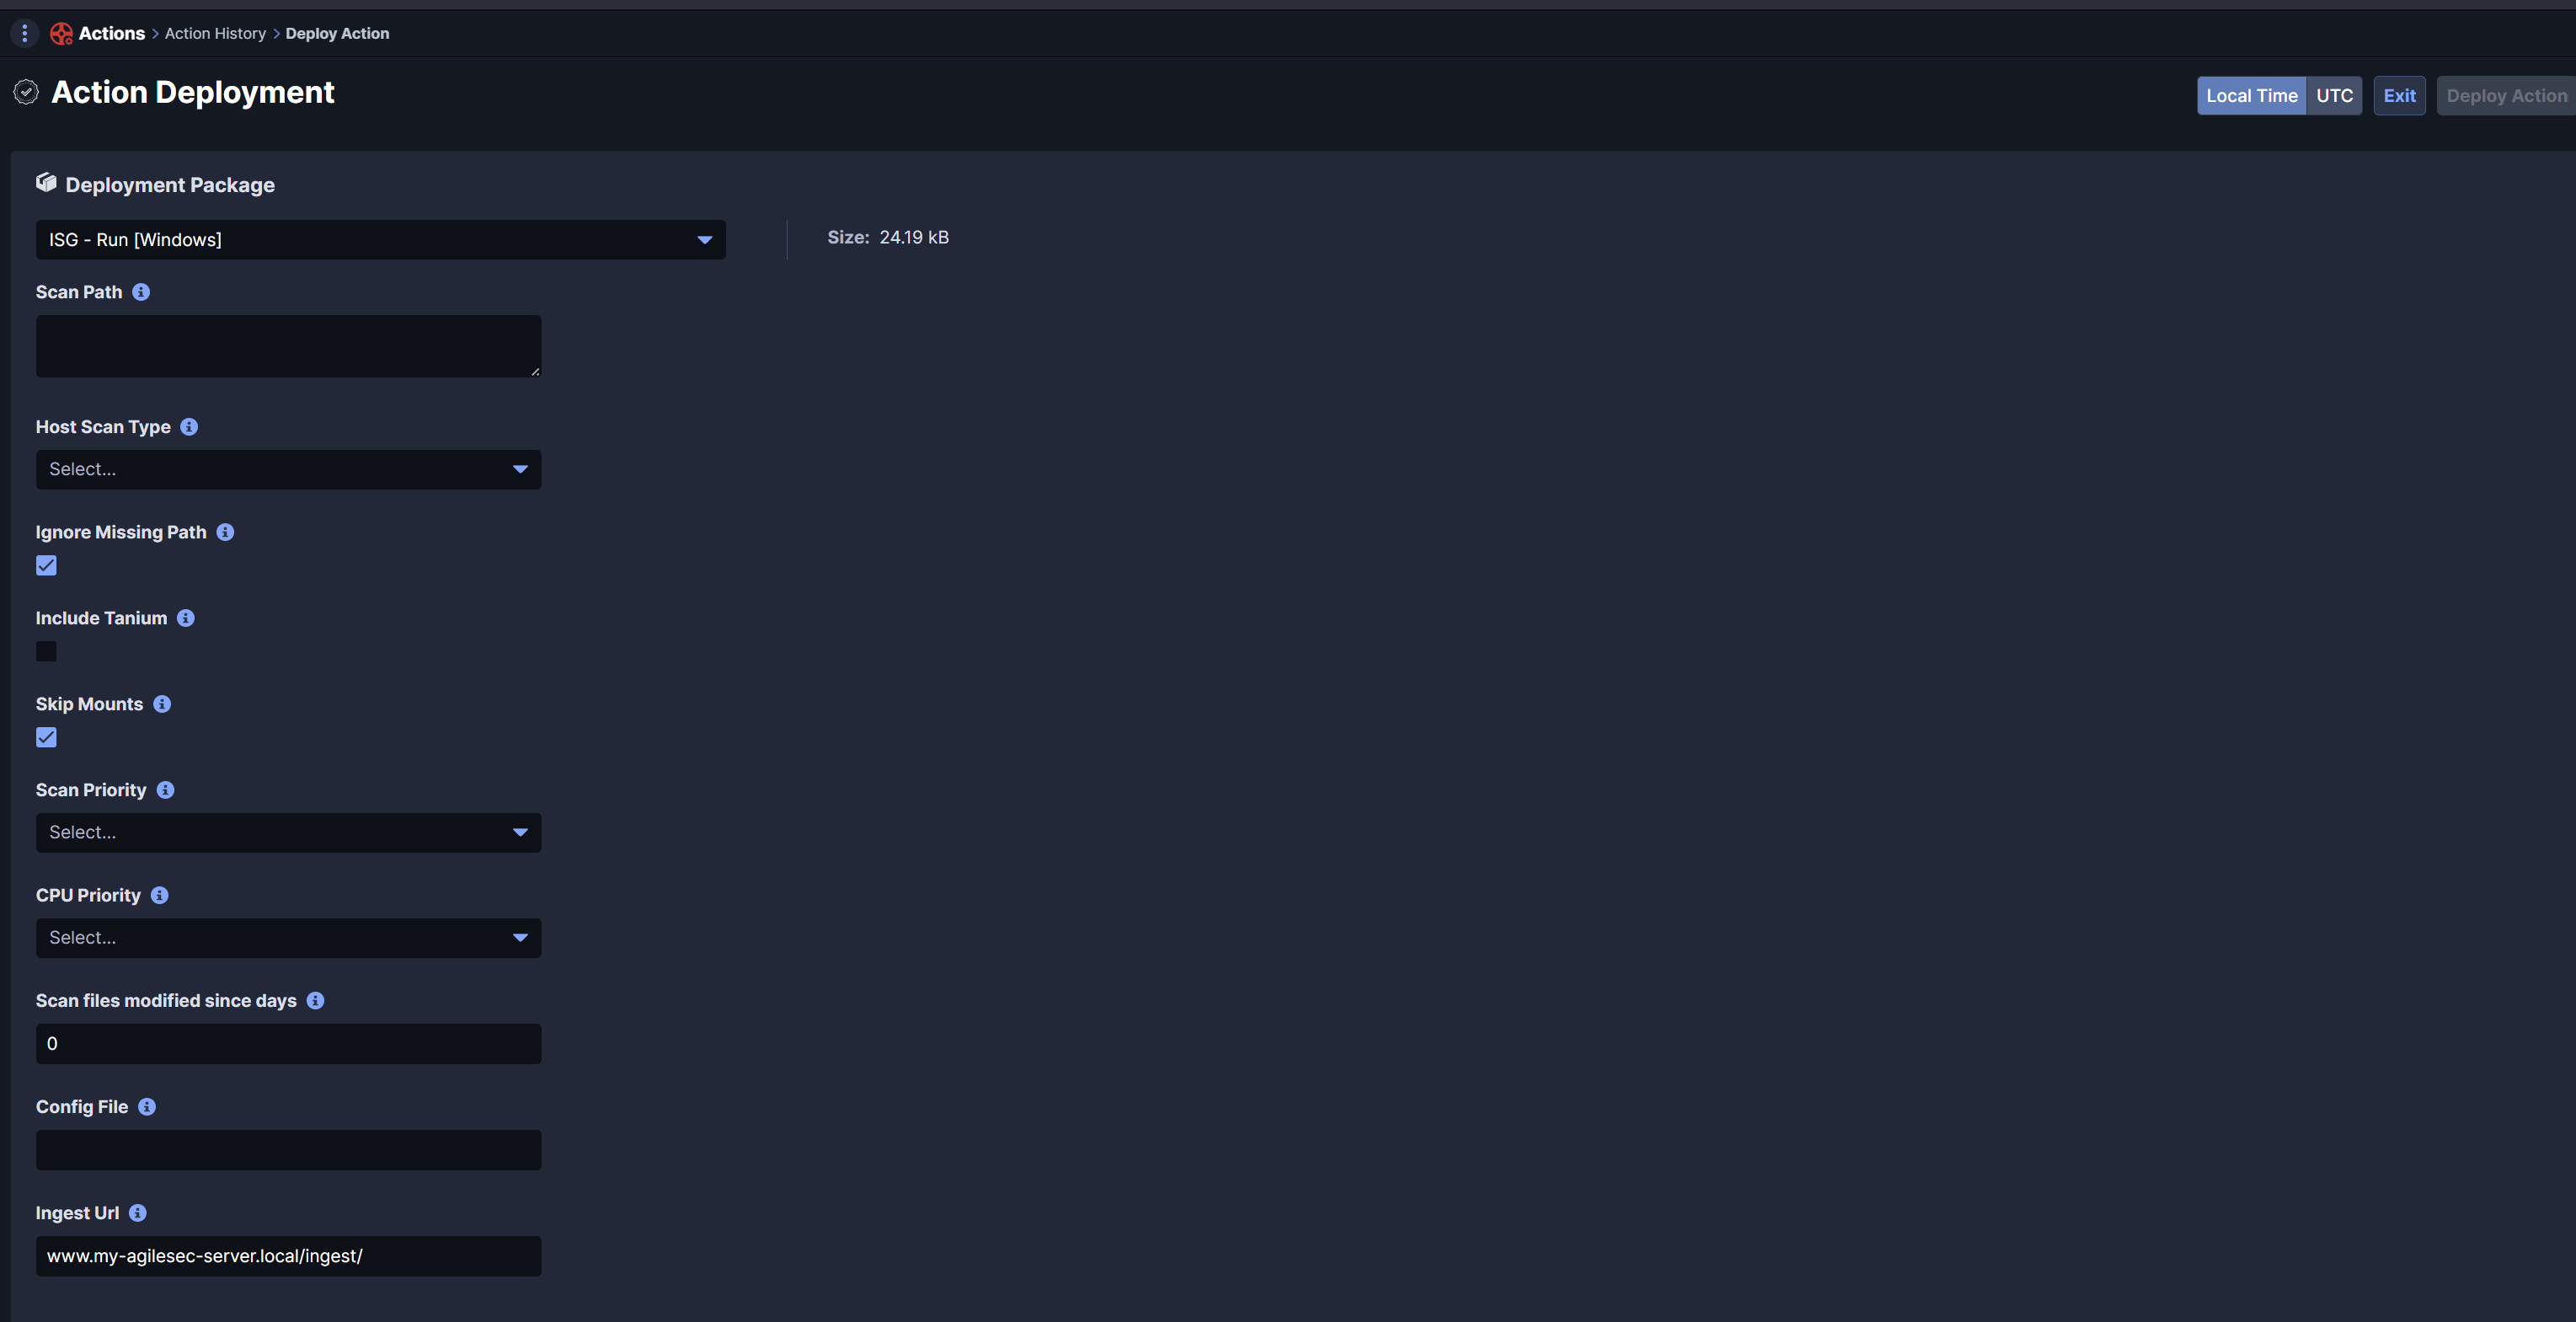
After successful deployment of the AgileSec Tanium Sensor, you can execute the Run Action against Windows or Linux devices. Select the ISG - Run Action, set the parameters, then click Deploy Action.
|
Run Action Field |
Description |
Recommended Default |
|---|---|---|
|
Scan Path |
Set the Directories or Drives to include in the analysis |
Windows: Linux: Note: using / for Linux or C:/ for Windows may be heavy and time-consuming as it scans the entire target machine. Adjust the path based on performance and scope requirements. |
|
Host Scan Type |
Select the type of scan to run:
|
Run-Full |
|
Ignore Missing Path |
Avoid fail if a given scan path is missing. For example, when targeting Windows systems, if When enabled, scan will still fail if all given scan paths do not exist. |
Checked |
|
Include Tanium |
Select to include Tanium directory in scan process |
Not Checked |
|
Skip Mounts |
Set to skip network mounts |
Checked |
|
Scan Priority |
Set priority of the discovery process vs other processes:
|
Low |
|
CPU Priority |
Set number of workers to parallelize the discovery process run:
|
Normal |
|
Config File |
Add a custom configuration file |
Leave blank unless a specific, custom configuration is needed. |
|
EDR Id |
An organization ID used by sensor to retrieve a token |
EDR Id obtained from AgileSec UI (Platform Management → EDR Management) |
|
Ingest URL |
Ingest URL of your AgileSec Server
|
|
|
Background Mode |
When enabled, scan runs as a background process. |
Enabled |
|
Log Level |
Sets the log level for the log file to Warn, Info, or Debug. When scan runs, a log file is created in the installation directory on the execution machine. Log files can be examined if there is remote access to machine.
|
Warn |
Use Case 2: Connect Jobs
Note: Saved Questions and Connect jobs are only compatible with Tanium Platform. Tanium SaaS API does not allow importing Saved Questions or Connect jobs.
Step 1: Select Target Systems
On the Tanium Home page, use Tanium’s Interact tool to Ask a Question or use the Question Builder to retrieve and group specific systems endpoints for cryptographic inventory.
AgileSec Tanium Actions run by OS, so it is recommended to group target endpoints by OS Platform.
Example: Sort by OS with Ask a Question
As an example, you may sort by OS using Ask a Question as follows.
Or search for Windows OS specifically.
Check the box beside the results you want to target then click Deploy Action.
Step 2: Execute Deploy Action
Select the ISG - Deploy action and execute it against the previously defined target systems.

|
Deploy Action Field |
Description / Notes |
|---|---|
|
Deployment Package |
Specific Action to run. Example: |
|
Deployment Path |
Path to store the different AgileSec AgileSec Discovery Packages on the Target Systems. Tanium provides default path suggestions in the Action Deployment UI. In most cases, users can rely on the default values unless they have a specific requirement to change them. |
|
DB Path |
Path to store the different AgileSec Local Databases on the target systems. By default, DB Path is the same as the Deployment Path. |
|
Minimum available space for the filesystem (GB) |
Deployment Path and DB Path must have at least the specified amount of free space or Action will fail. |
|
Action Details
|
|
|
Deployment Schedule
|
Schedule Type options:
One-Time Deployment is recommended for Deploy and Undeploy actions. Discover and Run actions use One-Time Deployment by default but may be configured with a Recurring Deployment. |
|
Targeting Criteria
|
Select the previously defined Target Systems from Step 1 to execute action on. |
After filling out the required fields, click Show Preview to Continue, review, then click Deploy Actions to proceed to action execution.
Step 3: Execute Discover Action
After successful deployment of the AgileSec Tanium Sensor, you can execute the Discover Action against Windows or Linux devices. Select the ISG - Discover Action, set the different parameters, then click Deploy Action.
|
Discover Action Field |
Description |
Recommended Default |
|---|---|---|
|
Scan Path |
Set the Directories or Drives to include in the analysis |
Windows: Linux: Note: using / for Linux may be heavy and time-consuming as it scans the entire Linux target machine. Adjust the path based on performance and scope requirements. |
|
Host Scan Type |
Select the type of scan to run:
|
None |
|
Network Scan Type |
Select the network scan type:
|
Host |
|
Ignore Missing Path |
Avoid fail if a given scan path is missing. For example, when targeting Windows systems, if When enabled, scan will still fail if all given scan paths do not exist. |
Checked |
|
Include Tanium |
Select to include Tanium directory in scan process |
Not Checked |
|
Skip Mounts |
Set to skip network mounts |
Checked |
|
Scan Priority |
Set priority of the discovery process vs other processes:
|
Low |
|
CPU Priority |
Set number of workers to parallelize the discovery process run:
|
Normal |
|
Scan files modified since days |
Limit scan to only new or modified files since x days ago. For example, if the last scan was 3 days ago, set the value to 3 to scan for new results. |
0 |
|
Config File |
Add a custom configuration file |
Leave blank unless a specific, custom configuration is needed. |
|
Background Mode |
When enabled, scan runs as a background process. |
Enabled |
|
Log Level |
Sets the log level for the log file to Warn, Info, or Debug. When scan runs, a log file is created in the installation directory on the execution machine. Log files can be examined if there is remote access to machine.
|
Warn |
Step 4: Execute Saved Questions
Navigate to Modules > Interact > Overview, locate the question in the Saved Questions panel, and click its name. Alternatively, go to Administration > Content > Saved Questions, select the question, and click Load.
Check the results. If there are results, continue to Execute Connect job. Otherwise, amend your Deployment targets or change your Saved Question to one appropriate for your use case or environment.
Step 5: Execute Connect Jobs
Navigate to Modules > Connect > Connections. Select the Connect job using the previous Saved Question as the source.
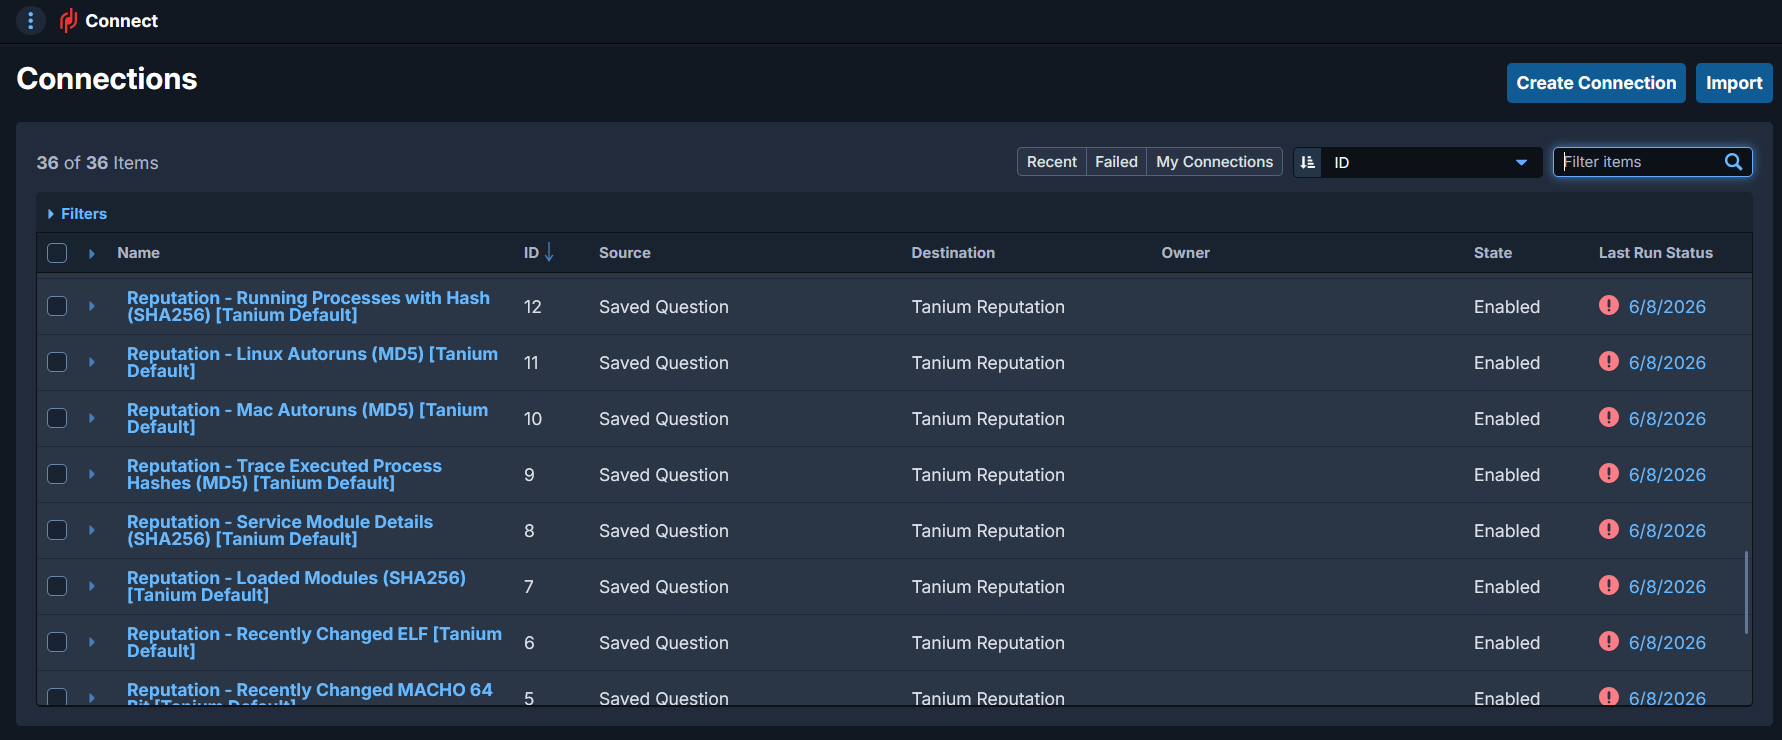
Run the Connect job to export results to the AgileSec Server.
Create Your Own Connect Jobs
To create your own, non-loaded Connect jobs, navigate to Modules > Connect > Connections.
Click Create Connection.

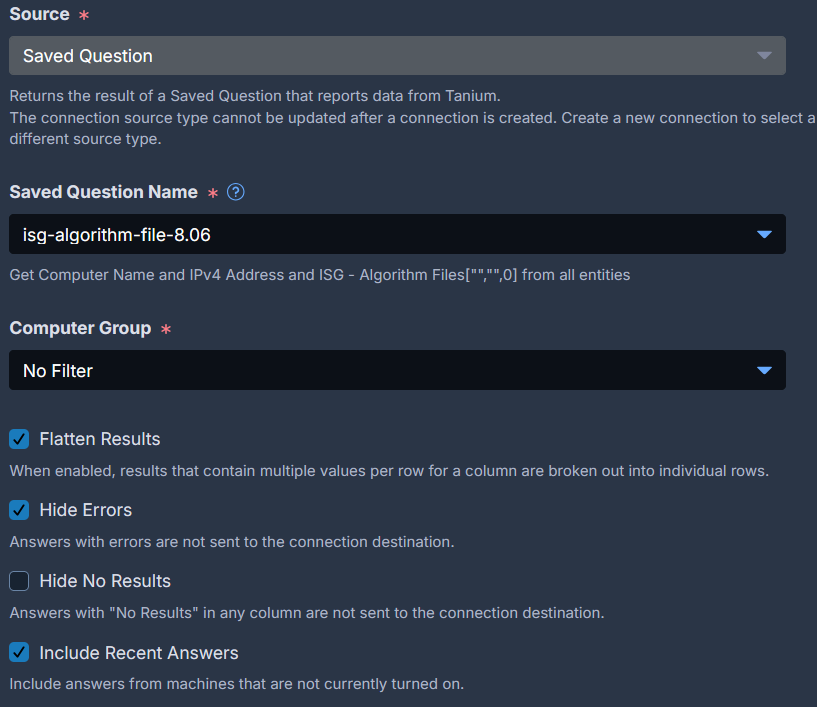
Select the following parameters:
Source: Saved Questions
Saved Question Name: Select a Saved Question
Check to enable the following settings:
-
Flatten Result
-
Hide Errors
-
Include Recent Answers
Computer Group: Create new or use an existing destination
HTTPS Destination and Authentication:
-
URL: Update
your_server_urlto your AgileSec Server endpoint (ingestion URL server)-
Examples:
https://ingest.agilesec.net/
-
-
Method: POST
-
Trust on First Use Enabled
-
Add or update Authorization HTTP Header with an AgileSec JWE bearer token (see Load ISG Tanium Connect Jobs instructions for generating a token).

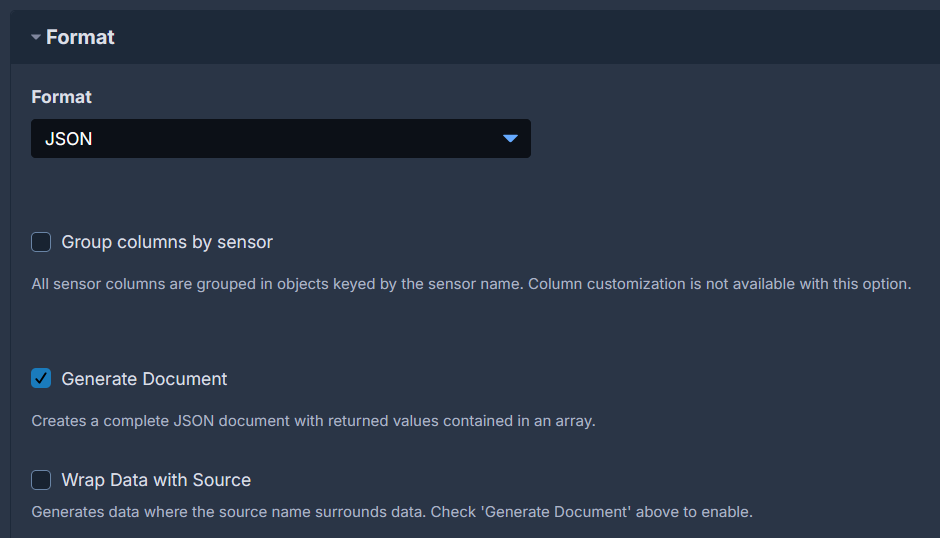
Output Format:
-
Format: JSON
-
Generate Document enabled
Click Save to save the job. Click Save and Run to save the job and export results to the AgileSec Server.