Enterprise
The AWS Cloud HSM sidecar container enables integrating the application container to an AWS Cloud HSM. The following covers how to set up the integration in Kubernetes.
For more general information on the HSM integration with PKCS#11, see HSM Integration.
Prerequisites
Before using this container, you need the following:
-
An operational AWS Cloud HSM cluster:
-
The cluster has been initialized with a TLS server certificate. The CA certificate issuing this certificate is referred to as
customerCA.crt. For more information, refer to the AWS CloudHSM docs Initialize the cluster in AWS CloudHSM. -
The cluster has been activated. For more information, refer to the AWS CloudHSM docs Activate the cluster in AWS CloudHSM.
-
An HSM user with the role
crypto-userhas been created. EJBCA uses this credential within the Crypto Token. Example:Bash/opt/cloudhsm/bin/cloudhsm-cli user create --username ejbca_issuing \ --role crypto-user --password foobar123For more information, refer to the AWS CloudHSM docs Create an HSM crypto user using CloudHSM CLI.
-
-
The Kubernetes cluster (or EJBCA pods) must have network access to the CloudHSM. Ensure that your VPC, security groups, and other networking components are configured to allow traffic on ports
2223–2225.
HSM driver container deployment parameters
The following parameters are configurable for the HSM driver container. Update these values according to your environment. They are defined in the Helm chart under the hsm.awsCloudHsmsection.
|
Name |
Description |
Comments |
|---|---|---|
|
hsmIpAddress |
IP Address of the Cloud HSM |
Default: None
|
|
logLevel |
Log level of the HSM sidecar |
Default: INFO
|
Volume mounts
The volume mount parameters are mandatory and need only be configured in the HSM sidecar container. These mounts are defined via the Helm chart under the hsm.awsCloudHsmsection, using a combination of ConfigMap and Secret resources.
You can verify the configuration by checking the corresponding files inside the container after deployment.
|
Description |
Mount point |
|---|---|
|
Issuing CA certificate of HSM Server certificate |
|
Caveats
-
You only need to configure IP address of one of the HSMs. Other HSMs which are present in the cluster will automatically be configured.
-
There is no validation for zonal availability check for used/created keys.
-
EJBCA can only work with one CloudHSM cluster.
Prepare HSM configuration
Refer to the Prerequisites section above before proceeding.
You must:
-
Obtain the IP address of one HSM node in the cluster.
-
Mount the issuing CA certificate (
customerCA.crt) in the HSM sidecar container using a Kubernetes ConfigMap. Example:Bashkubectl create configmap -n ejbcans aws-cloudhsm-trustedca-configmap \ --from-file=customerCA.crt=customerCA.crtIt is recommended to use the AWS CloudHSM CLI to generate the keys. For details, refer to the AWS CloudHSM docs Generate asymmetric keys using CloudHSM CLI.
Configure Deployment
The following provides an example of customizing the deployment using Helm. Note that the Helm chart values file values.yaml describes an example test deployment and does not include:
-
TLS connection required after the deployment and creation of the CAs.
-
Database connection.
Also note that the configuration uses Ingress for external cluster access, which is not recommended for production. Instead, use an NGINX or Apache HTTPD sidecar configured via Helm using a LoadBalancer service.
imagePullSecrets: [{ name: keyfactor-registry }]
ejbca:
  env:
    LOG_AUDIT_TO_DB: true
#################### HSM configuration - start ####################
hsm:
  enabled: true
  awsCloudHsm:
    enabled: true
    hsmIpAddress: 172.16.12.12
    logLevel: "INFO"
    customerCACrtConfigMap: trusted-ca-cert
#################### HSM configuration - end ####################
podSecurityContext:
  fsGroup: 10001
# Ingress or LoadBalancer configuration skipped
Create and verify HSM Crypto Token
To create a crypto token and test the HSM key, do the following:
-
In the EJBCA menu, click CA Functions > Crypto Tokens.
-
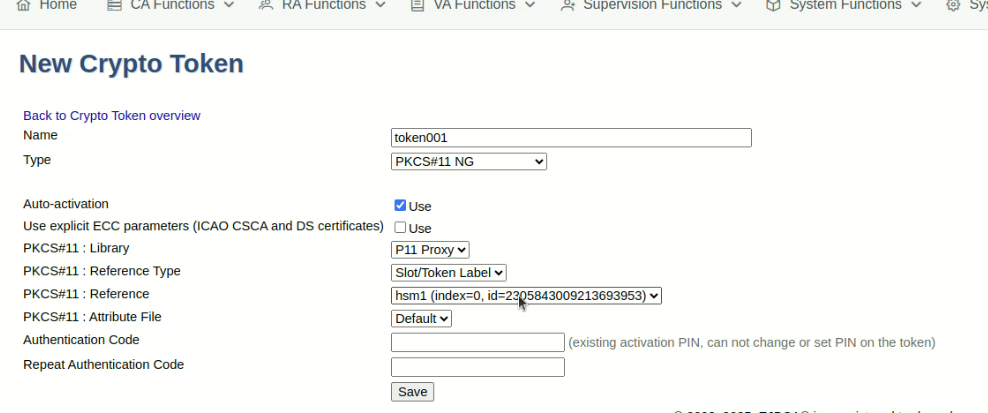
Click Create new and specify the following on the New Crypto Token page:
-
Name: Specify a name for the crypto token.
-
Type: Select PKCS#11 NG.
-
Auto-activation: Select use to allow EJBCA to save the password and reapply it after a restart so that the CA is always available.
-
For PKCS#11 : Reference Type, select Slot/Token Label.
-
For PKCS#11 : Reference, select the slot starting with hsm1.
-
Authentication Code: It comprises of your HSM user name with role crypto-user and then the password separated by colon(:) e.g.
ejbca_issuing:foobar123whereejbca_issuingis the user name andfoobar123is the password. -
Click Save to create the crypto token.
-
-
Once created, you can generate new key pairs or view any existing key pairs on the HSM.
-
To verify that the HSM key is operational, click Test.