The following describes the steps included in EJBCA CA to VA configuration and administration tasks related to VA management.
Apache Certificate Generation for the VA
Generate the Apache Certificate for the VA by following the instructions for the CA and the VA Server below.
Step 1: On the CA
-
SSH into the CA server and navigate to the
/opt/PrimeKey/supportdirectory. -
Start by taking a backup of the system:
# /opt/PrimeKey/support/system_backup.sh
-
Generate TLS certificates for the VA server on the CA. Since a VA will most likely have two IP addresses and two DNS addresses, those are indicated with the
-dand-iflags. In this case the IP and DNS names the host has are:
-
ec2-13-59-110-179.us-east-2.compute.amazonaws.com
-
ip-172-31-0-115.ec2.internal
-
35.153.160.120
-
172.31.0.115
# /opt/PrimeKey/support/create_ra_tls_certs.sh -d ec2-13-59-110-179.us-east-2.compute.amazonaws.com -d ip-172-31-0-115.ec2.internal -i 35.153.160.120 -i 172.31.0.115
-
The script will prompt to request to generate the certificates in the format that Apache will expect them on the VA. Choose Y and press Enter. The following files will be output into the /home/ec2-user/pem directory:
-
managementca.ca-mgmt.pem
-
server-mgmt.key
-
server-mgmt.pem
-
Copy these files to the VA server and put them into place with the instructions in the next section.
Step 2: On the VA Server
-
SSH into the VA server and start by taking a backup of the system.
# /opt/PrimeKey/support/system_backup.sh
-
Copy the three files that were copied to /home/ec2-user/pem to the new VA. Copy the files (most likely in /home/ec2-user/ to the /etc/httpd/ssl directory and restart Apache:
# cp /home/ec2-user/managementca.ca-mgmt.pem /home/ec2-user/server*
/etc/httpd/ssl/
# service httpd restart
-
Convert the server to a VA using the
install_ra.shscript. Note that this is the same script that is used to configure the server into a VA. There are many configuration commonalities between RAs and VAs from a system standpoint. The Peer Connections and permissions are where they differ. Theinstall_ra.shscript will import the ManagementCA certificate from the CA server so that the VA is managed by the same ManagementCA as the CA server.
# /opt/PrimeKey/support/install_ra.sh
-
The script will ask for the path to the ManagementCA PEM file from the CA server. Use the
managementcaPEM that was copied to the/etc/httpd/ssldirectory or copy a new one. -
Access the VA Administration GUI with the same certificate used to access the CA server. Test this by going to the EJBCA Admin Web on the VA. Note that there is no Management CA configured, an external ManagementCA is used.
Import the CAs Public Certificate Chain into the VA
For the VA to be aware of the CA we need to import the CAs certificates into the VA. If you need assistance with setting up a CA structure, see the EJBCA Cloud Quick Start Guide.
Step 1: On the CA
To download certificate:
-
Click CA Structure & CRLs on the CA.
-
Download the PEM file for the Root and Issuing CAs.
Step 2: On the VA
To import certificate:
-
Click Certification Authorities.
-
Click Import CA certificate.
-
Enter the name for the Root CA.
-
Click Browse and browse to the CA cert downloaded in the previous step.
-
Click Import CA Certificate.
-
-
Click Import CA Certificate
-
Enter the name for the Issuing CA.
-
Click Browse and browse to the CA cert downloaded in the previous step.
-
Click Import CA Certificate.
-
Configure TLS Connections Between the CA and VA
Step 1: Import Profiles on the CA
-
SSH into the CA server.
-
Import the profiles that are going to be used for generating the key binding and peer connection certificates. This imports OCSP and Peer systems profiles.
# /opt/ejbca/bin/ejbca.sh ca importprofiles -d /opt/PrimeKey/ra_profiles/
Step 2: Create Crypto Token to store Peer Systems authentication key on CA
To create a Crypto Token for the key binding to use:
-
Navigate to Crypto Tokens and select Create new.
-
Specify the following for the new crypto token:
-
Enter a name: Peer Systems Token.
-
Select Type: Soft.
-
Enter and repeat Authentication Code.
-
Enable Auto-activation.
-
-
Click Save.
-
Generate new key pair:
-
Alias: peer_systems_auth_key.
-
Key Spec: RSA 4096.
-
Step 3: Set up Authentication Key Binding for Mutual Authentication on CA
To create an internal key binding for authenticating the TLS connection to the VA:
-
Start by selecting Internal Key Bindings on the CA.
-
Click Create new on the AuthenticationKeyBinding tab.
-
Enter a name: Peer System Key Binding to VA.
-
Select Crypto Token: "Peer Systems Token".
-
Key Pair Alias: peer_systems_auth_key.
-
Signature Algorithm: SHA256WithRSA.
-
Click Create.
-
Click Back to overview to go back to the AuthenticationKeyBinding tab.
-
Under the Action column, select CSR and save the file (Peer System Key Binding to VA.pkcs10.pem).
Step 4: Generate Certificate for TLS Connection
To generate Certificate for TLS Connection:
-
In the Admin GUI, select RA Web, and select Make New Request.
-
Select Certificate Type: "Peer Systems User EE Profile"
-
CA: "ManagementCA".
-
Click Browse and select the "Peer System Key Binding to VA.pkcs10.pem" file.
-
Change CN, Common Name to "peersystems".
-
Change the Username to be the "peersystems"
-
Click Download PEM.
-
Save the file (
peersystems.pem).
Step 5: Import Peer Systems certificate into Authentication Key Binding on CA
-
Choose System Functions > Internal Key Bindings.
-
Click the AuthenticationKeyBinding tab.
-
Under Import externally issued certificate:
-
Target AuthenticationKeyBinding: Peer System Key Binding to CA.
-
Click Browse.
-
Select the
peersystems.pemfile. -
Click Import.
-
-
Under Action:
-
Click Enable.
-
-
The Peer Systems Authentication Key Binding should now be Active.
Setup Peer Systems
Follow the steps below to setup Peer Systems:
Step 1: On the CA
-
Choose System Functions > Peer Systems.
-
Under Outgoing Peer Connectors, click Add.
-
For Create Peer Connector, specify the following:
-
Name: Peer Connection to VA
-
URL: This should be the internal FQDN of the VA. For this example: "https:// ip-172.31.0.115.us-east-2.compute.internal/ejbca/peer/v1"
EJBCA Enterprise Cloud Uses Apache and no port designation is necessary.
-
In the Authentication Key Binding list menu, select Peer System Key Binding to VA.
-
Select Enabled.
-
Clear Process Incoming Requests.
-
-
Click Create.
-
Click Ping. You should see the error Unable to connect to peer. Unauthorized
Step 2: On the VA
-
Choose System Functions > Peer Systems.
-
You should see a connection attempt from the CA under Incoming Connections.
-
Click Create Role.
-
Ensure that – Create new role – is selected, and click Select.
-
Additional properties will show. Change the Role name to "External VA Role".
-
Select Accept Long Hanging Connections.
-
Ensure that Accept RA requests is not selected.
-
Select Access ManagementCA and any other CAs desired for the VA to access.
-
Select Publish Certificate.
-
Select Compare certificate synchronization status.
-
Click Create new role.
Step 3: On the CA
-
Click Peer Systems.
-
Click Manage on the Peer Connection to VA peer connection.
-
Click Start.
-
It will say "Running".
-
Click Refresh.
-
You should see certificates added or synchronized.
Create a Peer Publisher on the CA
To create a Peer Publisher on the CA, do the following:
-
Select Publishers in the Administration GUI.
-
Enter a name such as VA Peer Publisher.
-
Click Add.
-
Select the publisher and click Edit.
-
From the PublisherType list, select Validation Authority Peer Publisher.
-
Ensure the correct Peer System is selected.
-
Select Store CRL at the Validation Authority.
-
Click Save and Test Connection.
-
You should see Connection Tested Successfully at the top. Click Save.
Edit a Certificate Profile to use the Publisher
In order for generated certificates to be published to the VA, the profiles for the CA need to be configured to use the Peer Publisher.
-
In the Admin GUI, select CA Functions > Certificate Profiles.
-
Click Edit next to the profile from which you want to issue certificates (or create a new one).
-
Under the section Other Data, select VA Peer Publisher next to Publishers.
-
Click Save.
Edit a Certificate Authority to use the Publisher
In order for generated CRLs and CA Certificates to be published to the VA, the CA needs to be configured to use the Peer Publisher.
-
In the Admin GUI, select CA Functions > Certification Authorities.
-
Select the CA to be edited and click Edit CA.
-
Under the section Other Data, select VA Peer Publisher next to Publishers.
-
Click Save.
Create Crypto Token to Store Peer Systems Authentication Key on VA
On the VA, create a Crypto Token for the key binding to use.
-
Navigate to Crypto Tokens and select Create new.
-
Specify the following for the new crypto token:
-
Enter a name: OcspKeyBindingToken.
-
Type: SOFT.
-
Enter and repeat Authentication Code.
-
Enable Auto-activation.
-
-
Click Save.
-
Generate new key pair:
-
Alias: OcspKeyBindingKey
-
Key Spec: RSA 4096
-
Set up OCSP Key Binding for Mutual Authentication on the VA
To setup OCSP Key Binding for Mutual Authentication on the VA, do the following:
-
Click on InternalKeyBindings on the VA and then select the OcspKeyBinding tab.
-
Click Create new.
-
Enter a name for the key binding, for example “OCSPKeyBinding_IssuingCA”.
-
Select the OCSPKeyBindingToken.
-
Ensure the correct key pair alias is chosen.
-
Click Create.
-
Click Back to Overview.
-
Click CSR under the actions column.
-
Save the
OCSPKeyBinding_IssuingCA.pkcs10.pemfile.
On the CA
-
In the Admin GUI, select RA Web.
-
Click Make New Request.
-
Select the OCSP Signer EE Profile.
-
Select the Issuing CA. This is the CA certificate that is going to stamp the OCSP responses.
-
Browse to the OCSPKeyBinding_IssuingCA.pkcs10.pem file.
-
Enter a username, for example “OCSPKeyBinding_IssuingCA”.
-
Click download PEM.
On the VA
-
On the Internal Key Bindings > OCSP Key Bindings tab, click Browse to browse to the certificate that was downloaded from the RA Web.
-
Click Import.
-
The following message displays “Operation completed without errors.”
-
Click Update.
-
Click Enable. An hourglass will show in the Active Column and the text “OCSPKeyBinding_IssuingCA status is now ACTIVE” will appear at the top
-
Set the Default Responder to be the OCSP Key Binding created.
You need to repeat these steps for any other CAs you want the VA to be an OCSP responder for.
Upload the first CRL to the VA for each CA
On the CA
-
Click CA Structure & CRLs.
-
Click Get CRL for the CA being configured for OCSP.
-
Save the CRL to the local computer.
On the VA
-
Click CA Structure & CRLs.
-
Click Browse and point to the CRL downloaded in the previous step.
-
Select the CA in the list for the CA you are importing the CRL from.
-
Click Import.
Add a Publisher Queue Process Service
On the CA
To add a Publisher Queue Process Service, perform the following on the CA:
-
Select Services under System Functions.
-
In the Add Service dialog, enter the name "Peer Publisher Queue Process Service", and click Add.
-
Select the newly added service and click Edit Service.
-
In the Select Worker list, select Publish Queue Process Service.
-
Select the VA Peer Publisher in the Publishers to check.
-
Select Active next to Active.
-
Click Save.
Testing OCSP
Generate a certificate from the Issuing CA using the RA Web. The instructions will not be outlined here. It is easiest to have the key generated server-side and the certificate downloaded as PEM. Once completed run the following SSL command:
# openssl ocsp -issuer Corporate_Issuing_CAG1.cacert.pem -CAfile Corporate_Root_CAG1.cacert.pem -cert server1.pem -req_text -url https://ec2-54-161-138-211.compute-1.amazonaws.com/ejbca/publicweb/status/ocsp
Where the flags are:
|
Option |
Description |
|---|---|
|
-issuer |
OS the Issuing CA Public Certificate. |
|
-CAfile |
The Root certificate or Chain of the CA. |
|
-url |
The URL to the OCSP server. |
|
-req_text |
Optional but gives more output. |
The output should appear as follows:
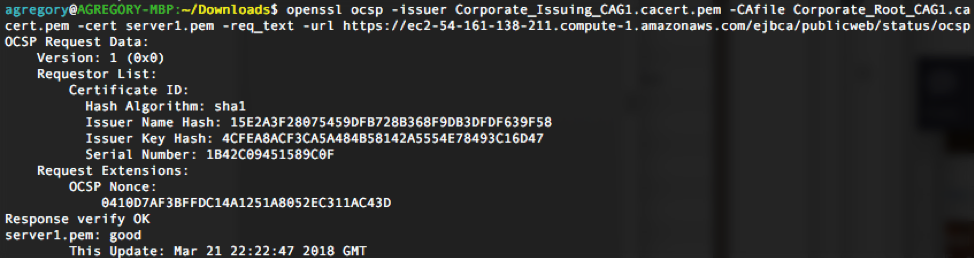
Where “Response Verify: OK” means that the stamped OCSP reply from the OCSP server was able to be validated with the certs provided in the command. “server1.pem: good” means the certificate status is good.
Revoking the Certificate
-
Select Search End Entities.
-
Search by username (end entity name).
-
Find the End Entity in the search results.
-
Click ViewCertificates on the right side.
-
Select CertificateHold from the revocation reasons.
-
Click Revoke.
-
Run the openssl command again, and the status should now be “revoked” with a reason of “Certificate Hold”.