The following sections cover administrating EJBCA and include instructions on how to create a 3-tier CA hierarchy, add custom certificate extensions, and how to create certificate profiles and end entity profiles.
Step 1 - Create 3-tier CA Hierarchy
The following sections cover how to create a 3-tier CA (Root CA, Intermediate CA, and Issuing CA) using soft keystores.
Create Root CA
Follow the steps below to create a Root CA Crypto Token, a Root CA Certificate Profile, and then the Root CA certificate.
Create Root CA Crypto Token
To create Crypto Tokens for the Root CA:
-
In EJBCA, select Crypto Tokens under CA Functions, and then click Create new.
-
Specify the following on the New Crypto Token page and click Save.
-
Name: As name for the Crypto Token, specify "Root CA Token".
-
Type=Soft.
-
Authentication Code: Enter a password for the token.
-
Auto-activation: Clear Use.
-
-
Create three key pairs within the Crypto Token:
-
Generate a signKey of size RSA 4096, used for cert signing.
-
Generate a defaultKey of size RSA 4096, used for everything not signing or test.
-
Generate a testKey of size RSA 1024, used for testing.
-
Create Root CA Certificate Profile
To create a Root CA Certificate Profile:
-
Click Certificate Profiles under CA Functions.
-
Clone the ROOTCA profile to create your own profile for the Root CA:
-
Click Clone next to the ROOTCA profile.
-
Specify "Root CA Certificate Profile" and click Create from template.
-
-
Click Edit on the new Root CA Certificate Profile and specify the following:
-
Available key algorithms: RSA.
-
Available bit lengths: 4096.
-
Validity: 25y.
-
LDAP DN order: Clear (to get X509 DN ordering) for greater compatibility with systems that use certificates.
-
Available CAs: Any CA.
-
-
Click Save to save the Root CA Profile.
Create Root CA Certificate
To create a Root CA Certificate:
-
Click Certificate Authorities under CA Functions.
-
In the Add CA field, enter the name "Root CA" and click Create.
-
On the Create CA page, specify the following and then click Create:
-
Signing Algorithm: SHA256WithRSA.
-
Crypto Token: Root CA Token.
-
Subject DN: <RootCASubjectDN>.
-
Signed By: Self Signed.
-
Certificate Profile: Root CA Certificate Profile.
-
Validity: 25y.
-
CRL Distribution Point: <http://crl.yourcompany.com/Root_CA.crl>.
-
OCSP Service Locator URI: <http://yourocsp.company.com>.
-
Create Intermediate CA
Follow the steps below to create an Intermediate CA Crypto Token, an Intermediate CA Certificate Profile, and then an Intermediate CA certificate.
Create Intermediate CA Crypto Token
To create an Intermediate CA Crypto Token:
-
In EJBCA, select Crypto Tokens under CA Functions, and then click Create new.
-
Specify the following on the New Crypto Token page and click Save.
-
Name: As name for the Crypto Token, specify "Intermediate CA Token".
-
Type=Soft.
-
Authentication Code: Enter a password for the token.
-
Auto-activation: Clear Use.
-
-
Create three key pairs within the Crypto Token:
-
Generate a signKey of size RSA 4096, used for cert signing.
-
Generate a defaultKey of size RSA 4096, used for everything not signing or test.
-
Generate a testKey of size RSA 1024, used for testing.
-
Create Intermediate CA Certificate Profile
To create an Intermediate CA Certificate Profile:
-
Click Certificate Profiles under CA Functions.
-
Clone the SUBCA profile to create your own profile for the Intermediate CA:
-
Click Clone next to the SUBCA profile.
-
Specify "Intermediate CA Certificate Profile" and click Create from template.
-
-
Click Edit on the new Intermediate CA Certificate Profile and specify the following:
-
Available key algorithms: RSA.
-
Available bit lengths: 4096.
-
Validity: 20y.
-
LDAP DN order: Clear (to get X509 DN ordering) for greater compatibility with systems that use certificates.
-
Available CAs: Root CA.
-
-
Click Save to save the Intermediate CA Certificate Profile.
Create Intermediate CA Certificate
To create an Intermediate CA Certificate:
-
Click Certificate Authorities under CA Functions.
-
In the Add CA field, enter the name "Intermediate CA" and click Create.
-
On the Create CA page, specify the following and then click Create:
-
Signing Algorithm: SHA256WithRSA.
-
Crypto Token: Intermediate CA Token.
-
Subject DN: <IntermediateCASubjectDN>.
-
Signed By: Root CA.
-
Certificate Profile: Intermediate CA Certificate Profile.
-
Validity: 20y.
-
CRL Distribution Point: <http://crl.yourcompany.com/Intermediate_CA.crl>.
-
OCSP Service Locator URI: <http://ocsp.yourcompany.com>.
-
Create Issuing CA
Create Issuing CA Crypto Token
To create an Issuing CA Crypto Token:
-
In EJBCA, select Crypto Tokens under CA Functions, and then click Create new.
-
Specify the following on the New Crypto Token page and click Save.
-
Name: As name for the Crypto Token, specify "Issuing CA Token".
-
Type=Soft.
-
Authentication Code: Enter a password for the token.
-
Auto-activation: Clear Use.
-
-
Create three key pairs within the Crypto Token:
-
Generate a signKey of size RSA 4096, used for cert signing.
-
Generate a defaultKey of size RSA 4096, used for everything not signing or test.
-
Generate a testKey of size RSA 1024, used for testing.
-
Create Issuing CA Certificate Profile
To create an Issuing CA Certificate Profile:
-
Click Certificate Profiles under CA Functions.
-
Clone the SUBCA profile to create your own profile for the Issuing CA:
-
Click Clone next to the SUBCA profile.
-
Specify "Issuing CA Certificate Profile" and click Create from template.
-
-
Click Edit on the new Issuing CA Certificate Profile and specify the following:
-
Available key algorithms: RSA.
-
Available bit lengths: 4096.
-
Validity: 15y.
-
LDAP DN order: Clear (to get X509 DN ordering) for greater compatibility with systems that use certificates.
-
Available CAs: Intermediate CA.
-
-
Click Save to save the Issuing CA Certificate Profile.
Create Issuing CA Certificate
To create an Issuing CA Certificate:
-
Click Certificate Authorities under CA Functions.
-
In the Add CA field, enter the name "Issuing CA" and click Create.
-
On the Create CA page, specify the following and then click Create:
-
Signing Algorithm: SHA256WithRSA.
-
Crypto Token: Issuing CA Token.
-
Subject DN: <IssuingCASubjectDN>.
-
Signed By: Intermediate CA.
-
Certificate Profile: Issuing CA Certificate Profile.
-
Validity: 15y.
-
CRL Distribution Point: <http://crl.yourcompany.com/Issuing_CA.crl>.
-
OCSP Service Locator URI: <http://ocsp.yourcompany.com>.
-
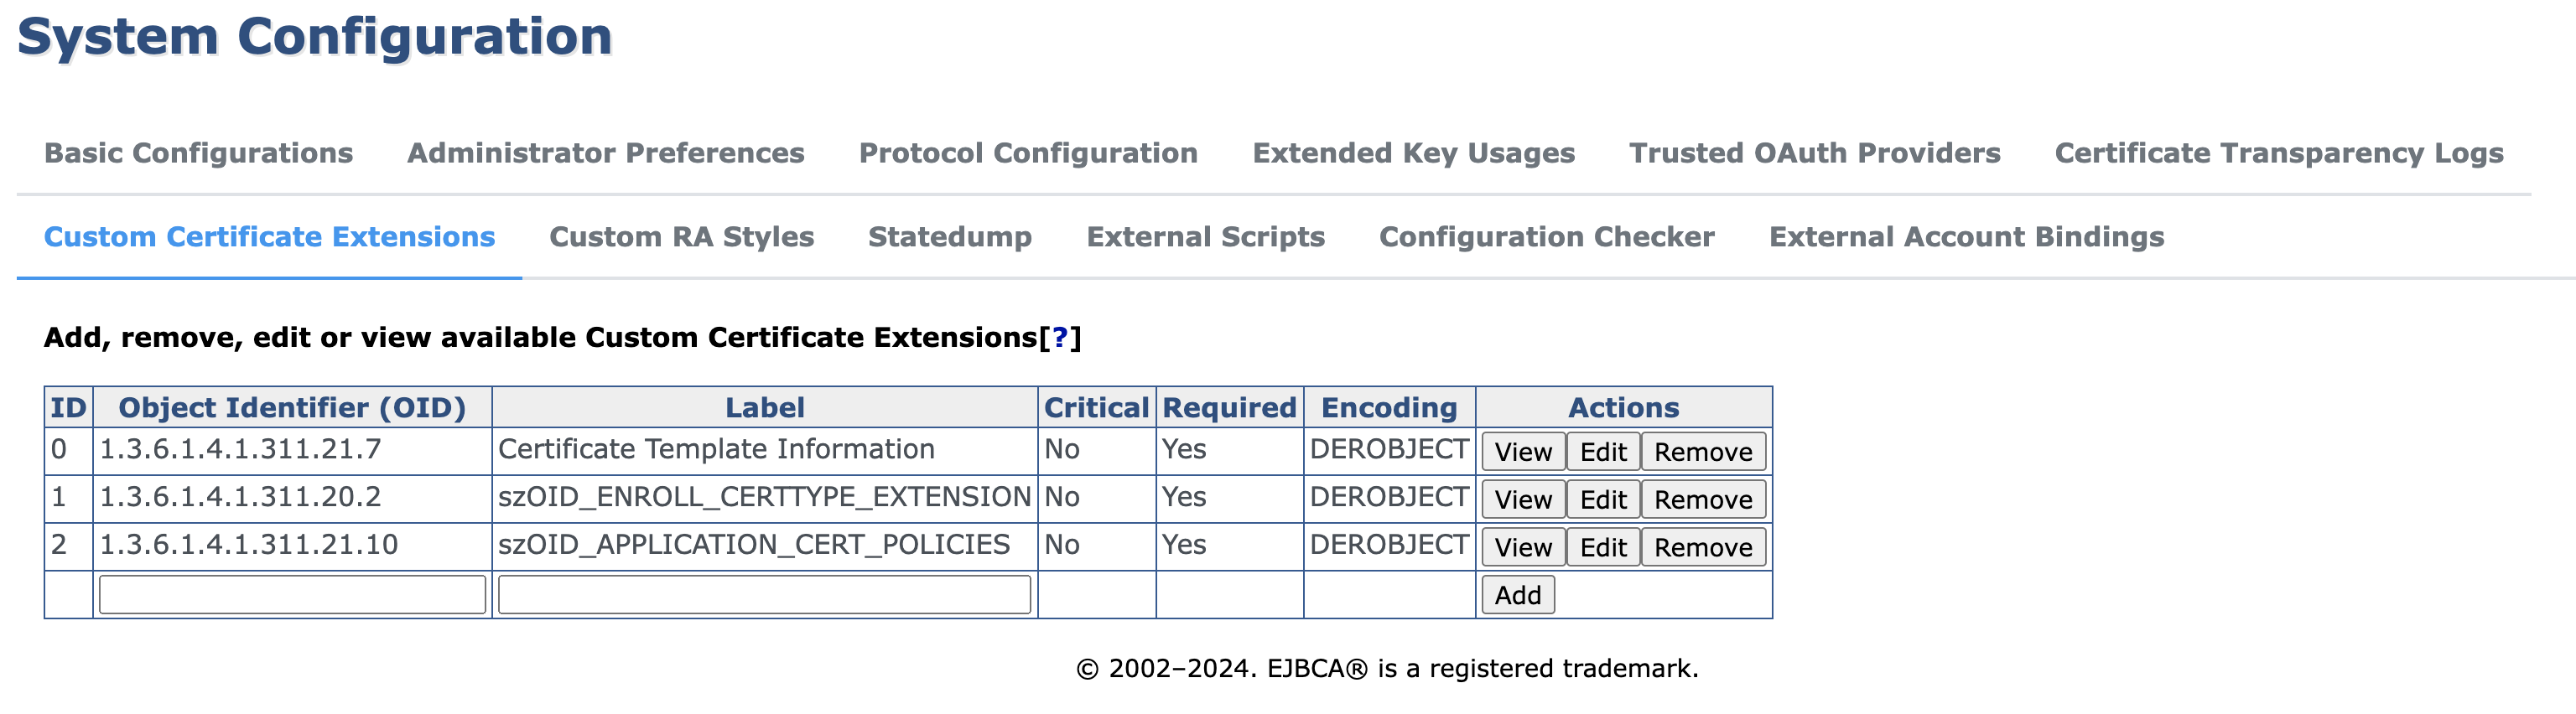
Step 2 - Create Custom Certificate Extensions
The Microsoft Certificate Template Information extension contains OID and revision of the template used to issue the certificate. To create the custom extension, do the following:
-
In EJBCA, click System Configuration.
-
Select the Custom Certificate Extensions tab and specify the following:
-
Object Identifier (OID): "1.3.6.1.4.1.311.21.7".
-
Label: "Certificate Template Information".
-
-
Click Add.
-
Click Edit on the added object and specify the following:
-
Select the Encoding = DEROBJECT
-
Set Dynamic to true.
-
-
Click Save.
Step 3 - Create User and Computer Auto-enrollment Certificate Profiles
The following describes how to create user and computer profiles for Auto-enrollment.
If the Certificate Template to be mapped with the Certificate Profile uses "Supply in the request" option, following options need to be enabled in the Certificate Profile:
-
Allow Subject DN Override by CSR
-
Allow Extension Override for 2.5.29.17 (Subject Alt Name)
Create Certificate Profile for User Auto-enrollment
To create a certificate profile for User Auto-enrollment:
-
Click Certificate Profiles under CA Functions.
-
Clone the ENDUSER profile to create your own profile for the Intermediate CA:
-
Click Clone next to the ENDUSER profile.
-
Specify "User_Certificate_Profile" and click Create from template.
-
-
Click Edit on the new User_Certificate_Profile and specify the following:
-
Key Usage: Digital Signature, Non-repudiation, and Key encipherment.
-
Extended Key Usage: Client Authentication, Email Protection, and MS Encrypted File System (EFS).
-
Used Custom Certificate Extensions: Certificate Template Information.
-
Available CAs: Issuing CA.
-
-
Click Save to save the Certificate Profile.
Create Certificate Profile for Computer Auto-enrollment
To create a certificate profile for Computer Auto-enrollment:
-
Click Certificate Profiles under CA Functions.
-
Clone the ENDUSER profile to create your own profile for the Intermediate CA:
-
Click Clone next to the ENDUSER profile.
-
Specify "Computer_Certificate_Profile" and click Create from template.
-
-
Click Edit on the new Computer_Certificate_Profile and specify the following:
-
Key Usage: Digital Signature and Key encipherment.
-
Extended Key Usage: Client Authentication and Server Authentication.
-
Used Custom Certificate Extensions: Certificate Template Information.
-
Available CAs: Issuing CA.
-
-
Click Save to save the Certificate Profile.
Step 4 - Create User and Computer Auto-enrollment End Entity Profiles
The following describes how to create User and Computer Auto-enrollment End Entity Profiles.
Create End Entity Profile for User Auto-enrollment
To create an End Entity Profile for User Auto-enrollment:
-
Click End Entity Profiles under RA Functions.
-
In the Add Profile field, specify User_End_Entity_Profile and click Add.
-
Select the User_End_Entity_Profile, click Edit End Entity Profile, and specify the following:
-
Subject DN Attributes: CN.
-
Subject Alternative Name: MS UPN, User Principal Name.
-
Default Certificate Profile: User_Certificate_Profile.
-
Available Certificate Profiles: User_Certificate_Profile.
-
Default CA: Issuing CA.
-
Available CAs: Issuing CA.
-
Default Token: User Generated.
-
Available Tokens: User Generated.
-
-
Click Save to store the end entity profile.
Create End Entity Profile for Computer Auto-enrollment
To create an End Entity Profile for Computer Auto-enrollment:
-
Click End Entity Profiles under RA Functions.
-
In the Add Profile field, specify Computer_End_Entity_Profile and click Add.
-
Select the Computer_End_Entity_Profile, click Edit End Entity Profile, and specify the following:
-
Subject DN Attributes: CN.
-
Subject Alternative Name: DNS Name.
-
Default Certificate Profile: Computer_Certificate_Profile.
-
Available Certificate Profiles: Computer_Certificate_Profile.
-
Default CA: Issuing CA.
-
Available CAs: Issuing CA.
-
Default Token: User Generated.
-
Available Tokens: User Generated.
-
-
Click Save to store the end entity profile.
Step 5 - Configure Key Archival (Optional)
The following describes how to optionally configure key archival.
Add Custom Certificate Extensions
Key Archival requires two additional Custom Certificate Extensions to be configured. The extension szOID_ENROLL_CERTTYPE_EXTENSION represents the value of the CN attribute of a certificate template object. The extension szOID_APPLICATION_CERT_POLICIES represents application policies. The following steps provide the values to configure:
-
In EJBCA, click System Configuration.
-
Select the Custom Certificate Extensions tab and configure the following values. Note that several of these values can only be configured when editing the Custom Certificate Extension.
-
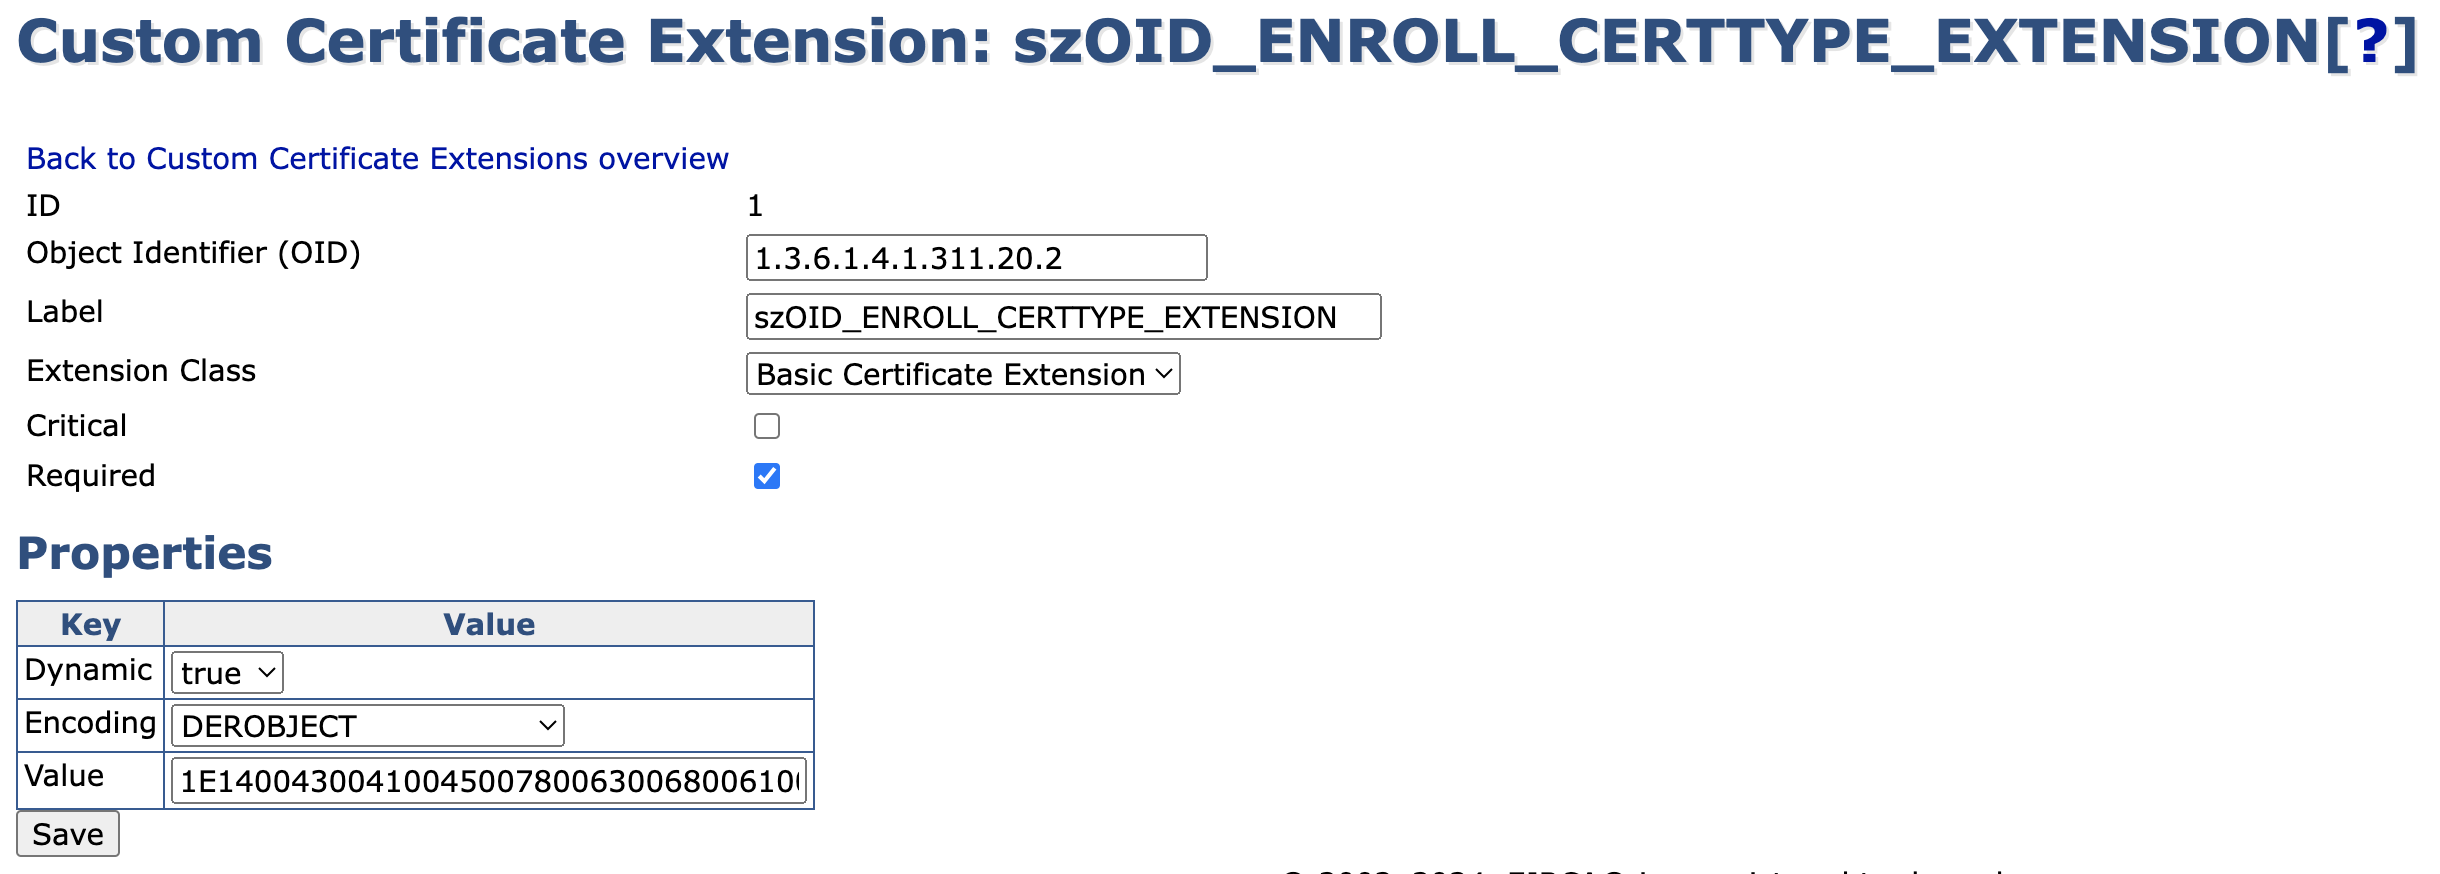
Object Identifier (OID): 1.3.6.1.4.1.311.20.2, Label: szOID_ENROLL_CERTTYPE_EXTENSION, Encoding = DEROBJECT, Dynamic: true, Value: 1E140043004100450078006300680061006E00670065, Critical: No
-
Object Identifier (OID): 1.3.6.1.4.1.311.21.10, Label: szOID_APPLICATION_CERT_POLICIES, Encoding = DEROBJECT, Dynamic: true, Value: 300D300B06092B0601040182371505, Critical: No
-
The following example displays the custom certificate extension szOID_ENROLL_CERTTYPE_EXTENSION.
Create Certificate Profile for Key Exchange Certificate
To create a certificate profile for Key Exchange Certificate:
-
Click Certificate Profiles under CA Functions.
-
Clone the ENDUSER profile to create your own profile for the Intermediate CA:
-
Click Clone next to the ENDUSER profile.
-
Specify "Microsoft_Key_Exchange_Certificate" and click Create from template.
-
-
Click Edit on the new Microsoft_Key_Exchange_Certificate and specify the following:
-
Available Key Algorithms: RSA
-
Available Bit Lengths: 2048/3072/4096 bits (most recommended bit length is 4096)
-
Validity or end date of the certificate: 30d
-
Key Usage: Key encipherment.
-
Extended Key Usage: szOID_KP_CA_EXCHANGE
-
Authority Information Access: Use.
-
OCSP Service Locator URI: http://<domain name or IP address>:8080/ejbca/publicweb/status/ocsp
-
Used Custom Certificate Extensions: szOID_APPLICATION_CERT_POLICIES, szOID_ENROLL_CERTIFICATE_EXTENSION.
-
Available CAs: Issuing CA.
-
-
Click Save to save the Certificate Profile.
Enable Key Recovery in System Configuration
Key Archival requires Key Recovery to be enabled in System Configuration. The following steps are required to enable it:
-
In EJBCA, click System Configuration.
-
Under Basic Configurations, check Enable Key Recovery.
Enable Key Recovery for End Entity Profiles
To enable key recovery for the end entity profiles, perform the following:
-
Click End Entity Profiles under RA Functions.
-
Select the User_End_Entity_Profile.
-
Click Edit End Entity Profile.
-
Enable Key Recoverable.
-
Click Save to store the end entity profile and go back to the list of end entity profiles.
-
-
Select the Computer_End_Entity_Profile.
-
Click Edit End Entity Profile.
-
Enable Key Recoverable.
-
Click Save to store the end entity profile.
-
Next: EJBCA Policy Server Configuration
Next, set up EJBCA as a Policy Server for auto-enrollment, see Part 3b: EJBCA Policy Server Configuration.