The code signing integration uses the following servers:
-
EJBCA CA
-
SignServer Code Signing
-
Jenkins CI
Network traffic between the instances must be allowed. If running in AWS, the most straightforward is to allow all local virtual private cloud (VPC) traffic to the nodes, see SignServer Cloud AWS Launch Guide.
Follow the instructions in the following sections to set up the instances:
Setting up EJBCA Instance
First, launch a standard EJBCA Cloud instance according to the EJBCA Cloud Documentation. Once you have launched your EJBCA Cloud instance and have access to the EJBCA Admin UI, set up code signing profiles in EJBCA according to the following instructions.
Create Certificate Profile
Certificate Profiles model how CAs look with regards to the different types of certificates, DN contents, extensions, and so on. For more information, refer to the EJBCA Documentation Certificate Profiles Overview.
To create a code signing certificate profile:
-
In EJBCA, click Certificate Profiles.
-
Enter CodeSigning in the input field and click Add to create a new certificate profile.
-
Click Edit on the CodeSigning profile and specify the following:
-
Key Usage: Select only Digital Signature.
-
Extended Key Usage: Select only Code Signing.
-
Click Save.
-
Create End Entity Profile
End Entity Profiles model how the certificates themselves will look in terms of what fields should be in the certificates and what Certificate Profiles and CAs are allowed to use them. For more information, refer to the EJBCA Documentation End Entity Profiles Overview.
To create a code signing end entity profile:
-
In EJBCA, click End Entity Profiles.
-
Enter CodeSigning in the input field and click Add profile to create a new end entity profile.
-
Click Edit on the CodeSigning end entity profile and specify the following:
-
Subject DN Attributes: Select O, Organization and click Add.
-
Subject DN Attributes: Select C, Country and click Add.
-
Default Certificate Profile: Specify CodeSigning.
-
Available Certificate Profiles: Specify CodeSigning.
-
Click Save.
-
Setting up SignServer Instance
Launch a standard SignServer Cloud instance with the default settings according to the SignServer Cloud Documentation. Once you have access to the SignServer Admin UI, configure the SignServer instance to allow the EJBCA SuperAdmin to administrate SignServer, and add the SignServer signer for Java code signing.
TLS Certificate and SuperAdmin Access
We want to have the TLS certificate for SignServer generated from EJBCA, and we want to use a single SuperAdmin keystore/client certificate used for accessing both the EJBCA and SignServer Admin UIs.
To generate a TLS certificate from EJBCA, perform the steps outlined in Regenerate TLS Keys and Certificates.
To allow the EJBCA SuperAdmin to administrate SignServer:
-
SSH to the SignServer instance.
-
Run the following command to allow the EJBCA SuperAdmin access to SignServer:
# cd /opt/signserver # bin/signserver wsadmins -allowany -
Open SignServer Admin Web in a browser and authenticate with the EJBCA SuperAdmin certificate.
-
Select the Administration tab and click Add to add authorization for the current Issuer DN.
-
On the SignServer Administrators tab, change the Current Setting: Allow any to Only Listed by clicking Switch to "Only Listed".
Configure a Java Code Signing Worker
Our Java project will produce a .jar file as output, and this is the artifact we want to sign using Java JAR signing. This guide takes the easy route and uses a signing certificate issued by the same CA as the TLS and admin certificates, but you can use a dedicated code signing CA as well.
To configure the Java signer, first add the signer and then install a new signer certificate according to the following instructions. For more information on code signing, see the Code Signing.
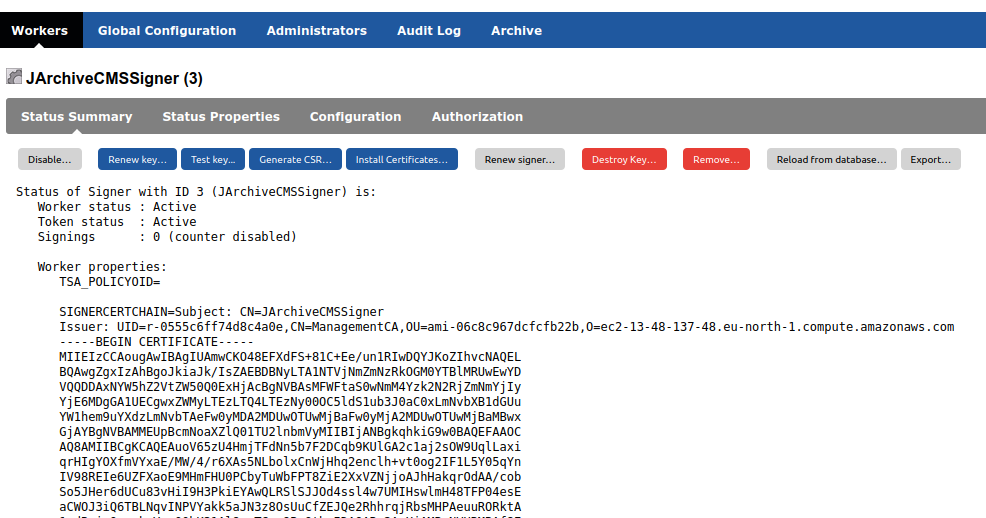
Add JArchive CMS Signer
To add the JArchive CMS Signer, do the following:
-
Go to the Workers page and click Add to add a new worker.
-
On the Add Worker / Load Template page, choose the method From Template.
-
In the Load From Template list menu, select jarchive_cms_signer.properties and click Next.
-
On the Configuration page, click Apply to load the default signer configuration and create the signer. Since the default template uses keys from the default sample crypto token, you do not need to update the default configuration.
Install Signer Certificate
Perform the following to install a new signer certificate.
-
Go to the Workers page.
-
Select the JArchive CMS signer, click Generate CSR and specify the following:
-
Specify DN as CN=JArchiveCMSSigner.
-
-
Click Generate > Download and save the file JArchiveCMSSigner-code00003.p10.
Next, configure EJBCA according to the following
-
In the EJBCA Admin UI, click Add End Entity and specify the following:
-
End Entity Profile: CodeSigning.
-
Username: JArchiveCMSSigner.
-
Enrollment code: onetime123.
-
CN: JArchiveCMSSigner.
-
O: MyOrganization (use your organization name).
-
C: SE (use your ISO 3166 two letter country code).
-
-
Click Add to create the end entity.
Then, generate a certificate in the EJBCA RA Web:
-
In the EJBCA RA Web, click Enroll>Use Username and specify the following:
-
Username: JArchiveCMSSigner.
-
Enrollment code: onetime123.
-
-
Click Check and upload the JArchiveCMSSigner-code00003.p10.
-
Click Download PEM full chain and save the file JArchiveCMSSigner.pem.
Finally, install the signer certificates in SignServer:
-
In the SignServer Admin Web, select the JArchiveCMSSigner in the workers list, and click Install Certificates.
-
Browse for the JArchiveCMSSigner.pem certificate and click Add.
-
Click Install.
Setting up Jenkins Instance
The Jenkins server is configured with a Pipeline to build a sample Java project. The Pipeline automates building your Java application with Maven in Jenkins and is created as a Jenkinsfile.
The Jenkinsfile is a text file that contains the definition of the Jenkins Pipeline, which in this case implements a basic three-stage continuous delivery pipeline including the stages build, test, and deliver. The GitHub repository signservertools / jenkins-integration directory includes a sample Jenkinsfile and the scripts subdirectory contains an example deliver stage script (deliver.sh) with commands that are executed when Jenkins processes the Deliver stage of the Pipeline. For more information on using Jenkins to build the simple Java application with Maven, refer to the Jenkins tutorial Build a Java app with Maven.
Some configuration is also needed to use the recently configured SignServer instance, or point it to the right SignServer instance when the machine has been restarted and given a new name/IP.
Start the Jenkins Docker Container
To start the Jenkins server.
-
SSH to Jenkins:
ssh -i ~/.ssh/your-public-key.pem ec2-user@ec2-13-53-109-81.eu-north-1.compute.amazonaws.com -
Start Jenkins:
sudo -i
./startJenkinsScreen.sh (Starts Jenkins in screen session)
screen -ls
This starts the screen session Jenkins.
-
Open Jenkins in your browser (using your standard Admin password):
http://ec2-13-53-109-81.eu-north-1.compute.amazonaws.com:8080
admin:<standard password>
You should now see the simple-java project according to the Jenkins tutorial Build a Java app with Maven.
-
Click Open Blue Ocean on the left to access Jenkins’s Blue Ocean interface.
-
Click on the simple-java pipeline to view previous executions of the pipeline.
Configure Pipeline to Use Code Signing Signer
To configure the Jenkins Pipeline to use the JArchiveCMSSigner for code signing;
-
SSH to Jenkins (if not logged in already):
ssh -i ~/.ssh/your-public-key.pem ec2-user@ec2-13-53-109-81.eu-north-1.compute.amazonaws.com sudo -i -
Edit the deliver stage script (deliver.sh) that performs the code signing:
cd /root/git/simple-java-maven-app/jenkins/scripts vim deliver.sh -
Paste the following contents into the deliver.sh script:
#!/usr/bin/env bash echo 'The following complex command extracts the value of the <name/> element' echo 'within <project/> of your Java/Maven project''s "pom.xml" file.' set -x NAME=`mvn help:evaluate -Dexpression=project.name | grep "^[^\[]"` set +x echo 'The following complex command behaves similarly to the previous one but' echo 'extracts the value of the <version/> element within <project/> instead.' set -x VERSION=`mvn help:evaluate -Dexpression=project.version | grep "^[^\[]"` set +x EATER="$(jenkins/signserver/bin/signclient signdocument -host ec2-54-87-136-94.compute-1.amazonaws.com -port 443 -workername JArchiveCMSSigner -infile "target/${NAME}-${VERSION}.jar" -outfile "target/${NAME}-${VERSION}-signed.jar" -truststore jenkins/certs/truststore-signserver.jks -truststorepwd "changeit" -keystore $keystore -keystorepwd $password -clientside -digestalgorithm SHA-256)" RETVAL=$? if [ $RETVAL -eq 0 ]; then echo $EATER echo 'JAR signed successfully.' else echo $EATER echo 'JAR signing failed.' exit 1 fi EATER2="$(jarsigner -verify -strict -verbose -keystore jenkins/certs/SignCA-chain.jks -storepass changeit target//${NAME}-${VERSION}-signed.jar)" RETVAL=$? if [ $RETVAL -eq 0 ]; then echo $EATER2 echo 'JAR signing verified.' echo 'Rename signed JAR.' mv -f "target/${NAME}-${VERSION}-signed.jar" "target/${NAME}-${VERSION}.jar" else echo $EATER2 echo 'JAR signing verification failed.' exit 1 fi echo 'The following Maven command installs your Maven-built Java application' echo 'into the local Maven repository, which will ultimately be stored in' echo 'Jenkins''s local Maven repository (and the "maven-repository" Docker data' echo 'volume).' set -x mvn jar:jar install:install help:evaluate -Dexpression=project.name set +x echo 'The following command runs and outputs the execution of your Java' echo 'application (which Jenkins built using Maven) to the Jenkins UI.' set -x java -jar target/${NAME}-${VERSION}.jar ~ -
Find the existing (old) SignServer instance hostname and replace it with the new hostname of the SignServer instance. For example, edit the hostname manually or run the following command and update with your relevant values:
:%s/ec2-54-87-136-94.compute-1.amazonaws.com/ec2-13-48-31-155.eu-north-1.compute.amazonaws.com/g -
Run the following to stage and commit the changes in Git:
# git stage .
# git commit -m "Change SignServer hostname"
Configure Jenkins with trusted CA Certificate for TLS and Code Signing
This step is needed when a new instance of EJBCA has been set up (a fresh installation), so that the Management CA Root CA certificate has changed.
-
In the EJBCA Admin UI:
-
Click CA Structure and CRLs>Management CA>Download JKS File.
-
Enter the password to use for this JKS file: changeit.
-
Click Download JKS file and save the file ManagementCA.cacert.jks.
-
-
Copy the file ManagementCA.cacert.jks to the Jenkins server:
scp -i ~/.ssh/your-public-key.pem ManagementCA.cacert.jks ec2-user@ec2-13-53-109-81.eu-north-1.compute.amazonaws.com:. -
SSH to Jenkins (if not logged in already):
ssh -i ~/.ssh/your-public-key.pem ec2-user@ec2-13-53-109-81.eu-north-1.compute.amazonaws.com sudo -i -
Move the truststore file to the correct location
(/root/git/simple-java-maven-app/jenkins/scripts):cd /root/git/simple-java-maven-app/jenkins/scripts mv /home/ec2-user/ManagementCA.cacert.jks . -
Run the following to stage and commit the changes in Git:
# git stage .
# git commit -m "Change SignServer hostname"
Optional: Configure Jenkins with Client Certificate for Authenticating with SignServer
We can use client certificate authentication, instead of allowing code signing from all clients that can access SignServer. This is done by setting up authorization for the JArchive CMS Signer in SignServer. SignClient, as used by the shell script deliver.sh, will then use a client certificate to authenticate to SignServer. Without an authorized client certificate, Jenkins will not be allowed to sign files.
When JArchiveCMSSigner is configured to use client certificate authentication, you can add the credentials in the Jenkins Administration. The Jenkinsfile provides the certificate and password as variables to the code and the password is thus not hardcoded in any scripts, neither the deliver stage script nor the Jenkinsfle.
In the EJBCA Admin UI:
-
Click Add End Entity and specify the following:
-
End Entity Profie: AdminEndEntity.
-
Username: jenkins
-
Enrollment code: mycode
-
CN (Common Name): jenkins
-
Token: P12 File.
-
Click Add.
-
Next, generate a certificate in the EJBCA RA Web:
-
Click RA Web > Enroll > Use Username and specify the following:
-
Username: jenkins.
-
Enrollment code: mycode.
-
Click Check.
-
Key Algorithm: RSA 2048 bits.
-
Click Download PKCS#12 and save the file jenkins.p12.
-
-
Click Search>Certificates and enter jenkins in the search field to list the entry with the recently enrolled end entity.
-
Click View > Download as PEM and save the file, for example certbc9da2fb0b69a41730b3c12e8d38cb0e8730da05-chain.pem.
-
In the SignServer Admin Web, do the following to configure the Client Certificate Authorizer:
-
On the Workers page, select the JArchiveCMSSigner in the workers list, and click the Configuration tab.
-
Select AUTHTYPE and click Edit.
-
Delete NOAUTH and replace it with CLIENTCERT.
-
Click Submit.
-
-
Then, click Workers, select the JArchiveCMSSigner and click the Authorization tab.
-
Click Add > Import from certificate > From File.
-
Click Browse and upload the previously saved certificate file certbc9da2fb0b69a41730b3c12e8d38cb0e8730da05-chain.pem.
-
Click Load.
-
Choose to match the Subject with the RDN: CN, commonName field by clicking Select in front of it.
-
Click Submit and then click Submit again to save the rule.
-
Finally, in the Jenkins Admin UI:
-
Click the Credentials > System menu item.
-
Select Global Credentials in the list.
-
Click the Add Credential menu item and specify the following:
-
Kind: Certificate.
-
Certificate: Upload PKCS#12 file>Upload certificate and upload the jenkins.p12 created from EJBCA:
-
Password: mycode (as entered in EJBCA above).
-
Description: Jenkins access to SignServer.
-
-
Click Ok.
-
-
Click the Credentials menu item again to list your added credentials with a generated ID.
-
Copy the ID, for example: f599a45b-f33e-4b92-bc45-e075c8c1d9e7
-
-
Add the ID to the Jenkinsfile of your project at the end of the file:
withCredentials([certificate(aliasVariable: 'alias', credentialsId: 'f599a45b-f33e-4b92-bc45-e075c8c1d9e7', keystoreVariable: 'keystore', passwordVariable: 'password')]) { -
Add options to enable the client certificate authentication in SignClient:
-keystore $keystore -keystorepwd $password -keyalias jenkins -
Stage and commit the changes in Git:
    # git stage .
    # git commit -m "Added credential to Jenkinsfile"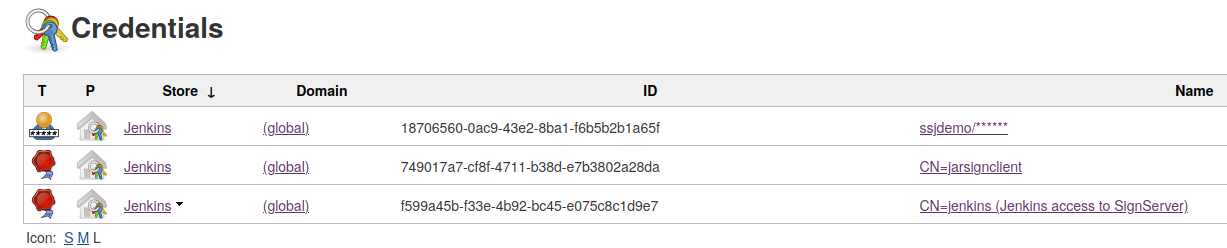
Next, run the Pipeline to start the build/test/deliver process as described in Build and Sign Software Artifact.