Enterprise
In this tutorial, you will learn how to set up a near-production-ready Public Key Infrastructure (PKI) using the EJBCA Enterprise container, Helm, and Kubernetes.
You will configure the EJBCA Enterprise container, gain an understanding of the Helm values.yaml file, and create a Management CA and a two-tier PKI with an Issuing CA. The tutorial concludes with steps to verify the deployment by enrolling a certificate through the EJBCA REST API using a Certificate Signing Request (CSR). By the end, you will have a functional PKI environment ready for further development or integration.
The tutorial covers these steps:
-
Set up the environment
-
Configure the Helm chart
-
Secure the cluster and Admin setup
-
Set up a two-tier PKI in Kubernetes
-
Enroll device certificate and set up CRL service
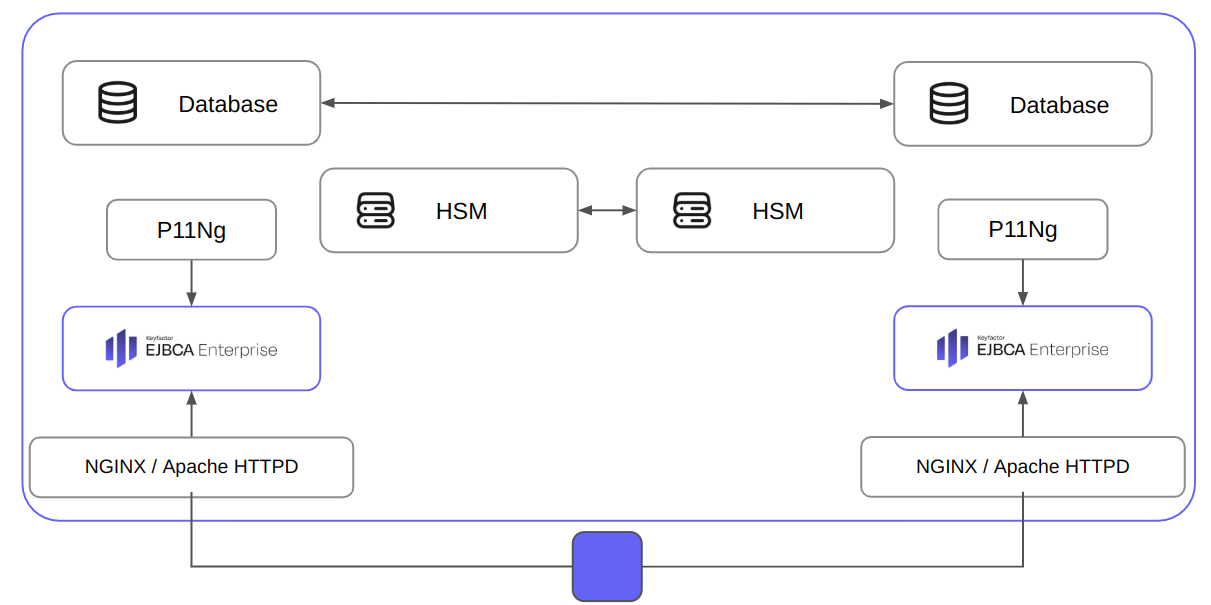
Here is an EJBCA deployment example with two replicas connected to a pair of multi-master database instances (such as MariaDB Galera), load balanced by a Kubernetes service and proxied through an NGINX or Apache HTTPD sidecar. Both EJBCA instances are integrated with Hardware Security Modules (HSMs) for enhanced cryptographic key security.
Prerequisites
For this tutorial, EJBCA Enterprise container version 9.2.0 was used.
This tutorial is only valid for the EJBCA Enterprise container.
Before you begin, you need:
-
Access to a Kubernetes cluster with:
-
LoadBalancer – to allow cluster external access
-
Volumes – to persist the contents of the database and HSM
-
-
MicroK8s installed. To install, follow the steps in Install MicroK8s to run EJBCA
Part 1 – Set up the Environment
The following sections cover how to prepare the environment by creating a Kubernetes namespace and secret, and setting up the database and soft HSM.
Step 1 – Prepare the Environment
Create a fresh namespace
In your terminal, run the following command to create a namespace:
kubectl create namespace cadeployment
Create image pull secret
Create your image pull secret to download the EJBCA container directly from the Keyfactor repository. You can find more details in Container Registry.
kubectl create secret docker-registry keyfactor-registry \
--docker-server=keyfactor.jfrog.io \
--docker-username=<email> \
--docker-password=<credential> \
--docker-email=<email> \
--namespace cadeployment
Now you have a fresh environment ready for deploying EJBCA using a Helm chart. You can apply a similar setup approach for production environments.
Proceed to the next steps to configure EJBCA with a database and a soft HSM.
Step 2 – Set up Database
Install a database in Kubernetes for convenience. EJBCA will be connected to a supported database i.e. MariaDB, PostgreSQL, Oracle, or MSSQL in a production environment. In this tutorial, having a database will allow you to simulate a similar setting.
The contents of the database will be persisted using Kubernetes volumes. This allows you to shut down your local MicroK8s cluster without losing data, so the tutorial does not need to be completed in a single session.
This example uses MariaDB Galera as it is a multi-master database and is heavily used with EJBCA in production environments.
The following example uses MariaDB Galera with 2 replicas. Note that the minimum recommended replicas for Galera is 3.
You need to do the following:
-
Prepare the database credentials as Kubernetes secrets for both the Database and EJBCA.
-
Configure the values.yaml file to deploy the database with Helm Chart.
-
Deploy and wait for the database to be up and running.
Database credential
Set up the database credentials for EJBCA and the database itself.
For MariaDB:
kubectl create secret generic maria-db-pass -n cadeployment \
    --from-literal=mariadb-root-password=rootpass \
    --from-literal=mariadb-galera-mariabackup-password=backpass \
    --from-literal=mariadb-password=normalpass
For EJBCA:
kubectl create secret generic ejbca-db-credentials -n cadeployment \
    --from-literal=DATABASE_USER=ejbcauser \
    --from-literal=DATABASE_PASSWORD=normalpass
Database deployment
This example uses the Helm chart maintained by Bitnami to deploy the database.
The Helm deployment configuration is done with values.yaml:
replicaCount: 2
existingSecret: maria-db-pass
persistence:
  size: 100Mi
db:
  user: ejbcauser
  name: ejbca
In this example, we are configuring only 100MB of storage in persistence.size as it is sufficient for this tutorial. If you are planning to use this installation for other tests, increase it to 1000Mi.
Deploy the database:
helm install ejbca-ca-database -n cadeployment -f values-mariadb-galera.yaml \
    oci://registry-1.docker.io/bitnamicharts/mariadb-galera
Once the deployment is complete and the pods are ready, proceed to configure the HSM.
Step 3 – Set up (Soft) HSM
This tutorial shows how to use SoftHSM, a software-based implementation designed to test PKCS#11 integrations. In production, a physical or cloud-based HSM should be used, but the integration approach remains the same.
For production deployments, it is strongly recommended to use a real HSM and to generate keys directly within the device using the vendor’s utilities.
Create keys before EJBCA startup (database protection)
To create keys for database protection or signed audit logging, begin by creating a Kubernetes ConfigMap file, softhsm-init-configmap.yaml, to initialize the SoftHSM with the necessary key pairs:
apiVersion: v1
kind: ConfigMap
metadata:
  name: softhsm-slot-init
data:
  after-init-post.sh: |
    #!/bin/bash
    echo "web.reqcert=false" >> /opt/keyfactor/ejbca/conf/web.properties
    common_args="--password foo123 --lib-file /opt/keyfactor/p11proxy-client/p11proxy-client.so --slot-ref SLOT_LABEL --slot Token-1"
    if p11ng-cli.sh listkeypairs $common_args | grep -q "signkey001"; then
        return 0
    fi
    p11ng-cli.sh generatekeypair $common_args --key-spec RSA2048 --alias signkey001
    p11ng-cli.sh generatekeypair $common_args --key-spec RSA2048 --alias defaultkey001 --key-usage SIGN_ENCRYPT
    p11ng-cli.sh generatekeypair $common_args --key-spec RSA2048 --alias signkey002
    p11ng-cli.sh generatekeypair $common_args --key-spec RSA2048 --alias defaultkey002 --key-usage SIGN_ENCRYPT
    p11ng-cli.sh generatekeypair $common_args --key-spec RSA2048 --alias testkey

    p11ng-cli.sh generatekeypair --alias dbprotectionkey --key-spec RSA2048 --password "foo123"   \
            --lib-file /opt/keyfactor/p11proxy-client/p11proxy-client.so --slot Token-5 --slot-ref SLOT_LABEL
Then, run the following command to apply the ConfigMap configuration to Kubernetes:
kubectl apply -f softhsm-init-configmap.yaml -n cadeployment
Create a Persistent Volume Claim
To persist the key material of the HSM between container restarts, a Persistent Volume Claim (PVC) is used. For more information on PVCs, refer to the Kubernetes documentation topic Persistent Volumes.
Create a PVC for persisting the key data in the SoftHSM, and then apply the necessary YAML configuration (softhsm-pvc.yaml):
kubectl apply -f softhsm-pvc.yaml -n cadeployment
Configure EJBCA for Database Protection
Next, configure EJBCA to use configuration for database protection. EJBCA will sign all the entries in the database using the configured key stored in HSM. It ensures the database entries are not tampered with. This in turn allows us to create a signed audit log which is a key functionality behind every secure PKI.
Create a Kubernetes secret containing the configuration file:
kubectl create secret generic ejbca-config-files -n cadeployment \
    --from-file=databaseprotection.properties=databaseprotection.properties
For enhanced security, it is recommended to configure PASSWORD_ENCRYPTION_KEY and EJBCA_CLI_DEFAULTPASSWORD in EJBCA using Kubernetes secrets.
All preparations are now done and you can continue to configure the EJBCA installation using a Helm chart.
Part 2 – Configure the Helm Chart
The following sections cover how to configure the Helm chart using values.yaml and deploy EJBCA CA using the Helm chart configuration.
Step 4 – Configure Helm Chart in values.yaml
Helm chart deployments are customized using the values.yaml.
To check the default values.yaml for the latest version of the Helm chart:
helm show values oci://repo.keyfactor.com/charts/ejbca > ejbca-default-values.yaml

helm show values oci://repo.keyfactor.com/charts/ejbca --version <version>
For the initial deployment, configure the following components:
-
Connect EJBCA to:
-
The deployed database.
-
SoftHSM, running as a sidecar.
-
-
Configure EJBCA to:
-
Use database protection.
-
Enable application-level DEBUG logging.
-
-
Use NGINX as a sidecar to act as a proxy for EJBCA
-
Enable LoadBalancer service to allow access to EJBCA from outside the Kubernetes cluster.
-
You can also use this service for internal cluster operations.
-
-
Additionally, you may:
-
Impose resource reservations and limits via the Helm chart.
-
Configure autoscaling through the
values.yamlfile.
-
For a visual walk-through, refer to the video tutorial EJBCA Helm Chart 2 – Configure the Helm Chart.
Example values.yaml for the initial deployment:
imagePullSecrets: [{ name: keyfactor-registry }]
replicaCount: 2
##############################################################################################
ejbca:
  env:
    LOG_LEVEL_APP: DEBUG
    LOG_AUDIT_TO_DB: true
    DATABASE_JDBC_URL: "jdbc:mariadb://ejbca-ca-database-mariadb-galera:3306/ejbca?characterEncoding=utf8"
  envFrom:
    - secretRef:
        name: ejbca-db-credentials
##############################################################################################
  # Extra init containers to be added to the deployment
  initContainers:
    - name: hsm-driver-init
      image: keyfactor.jfrog.io/dev-oci/keyfactor-commons/hsm-driver-softhsm/images/hsm-driver-softhsm:1.1.0
      command:
        ["sh", "-c", "cp --preserve --recursive /opt/keyfactor/p11proxy-client/* /mnt/driver/"]
      volumeMounts:
        - name: p11proxy-client
          mountPath: /mnt/driver/
  # Extra sidecar containers to be added to the deployment
  sidecarContainers:
    - name: hsm
      image: keyfactor.jfrog.io/dev-oci/keyfactor-commons/hsm-driver-softhsm/images/hsm-driver-softhsm:1.1.0
      imagePullPolicy: IfNotPresent
      env:
        - name: SOFTHSM2_LOG_LEVEL
          value: INFO
      volumeMounts:
        - name: tokens
          mountPath: /mnt/tokens
  # Extra volumes to be added to the deployment
  volumes:
    - name: p11proxy-client
      emptyDir: {}
    - name: tokens
      persistentVolumeClaim:
        claimName: softhsm-pvc
    - name: after-init-post
      configMap:
        name: softhsm-slot-init
        defaultMode: 0777
        items:
          - key: "after-init-post.sh"
            path: "after-init-post.sh"
    # signed database entries and audit log
    - name: databaseprotection
      secret:
        secretName: ejbca-config-files
        items:
          - key: "databaseprotection.properties"
            path: "databaseprotection.properties"
  # Extra volume mounts to be added to the deployment
  volumeMounts:
    - name: p11proxy-client
      mountPath: /opt/keyfactor/p11proxy-client
    - name: after-init-post
      mountPath: /opt/keyfactor/bin/internal/after-init-post.sh
      subPath: after-init-post.sh
    - name: databaseprotection
      mountPath: /opt/keyfactor/ejbca/conf/databaseprotection.properties
      subPath: databaseprotection.properties
# needed to make softhsm volume mount to work
podSecurityContext:
  fsGroup: 10001
##############################################################################################
resources:
  limits:
    memory: "1Gi"
# autoscaling:
#  enabled: true
#  minReplicas: 1
#  maxReplicas: 5
#  targetMemoryUtilizationPercentage: 80
##############################################################################################
nginx:
  enabled: true
  initializeWithSelfSignedTls: true
  service:
    # Use LoadBalancer to terminate in the pod, otherwise use ClusterIP or NodePort
    type: LoadBalancer
  loadBalancerAccess:
    enableStickySessionClientIp: true
    # create a load balancer service for each Pod with separate IP address
    # enableReplicaSpecificAccess: false
Step 5 – Deploy EJBCA
Deploy EJBCA:
helm install ejbca-cluster -n cadeployment -f ejbca_initial_setup.yaml \
              oci://repo.keyfactor.com/charts/ejbca
To monitor the deployment and cluster, run the following:
kubectl get all,pvc,cm,secret -n cadeployment
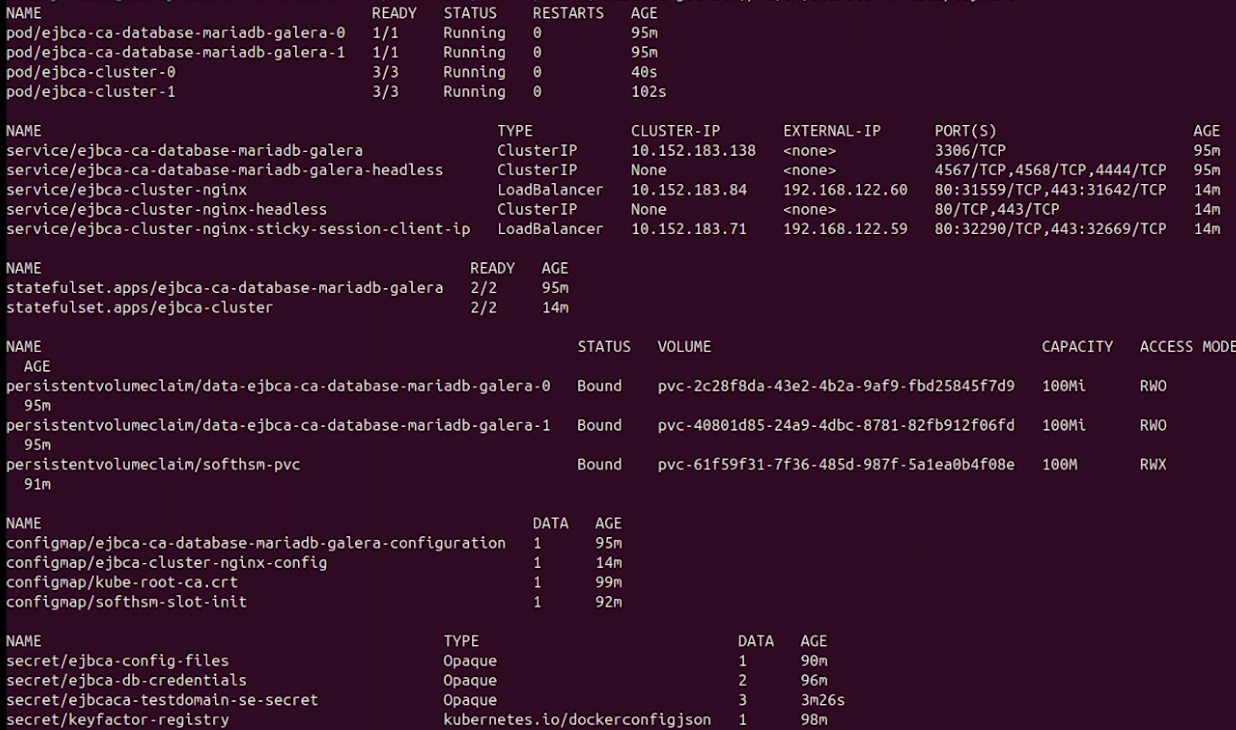
The output will be similar to the following:
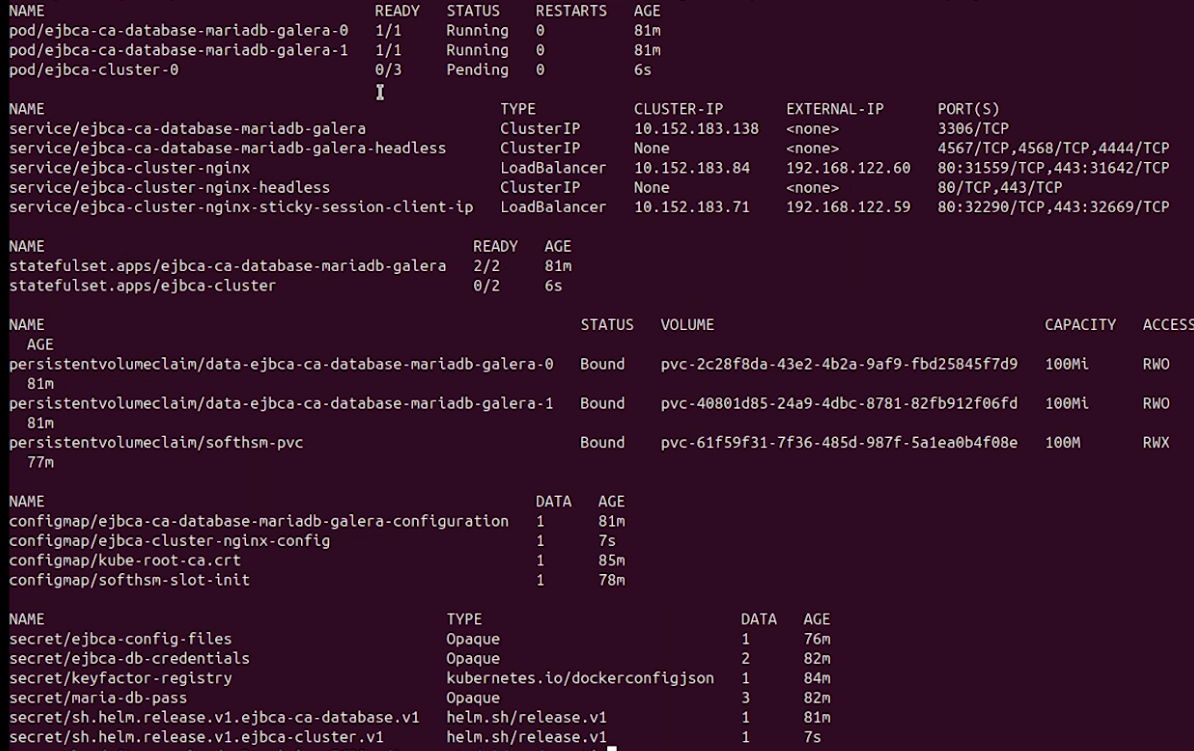
Note the following expected behavior:
-
Two database pods are running, along with the
ejbca-ca-database-mariadb-galeraservice, which is used to connect EJBCA. -
A StatefulSet named
ejbca-clusteris created. Initially, it has 0 out of 2 expected instances in the READY state. -
A pod named
ejbca-cluster-0contains three containers: EJBCA itself, NGINX, and the SoftHSM sidecar. Eventually,ejbca-cluster-0will have all containers READY i.e.3/3. -
A second pod,
ejbca-cluster-1, will be deployed as part of the StatefulSet and will also reach the READY state (3/3). -
There are two services for EJBCA:
ejbca-cluster-nginxandejbca-cluster-nginx-sticky-session-client-ip. Both are of typeLoadBalancer. You should see anEXTERNAL-IPassigned to both. Verify that these endpoints are accessible via your browser. -
Use the IP address of
ejbca-cluster-nginx-sticky-session-client-ipfor UI access. Useejbca-cluster-nginxfor all other access, such as REST API calls, as it provides load-balanced access to both pods.
EJBCA pods may take up to 2 minutes each to become READY. Continue running kubectl get until the StatefulSet shows READY 2/2.
If your output differs from the above, verify that all the described resources are present. Missing resources typically indicate a skipped or incorrect step.
Part 3 – Secure the Cluster and Admin Setup
The following sections cover some basic configurations of EJBCA for administrative and security purposes, including setting up a Management CA, enrolling a superadmin user, and issuing a server certificate.
Step 6 – Set up Management CA
To create a Management CA and a Super Administrator, perform the following:
-
Access EJBCA Admin Web by navigating your browser by using the EXTERNAL_IP address from
ejbca-cluster-nginx-sticky-session-client-ip -
Select Create a New CA and click Next.
-
For Create Management CA, select Create New Crypto Token, and click Next.
-
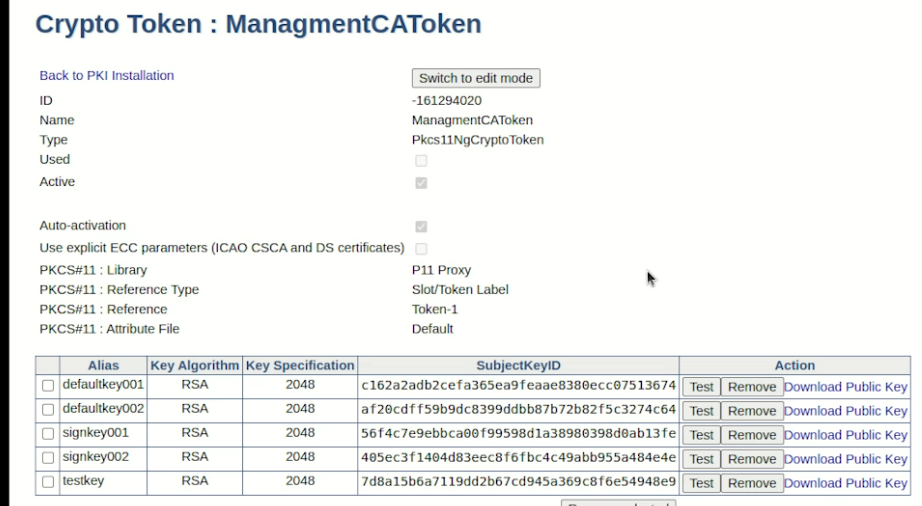
On the New Crypto Token page, specify the following:
-
Name: Specify a name for the crypto token, such as ManagementCaToken.
-
Type: Select PKCS#11 NG.
-
Auto-activation: Select Use to allow EJBCA to save the password and reapply it after a restart so that the CA is always available.
-
Authentication Code: Enter
foo123. This is the same password as configured during setting up the prerequisites. -
Repeat Authentication Code: Re-enter the password.
-
-
Click Save to create the crypto token and list the created keys.
-
Click Back to PKI Installation and specify values on the Create Management CA page similar to the following:
-
Crypto Token: ManagementCaToken
-
defaultKey: defaultKey001
-
certSignKey: signkey001
-
-
You can leave the other entries as default and click Next.
-
On the Create Super Administrator page, specify the following:
-
For Super Administrator DN, specify CN=SuperAdmin.
-
For Super Administrator Password, enter your password.
-
For Repeat Super Administrator Password, re-enter your password.
-
-
Click Next to create the super administrator.
-
Review the information on the Summary page and click Install to create the Management CA.
-
To enroll and download the CA certificate:
-
Click Enroll to retrieve the Super Administrator key store
(SuperAdmin.p1) file. -
Click Download CA Certificate.
-
On the CA Structure & CRLs page, click Download PEM file to download the
ManagementCA.cacert.pemfile.
-
Step 7 – Finalize the Deployment
This step finalizes the deployment by configuring Transport Layer Security (TLS) for EJBCA using a server certificate enrolled via the EJBCA RA Web interface and securely provisioned into the Kubernetes cluster.
Issue Server certificates
Note the following:
-
The Common Name (CN) in the SubjectDN must match the value of
nginx.hostnamedefined invalues.yaml. -
This CN should also be included as one of the
DNSNameentries in theSubjectAltName(SAN) to ensure accessibility from outside the cluster (such as via browsers). -
Additionally, include an internal DNS name in the SAN in the format
{helm-deployment-name}-nginx.{namespace}to enable access from within the cluster, such as from a customer application invoking the EJBCA REST API.
SubjectDN:
  CN: ejbcaca.testdomain.se
SubjectAlternateName:
  DNSName: ejbcaca.testdomain.se
  DNSName: ejbca-cluster-nginx.cadeployment
Use the EJBCA RA Web to enroll a server TLS certificate for Ingress.
-
In EJBCA, click RA Web to access the EJBCA RA user interface.
-
Select Enroll > Make New Request and specify the following:
-
For Certificate Type, select EMPTY.
-
For Certificate subtype, select SERVER.
-
For CA (if prompted), select ManagementCA.
-
For Key-pair generation, select By the CA.
-
For Key algorithm, select for example, RSA-2048, or P-256.
-
For the Required Subject DN Attributes, specify CN, Common Name=
ejbcaca.testdomain.se. -
For Optional Subject Alternative Name Attributes, specify DNS Name=
ejbcaca.testdomain.seand DNS Name=ejbca-cluster-nginx.cadeployment -
For Provide User Credentials, enter a username and password.
-
-
Click Download PEM to download the server certificate in PEM format.
-
Save the server certificate file.
TLS setup
Use the split_pem_to_key_and_certificate.sh script to separate the downloaded PEM file and extract the certificate, key, and CA files required for sidecar configuration.
Run the script with the server certificate filename (excluding .pem) as the argument:
./split_pem_to_key_and_certificate.sh ejbcaca.testdomain.se
Note that the file names are expected in the following format:
-
{domain-name}.pem(certificate) -
{domain-name}-Key.pem(private key) -
{domain-name}-CA.pem(CA certificate)
Next, create a Kubernetes secret which will be configured in values.yaml to provide the TLS credential to EJBCA.
kubectl create secret generic ejbcaca-testdomain-se-secret -n cadeployment \
 --from-file=ejbcaca.testdomain.se.pem=ejbcaca.testdomain.se.pem \
 --from-file=ejbcaca.testdomain.se-Key.pem=ejbcaca.testdomain.se-Key.pem \
 --from-file=ejbcaca.testdomain.se-CA.pem=ejbcaca.testdomain.se-CA.pem
Import SuperAdmin p12 to your browser
To access the EJBCA user interface, import the SuperAdmin certificate into your web browser. For details, see the steps in Start EJBCA Container with Client Certificate Authenticated Access.
Update values.yaml with Enrolled Certificate
Update the values.yaml to use the enrolled certificate stored in the Kubernetes secret just created.
Note the following:
-
The parameters
mountInternalNginxCertandsecretInternalNginxCert. -
You can comment out or delete the parameter
initializeWithSelfSignedTls.
nginx:
  enabled: true
  # initializeWithSelfSignedTls: true
  host: "ejbcaca.testdomain.se"
  mountInternalNginxCert: true
  secretInternalNginxCert: "ejbcaca-testdomain-se-secret"
  service:
    type: LoadBalancer
  loadBalancerAccess:
    enableStickySessionClientIp: true
Run the following command to deploy:
helm upgrade ejbca-cluster -n cadeployment -f ejbca_final_setup_with_tls.yaml \
          oci://repo.keyfactor.com/charts/ejbca
Wait until the StatefulSet is READY with 2/2 before moving on to the next step. Verify this from the output of:
kubectl get all,pvc,cm,secret -n cadeployment
Next, access EJBCA from your browser:
-
Navigate to
https://<IP Address>/ejbca/adminweb/. EXTERNAL_IP address ofejbca-cluster-nginx-sticky-session-client-ipneed to be used. -
When prompted for the SuperAdmin certificate, select the one you just imported and click OK.
-
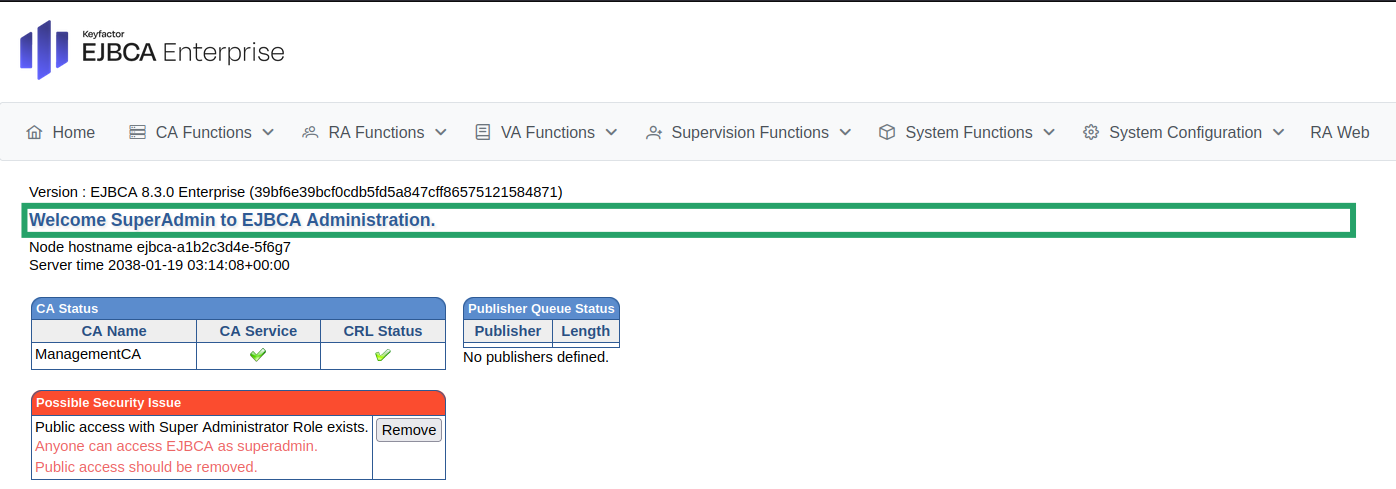
Verify that you are logged in as SuperAdmin, indicated by the welcome message Welcome SuperAdmin to EJBCA Administration.
-
To remove public access and restrict access to EJBCA to only the Super Administrator, click Remove next to Public access with Super Administrator Role exists.
At this point, EJBCA is secured with a trusted server certificate and accessible using the SuperAdmin certificate.
Part 4 – Set up 2-Tier PKI in Kubernetes
In a production setting, a 2-tier PKI architecture is typically used, for security reasons. You can use the Management CA for EJBCA Administration and other CAs for managing your specific use case.
A Root CA is typically created in an offline instance, with one or more Sub CAs to issue certificates to devices or end entities.
For example, you could have:
-
One CA for enrolling certificates to web applications deployed in Kubernetes, for example with cert-manager.
-
One CA for issuing certificates to IoT devices connecting to EJBCA over the public internet.
-
One CA for managing certificates for corporate workstations.
For more information and detailed instructions, see Create a PKI Hierarchy in EJBCA.
Step 8 – Create Issuing CA
Creating an Issuing CA is very similar to creating a Management CA. For this example, it is assumed that an offline EJBCA instance is already configured with a Root CA. You will create a new Sub CA, IssuerCA, in your installation in Kubernetes and get it signed by the Root CA.
Create Sub CA Crypto Token
To create a clear separation between your Management CA and Issuer CA, the following steps cover how to create a new crypto token. You may reuse the same token.
In the following example, we use the same HSM slot as ManagementCA but you are encouraged to use a separate slot.
-
In the EJBCA menu, click CA Functions > Crypto Tokens or navigate to
https://<IP Address>/ejbca/adminweb/cryptotoken/cryptotokens.xhtml -
Click Create new and specify the following on the New Crypto Token page:
-
Name: Specify a name for the crypto token, such as IssuerCaToken.
-
Type: Select PKCS#11 NG.
-
Auto-activation: Select Use to allow EJBCA to save the password and reapply it after a restart so that the CA is always available.
-
Authentication Code: Enter
foo123. This is the same password as configured during setting up the prerequisites. -
Repeat Authentication Code: Re-enter the password.
-
-
Click Save to create the crypto token and list the keys.
Create Sub CA
To create the Sub CA, follow these steps:
-
In the EJBCA menu, click CA Functions > Certification Authorities or navigate to
https://<IP Address>/ejbca/adminweb/ca/editcas/managecas.xhtml -
In the Add CA field, enter the CA name, such as “IssuerCA”, and click Create.
-
Select the Sub CA crypto token IssuerCaToken (just created) in the Crypto Token list.
-
Map the keys for their intended usages:
-
defaultKey: defaultkey002
-
certSignKey: signkey002
-
-
Under CA Certificate Data, specify the following:
-
Subject DN: Should say “CN=IssuerCA”.
-
Signed By: Select External CA.
-
-
-
Scroll down to the bottom of the page and click Create Certificate Request.
-
On the Certificate Request Generated page, click Download PEM file.
Create End Entity Profile and Certificate
To sign the CSR of the Issuer CA (Sub CA) from Root CA, you need to navigate to the EJBCA Root CA instance and use the Sub CA certificate profile to create an end entity profile and issue the certificate.
To do so, follow these steps:
-
Navigate to the EJBCA instance with Root CA in your browser.
-
In the EJBCA menu, under RA Functions, click End Entity Profiles.
-
In the Add Profile field, add a name for the new profile, in this example SubCAEEprofile, and click Add profile.
-
Select the newly created SubCAEEProfile, click Edit End Entity Profile and update the following:
-
For Default Certificate Profile, select SUBCA.
-
For Default CA and Available CAs, verify that the Root CA is selected.
-
-
Click Save to store the end entity profile.
Issue Certificate and receive Certificate Response
-
In the EJBCA menu, click RA Web.
-
Select Enroll > Make New Request and specify the following:
-
For Certificate Type, select SubCAEEprofile.
-
For Certificate subtype, select SUBCA.
-
For CA (if prompted), select Root CA. If only Root CA is available, this option will not be shown.
-
For Key-pair generation, select Provided by User.
-
Under Upload CSR, click Choose File to upload the CSR of the IssuerCA.
-
For the Required Subject DN Attributes, specify Common Name (CN)=
IssuerCA. -
For Username, specify IssuerCA or anything unique.
-
Click Download PEM full chain to download the server certificate in PEM format (
IssuerCA.pem). -
Navigate to the EJBCA instance in Kubernetes, thus go to
https://<IP Address>/ejbca/adminweb/ca/editcas/managecas.xhtmland click the EJBCA menu CA Functions > Certification Authorities.-
In the list of Certification Authorities, select the IssuerCA (Waiting for Certificate Response) and click Edit CA.
-
Under Externally signed CA creation/renewal, for Step 2: Import Certificate, click Choose File to upload the Issuer Certificate (
IssuerCA.pem). -
Then, click Receive Certificate Response.
-
-
Your Issuer CA is now fully configured.
Enable REST Certificate
To issue a certificate with the IssuerCA using the REST Certificate Management API, perform the following steps.
To create a Certificate Profile:
-
In EJBCA, under CA Functions, click Certificate Profiles.
The Manage End Entity Profiles page displays a list with default profiles. -
Specify the Certificate Profile Name, such as DeviceCertProfile, and click Add.
-
For the created profile DeviceCertProfile, click Edit and specify the following:
-
For Available CA, ensure IssuerCA is selected.
-
-
Click Save to store the certificate profile.
To create an End Entity Profile:
-
In EJBCA, under RA Functions, click End Entity Profiles.
The Manage Certificate Profiles page displays a list with default profiles. -
In Add End Entity Profile, specify a name such as DeviceEEProfile, and click Add.
-
For the created profile DeviceEEProfile, click Edit End Entity Profile and specify the following:
-
For Available Certificate Profile, ensure DeviceCertProfile is selected as one of the profiles.
-
For Available CAs, ensure IssuerCA is selected as one of the CAs.
-
-
Click Save to store the end entity profile.
Enable Certificate Management
To enable the EJBCA REST API for certificate issuance, do the following:
-
In the EJBCA menu, click System Configuration > System Configuration.
-
Click the Protocol Configuration tab.
-
Click Enable for REST Certificate Management.
Enable another Server Certificate
Lastly, you will enroll another server certificate for your new domain responsible for your IssuerCA. This domain will be ejbca-issuer-ca.testdomain.se.
-
In EJBCA, click RA Web to access the EJBCA RA user interface.
-
Select Enroll > Make New Request and specify the following:
-
For Certificate Type, select EMPTY.
-
For Certificate subtype, select SERVER.
-
For CA (if prompted), select IssuerCA instead of ManagementCA like before.
-
For Key-pair generation, select By the CA.
-
For Key algorithm, select for example, RSA-2048, or P-256.
-
For the Required Subject DN Attributes, specify CN, Common Name=
ejbca-issuer-ca.testdomain.se. -
For Optional Subject Alternative Name Attributes, specify DNS Name=
ejbca-issuer-ca.testdomain.seand DNS Name=ejbca-cluster-nginx.cadeployment -
For Provide User Credentials, enter a username and password.
-
-
Click Download PEM to download the server certificate in PEM format.
-
Save the server certificate file.
-
Step 9 – Re-configure TLS
In this step, create two domains with different server TLS credentials:
-
ejbcaca.testdomain.se- This domain is intended for administrative access and general use cases. -
ejbca-issuer-ca.testdomain.se- This domain is dedicated to Public Key Infrastructure (PKI) operations involving theIssuerCAcreated earlier. Devices using certificates signed byIssuerCAwill recognize onlyIssuerCAas the trusted CA. This separation is particularly useful when using certificate enrollment protocols such as EST, CMP, SCEP, or ACME.
You can create multiple domains with different TLS credentials for each Issuing CA. NGINX will use the Server Name Indicator or SNI to select the correct certificate.
-
To configure the TLS credential, split the server certificate similar to as done previously:
./split_pem_to_key_and_certificate.sh ejbca-issuer-ca.testdomain.se -
Create the required Kubernetes secret:
kubectl create secret generic ejbcaca-testdomain-se-secret-with-isserca -n cadeployment \ --from-file=ejbcaca.testdomain.se.pem=ejbcaca.testdomain.se.pem \ --from-file=ejbcaca.testdomain.se-Key.pem=ejbcaca.testdomain.se-Key.pem \ --from-file=ejbcaca.testdomain.se-CA.pem=ejbcaca.testdomain.se-CA.pem \ --from-file=ejbca-issuer-ca.testdomain.se.pem=ejbca-issuer-ca.testdomain.se.pem \ --from-file=ejbca-issuer-ca.testdomain.se-Key.pem=ejbca-issuer-ca.testdomain.se-Key.pem \ --from-file=ejbca-issuer-ca.testdomain.se-CA.pem=ejbca-issuer-ca.testdomain.se-CA.pem -
Modify the NGINX sidecar in the
values.yamlfile:YAMLnginx: enabled: true # initializeWithSelfSignedTls: true host: "ejbcaca.testdomain.se" mountInternalNginxCert: true secretInternalNginxCert: "ejbcaca-testdomain-se-secret-with-isserca" service: type: LoadBalancer loadBalancerAccess: enableStickySessionClientIp: true additionalHosts: - "ejbca-issuer-ca.testdomain.se"Notice the following:
-
The
secretInternalNginxCertrefers to the newly created secret. -
The
additionalHostssection lists the secondary domain.
-
-
Run the following to apply the configuration and modify the deployment:
helm upgrade ejbca-cluster -n cadeployment -f ejbca_final_setup_with_tls.yaml \
              oci://repo.keyfactor.com/charts/ejbca
Step 10 – Verify EJBCA Setup
To verify that the EJBCA cluster is fully operational:
-
Run the following:
kubectl get all,pvc,cm,secret -n cadeployment -
Ensure the
statefulset.apps/ejbca-clusterstatus isREADY 2/2before proceeding.
Note that the EXTERNAL_IP addresses of the services being used may change.
Verify TLS Setup with Created CAs
To verify the TLS credential setup, map the hostnames to the service IP in your local /etc/hosts file. Adjust the IP address based on the EXTERNAL_IP assigned to the ejbca-cluster-nginx-sticky-session-client-ip service.
Example:
192.168.122.59 ejbcaca.testdomain.se
192.168.122.59 ejbcaca-issuer-ca.testdomain.se
Both domains should point to the same IP address.
Next, verify EJBCA access via browser by opening the following URLs in a browser:
-
https://<IP address of ejbca-cluster-nginx-sticky-session-client-ip>/ejbca/adminweb -
https://ejbcaca.testdomain.se/ejbca/adminweb -
https://ejbcaca-issuer-ca.testdomain.se/ejbca/adminweb
Expected behavior:
-
For the first two URLs:
-
You will be prompted to log in using your SuperAdmin certificate.
-
Access to the Admin Web will be granted.
-
The certificate presented by the server should be issued by
ManagementCAwith the Common Nameejbcaca.testdomain.se. -
This certificate is selected because:
-
SNI matches
ejbcaca.testdomain.se, or -
The request uses an IP address or internal ClusterIP service (default fallback).
-
-
-
For
https://ejbca-issuer-ca.testdomain.se/ejbca/adminweb:-
You will receive an Authentication Denied message as you do not have an admin token issued by
IssuerCA. -
However, you can verify that the certificate is issued by IssuerCA and with the common name
ejbcaca-issuer-ca.testdomain.seby clicking the button to the left of the URL in your browser. Now when your devices access EJBCA with this domain, they do not need to be aware of ManagementCA or any other CAs. Additionally, in the case of protocols like EST or CMP, this is useful as it allows devices to be authenticated with certificates issued by IssuerCA.
-
Part 5 – Enroll Device Certificate and Set up CRL Service
The following sections cover how to enroll a device certificate and set up a CRL Service.
Step 11 – Enroll Device Certificate
EJBCA offers a REST API with useful commands for automated certificate enrollment.
You need the following to enroll a certificate_
-
IssuerCA as Certificate Authority
-
DeviceCertProfile as Certificate Profile
-
DeviceEndEntityProfile as End Entity Profile
-
REST API enabled in EJBCA System Configurations
-
SuperAdmin or equivalent admin token enrolled
You can use the provided scriptenroll_device_certificate.sh to enroll the certificate using EJBCAs v1/certificate/pkcs10enroll REST API. This script:
-
Creates a CSR using OpenSSL
-
Prepares the REST Request Body
-
Uses the SuperAdmin token in the same directory
Example:
# ./enroll_device_certificate.sh <EXTERNAL_IP of ejbca-cluster-nginx service> \
#                     <CommonName of End Entity>
#                     <Admin p12 file path>  <Admin p12 password>
./enroll_device_certificate.sh 192.168.122.59 device1_guid SuperAdmin.p12 foo123
Note that the EXTERNAL_IP of ejbca-cluster-nginx service (without sticky client IP) is used to allow proper load balancing for REST API calls across multiple EJBCA pods/instances. This applies to REST API and protocol endpoints (e.g., ACME, CMP) but not to the Admin UI.
Step 12 – Customize EJBCA for your PKI
Now that you have deployed EJBCA Enterprise you can continue with customizing EJBCA for your PKI. For example, to ensure that your CAs maintain up-to-date revocation information, you can set up a Certificate Revocation List (CRL) service.
To set up a CRL updater service in EJBCA:
-
In EJBCA, click System Function>Services.
-
Create a new service named CrlService001 by putting it in Add CA box and clicking Add
-
Select CRL Updater in Select Worker.
-
For CAs to check, select Any CA.
-
For Period, select how often the service should check if a new CRL needs to be downloaded.
-
Enable Active to activate the service.
-
Click Save.
Your CRLs will now be generated periodically. For more information on services available in EJBCA, see Services, and for more general information about day-to-day administrative tasks in EJBCA, see https://docs.keyfactor.com/ejbca/latest/ejbca-operations-guide.
You may also configure OCSP (Online Certificate Status Protocol), used by PKI clients to verify the validity of certificates in real time. For example, you can create OCSP Responders in EJBCA using a separate EJBCA VA. For more information, see EJBCA Operations Guide.
Optional - Clean up
You can optionally clean up all the resources permanently or stop them temporarily. If your deployment is local (for example, using MicroK8s), you will more likely want to stop and later restart the services.
Clean up resources permanently
To clean up all resources permanently (destructive action), run the following:
kubectl delete namespace cadeployment
Shut down resources temporarily
To temporarily shut down resources:
-
Run the following to shut down EJBCA and the MariaDB database:
Bash# shutdown EJBCA helm uninstall ejbca-cluster -n cadeployment # wait till EJBCA pods are not shown with 'kubectl get pods -n cadeployment' # scale down database # This is VERY IMPORTANT. Otherwise Galera cluster may result in an invalid state. kubectl scale sts ejbca-ca-database-mariadb-galera --replicas=0 # wait till MariaDB pods are not shown with 'kubectl get pods -n cadeployment' # then to shut down all associated resources helm uninstall ejbca-ca-database -n cadeployment
Restart services
To restart the environment, navigate to the working directory used during deployment and run the following:
-
Deploy the MariaDB database:
helm install ejbca-ca-database -n cadeployment -f values-mariadb-galera.yaml \
    oci://registry-1.docker.io/bitnamicharts/mariadb-galera
Wait until all database instances are deployed and show a
READYstatus. -
Deploy EJBCA:
helm install ejbca-cluster -n cadeployment -f ejbca_final_setup_with_tls.yaml \
              oci://repo.keyfactor.com/charts/ejbca
Next steps
In this tutorial, you learned how to deploy a CA using the EJBCA Enterprise container and Helm charts in Kubernetes.
Here are some next steps we recommend:
-
For information on key architectural considerations and security best practices to enhance redundancy, fault tolerance, and automation while streamlining management through Helm, see High-Availability Multi-Region PKI Deployment with EJBCA and Helm.
-
For a deeper dive into the EJBCA Enterprise Helm chart, refer to EJBCA Helm Chart Building Blocks. This guide provides a structured breakdown of essential configurations, including database connectivity, HSM integration (P11NG), and security measures - enabling security engineers and DevOps teams to deploy and manage PKI services efficiently.
-
Learn more about segmenting a Public Key Infrastructure (PKI) to reduce risk by isolating trust domains, limiting the impact of a potential compromise, and supporting stronger governance and compliance practices. For more information, see Segmenting the PKI using EJBCA Peer.
-
Learn how to automate the RA deployment using Peer connectors, by following the tutorial https://docs.keyfactor.com/ejbca/latest/tutorial-automate-ejbca-ra-deployment-with-helm.
-
If you are interested in EJBCA Enterprise, read more on Keyfactor EJBCA Enterprise.
-
If you are interested in EJBCA Community, check out EJBCA Community vs Enterprise or read more on ejbca.org.
-
If you are an EJBCA Enterprise customer and need support, visit the Keyfactor Support Portal.
-
Discuss with the EJBCA Community on GitHub Discussions.