ENTERPRISE
In this tutorial, we will configure EJBCA as a Registration Authority (RA) instance connected to an EJBCA Certificate Authority (CA) instance in Kubernetes. We will demonstrate how to automate this deployment using the EJBCA Enterprise container, ConfigDump, and Helm charts.
Automating the deployment is particularly useful when consistent configuration is required, such as in the following scenarios:
-
Managing a large number of peers.
-
Deploying a PKI across multiple regions.
-
Maintaining multiple environments, such as test and production.
For more information on ConfigDump, see the section What is ConfigDump? in Segmenting the PKI using EJBCA Peer.
The tutorial covers these steps:
-
Set up the environment and configure the Helm chart
-
Configure the CA-side peer connection
-
Configure the RA-side peer connection
-
Deploy the RA and access EJBCA
Prerequisites
For this tutorial, EJBCA Enterprise container version 9.2.0 was used.
This tutorial is only valid for the EJBCA Enterprise container.
Before you begin, you need:
-
Access to a Kubernetes cluster with:
-
LoadBalancer – to allow cluster external access (MetalLB:
microk8s enable metallb) -
Volumes – to persist the contents of the database and HSM
-
Storage (hostpath:
microk8s enable storage)
-
-
MicroK8s installed. To install, follow the steps in Install MicroK8s to run EJBCA
-
A deployed and fully configured CA, follow the steps in Tutorial - Deploy EJBCA Enterprise CA with Helm chart
-
An enrolled SuperAdmin token that you can log in with.
-
Issued TLS credentials to the CA instance.
-
Enabled REST API operations.
-
-
To learn more about Peer Connections in EJBCA, see Segmenting the PKI using EJBCA Peer.
-
To learn more about replicating configurations, see Lift & Shift Your EJBCA Setup: Automate with ConfigDump.
Part 1 – Set up the Environment
The following sections cover how to prepare the environment by creating a Kubernetes namespace and secret, and setting up the database.
Step 1 – Prepare the Environment
Create a fresh namespace
In your terminal, run the following command to create a namespace:
kubectl create namespace radeployment
Create image pull secret
Create your image pull secret to download the EJBCA container directly from the Keyfactor repository:
kubectl create secret docker-registry keyfactor-registry \
--docker-server=keyfactor.jfrog.io \
--docker-username=<email> \
--docker-password=<credential> \
--docker-email=<email> \
--namespace radeployment
Step 2 - Set up Database
Install a database in Kubernetes for convenience. EJBCA will be connected to a supported database i.e. MariaDB, PostgreSQL, Oracle or MSSQL in a production environment. In this tutorial, having a database will allow you to simulate a similar setting.
The contents of the database will be persisted using Kubernetes volumes. This allows you to shut down your local MicroK8s cluster without losing data, so the tutorial does not need to be completed in a single session.
This example uses MariaDB as database which is heavily used with EJBCA in production environments.
You need to do the following:
-
Prepare the database credentials as Kubernetes secrets for both the database and EJBCA.
-
Deploy the database with a Helm chart and wait for the database to be up and running.
Prepare the database credential
Set up the database credentials for EJBCA and the database itself.
For MariaDB:
kubectl create secret generic maria-db-credentials \
      --from-literal=mariadb-root-password="rootpass" \
      --from-literal=mariadb-password="normalpass" \
      -n radeployment
For EJBCA:
kubectl create secret generic ra-db-credentials -n radeployment \
    --from-literal=DATABASE_USER=ejbcauser \
    --from-literal=DATABASE_PASSWORD=normalpass
Database deployment
Deploy the database:
helm install -n radeployment mariadb \
      --set auth.database="ejbca" \
      --set auth.username="ejbcauser" \
      --set auth.existingSecret="maria-db-credentials" \
      --set primary.persistence.size="100Mi" \
      --set secondary.replicaCount=0 \
      oci://registry-1.docker.io/bitnamicharts/mariadb
Step 3 – Configure Helm Chart in values.yaml
To check the default values.yaml for the latest version of the Helm chart:
helm show values oci://repo.keyfactor.com/charts/ejbca > ejbca-default-values.yaml

helm show values oci://repo.keyfactor.com/charts/ejbca --version <version>
For the initial deployment, configure the following components:
-
Configure EJBCA to:
-
Import the ConfigDump which requires configuration for all relevant EJBCA resources using the
ejbca.configdumpImportsection. -
Connect EJBCA to the deployed database.
-
Use the EJBCA RA container image
image.variant: ra.
-
-
Use NGINX as a sidecar to act as a proxy for EJBCA:
-
Enable LoadBalancer service to allow access to EJBCA from outside Kubernetes.
-
Configure the server TLS certificate as a Kubernetes secret in
nginx.secretInternalNginxCertThis tutorial shows how to issue this certificate via the REST API. -
You can also use this service for internal cluster operations.
-
-
Additionally, you may:
-
Impose resource reservations and limits via the Helm chart.
-
Configure autoscaling through the
values.yamlfile. This is useful for CA and VA instances.
-
Example values.yaml:
image:
  variant: ra
imagePullSecrets: [{ name: keyfactor-registry }]
ejbca:
  configdumpImport: ####
    enabled: true
    configMapName: ejbca-ra-init-configmap
    configMapKey: configdump.json
  env:
    LOG_LEVEL_APP: DEBUG
    DATABASE_JDBC_URL: "jdbc:mariadb://mariadb:3306/ejbca?characterEncoding=utf8"
  envFrom:
    - secretRef:
   name: ra-db-credentials
################################################################
nginx:
  enabled: true
  host: "ejbcara.testdomain.se"
  mountInternalNginxCert: true
  secretInternalNginxCert: "ejbcara-testdomain-se-secret"
  service:
    type: LoadBalancer
Part 2 - Configure the CA Side Peer Connection
Step 4 – Prepare Server Certificate
Before configuring the peer connection, the peer server certificate must be issued and stored as a Kubernetes secret.
To enroll a server certificate for the peer, you can use the REST API and the provided script enroll_server_certificate.sh.
Example:
# ./enroll_server_certificate.sh <CA IP Address or Domain> <Domain Name for K8s external access>
# <Domain Name for K8s internal access> <SuperAdmin token file> <password>

./enroll_server_certificate.sh 192.168.122.59 ejbcara.testdomain.se ejbca-ra-nginx.radeployment SuperAdmin.p12 foo123
Note:
-
<Domain Name for K8s external access>is also configured invalues.yamlatnginx.hostattribute -
<Domain Name for K8s internal access>is of the form{helm deployment name}-nginx.{namespace of peer deployment}
Next, create a Kubernetes secret which will be configured in values.yaml to provide the TLS credential to EJBCA.
Note that the file names are expected in the following format:
-
{domain-name}.pem(certificate) -
{domain-name}-Key.pem(private key) -
{domain-name}-CA.pem(CA certificate)
kubectl create secret generic ejbcara-testdomain-se-secret -n radeployment \
 --from-file=ejbcara.testdomain.se.pem=ejbcara.testdomain.se.pem \
 --from-file=ejbcara.testdomain.se-Key.pem=ejbcara.testdomain.se.key \
 --from-file=ejbcara.testdomain.se-CA.pem=ManagementCA.cacert.pem
Note that the name of the secret is mentioned in secretInternalNginxCert in the nginx block in values.yaml:
nginx:
  enabled: true
  host: "ejbcara.testdomain.se"
  mountInternalNginxCert: true
  secretInternalNginxCert: "ejbcara-testdomain-se-secret"
  service:
    type: LoadBalancer
Now that you have a database for the RA deployed, the server TLS credentials for your RA, and a fully configured values.yaml for your RA referring to the TLS credential and the deployed database, you can continue to the next step to configure your CA for your peer connection.
Step 5 – Configure Peer in CA
This section shows how to configure the CA instance to find the Peer, that is, the RA. For the Peer connection to function correctly, the resources highlighted in green must be configured on the CA.
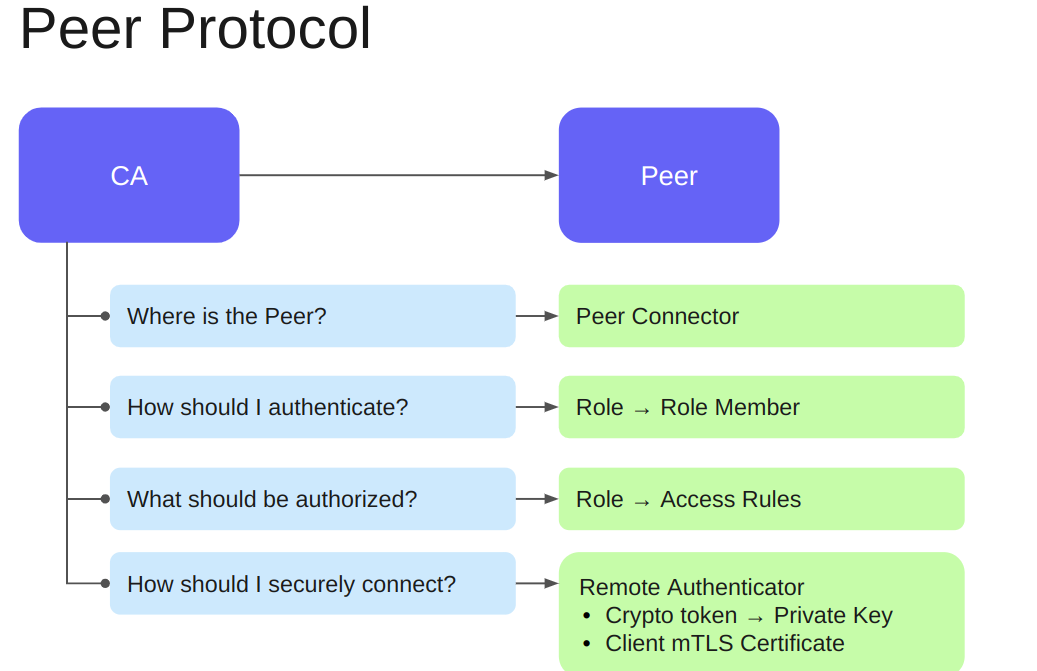
These configurations initiate an mTLS connection to the RA and properly authenticate and authorize the RA(s). This configuration can be performed either before or after deploying the RA.
For more information about peer configurations in EJBCA deployments, see Segmenting the PKI using EJBCA Peer.
Below is the configuration used in this example (add_ra_in_ca_configdump.json), which also serves as a comprehensive example:
{
  "peer-connectors": {
    "ejbca-ra1": {
      "Object Type": "Peer Connector",
      "Version": 1,
      "Name": "ejbca-ra1",
      "Peer Enabled": true,
      "URL": "<https://ejbca-ra-nginx.radeployment/ejbca/peer/v1>",
      "Long Hanging Connections Enabled": true,
      "Min Long Hanging Connections": 10,
      "Max Long Hanging Connections": 20,
      "Authentication Key Binding": "peer-key"
    }
  },
  "internal-key-bindings": {
    "peer-key": {
      "Object Type": "Internal Key Binding",
      "Version": 1,
      "Name": "peer-key",
      "Type": "AuthenticationKeyBinding",
      "Status": "ACTIVE",
      "Crypto Token": "PeerToken",
      "Key Pair Alias": "peerkey",
      "Next Key Pair Alias": null,
      "Signature Algorithm": "SHA256WithRSA",
      "Enrollment info: Key Binding SubjectDN": "CN=peer-key",
      "Enrollment info: Signing CA SubjectDN": "CN=ManagementCA,O=EJBCA Sample,C=SE",
      "Enrollment info: Certificate profile": "ENDUSER",
      "Enrollment info: End entity profile": "EMPTY",
      "Enrollment info: Key spec or curve": "RSA2048",
      "Trusted certificates": {},
      "Signed on behalf of CAs": {},
      "Properties": {
   "Protocol and Cipher Suite": "TLSv1.2;TLS_RSA_WITH_AES_256_CBC_SHA256"
      }
    }
  },
  "admin-roles": {
    "RA-Peer-Connection": {
      "Object Type": "Role",
      "Version": 1,
      "Name": "RA-Peer-Connection",
      "Role Members": [
   {
     "Token Type": "CertificateAuthenticationToken",
     "Issuer": "ManagementCA",
     "Match With": "WITH_COMMONNAME",
     "Match Value": "ejbcara.testdomain.se"
   }
      ],
      "Namespace": "",
      "RA Style Id": 0,
      "Access Rules": {
   "/administrator/": "Allow",
   "/ca/": "Allow",
   "/ca_functionality/create_certificate/": "Allow",
   "/ca_functionality/use_approval_request_id/": "Allow",
   "/ca_functionality/use_username/": "Allow",
   "/ca_functionality/view_ca/": "Allow",
   "/ca_functionality/view_certificate/": "Allow",
   "/endentityprofilesrules/": "Allow",
   "/endentityprofilesrules/EMPTY/": "Allow",
   "/protocol/acme/": "Allow",
   "/protocol/cmp/": "Allow",
   "/protocol/est/": "Allow",
   "/protocol/rest/": "Allow",
   "/protocol/scep/": "Allow",
   "/protocol/web_services/": "Allow",
   "/ra_functionality/approve_end_entity/": "Allow",
   "/ra_functionality/create_end_entity/": "Allow",
   "/ra_functionality/delete_end_entity/": "Allow",
   "/ra_functionality/edit_end_entity/": "Allow",
   "/ra_functionality/revoke_end_entity/": "Allow",
   "/ra_functionality/view_approvals/": "Allow",
   "/ra_functionality/view_end_entity/": "Allow",
   "/ra_functionality/view_end_entity_history/": "Allow",
   "/ra_functionality/view_end_entity_profiles/": "Allow",
   "/ra_master/invoke_api/": "Allow"
      }
    }
  }
}
Note the following:
-
A
"peer-connectors"section that describes the peer instance, including its URL. The URL should reference theClusterIPaccess point, which typically follows the format:{helm-deployment-name}-nginx.{namespace}. -
Authentication and authorization rules in the
"admin-roles"section.-
The Common Name used in the RA’s server TLS certificate must match the DNS Name defined in the NGINX block of the
values.yamlfile.
-
-
An
"internal-key-bindings"section for the Remote Authenticator. The Remote Authenticator connects to the RA and creates an mTLS authenticated connection pool. The following arguments are used to enroll a certificate:-
A key pair named
peerkeyin the crypto tokenPeerToken -
With the subject DN
"CN=peer-key"issued by ManagementCA which is identified bySigning CA SubjectDN -
The
ENDUSERCertificate profile andEMPTYEnd entity profile are used.
-
"Crypto Token": "PeerToken",
"Key Pair Alias": "peerkey",
"Enrollment info: Key Binding SubjectDN": "CN=peer-key",
"Enrollment info: Signing CA SubjectDN": "CN=ManagementCA,O=EJBCA Sample,C=SE",
"Enrollment info: Certificate profile": "ENDUSER",
"Enrollment info: End entity profile": "EMPTY"
To add additional peers, replicate the "peer-connectors" section with a new name and URL (such as, ejbca-ra2). The remaining configuration can remain the same.
You can also send a separate REST API request at a later stage to create additional peers as needed.
Next, do the following:
-
Create a Crypto Token in the CA named
PeerTokenof type SOFT. For more information about creating crypto tokens, see Managing Crypto Tokens.
PeerToken, ConfigDump will automatically create the key pair. If not, you must create the key pair in advance. This example uses the key pair namedpeerkey. -
Send a ConfigDump REST request to the CA using the provided script configdump-rest.sh:
# <CA IP Address or Domain> <JSON file with configdump> <SuperAdmin token file> <password>
./configdump-rest.sh <CA IP Address or Domain> add_ra_in_ca_configdump.json SuperAdmin.p12 foo123
Ensure that you use initialize=true when importing the ConfigDump. Without this parameter, EJBCA will not generate the Remote Authentication certificate.
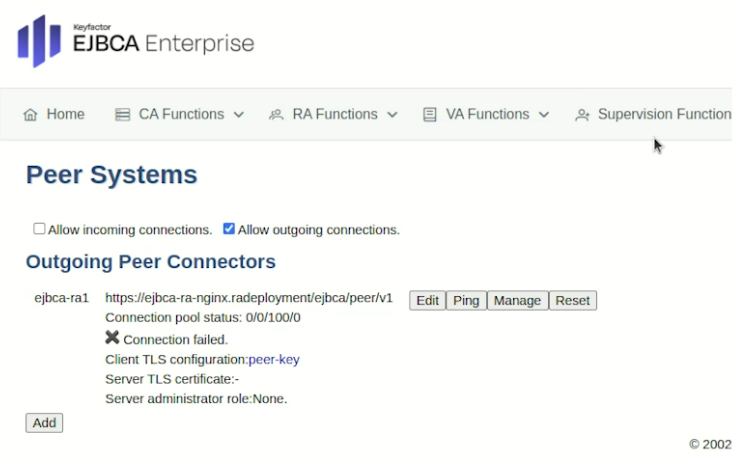
The script will create and/or configure all necessary resources. To verify, navigate to the EJBCA Admin user interface and verify that a peer connection is created on the /ejbca/adminweb/peerconnector/peerconnectors.xhtml page.
Part 3 - Configure the RA Side Peer Connection
Step 6 – Configure Peer in RA
This section shows how to prepare configdump with the necessary configurations which RA will import during the installation. For the Peer connection to work, the RA resources highlighted in green must be configured.
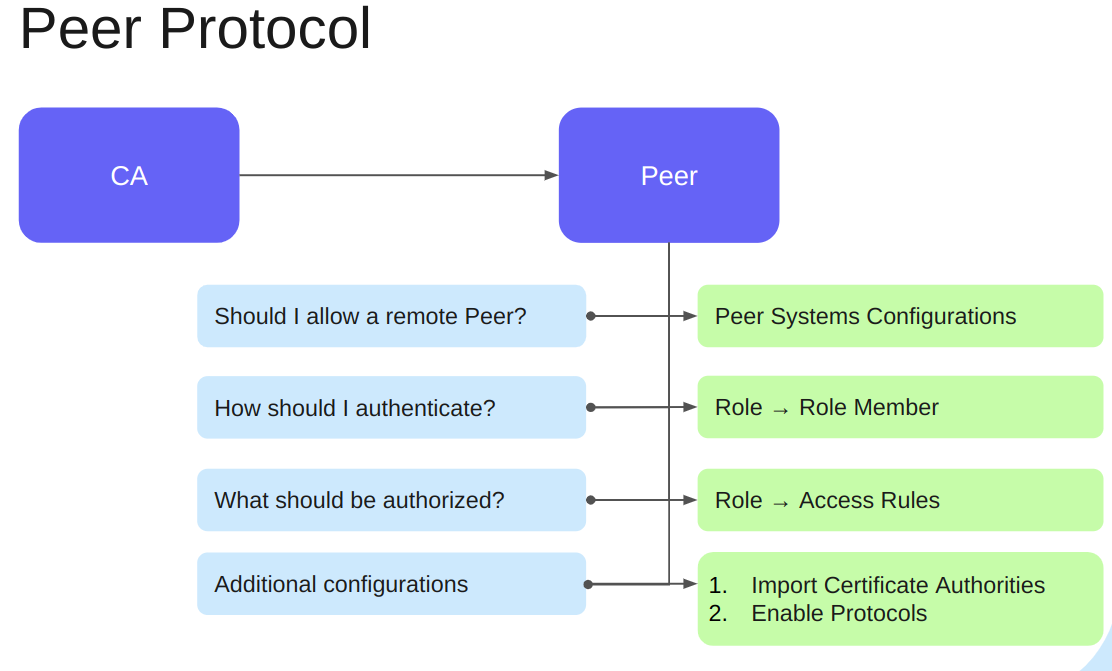
For more information about peer configurations in EJBCA deployments, see Segmenting the PKI using EJBCA Peer.
Notice that:
-
A
"peer-connectors"."global-peer-configuration"to allow incoming connection. -
Authentication and authorization rules in
"admin-roles"section to:-
Authorize the certificate issued to Remote Authenticator in the CA.
-
Use the same SuperAdmin token for the CA to access the RA.
-
-
A
"certification-authorities"to import the CAs present in the CA instance:-
Import the ManagementCA, that is, the CA issuing the Admin(SuperAdmin) token.
-
Import the CAs that will be issuing certificates, in this example, named IssuerCA.
-
-
An
"available-protocols"section to enable protocols such as ACME, CMP, and a subset of the REST API.
The same ConfigDump content can be reused to configure multiple RAs of the same type.
You need to prepare the "certification-authorities" section. However, you can automate this process with scripts or take advantage of EJBCA features introduced in version 9.3.
As of EJBCA 9.3, use the query parameter exportCasForPeerImport in the ConfiDump REST API to automatically retrieve the "certification-authorities" content.
-
Get the ConfigDump of Certificate Authorities from CA configdump-rest-get.sh
# <CA IP Address or Domain> <SuperAdmin token file> <password>.
/configdump-rest-get.sh 192.168.122.59 SuperAdmin.p12 foo123
-
Remove the
"CA Token"section for each CA. -
Download and format the Certificate Chain for each CA.
-
Set the certificate as a single line in
"Certificate Chain"attribute as shown in the following example.
Configuration example:
{
  "certification-authorities": {
   "ManagementCA": {
     "Object Type": "Certification Authority",
     "Version": 2,
     "Name": "ManagementCA",
     "Type of CA": "X.509",
     "Description": "CA created by certificate import.",
     "Serial Number Octet Size": 20,
     "Pre-produce OCSP Responses": false,
     "Microsoft CA Compatible Mode Used": false,
     "Store responses on-demand": false,
     "Pre-produce OCSP Responses Upon certificate issuance/revocation": false,
     "Certificate Profile": "ROOTCA",
     "Default Certificate Profile": "Not used",
     "Use Append-Only Table": false,
     "Certificate Chain": [
       "MIID......truncated........b8ubneo="
     ],
     "Enforce Unique Public Keys": true,
     "Enforce key renewal": false,
     "Enforce Unique DN": true,
     "User Storage": true,
     "Certificate Storage": true,
     "Accept Revocations for Non-Existing Entries": false,
     "Subject DN": "CN=ManagementCA,O=EJBCA Sample,C=SE",
     "Signed By": "Self Signed",
     "Validity": "0d",
     "Subject Alternative Name": null,
     "Use UTF-8 in Policy Notice Text": true,
     "LDAP DN Order": true,
     "Authority Key Id Used": true,
     "CRL Number Used": true,
     "Partitioned CRL Used": false,
     "CRL Expiration Period": "1d",
     "CRL Issue Interval": "0m",
     "CRL Overlap Time": "10m",
     "Delta CRL Period": "0m",
     "Generate CRL Upon Revocation": false,
     "Allow Changing Revocation Reason": false,
     "Finish User": true,
     "CA Healthcheck Enabled": true,
     "Request Processor": null
   },
   "IssuerCA": {
     "Object Type": "Certification Authority",
     "Version": 2,
     "Name": "IssuerCA",
     "Type of CA": "X.509",
     "Description": "CA created by certificate import.",
     "Serial Number Octet Size": 20,
     "Pre-produce OCSP Responses": false,
     "Microsoft CA Compatible Mode Used": false,
     "Store responses on-demand": false,
     "Pre-produce OCSP Responses Upon certificate issuance/revocation": false,
     "Certificate Profile": "ROOTCA",
     "Default Certificate Profile": "Not used",
     "Use Append-Only Table": false,
     "Certificate Chain": [
       "MIIDFzCCAf+g......truncated........KPCEvEre"
     ],
     "Enforce Unique Public Keys": true,
     "Enforce key renewal": false,
     "Enforce Unique DN": true,
     "User Storage": true,
     "Certificate Storage": true,
     "Accept Revocations for Non-Existing Entries": false,
     "Subject DN": "CN=IssuerCA",
     "Signed By": "Self Signed",
     "Validity": "0d",
     "Subject Alternative Name": null,
     "Use UTF-8 in Policy Notice Text": true,
     "LDAP DN Order": true,
     "Authority Key Id Used": true,
     "CRL Number Used": true,
     "Partitioned CRL Used": false,
     "CRL Expiration Period": "1d",
     "CRL Issue Interval": "0m",
     "CRL Overlap Time": "10m",
     "Delta CRL Period": "0m",
     "Generate CRL Upon Revocation": false,
     "Allow Changing Revocation Reason": false,
     "Finish User": true,
     "CA Healthcheck Enabled": true,
     "Request Processor": null
   }
  },
  "available-protocols": {
   "available-protocol-configuration": {
     "Object Type": "Available Protocols",
     "Version": 1,
     "Name": "available-protocol-configuration",
     "ACME": true,
     "Certstore": true,
     "CMP": true,
     "CRLstore": true,
     "EST": true,
     "MSAE": true,
     "OCSP": false,
     "SCEP": true,
     "RA Web": true,
     "REST CA Management": false,
     "REST Certificate Management": false,
     "REST Coap Management": false,
     "REST Crypto Token Management": false,
     "REST End Entity Management": true,
     "REST End Entity Management V2": true,
     "REST Configdump": true,
     "REST Certificate Management V2": true,
     "REST SSH V1": true,
     "REST System V1": false,
     "Webdist": true,
     "Web Service": true,
     "ITS Certificate Management": false,
     "Custom header name for REST calls from browser": "X-Keyfactor-Requested-With"
   }
  },
  "peer-connectors": {
   "global-peer-configuration": {
     "Object Type": "Peer Global Configuration",
     "Version": 1,
     "Allow incoming connections": true,
     "Allow outgoing connections": false,
     "Max wait by caller (ms)": 25000,
     "Max wait by peer (ms)": 15000,
     "Max age for requests (ms)": 16000
   }
  },
  "admin-roles": {
   "Super Administrator Role": {
     "Object Type": "Role",
     "Version": 1,
     "Name": "Super Administrator Role",
     "Role Members": [
       {
         "Token Type": "CertificateAuthenticationToken",
         "Issuer": "ManagementCA",
         "Match With": "WITH_COMMONNAME",
         "Match Value": "SuperAdmin"
       },
       {
         "Token Type": "CliAuthenticationToken",
         "Issuer": null,
         "Match With": "USERNAME",
         "Match Value": "ejbca"
       }
     ],
     "Namespace": "",
     "RA Style Id": 0,
     "Access Rules": {
       "/": "Allow"
     }
   },
   "raIncomingCaPeer": {
     "Object Type": "Role",
     "Version": 1,
     "Name": "raIncomingCaPeer",
     "Role Members": [
       {
         "Token Type": "CertificateAuthenticationToken",
         "Issuer": "ManagementCA",
         "Match With": "WITH_COMMONNAME",
         "Match Value": "peer-key"
       }
     ],
     "Namespace": "",
     "RA Style Id": 0,
     "Access Rules": {
       "/ca/": "Allow",
       "/peerincoming/": "Allow",
       "/ra_slave/manage/": "Allow"
     }
   }
 }
}
Part 4 - Finalize RA Deployment
Step 7 – Deploy the RA
Before deploying the RA, you need to upload the ConfigDump JSON just created to Kubernetes. To do this, create a ConfigMap in Kubernetes:
kubectl apply -f ejbca-ra-init-configmap.yaml -n radeployment
Ensure that the name of the ConfigMap matches the value of configMapName under the ejbca.configdumpImport section in your values.yaml file:
ejbca:
  configdumpImport: ####
    enabled: true
    configMapName: ejbca-ra-init-configmap
    configMapKey: configdump.json
This allows the EJBCA RA instance to read and import the required resources.
Deploy RA instance
To deploy the RA by using the Helm chart:
-
Copy the contents of the
values.yamlmentioned above to a file namedra_deployment_values.yaml, or download and use the provided ra_deployment_values.yaml. -
Run the following command to deploy the EJBCA RA instance:
helm install ejbca-ra -n radeployment -f ra_deployment_values.yaml \ oci://repo.keyfactor.com/charts/ejbca -
To verify that EJBCA is operational, run:
kubectl get all,pvc,cm,secrets -n radeployment -
The output will be similar to the following:
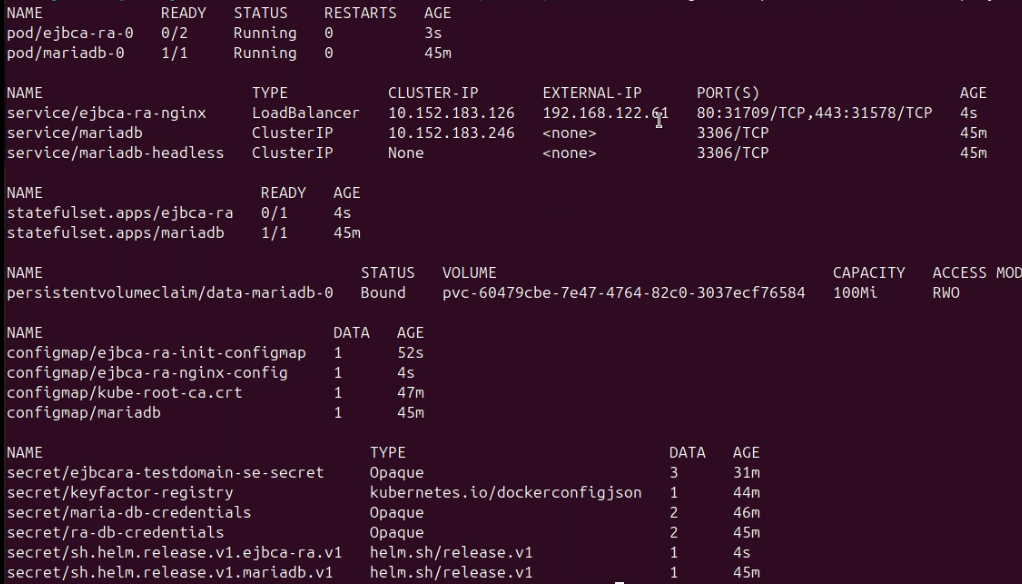
Note the following expected behavior:
-
You have only one pod of MariaDB and EJBCA RA. Currently, each RA instance requires a separate Helm installation. All RAs connect to a single shared database instance, that is, there is no need for database replication.
-
The EJBCA RA pod contains two containers:
-
ejbca: the application itself. -
nginx
-
-
Services:
-
mariadb: internal service used by EJBCA to access the database. -
ejbca-ra-nginx: aLoadBalancerservice for accessing EJBCA both from within and outside the Kubernetes cluster.
-
-
There is a service
mariadbwhich is used by EJBCA to talk to the database. -
The service
ejbca-ra-nginxis used to connect to EJBCA both inside and outside the cluster as it is a LoadBalancer service. The EXTERNAL_IP of this service will be used in a later step to access EJBCA from your browser.
Wait until pod/ejbca-ra-0 shows status READY 2/2.
Access EJBCA RA
Access EJBCA by navigating to:
https://<IP Address of ejbca-ra-nginx>
When prompted for certificate authentication, select the same SuperAdmin certificate.
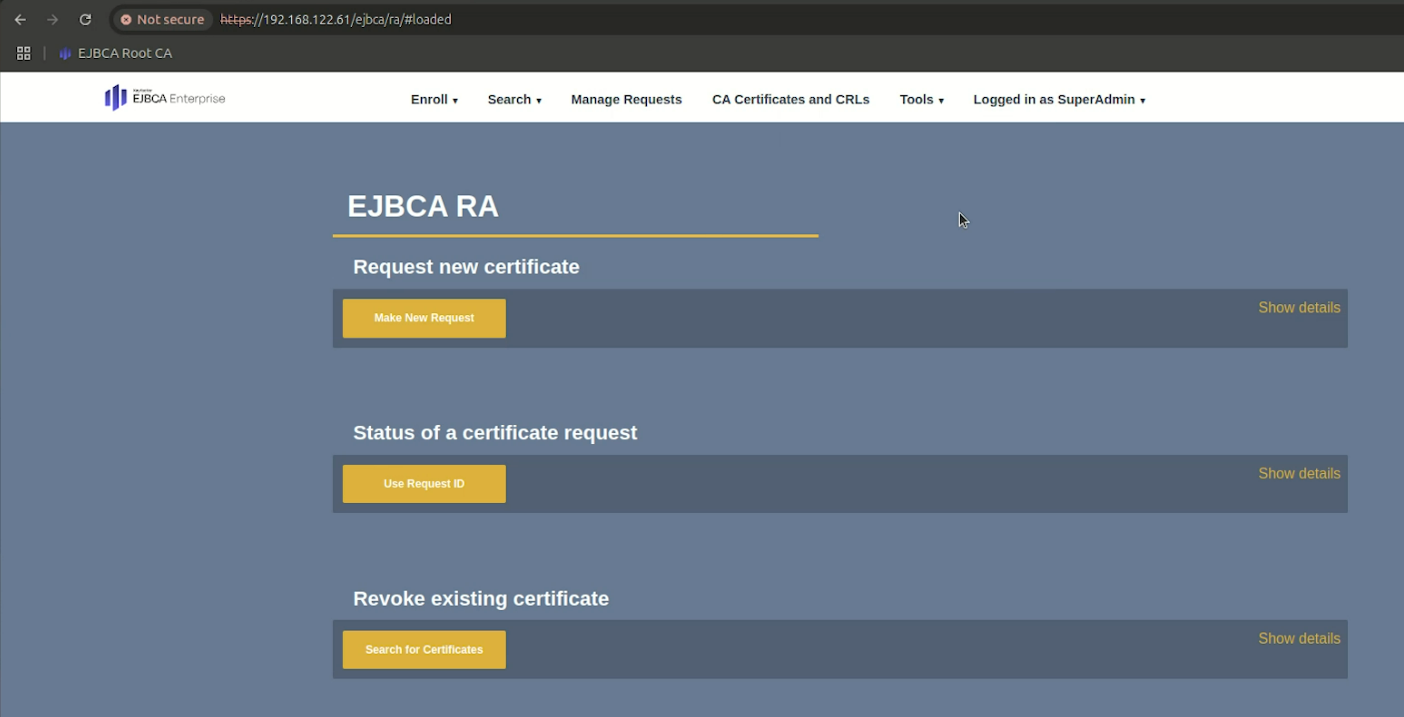
You should be automatically redirected to the EJBCA RA Web, displaying Logged in as SuperAdmin at the top.
If the error RA is not connected to any CA is displayed, go to https://<IP Address of ejbca-ra-nginx>/ejbca/adminweb/peerconnector/peerconnectors.xhtml. Check if the CA instance is listed as peer:
-
If listed, wait 1–2 minutes and try accessing the RA web interface again.
-
If not listed, review the earlier configuration steps to ensure proper peer setup.
Now you can search for already enrolled certificates by clicking Search>Certificates.
Test the setup
To enroll a certificate to verify the setup, do the following:
-
Select Enroll > Make New Request and specify the following:
-
For Certificate Type, select EMPTY or any listed End Entity Profile.
-
For Certificate subtype, select ENDUSER or any listed Certificate Profile.
-
For CA (if prompted), select IssuerCA or ManagementCA.
-
For Key-pair generation, select By the CA.
-
For Key algorithm, select for example, RSA-2048, or P-256.
-
For the Required Subject DN Attributes, specify CN, Common Name and enter a unique value.
-
For Provide User Credentials, enter a username and password. The user name should be unique in EJBCA.
-
-
Click Download PEM to download the certificate in PEM format.
Now you have verified that your RA is working properly.
Next steps
In this tutorial, you learned how to automate the deployment of peer connections between Certificate Authorities (CAs) and Registration Authorities (RAs) in EJBCA Enterprise using ConfigDump, Helm charts, and Kubernetes-native automation tools.
Here are some next steps we recommend:
-
To learn more about how to automate peer configurations in EJBCA deployments using the EJBCA ConfigDump tool and JSON, see Segmenting the PKI using EJBCA Peer and watch our videos about EJBCA Peer and deployment automation:
-
For information on key architectural considerations and security best practices to enhance redundancy, fault tolerance, and automation while streamlining management through Helm, see High-Availability Multi-Region PKI Deployment with EJBCA and Helm.
-
For a deeper dive into the EJBCA Enterprise Helm chart, refer to EJBCA Helm Chart Building Blocks. This guide provides a structured breakdown of essential configurations, including database connectivity, HSM integration (P11NG), and security measures - enabling security engineers and DevOps teams to deploy and manage PKI services efficiently.
-
If you are interested in EJBCA Enterprise, read more on Keyfactor EJBCA Enterprise.
-
If you are interested in EJBCA Community, check out EJBCA Community vs Enterprise or read more on ejbca.org.
-
If you are an EJBCA Enterprise customer and need support, visit the Keyfactor Support Portal.
-
Discuss with the EJBCA Community on GitHub Discussions.