Enterprise
This tutorial demonstrates how to export, adjust, and redeploy EJBCA configurations across environments using the EJBCA ConfigDump Tool in combination with Kubernetes and Helm. It enables repeatable and automated setup of certificate authorities (CAs) and related components, such as profiles, without requiring manual reconfiguration.
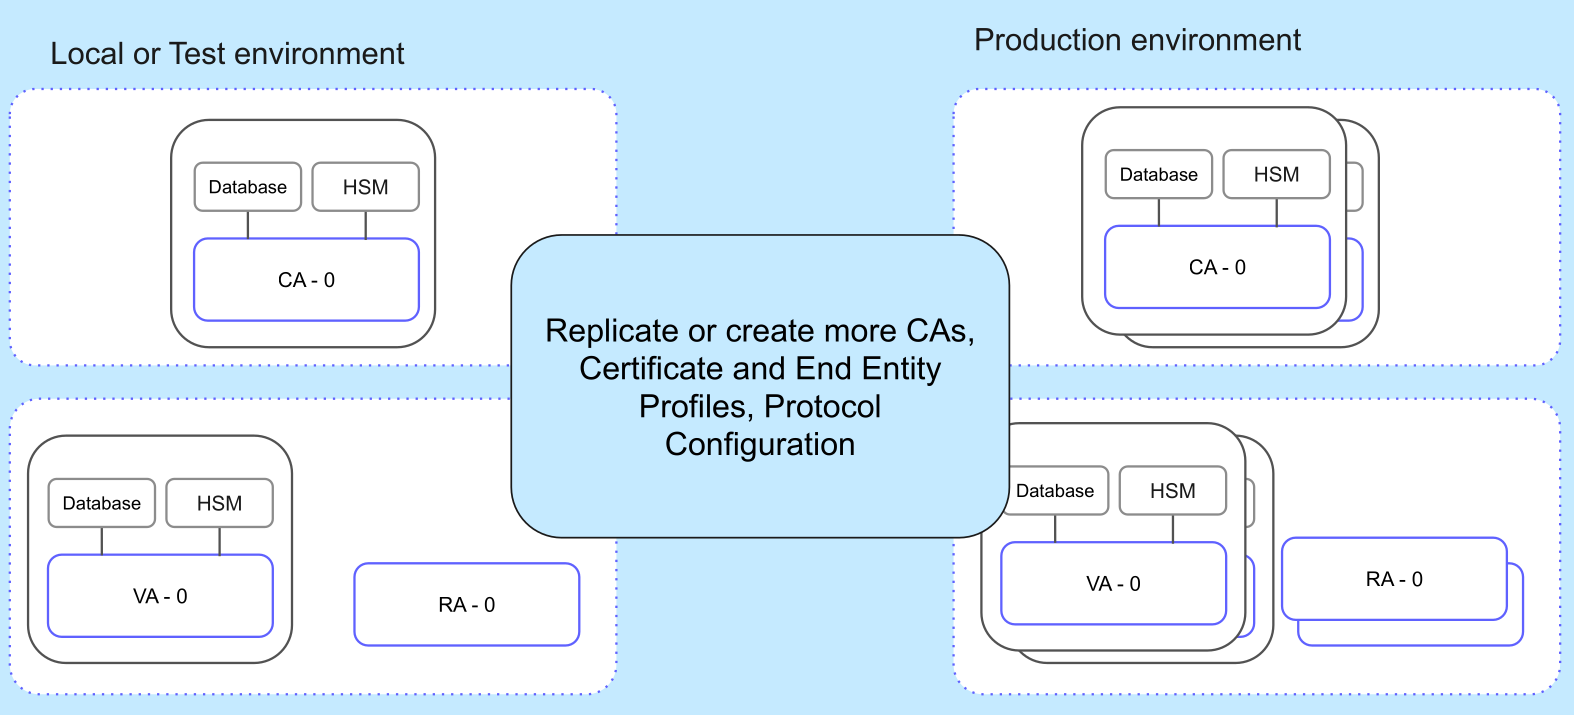
ConfigDump allows you to export and import EJBCA resources as JSON or YAML files and replicate the EJBCA configurations across environments:
-
Deploy EJBCA locally (for example, on MicroK8s) or in a development Kubernetes environment.
-
Set up the HSM integration and create crypto tokens in EJBCA.
-
Create CAs and profiles.
-
Optionally configure protocols (such as, ACME, CMP, EST, SCEP).
-
Once you have a working configuration, you can replicate your CA environment from development/test to a production environment using ConfigDump.
The tutorial covers these steps:
-
Prepare the target environment
-
Export configuration from an existing EJBCA installation
-
Adjust and prepare configuration files
-
Update Helm chart values
-
Deploy EJBCA with Helm
Prerequisites
For this tutorial, EJBCA Enterprise container version 9.2.0 was used.
This tutorial is only valid for the EJBCA Enterprise container.
Before you begin, you need:
-
A working EJBCA deployment. This guide builds on the setup described in the tutorial Deploy EJBCA Enterprise CA with Helm chart.
You may use any existing EJBCA deployment as the source, but be sure to review and adjust the exported
ConfigDumpJSON files to suit the target environment.
Step 1 - Prepare Environment
In this tutorial, we will replicate an existing EJBCA installation from the cadeployment namespace to a new namespace named productionca.
This guide builds on the EJBCA installation demonstrated in the Deploy EJBCA Enterprise CA with Helm chart tutorial. While you may reuse any existing EJBCA deployment, ensure that the exported ConfigDump JSON files are reviewed and adjusted to reflect the target environment.
To ensure the target environment has the required components such as the database and HSM setup, do the following:
-
Download the following files and place them in your current working directory:
-
Execute the following commands in sequence to prepare your target environment:
kubectl create namespace productionca

kubectl create secret generic maria-db-pass -n productionca \
    --from-literal=mariadb-root-password=rootpass \
    --from-literal=mariadb-galera-mariabackup-password=backpass \
    --from-literal=mariadb-password=normalpass

kubectl create secret generic ejbca-db-credentials -n productionca \
    --from-literal=DATABASE_USER=ejbcauser \
    --from-literal=DATABASE_PASSWORD=normalpass

helm install ejbca-ca-database -n productionca -f values-mariadb-galera.yaml \
    oci://registry-1.docker.io/bitnamicharts/mariadb-galera

kubectl apply -f softhsm-init-configmap.yaml -n productionca

kubectl apply -f softhsm-pvc.yaml -n productionca

kubectl create secret generic ejbca-config-files -n productionca \
    --from-file=databaseprotection.properties=databaseprotection.properties
The database and other foundational resources required by EJBCA should now be operational and you can proceed to the next step.
Step 2 - Export Configuration from Existing EJBCA Installation
Use the ConfigDump REST API to extract your existing EJBCA configuration as a JSON file.
-
Obtain your
SuperAdmin.p12token of your existing environment (you can use another token with appropriate privileges, or use OAuth). Place the SuperAdmin token in the same directory before running the following script to get all the configuration from EJBCA. -
Run the following script to allow the ConfigDump call to obtain all configurations from EJBCA:
Bash#!/bin/bash if [ $# -ne 3 ] then echo 'usage: ./configdump-rest.sh 192.168.122.59 SuperAdmin.p12 foo123' exit 1 fi SERVER_HOST="$1" ADMINP12="$2" ADMINP12PASS="$3" curl -k -X GET \ "https://$SERVER_HOST/ejbca/ejbca-rest-api/v1/configdump??ignoreerrors=false&defaults=false&externalcas=false&include=CA%3A%2A&exclude=%2A%3A%2A" \ --cert-type P12 --cert "$ADMINP12:$ADMINP12PASS" -H "Content-Type: application/json" -v -
Run the script and save the output to a
configdump.jsonfile:./configdump-rest-get.sh <LOADBALANCER_IP_OR_DNS> SuperAdmin.p12 foo123 -
The downloaded JSON file should look similar to the example configdump.json. If you are replicating your own installation, then content will vary.
You may adjust the contents of Configdump during the API call to only replicate the intended configuration and thus customize the include/exclude parameters to limit the scope of the exported configuration.
Now that you have the configuration to replicate in your new environment, continue with the next step.
Step 3 - Prepare Configuration Files
In this step, you will prepare the configuration with the content exported using ConfigDump:
-
Modify
configdump.json -
Prepare required Kubernetes resources
Modify configdump.json
Before importing the configuration into the new environment, perform the following updates:
-
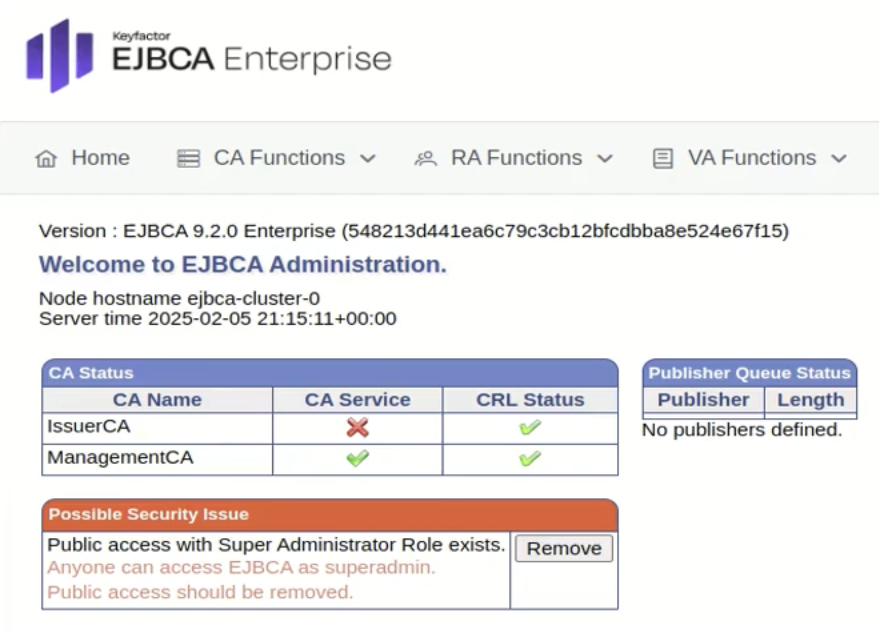
Update roles for unauthenticated access: You need to allow access to the new installation without any authentication the first time. This will allow you to enroll the SuperAdmin token in the new environment. To do so, update the
admin-rolessection for theSuper Administrator Roleto include unauthenticated access, thusPublicAccessAuthenticationToken, for initial setup:JSON"admin-roles": { "Super Administrator Role": { "Object Type": "Role", "Version": 1, "Name": "Super Administrator Role", "Role Members": [ { "Token Type": "CertificateAuthenticationToken", "Issuer": "ManagementCA", "Match With": "WITH_COMMONNAME", "Match Value": "SuperAdmin" }, { "Token Type": "CliAuthenticationToken", "Issuer": null, "Match With": "USERNAME", "Match Value": "ejbca" }, { "Token Type": "PublicAccessAuthenticationToken", "Issuer": null, "Match With": "TRANSPORT_ANY", "Match Value": "" } ], "Namespace": "", "RA Style Id": 0, "Access Rules": { "/": "Allow" } } } -
Update Cryptotoken Section:
-
Replace hardcoded passwords with environment variables (such as secrets with
${CONFIGDUMP_TOKENPASS}). Note that the prefixCONFIGDUMP_is required. -
Remove any existing
KeyData(as the cryptographic key pairs will vary in the new environment) to allow EJBCA to automatically populate these values.
-
Prepare Kubernetes Resources
Create Kubernetes resources to be used in the Helm chart values.yaml:
-
Create a Kuberentes secret for the Crypto token password. It will be provided as an environment variable to EJBCA:
kubectl create secret generic configdump-secrets -n productionca \ --from-literal=CONFIGDUMP_TOKENPASS=foo123 -
Create a ConfigMap in Kubernetes with the contents of the updated
configdump.json:kubectl create configmap ejbca-ca-init-configmap -n productionca \ --from-file=configdump.json=configdump.json
You have now uploaded the configuration in Kubernetes and need to ensure that EJBCA reads the configuration during installation.
Step 4 - Update Helm Chart Values
To prepare for deployment, update your Helm values.yaml file with the contents of ejbca_initial_setup_with_configdump.yaml.
The following values.yaml excerpt demonstrates how to configure EJBCA with the ConfigDump contents:
-
Enable ConfigDump Import: Set
ejbca.configdumpImport.enabledtotrueto activate the ConfigDump import. -
Initialize Certificate Authorities (CAs): Set
ejbca.configdumpImport.initializetotrueto allow CAs to be created. -
Specify the ConfigMap: Set
ejbca.configdumpImport.configMapNameto the name of the ConfigMap created. -
Reference Required Secrets: Use the
ejbca.envFromsection to reference Kubernetes Secrets created.
Example values.yaml configuration:
ejbca:
  configdumpImport: ####
    enabled: true
    initialize: true ####
    configMapName: ejbca-ca-init-configmap
    configMapKey: configdump.json
  env:
    LOG_AUDIT_TO_DB: true
    DATABASE_JDBC_URL: "jdbc:mariadb://ejbca-ca-database-mariadb-galera:3306/ejbca?characterEncoding=utf8"
  envFrom:
    - secretRef:
        name: ejbca-db-credentials
    - secretRef:
        name: configdump-secrets
Step 5 – Deploy EJBCA
To deploy EJBCA using the updated Helm chart values:
helm install ejbca-cluster -n productionca -f ejbca_initial_setup_with_configdump.yaml ./ejbca
The EJBCA installation includes all the resources of your existing installation.
Once deployed, use the LoadBalancer service IP address to access EJBCA via your browser.
Step 6 – Finalize the Deployment
Perform the final steps:
-
Enroll the SuperAdmin token using the same process as the source environment.
-
Set up TLS credentials for your new installation.
For detailed instructions, refer to the tutorial Deploy EJBCA Enterprise CA with Helm chart.
Your EJBCA instance is now production-ready, with configurations replicated from the original setup.
Next steps
In this tutorial, you learned how to export EJBCA configurations using ConfigDump, adapt the configuration for a new environment, and deploy a new instance of EJBCA using Helm and Kubernetes with automated setup.
Here are some next steps we recommend:
-
To learn more about how to automate peer configurations in EJBCA deployments using the EJBCA ConfigDump tool and JSON, see Segmenting the PKI using EJBCA Peer and watch our videos about EJBCA Peer and deployment automation:
-
For information on key architectural considerations and security best practices to enhance redundancy, fault tolerance, and automation while streamlining management through Helm, see High-Availability Multi-Region PKI Deployment with EJBCA and Helm.
-
For a deeper dive into the EJBCA Enterprise Helm chart, refer to EJBCA Helm Chart Building Blocks. This guide provides a structured breakdown of essential configurations, including database connectivity, HSM integration (P11NG), and security measures - enabling security engineers and DevOps teams to deploy and manage PKI services efficiently.