Enterprise
For improved performance and security, EJBCA Enterprise can be set up to communicate with other instances of EJBCA acting as Registration Authority (RA) and/or Validation Authority (VA) using the peer protocol. The EJBCA Enterprise RA and VA containers are deployed using the EJBCA Enterprise Edition Helm chart, see EJBCA Container Set.
This example applies only to retired Ingress NGINX deployments or Ingress resources that do not support TLS pass-through, see Prerequisites.
For clusters that support Ingress with TLS pass-through or the LoadBalancer, follow Deploy RA and VA in Kubernetes .
The following outlines how to configure RA and/or VA instances with Ingress, and how to set up peer communication with a CA instance. Minor differences exist in Steps 1 and 2 compared to LoadBalancer-based deployments, all other steps remain the same. For reference, see Deploy RA and VA in Kubernetes .
Step 1 - Setup TLS credentials
The following sections describe how to set up TLS credentials for the RA or VA peer instance. It is assumed that the CA communicates with the peer instance through the internal service connected to the NGINX sidecar, and that the CA and peer instances are part of same cluster.
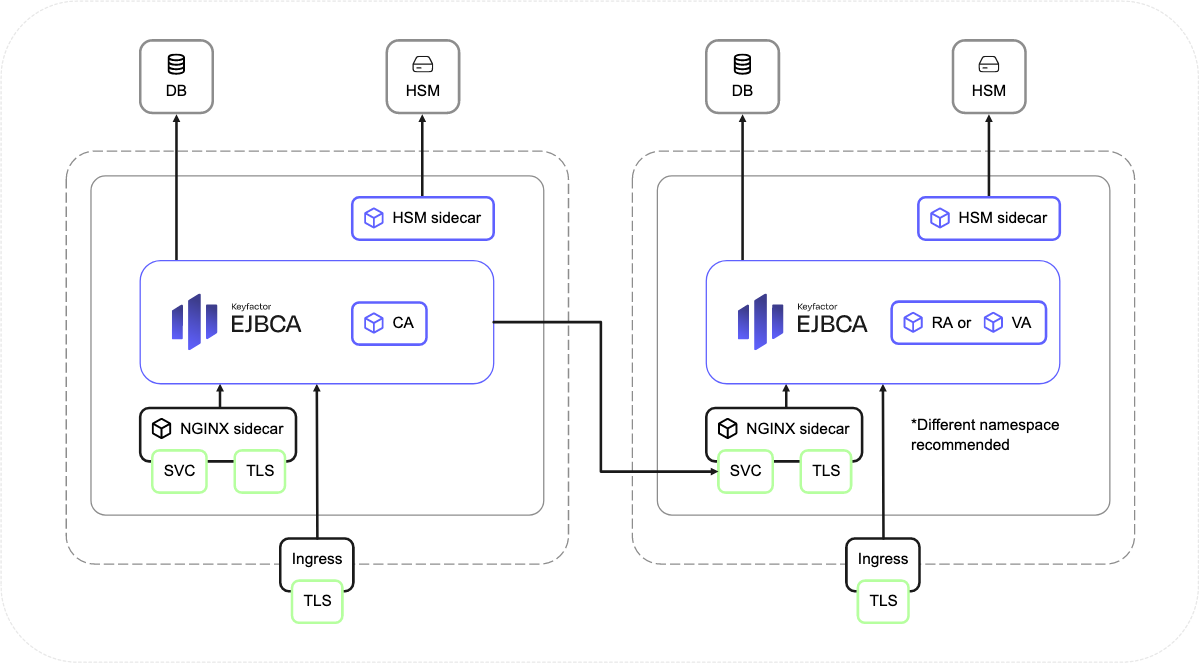
Note that if the CA and peer instances are not part of same cluster, the CA needs to communicate with peers via the Ingress.
Enroll server TLS certificates from CA
The following steps cover enrolling server TLS certificates from the CA. Two certificates will be issued since TLS needs to be set up for both the Ingress and NGINX sidecar over peers. For more information about the settings, see Creating Certificates on the RA.
To issue the two TLS certificates, follow these steps:
-
In EJBCA, click RA Web to access the EJBCA RA user interface.
-
Select Enroll > Make New Request and specify the following:
-
For Certificate Type, select EMPTY.
-
For Certificate subtype, select SERVER.
-
For CA, select a CA.
-
For Key-pair generation, select By the CA.
-
For Key algorithm, select for example, RSA-2048, or P-256.
-
To create a certificate for the NGINX sidecar, do the following:
-
For the Required Subject DN Attributes, CN, Common Name, specify a name according the following example:
ejbca-ra-deploy-nginx.ranamespace, that is the Helm release name and-nginxsuffix. Theranamespaceis the namespace where the peer is deployed. Based on the cluster setup, you could also need to addsvc.cluster.localor similar. -
For Optional Subject Alternative Name Attributes, DNS Name as, enter the same as for CN, Common Name.
-
For Provide User Credentials, enter a username and password. The Username is the name that will go into the database and is often the same as the Common Name.
-
Click Download PEM to download and save the PEM file.
-
-
To create a second certificate for Ingress, do the following:
-
For the Required Subject DN Attributes, CN, Common Name, specify the hostname.
-
For Optional Subject Alternative Name Attributes, DNS Name as , enter the same as for CN, Common Name.
-
For Provide User Credentials, enter a username and password. The Username is the name that will go into the database and is often the same as the Common Name.
-
Click Download PEM to download and save the PEM file.
-
The TLS certificates are now issued from the CA. Continue to the steps below to configure these certificates to use.
Configure internal sidecar with TLS
The internal sidecar must be configured with the enrolled TLS private key, TLS certificate, and issuing CA certificate. These components are extracted from the downloaded PEM file and stored in a Kubernetes Secret.
The filenames inside the secret are prefixed with the value of nginx.host. In this example, nginx.host is ejbca-ra-internal-host. Once the secret is created, set the nginx.secretInternalNginxCert to the name of the secret, and nginx.mountInternalNginxCert to true.
You can split the PEM file manually or use the following script.
#!/bin/bash

issued_key_pair_file="$1"
host_name="$2"

private_key_begin=$(cat "$issued_key_pair_file"|grep -n 'BEGIN PRIVATE KEY'|cut -f1 -d:)
private_key_end=$(cat "$issued_key_pair_file"|grep -n 'END PRIVATE KEY'|cut -f1 -d:)

head -n $private_key_end "$issued_key_pair_file" | tail -"$((private_key_end - private_key_begin +1))" > "$host_name-Key.pem"

ee_cert_begin=$(cat "$issued_key_pair_file"|grep -m 1 -n 'BEGIN CERTIFICATE'|cut -f1 -d:)
ee_cert_end=$(cat "$issued_key_pair_file"|grep -m 1 -n 'END CERTIFICATE'|cut -f1 -d:)

head -n $ee_cert_end "$issued_key_pair_file" | tail -"$((ee_cert_end - ee_cert_begin +1))" > "$host_name.pem"

lines_in_file=$(wc -l "$issued_key_pair_file"|cut -f1 -d ' ')
tail -n "$((lines_in_file - ee_cert_end))" "$issued_key_pair_file" > "$host_name-CA-temp.pem"

sed '/Bag Attributes/d' "$host_name-CA-temp.pem" | sed '/subject=/d' | sed '/issuer=/d' | sed '/friendlyName/d' > "$host_name-CA.pem"
rm "$host_name-CA-temp.pem"
Example usage:
# usage
./split-pem-full-chain.sh downloaded-file.pem host-name-of-sidecar-nginx

# example
./split-pem-full-chain.sh ejbca-ra-deploy-nginx.pem ejbca-ra-internal-host

# after the run
ls -A1
split-pem-full-chain.sh
ejbca-ra-internal-host.pem
ejbca-ra-internal-host-Key.pem
ejbca-ra-internal-host-CA.pem
ejbca-ra-deploy-nginx.pem

# then create the secret in Kubernetes to configue TLS for sidecar
kubectl create secret generic internal-nginx-credential-secret-ra1 \
 --from-file=ejbca-ra-internal-host.pem=ejbca-ra-internal-host.pem \
 --from-file=ejbca-ra-internal-host-Key.pem=ejbca-ra-internal-host-Key.pem \
 --from-file=ejbca-ra-internal-host-CA.pem=ejbca-ra-internal-host-CA.pem
Configure Ingress with TLS
Ingress is configured similar to the CA installation procedure, see Deploy CA in Kubernetes.
Create a generic or TLS secret depending on the Ingress version:
# generic secret
kubectl create secret generic ingress-credential-secret-ra1 \
 --from-file=tls.crt=ejbcara.pem \
 --from-file=tls.key=ejbcara-Key.pem

 # TLS secret
 kubectl create secret tls ingress-credential-secret-ra1 --key ejbcara-Key.pem --cert ejbcara.pem
For more information, refer to the Ingress NGINX Controller documentation on TLS/HTTPS.
Step 2 - Configure Helm chart parameters
Update the values.yaml with database credentials, TLS secrets for NGINX and Ingress, and deployment type (RA or VA).
Note that the trusted CA for the Ingress (#nginx.ingress.kubernetes.io/auth-tls-secret) will be set in a later step.
Example values.yaml configuration:
image:
  variant: ra
  #variant: va
  pullPolicy: IfNotPresent
imagePullSecrets:
  - name: keyfactor-registry
ejbca:
  license: ejbca-license-secret
  configdumpImport:
    enabled: true
    initialize: true
    configMapName: ejbca-ra-init-configmap
    configMapKey: configdump.json
  env:
    TLS_SETUP_ENABLED: "later"
    DATABASE_JDBC_URL: "jdbc:mariadb://ra-database-service:3306/ejbca?characterEncoding=utf8"
  envRaw:
    - name: DATABASE_USER
      valueFrom:
        secretKeyRef:
          name: ejbcadbcredentials
          key: database_user
    - name: DATABASE_PASSWORD
      valueFrom:
        secretKeyRef:
          name: ejbcadbcredentials
          key: database_password
nginx:
  enabled: true
  host: "ejbca-ra-internal-host"
  mountInternalNginxCert: true
  secretInternalNginxCert: "internal-nginx-credential-secret-ra1"
ingress:
  enabled: true
  className: "nginx"
  annotations:
    nginx.ingress.kubernetes.io/auth-tls-verify-client: "optional"
    #nginx.ingress.kubernetes.io/auth-tls-secret: "default/ejbca-ingress-trust-secret"
    nginx.ingress.kubernetes.io/auth-tls-pass-certificate-to-upstream: "true"
    nginx.ingress.kubernetes.io/auth-tls-verify-depth: "1"
  hosts:
    - host: "ejbcara.example.com"
      paths:
        - path: /
          pathType: Prefix
  tls:
    - hosts:
        - "ejbcara.example.com"
      secretName: ingress-credential-secret-ra1
When using a dedicated namespace, replace default/ with the relevant namespace name.
Wait for pods to get ready
watch kubectl get po
NAME                            READY   STATUS    RESTARTS      AGE
ejbca-ra-7f8494cc46-2qm4s   1/2     Running   0             13s
ejbca-ra-7f8494cc46-2qm4s   1/2     Running   0             63s
ejbca-ra-7f8494cc46-2qm4s   2/2     Running   0             63s
Wait until all pods have STATUS Running .
Step 3 - Install the Peer EJBCA
The following outlines steps for installing the peer EJBCA.
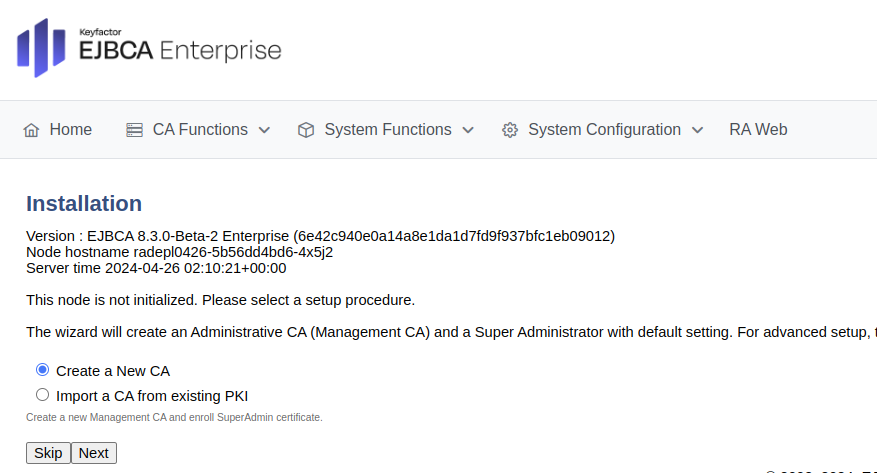
Import Management CA
-
In your browser, navigate to https://<host>/ejbca/adminweb, for example
https://ejbcara.example.com/ejbca/adminweb.
Ensure to connect over HTTPS as your browser may reject the EJBCA server certificate unless the Management CA is added to your local system as a trusted CA.
-
Select Import a CA from existing PKI and click Next.
-
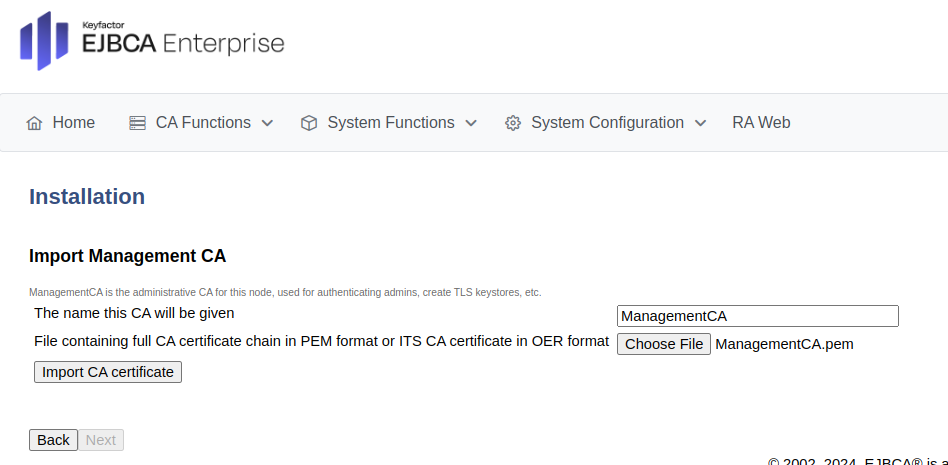
To import the Management CA certificate file downloaded from the CA instance in a previous step, do the following:
-
For The name this CA will be given, specify ManagementCA.
-
Click Browse to upload the full CA certificate ManagementCA.pem file previously downloaded.
-
Click Import CA certificate and click Next.
-
Update roles and role members
To update the Super Administrator role, perform the following steps:
-
Click Setup Role to go to the Roles Management page.
-
Next to the Super Administrator Role, click Members.
-
Members are defined by an attribute from the certificate DN and the serial number:
-
Match with: Select X509:CN, Common name.
-
CA: Ensure that the Management CA is selected for the CA to match on.
-
Match Value: Specify the CN value from the certificate, in this example: "SuperAdmin". Note that this is a case-sensitive matching.

-
-
Click Add to add the user to the Super Administrator Role.
Update Ingress trusted CA
Note that the same secret used to set the trusted CA in the CA Ingress can also be used for peers across different namespaces. Alternatively, a new secret can be created.
Update the auth-tls-secret in the ingress section of the values.yaml accordingly.
ingress:
  enabled: true
  className: "nginx"
  annotations:
    nginx.ingress.kubernetes.io/auth-tls-verify-client: "optional"
    nginx.ingress.kubernetes.io/auth-tls-secret: "default/ejbca-ingress-trust-secret"
    nginx.ingress.kubernetes.io/auth-tls-pass-certificate-to-upstream: "true"
    nginx.ingress.kubernetes.io/auth-tls-verify-depth: "1"
When using a dedicated namespace, replace default/ with the relevant namespace name.
Upgrade the EJBCA deployment using the helm upgrade command.
Access EJBCA
To access EJBCA using the SuperAdmin certificate:
-
In your browser, navigate to the EJBCA RA instance https://<hostname>/ejbca/adminweb/ (
https://ejbcara.example.com/ejbca/adminweb). -
When prompted for the SuperAdmin certificate, select the correct certificate, and click OK.
-
To remove public access and restrict access to EJBCA to only the Super Administrator, click Remove next to “Public access with Super Administrator Role exists”.
EJBCA is now successfully deployed.
Prepare for peer connection
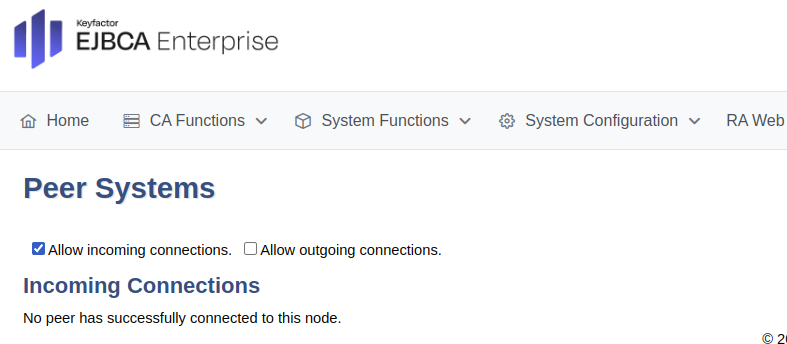
To set up the RA to allow for incoming connections, do the following:
-
In the EJBCA RA instance, click System Functions>Peer Systems.
-
Select Allow incoming connections to allow the CA to connect.
Step 4 - Configure peering in CA
Configure the EJBCA CA instance following the steps below. Navigate to adminweb of CA instance.
Create Crypto Token
The following covers how to create a soft crypto token and keys. If you will use an existing token, you can skip this step.
In your browser, navigate to the EJBCA CA instance.
-
In the EJBCA CA instance, click System Functions>Crypto Tokens.
-
Click Create new and specify the following on the New Crypto Token page:
-
For Create Management CA, select Create New Crypto Token.
-
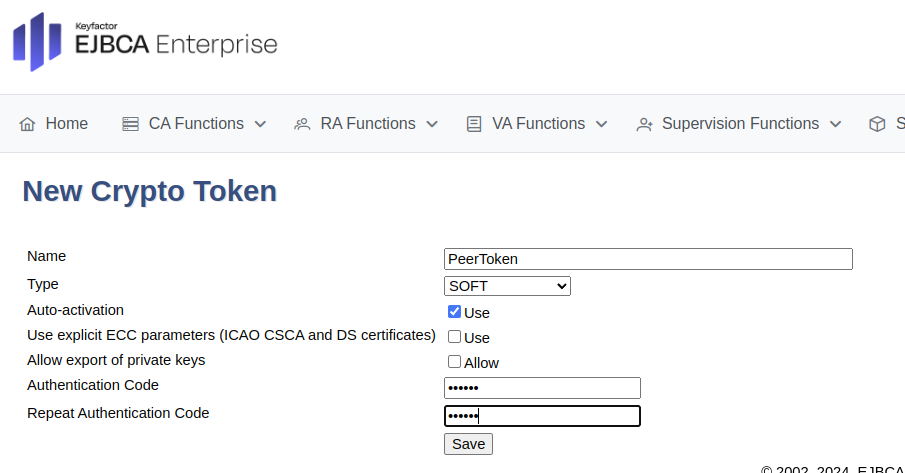
On the New Crypto Token page, specify the following:
-
Name: Specify a name for the crypto token, such as PeerToken.
-
Type: Select SOFT.
-
Auto-activation: Select Use to allow EJBCA to save the password and reapply it after a restart so that the CA is always available.
-
Authentication Code: Enter a password to be used to activate the crypto token.
-
Repeat Authentication Code: Re-enter the password.
-
-
Click Save to create the crypto token.
-
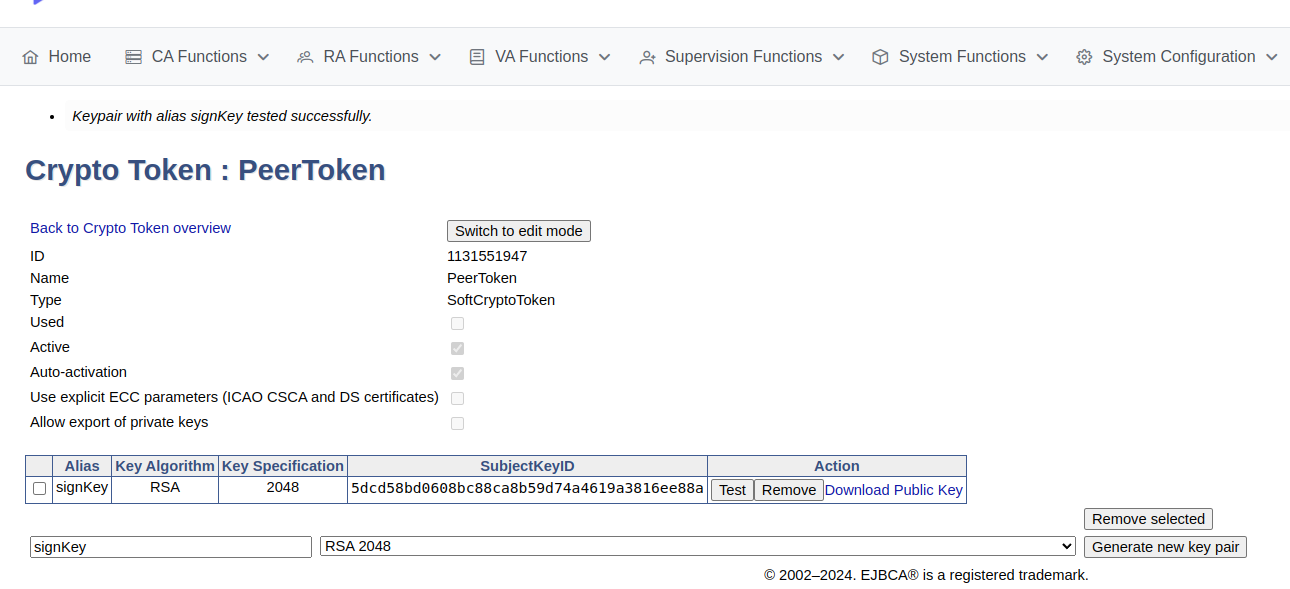
On the Crypto Tokens page, click the created crypto token.
-
For the signKey, select RSA 2048, and then click Generate new key pair to create the keys.
-
A new signKey key pair is generated and displayed in the list of key pairs.
It is recommended to use RSA2048 for peer connections to ensure performance and avoid issues which may arise if using ECC keys when an HSM (P11NG) token is used.
The Administrator also needs to select the following permissions for HSM (P11NG) tokens: Sign and Encrypt.
Create Remote Authentication
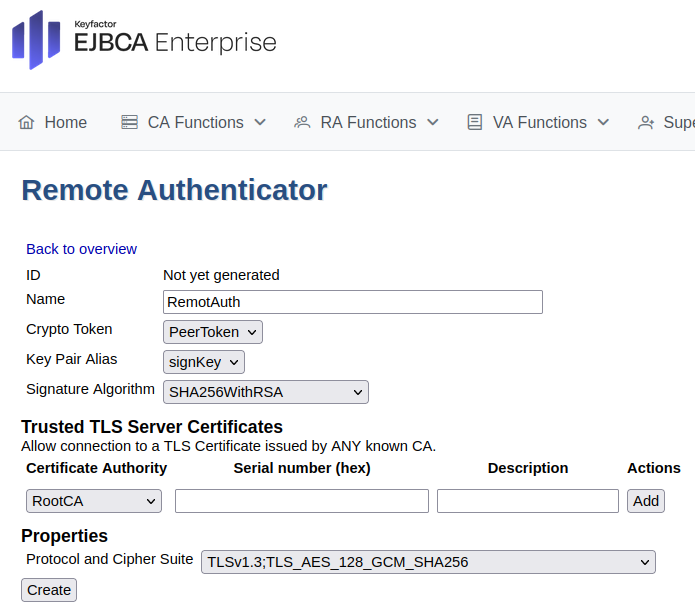
To set up an remote authenticator to identify the CA to the RA:
-
In EJBCA, go to System Functions>Remote Authentication.
-
Click Create new and select the crypto token and key.
-
Click Create.
-
Back on the Remote Authentication page, click the CSR action to download the certificate signing request for the key pair.
Enroll Remote Authentication
Next, to enroll the remote authentication:
-
In EJBCA, click RA Web to access the EJBCA RA interface.
-
Select Enroll > Make New Request and specify the following:
-
For Certificate subtype, select ENDUSER.
-
For Key-pair generation, select Provided by user.
-
Upload the CSR.
-
For Provide User Credentials, enter a username and password.
-
Click Download PEM to download the certificate in PEM format.
-
-
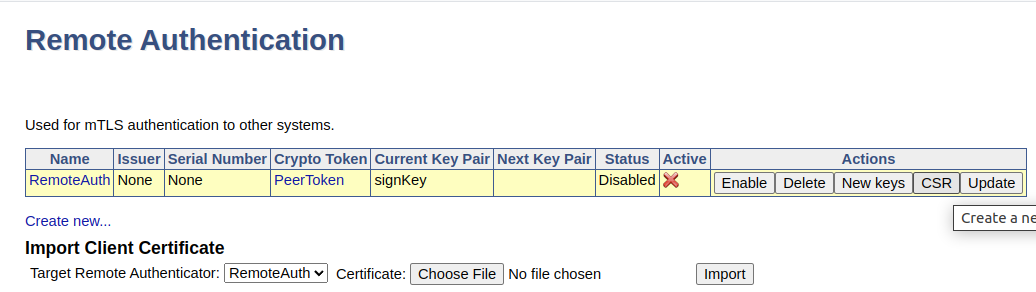
Go back to the Remote Authentication page, click the action Update, and then click Enable.
-
The remote authentication is indicated as Active in the overview.
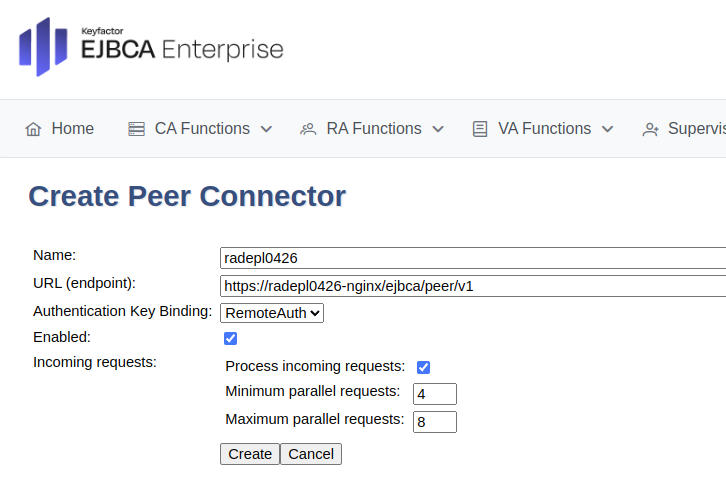
Create Peer Connection
For a VA peer connection, leave Process incoming requests disabled. The URL format is:
https://ejbca-va-nginx.ejbca-scenario02-va/ejbca/peer/v1
Unlike RA peers, there is no need to configure a separate service for each pod.
To create a peer connection, do the following:
-
In EJBCA, go to System Functions>Peer Systems.
-
Update the following:
-
For URL (endpoint), enter the URL for the RA instance. Depending on your setup, this is either the service corresponding to the NGINX sidecar, or the Ingress. Note that the DNS Name entered during certificate enrollment while TLS was setup, must match.
-
For Incoming requests, select Process incoming requests if the peer is an RA. If creating a peer connection for an VA, clear the Process incoming requests option.
-
-
Click Create.
-
Click Ping to ping the remote peer. A warning with status code 401 is shown since the Peer URL is reachable but the peer does not allow access to the remote authentication key.
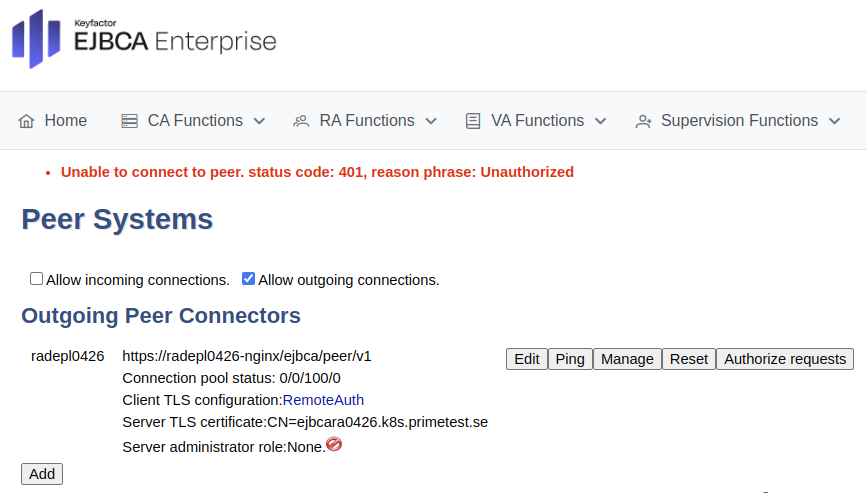
Note that the Authorize request is only visible when configuring a peer connection to an RA.
A Connection failed message appears when the RA replica is not yet deployed (for example, during auto-scaling). Once the replica is deployed, the CA automatically connects to it.
If a 401 – Unauthorized message does not appear:
-
Verify that the DNS Name in the server TLS certificate includes:
<helm-ra-release-name>-nginx.<ra-deployment-namespace>
You may also need to include the .svc.cluster.local suffix during certificate enrollment.
-
If the URL is unreachable, ensure the URL format matches the example above. Confirm that the NGINX sidecar service is running, and that the namespace and release names were correctly specified during peer configuration.
-
If the NGINX sidecar pod is not ready, check the pod logs for errors. Misconfigured TLS secrets may also prevent successful connection.
Step 5 - Configure access rules in cluster
Next, access the RA peer instance to configure the access rules.
Authorize the remote connection in RA or VA
To set up the incoming peer connection, do the following:
-
Navigate to the EJBCA peer instance (for example,
https://ejbcara.example.com/ejbca/adminweb). -
In EJBCA, click System Functions>Peer Systems.
The incoming connection from the CA should appear in the Incoming Connections section. The CA can connect, but the RA has been given no rights.
-
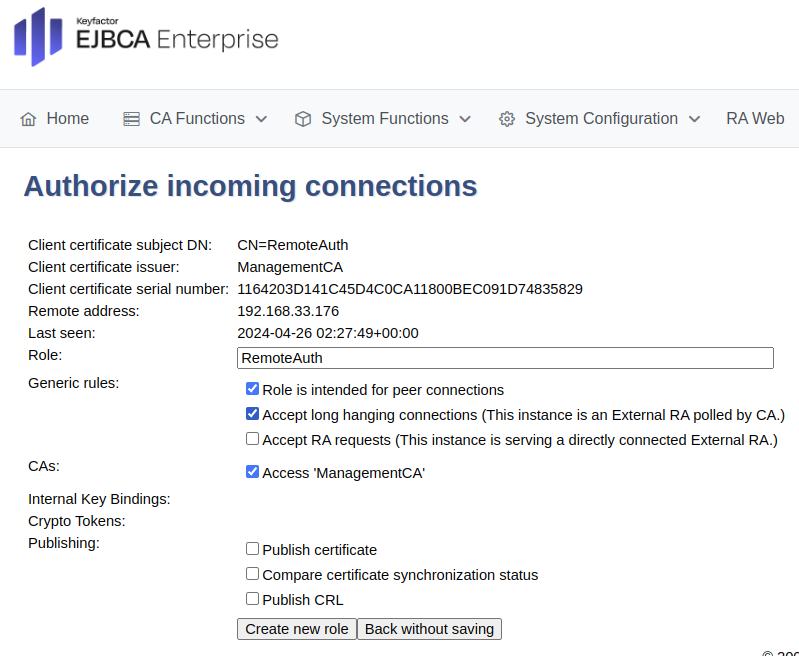
Click Create Role.
-
For the RA, ensure similar options are entered and then click Create new role at the bottom.
-
For an RA, update the following:
-
For Generic rules, select Role is intended for peer connections and Accept long hanging connections and ensure that Accept RA Requests is cleared.
-
For CAs, select Access ManagementCA.
-
-
For a VA, update the following:
-
Clear Accept long hanging connection.
-
Select all settings in the Publishing section.
-
Click Create new role.
-
Step 6 - Configure access rules
This step is only relevant for the RA peers and can otherwise be skipped.
Configure access rules on the EJBCA CA instance following the steps below.
-
On the EJBCA CA instance, click System Functions>Peer Systems.
-
Click Peer Systems.
-
In the Role list, select Create New Role and click Select.
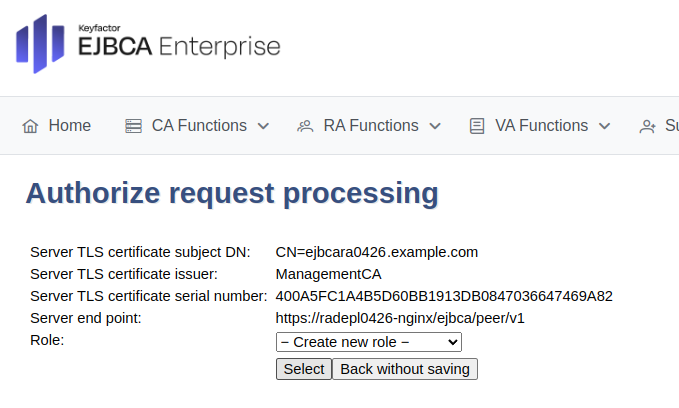
-
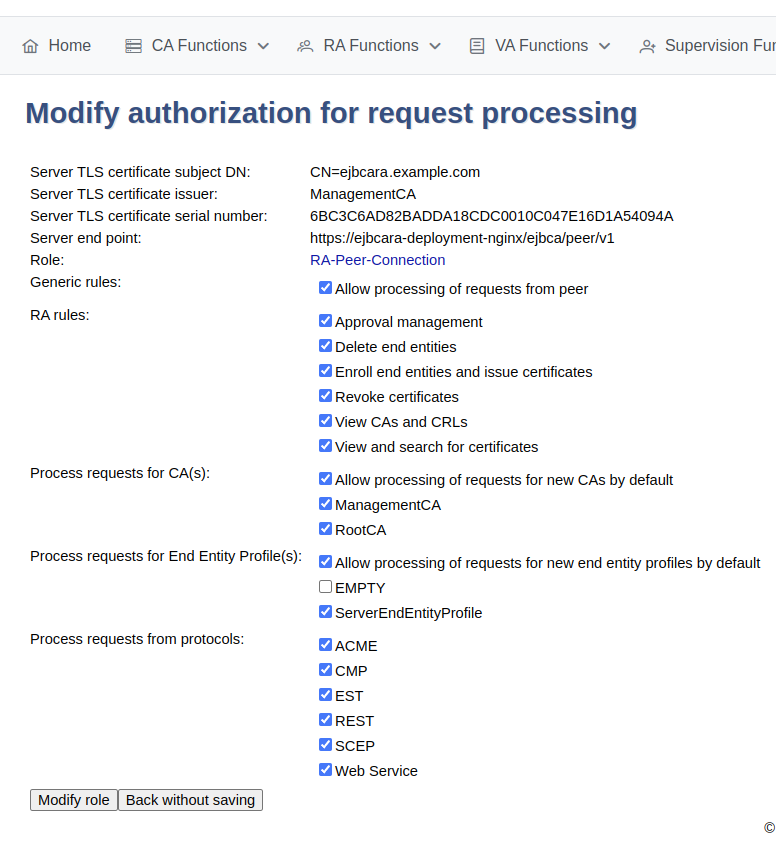
Set the following, and then click Modify role.
-
Select all options for all RA rules.
-
Select all options for Process requests for CA(s).
-
Select all options for Process requests for End Entity Profile(s), except EMPTY that should be cleared.
-
Select all options for Process requests from protocols.
-
-
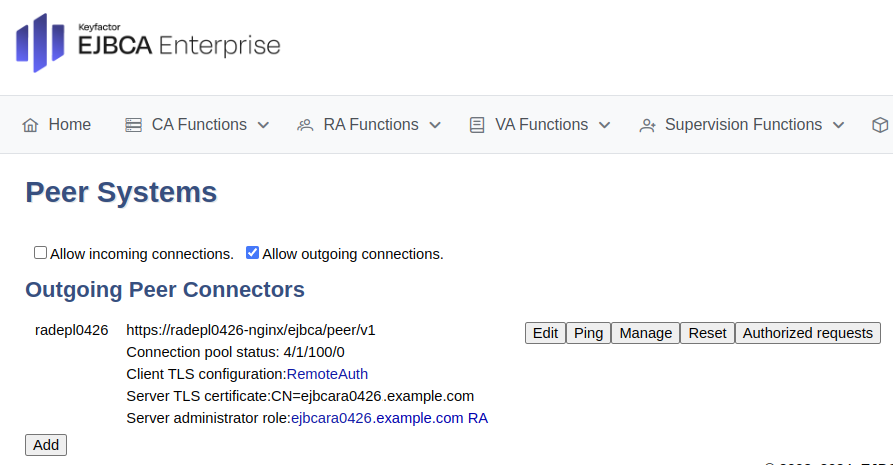
The Peer Systems page now displays the outgoing peer connectors with details for the Server administrator role for the corresponding peer.
Step 7 - Verify the setup
The following sections cover how you can verify the EJBCA RA and VA setup.
Verify RA
-
In your browser, navigate to the EJBCA RA instance https://<hostname>/ejbca/adminweb/ (
https://ejbcara.example.com/ejbca/adminweb) -
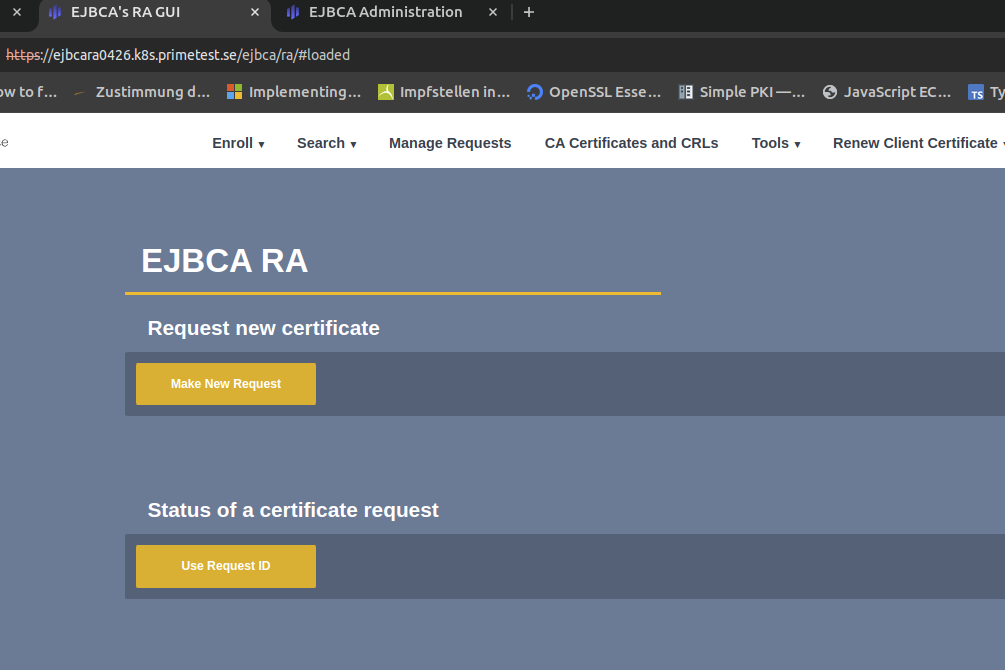
In EJBCA, click RA Web to access the EJBCA RA interface.
-
Optionally, click Search>Certificates to view enrolled certificates.
Verify VA
-
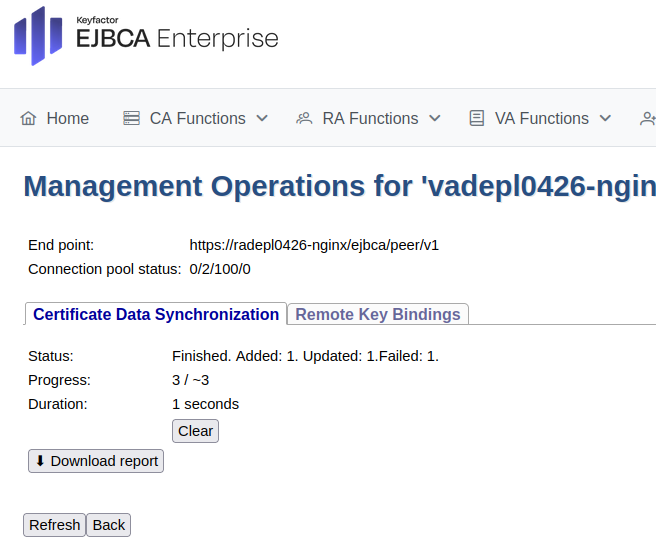
In EJBCA, click System Functions>Peer Systems.
-
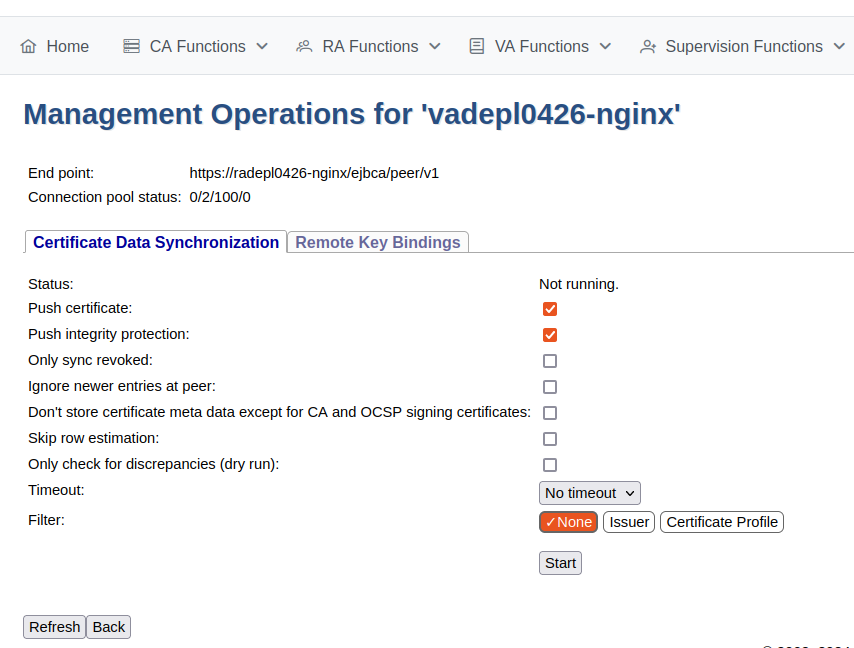
Click Manage for the peer connector representing the VA.
-
Select the Certificate Data Synchronization tab.
-
Click Start to initiate the synchronization and follow the process.
-
Click Refresh to display status information similar to the following.
Next Steps
This demonstrates how to complete an RA and VA deployment using Kubernetes with NGINX Ingress. You can verify connectivity and TLS functionality as described in Deploy RA and VA in Kubernetes.