The following sections cover how to install and configure Certificate Enrollment Policies and the Policy Server.
The examples below use the following denotations:
-
The domain used is yourcompany.com (YOURCOMPANY).
-
The EJBCA server hostname is ejbcaserver.yourcompany.com.
Labels indicated in bold should be replaced with the names of your environment and in the examples below, the text enclosed in angle brackets should be replaced with names in your environment. The recommendation for domain and hostname is lower case.
Step 1 - Configure Certificate Enrollment Policy Service
To configure EJBCA as the Certificate Enrollment Policy Server, first create and prepare the Service Account according to the instructions below.
To prepare the Service Account:
-
If not done yet, create the service account (<ra-service>) for EJBCA CEP and CES enrollment servlets on the Active Directory (AD) Domain Services Server.
Use the single service account if performing this installation with a single service account on a single host. -
Open the Command Prompt with Admin permissions.
-
Set the service principal name for the service account by running the following commands as admin and ensure to replace the server <FQDN> and account names with your own configuration.
setspn -s HTTP/ejbcaserver.yourcompany.com ra-service -
Open a PowerShell prompt with Admin permissions.
-
Create a Key Tab file for the ra-service service account. This file will later be used when enabling Kerberos authentication for the EJBCA CEP and CES Services in Part 3b: EJBCA Policy Server Configuration. 'YOURCOMPANY.COM' stands for the REALM, which must be upper case, e.g. same as the domain but in upper case.
-
> ktpass /out raservice.keytab /mapuser ra-service@YOURCOMPANY.COM /princ HTTP/ejbcaserver.yourcompany.com@YOURCOMPANY.COM /pass foo123 /pType KRB5_NT_PRINCIPAL /crypto allThe
cryptoparameter may be changed to only allow specific cipher suites. However, the krb5.conf file configured created in Part 3b: EJBCA Policy Server Configuration must support the same ciphers. If crypto is restricted to AES, the service user account option must be updated accordingly.
The password used for the Key Tab must meet the password requirements for the domain. Passwords that are not complex may result in the Key Tab generation command being "Aborted!"
Step 2 - Configure Certificate Templates
To configure Certificate Templates:
-
Open Microsoft Management Console (mmc.exe).
-
Click File, then click Add/Remove Snap-in.
-
Choose Certificate Templates and then click Add, then click OK.
-
Double-click on Certificate Templates.
-
Right-click the Computer template, select Duplicate Template and specify the following:
-
Under Compatibility Settings, specify Certification Authority=Windows Server 2003 and Certificate recipient=Windows XP/Server 2003.
-
Click the General tab, and change the Template display name to Computer_Auto_Enrollment.
-
Click the Security tab, and give "Domain Computers" permissions to Read, Enroll and Autoenroll.
-
Additionally, give 'Domain Controllers' permissions to Read, Enroll and Autoenroll. This is required as the DC computer account will request the policy server for validation rather than the logged-in user.
-
Select the Subject Name tab, and change the Subject name format to DNS Name.
-
Select DNS Name in the subject alternative name.
-
Under the Request Handling tab, clear Allow private key to be exported.
If the requirement is to be able to export private key, leave this checked. -
Click OK to go back to the template list.
-
-
Right-click the User template and select Duplicate Template and specify the following:
-
Under Compatibility Settings, specify Certification Authority=Windows Server 2003 and Certificate recipient=Windows XP/Server 2003.
-
Click the General tab, and change the Template display name to User_Auto_Enrollment.
If the requirement is to Publish the User certificate in Active Directory and Credential Roaming is enabled, ensure to select both Publish certificate in Active Directory and Do not automatically re-enroll if a duplicate certificate exists in Active Directory. -
Select the Security tab, and give "Domain Users" permissions to Enroll and Autoenroll.
-
Select the Subject Name tab, and change the Subject name format to Common name.
-
Clear Include email name in subject name and clear Email name in the subject alternative name.
-
Select User principal name (UPN).
-
Under the Request Handling tab, clear Allow private key to be exported.
If the requirement is to be able to export private key, leave this checked. -
Click OK to go back to the template list and then close the Certificate Templates Console window.
-
Step 3 - Configure Certificate Templates for Key Archival (Optional)
To enable key archival, configure Certificate Templates:
-
Double-click Computer_Auto_Enrollment.
-
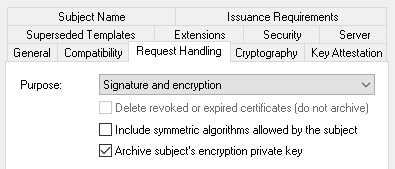
Under the Request Handling tab, for Purpose Signature and encryption, select Archive subject's encryption private key.
-
Click Ok to go back to the template list.
-
Double-click User_Auto_Enrollment.
-
Under the Request Handling tab, for Purpose Signature and encryption, select Archive subject's encryption private key.
-
Click Ok to go back to the template list.
Optional Step 4 - Configure Certificate Templates for Supply in the Request
By following the instructions in Step 2 - Configure Certificate Templates, you will configure the certificate templates in the default way, where enrollment data is looked up in AD when the request reaches EJBCA. Optionally, you can enable the Supply in the request setting to use the certificate request data to enroll a certificate.
The Supply in the request setting uses and requires Allow Subject DN Override by CSR and Allow Extension Override from the relevant Certificate Profile and should only be used when the request comes from a very trusted source.
To configure certificate templates to use the certificate request data to enroll a certificate:
-
Create a certificate template following the instructions in Step 2 - Configure Certificate Templates.
-
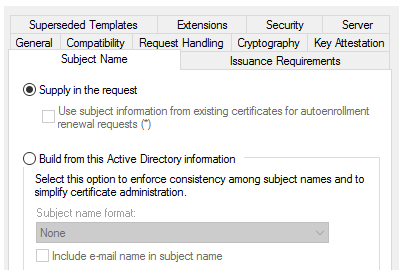
Click the Subject Name tab and select Supply in the request.
-
Note that during the EJBCA configuration, the certificate profile mapped to this template must have Allow Subject DN Override by CSR and Allow Extension Override (for 2.5.29.17 - Subject Alt Name) enabled.
Optional Step 5 - Configure Key Storage Provider Priorities in Certificate Templates
Create a certificate template by following the instructions in Step 2 - Configure Certificate Templates.
-
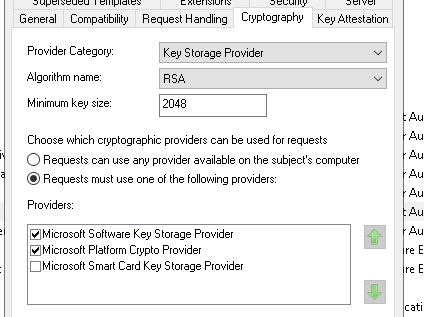
Go to the Cryptography tab.
-
For Provider Category, select Key Storage Provider.
-
Under Choose which cryptographic providers can be used for requests, select Requests must use one of the following providers.
-
Select the providers that should be available for certificate requests. Under typical circumstances:
-
Microsoft Platform Crypto Provider is preferred because it uses the device's TPM (Trusted Platform Module).
-
Microsoft Software Key Storage Provider serves as the system default or fallback option when TPM-backed key storage is unavailable.
-
To configure provider priority:
-
Select a provider by clicking its name.
-
Use the green arrow buttons to move the provider up or down in the list.
-
Providers are prioritized from bottom to top. The provider at the bottom of the list has the highest priority.
Next: EJBCA Configuration
Next, configure Certification Authorities (CAs) and profiles in EJBCA, see Part 3a: EJBCA Configuration.