In this guide, you will learn how to set up EJBCA for using NXP EdgeLock 2GO to provision and manage x.509 certificates to devices from your own PKI. This is achieved by setting up a root CA in your own environment and an intermediate CA in the NXP infrastructure.
About NXP EdgeLock 2GO
NXP offers a wide range of Roots-of-Trust, including microcontroller units (MCUs) and secure elements, that support x.509 certificates. Recognizing the complexities involved in factory provisioning of an Initial Device Certificate, NXP offers a specialized service portal EdgeLock 2GO, dedicated to the definition, generation, and over-the-air provisioning and management of secrets and x.509 certificates into their Roots-of-Trust.
For instance, an original equipment manufacturer (OEM) can use the EdgeLock 2GO service to order secure elements that will be pre-provisioned with their certificates by an NXP factory or a distributor such as Avnet before shipment to the CEM. A Service Provider can use the portal to dynamically admin secrets and operational certs into devices with an NXP Root-of-Trust, provided that the embedded FW of the device runs adequate code.
But what if a customer wishes to utilize this service while still preferring certificates to originate from their own Public Key Infrastructure (PKI)? For practical reasons, the Intermediate Certificate Authority (ICA) generating the certificates must reside in the NXP infrastructure, but nothing prevents CAs above this ICA from living outside of NXP, which allows a customer to own most of their chain of trust, while only delegating the lower-level ICA to NXP when using their provisioning service. This allows customers to maintain ownership of most of their chain of trust while delegating only the lower-level Intermediate CA to NXP when utilizing their provisioning service.
This tutorial explains how to achieve such a setup with EJBCA:

About the PKI Setup
The objective of the setup is to enable attaching the NXP factory ICA certificates to your wider public key infrastructure (PKI), while not changing the way NXP issues device certificates and programs them into your Root-of-Trust.
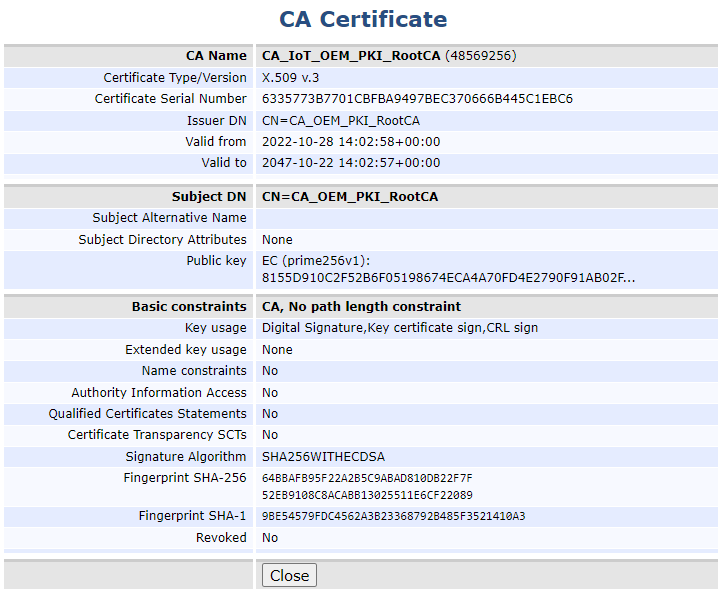
The example shows the EJBCA setup with a self-signed Root CA and a Sub CA NXP (SubCA_NXP) issuing the NXP EdgeLock 2GO ICA certificate. The ICA certificate will, in turn, produce a high number of device certificates that NXP injects into the secure elements to be shipped to your assembly line.
To generate the ICA certificate for the NXP factory, the certificate signing requests (CSRs) will be provided by NXP EdgeLock 2GO and then signed by the Sub CA (SubCA_NXP).
In EJBCA, this is accomplished by creating an End Entity for each CSR to sign (and ICA to issue). An End Entity relies on an End Entity Profile, and according to NXP’s requirements, a specific Certificate Profile needs to be created.
Prerequisites
Before you begin, you need:
-
An NXP EdgeLock 2GO account. For instructions on how to set up an account and configure your secure objects, see NXP’s application note AN12691: EdgeLock 2GO.
-
A connection between EdgeLock 2GO portal and EJBCA. For more information, see Create and manage intermediate CAs in NXP’s application note AN12691: EdgeLock 2GO.
Configure EJBCA
The following sections cover the steps needed to configure EJBCA.
Step 1 - Create Crypto Tokens
In EJBCA, cryptographic keys are stored in a crypto token. For more information on crypto tokens and available fields, see Crypto Tokens Overview.
-
Create crypto tokens for the various certificates and label them explicitly. Follow the tutorial Create a PKI Hierarchy in EJBCA.
Step 2 - Create Root CA
Next, create a Root CA in EJBCA:
-
Create a Root CA in EJBCA, by following Create your first Root CA using EJBCA, with the following mandatory settings for NXP EdgeLock 2GO:
-
Type: Root CA.
-
Available Key Algorithms: ECDSA or DSA.
-
Available curves: NIST ECC P-256 / P-384 / P-521 or RSA 2048 / 4096.
-
Signature Algorithm: SHA256withECDSA, SHA384withECDSA, SHA512withECDSA, SHA256withRSA, SHA384withRSA, SHA512withRSA.
-
Key Usage: Key certificate sign, at a minimum.
-
Step 3 - Create Sub CA
Next, create a Subordinate CA (Sub CA) in EJBCA. The SubCA_NXP certificate will be used to sign the certificate signing requests (CSRs) that will be provided by the NXP EdgeLock 2GO portal.
To set up a Sub CA:
-
Create a Sub CA in EJBCA, by following Create a PKI Hierarchy in EJBCA, with the following mandatory settings for NXP EdgeLock 2GO:
-
Type: Sub CA.
-
Available Key Algorithms: ECDSA or DSA.
-
Available curves: NIST ECC P-256 / P-384 / P-521 or RSA 2048 / 4096.
-
Signature Algorithm: SHA256withECDSA, SHA384withECDSA, SHA512withECDSA, SHA256withRSA, SHA384withRSA, SHA512withRSA.
-
Key Usage: Key certificate sign, at a minimum.
-

Step 4 - Create Certificate Profile
The certificate profile defines the constraints of new certificates, for example, what keys it can use and what the extensions will be. For more information, see Certificate Profiles Overview and Certificate Profile Fields.
To create a certificate profile:
-
In EJBCA, under CA Functions, click Certificate Profiles.
-
Click Clone next to the SUBCA template to use that as a basis for creating your new profile.
-
Name the new certificate profile and click Create from template.
-
To edit the profile values to fit your needs, find the newly created profile in the list and click Edit.
-
On the Edit page, verify that the type is End Entity and update the following:
-
For Available Key Algorithms, select ECDSA or RSA.
-
For Available ECDSA curves, select P-256, P-384, P-521
-
For Signature Algorithm, select SHA256withECDSA, SHA384withECDSA, SHA512withECDSA, SHA256withRSA, SHA384withRSA or SHA512withRSA.
-
Enable Allow Validity Override.
-
Enable Allow certificate serial number override.
-
Enable Allow Subject DN Override by CSR.
-
For Key Usage, select Critical, Digital Signature, CRL Sign, Key certificate sign.
-
X.509v3 extensions, None.
-
For Available CAs, select your Sub CA SubCA_NXP.
-
-
Click Save to store the certificate profile.
The newly created profile is displayed in the list of certificate profiles.
Step 5 - Create End Entity Profile
To create an end entity profile:
-
In EJBCA, under RA Functions, click End Entity Profiles.
-
In the Add Profile field, add a name for the new profile, and click Add profile.
-
Select the newly created profile and click Edit End Entity Profile to update the profile.
-
Edit the profile and update the following:
-
For Username, select Auto-generated.
-
For Password (or Enrollment Code): Specify a password.
-
For CN, Common name, verify that Required and Modifiable are selected.
-
Main Certificate Data allows you to map the profile to be used together with default certificate profiles and CAs:
-
For Default Certificate Profile, select the profile created in Create certificate profile above.
-
For Available CAs, select your NXP SubCA created in Create Sub CA above.
-
-
Specify Default Token options to define how the key pair generation should be implemented for the certificates:
-
For Available Tokens, select User Generated. User Generated means that the requester generates their own key pair and thus creates and provides a certificate signing request (CSR) for the certificate request to EJBCA.
-
-
Enable Custom certificate serial number.
-
For Certificate Validity Start Time, select Use.
-
For Certificate Validity End Time, select Use.
-
-
Click Save to store the end entity profile.
The newly created profile is displayed in the list.
Step 6 - Create End Entity
Now you can create a new end entity based on the end entity profile. For more information on how to add end entities in EJBCA, see Issue Matter IoT-compliant certificates with EJBCA.
To create an end entity:
-
In EJBCA, under RA Functions, click Add End Entity and specify the following:
-
In End Entity Profile, verify that the profile created in Create End Entity Profile is selected and update other settings as required.
-
-
To add the end entity, click Add.
The end entity is added.
Configure NXP EdgeLock 2GO
For step-by-step instructions on how to set up your EdgeLock 2GO account and configure your secure objects, see NXP’s application note AN12691: EdgeLock 2GO.
Step 7 - Create Intermediate CA on EdgeLock 2GO portal
For connecting the EdgeLock 2GO portal with EJBCA, see Create and manage Intermediate CAs in NXP’s application note AN12691: EdgeLock 2GO.
To create the intermediate CA, follow the steps in the application note:
-
When prompted to select a key type and size, ensure they are consistent with the trust chain created in EJBCA.
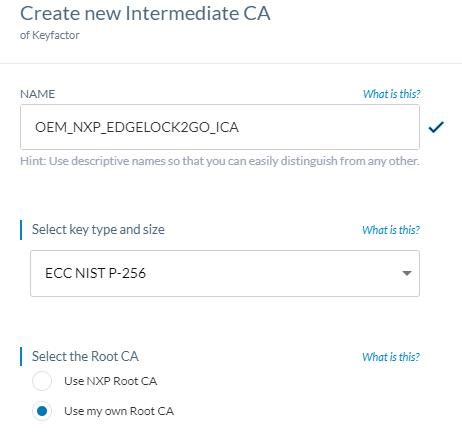
-
For Select the Root CA, select Use my own Root CA.
-
Under provide CSR metadata, specify the DN fields which will be transmitted into the CSR.
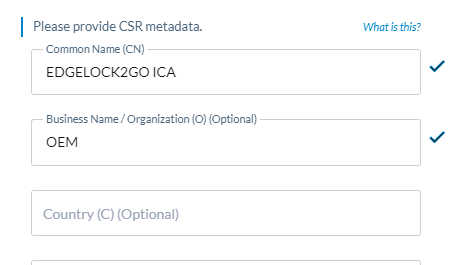
If using the optional fields, ensure the fields align with your trust chain previously defined in your EJBCA PKI.
Avoid using special characters such as '+' or '_', as they may lead to errors in the process later on.
-
Click Create to create the intermediate CA.
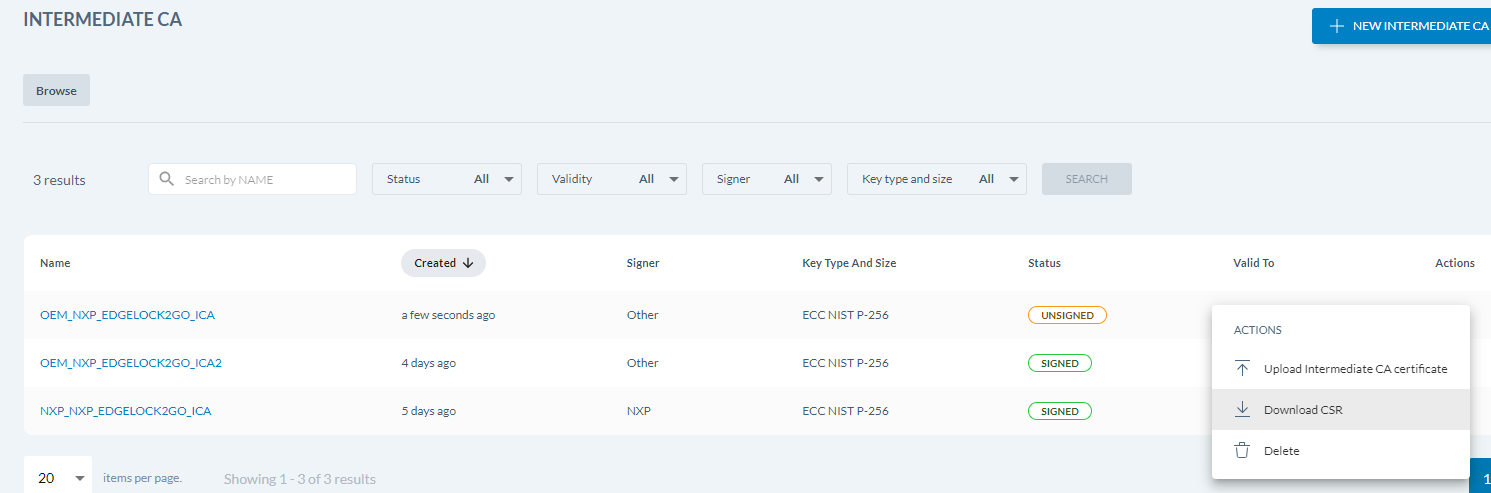
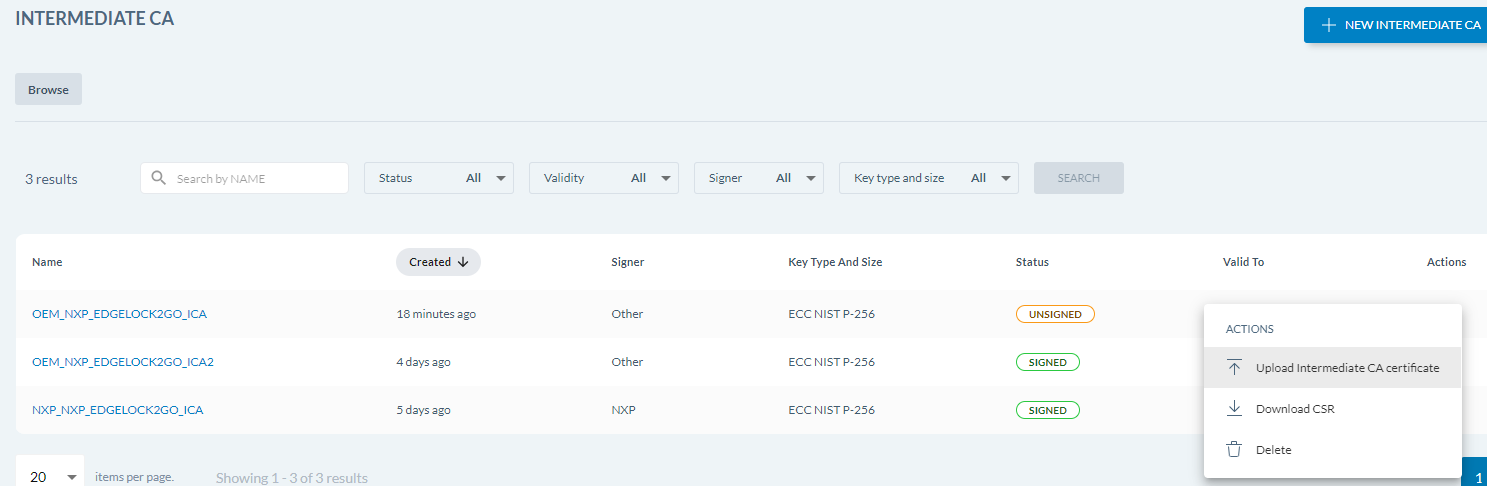
The ICA is now created on the portal, but it is not yet signed and is listed with the status Unsigned.
Step 8 - Finalize Intermediate CA
To get the Intermediate CA signed and ready to use, download the CSR from the portal and upload it to the EJBCA RA web to download a generated certificate:
-
Download the CSR for the ICA and save it to your working directory:
-
In EJBCA, click RA Web to access the EJBCA RA UI.
-
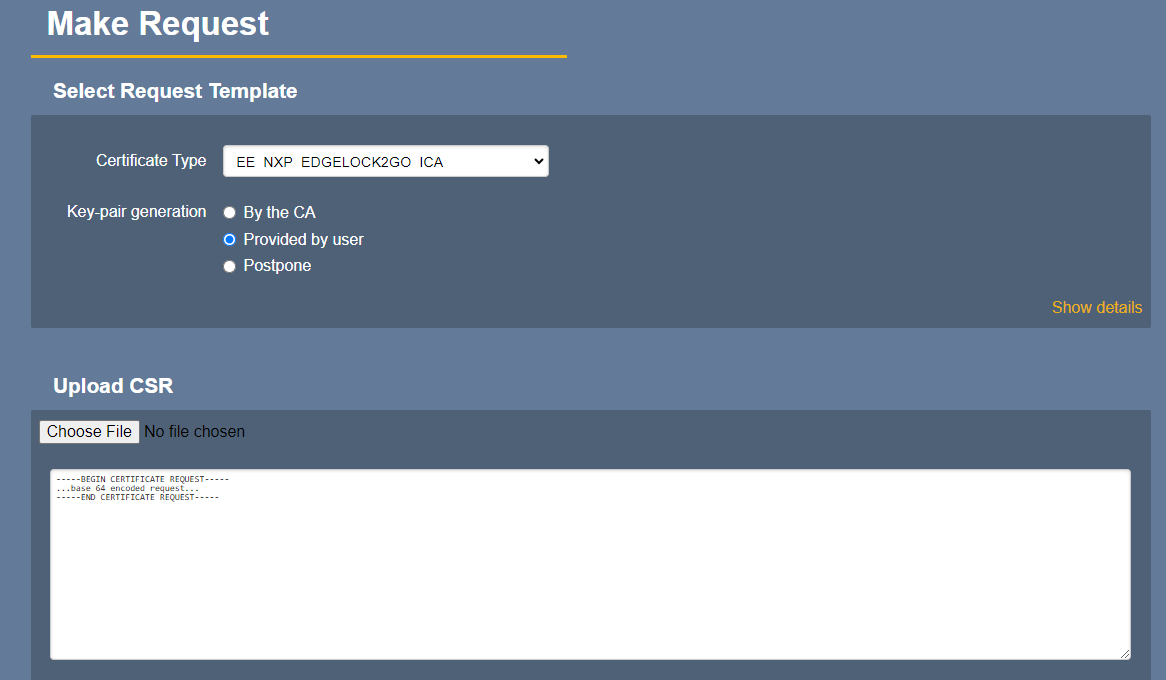
Under Request new certificate, select Make New Request.
-
For Certificate Type, select the relevant End Entity profile for the ICA certificate.
-
For Key-pair generation, select Provided by user.
-
Click Upload CSR to upload the CSR file previously downloaded from the EdgeLock 2GO portal to EJBCA.
-
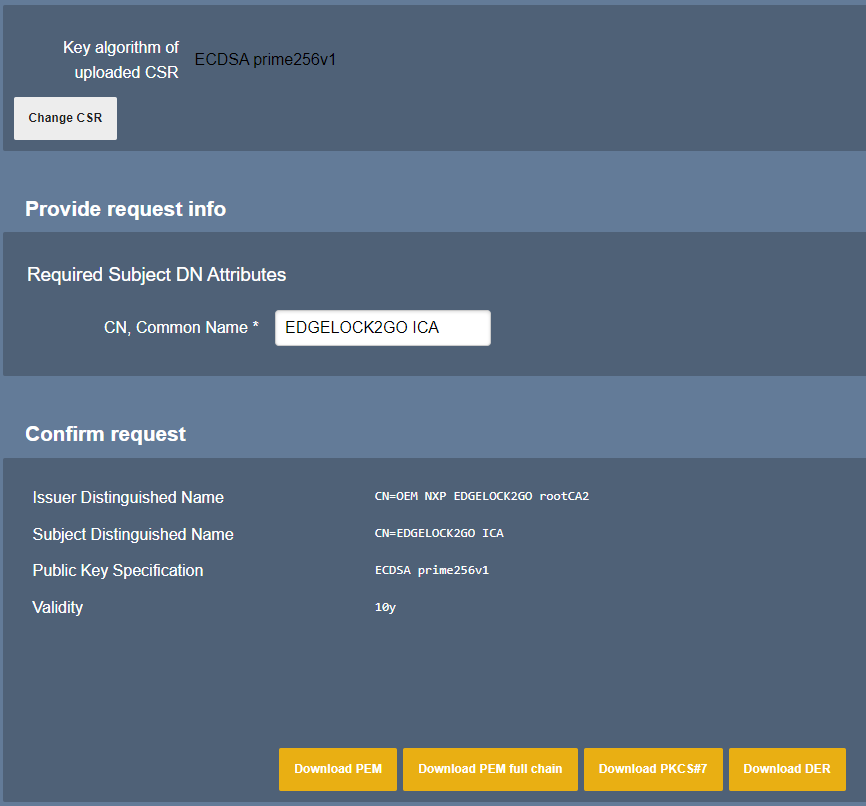
In the Provide request info section, you can verify that EJBCA picked up the common name from the CSR and that the information added to the profile are shown.
-
Download the PEM file and save it to your working directory.
-
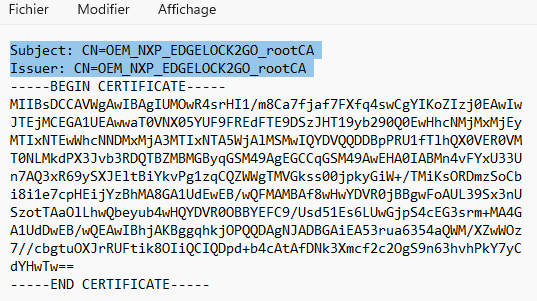
Also download the SubCA_NXP certificate which was used to sign this ICA certificate into the same directory.
-
Edit both files with a text editor to remove the Subject and Issuer headers (since EdgeLock 2GO does not parse this information), and save the files.
-
Go back to the EdgeLock 2GO portal and click Upload ICA certificate to finalize the creation of your ICA:
-
Upload the certificates you have just edited:
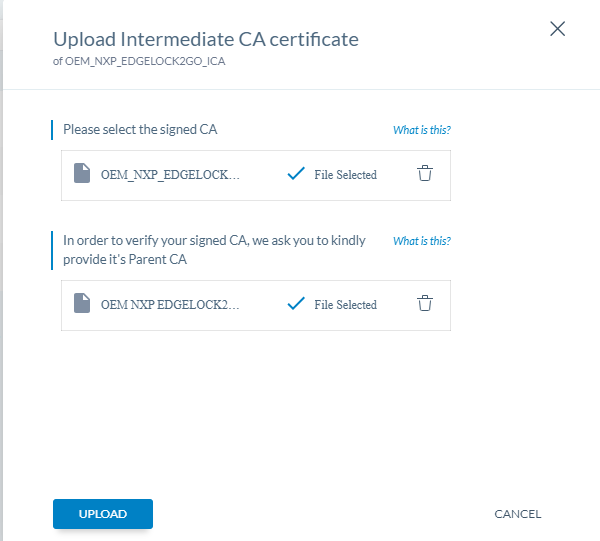
The ICA now appears as Signed in the portal.
Generate and provision device certificates
For step-by-step instructions on how to generate and provision device certificates, see NXP’s application note AN12691: EdgeLock 2GO.
When naming device certificates in the CN field, avoid using special characters as they may prevent the issuance of the device certificate by the EdgeLock 2GO server later on.
EdgeLock 2GO also provides APIs to automate the generation and issuance of certificates. For more information, see NXP’s information about EdgeLock 2GO.
Next steps
In this guide, you learned how to set up EJBCA for NXP’s service platform EdgeLock 2GO for provisioning and managing IoT devices.
Here are some next steps we recommend:
-
For more tutorials for trying out and evaluating EJBCA, see How-to Guides
-
If you are interested in EJBCA Enterprise, read more on Keyfactor EJBCA Enterprise.
-
If you are interested in EJBCA Community, check out EJBCA Community vs Enterprise or read more on ejbca.org.
-
If you are an EJBCA Enterprise customer and need support, visit the Keyfactor Support Portal.
-
Discuss with the EJBCA Community on GitHub Discussions.
Contact us
Request a live demo with one of our experts — whether you want to explore workflows hands-on or discuss your specific needs.