To create a new policy, navigate to Policies from the top menu bar and click New. This opens the policy creation wizard.
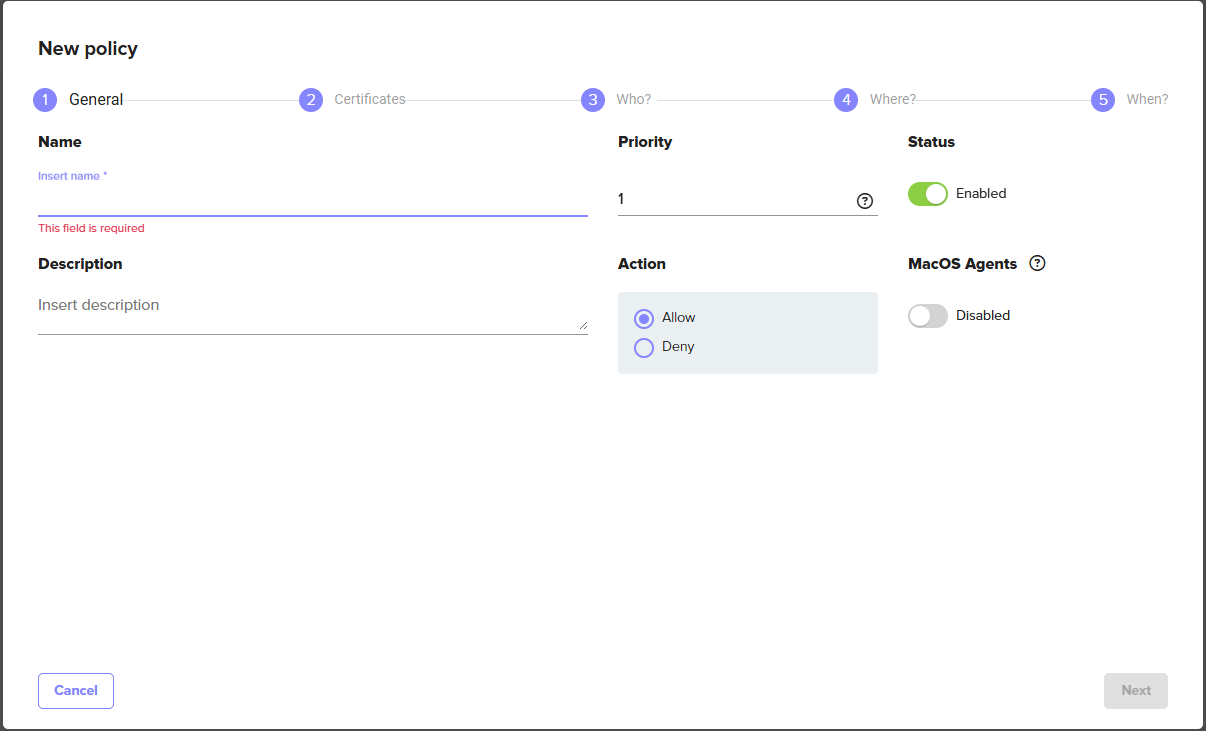
Step 1 - General
Define the policy's name, behavior, and status.
|
Setting |
Description |
|---|---|
|
Name |
A descriptive name for the policy. Choose a name that makes the policy's purpose clear at a glance. Example: |
|
Priority |
The order in which this policy is evaluated relative to others that match the same user and certificate. 0 is the highest priority. Lower numbers are evaluated first, so a priority 0 Deny policy overrides a priority 1 Allow policy for the same user. Do not assign the same priority to multiple policies that could match the same user as it causes inconsistent behavior. |
|
Status |
Enabled means the policy is active and enforced. Disabled means it is inactive and will not be evaluated. Disabling a policy is useful for temporarily suspending access without deleting the policy configuration. |
|
Description |
Optional free-text notes about the policy's purpose, scope, or owner. |
|
Action |
Whether the policy Allows or Denies the signing operation when all conditions match. Use Allow for standard access grants. Use Deny to block specific users, applications, or time windows within a broader Allow. When a Deny and an Allow policy both match, the one with the higher priority (lower number) takes effect. |
|
MacOS Agents |
When enabled, allows the certificate to be used on macOS without application restriction, regardless of what is configured in the Where step. Enable this when macOS users need to sign with tools that Signum cannot inspect at the process level. For example, Xcode or codesign invoked through a build system. If left disabled, the application restrictions in Step 4 apply on macOS as on other platforms. |
Users assigned as the Owner of a certificate can always sign with it, regardless of policies. For more information, see Certificate Operations.
Step 2 - Certificates (What)
Select which certificate or certificate group this policy applies to.
|
Setting |
Description |
|---|---|
|
Select Certificate(s) |
Start typing to search for certificates and certificate groups. The certificates available here depend on which certificate groups are assigned to your role. If a certificate you expect to see is not listed, check your role's certificate group assignments in Creating a Role. Multiple certificates and groups can be added to a single policy. |
Step 3 - Who
Select which users or user groups this policy applies to.
|
Setting |
Description |
|---|---|
|
Select User(s) |
Start typing to search for individual users or user groups from any configured domain. Multiple users and groups can be added. A user only needs to match one entry in this list for the policy to apply to them. |
Step 4 - Where
Restrict which applications on the client machine are permitted to trigger a signing operation using this certificate. This step is optional, and leaving it empty means any application can use the certificate.
Click Add Applications to select from existing application groups, or create a new one inline by clicking Add Application Group. For details on defining process names and command-line RegEx rules, see Applications.
If no application restrictions are needed, for example, in a development environment where any tool should be allowed to sign, leave this step empty.
If the macOS Agents toggle is enabled in Step 1, application restrictions configured here are bypassed on macOS. The restriction still applies on Windows and Linux.
Step 5 - When
Optionally, restrict the policy to specific times or days.
|
Setting |
Description |
|---|---|
|
Any Time |
Default. The policy is active at all times when enabled. |
|
Custom Schedule |
Restrict the policy to specific days and time windows. All times are in UTC. Account for your users' time zones when configuring schedules. |
Select New Custom Schedule to define a recurring schedule. Multiple schedules can be added to a single policy. The policy is active during any of the defined windows.
Time-based restrictions are most useful for compliance scenarios. For example, restricting production certificate use to business hours, or preventing signing during a code freeze window. Pair a time-restricted Allow policy with a higher-priority Deny policy covering the blocked window for the most predictable behavior.
After Creating the Policy
The new policy appears in the Policies list. Confirm its status shows as Enabled before testing. To test whether a specific user would be permitted to sign, check the Events log after a signing attempt. Both allowed and denied events are recorded with the policy that matched. See Events for details.