.png)
Follow these steps to deploy and execute the MSSQL Server Data Sensor using a CrowdStrike workflow.
Prerequisites
The following prerequisites must be met.
CrowdStrike RTR
The CrowdStrike Real Time Response (RTR) service collection is required to perform AgileSec scanning. See https://developer.crowdstrike.com/api-reference/collections/real-time-response/ for additional details.
Optional: Host Group
While this step is optional, it is recommended to create host groups to organize your hosts. This allows you to selectively target only the hosts where you want to run scans when configuring workflows, rather than scanning all hosts in your environment.
-
Add your Linux hosts in CrowdStrike
-
Add your Window hosts in CrowdStrike
-
Add your Mac hosts in CrowdStrike
-
Add your hosts to a host group
Set up EDR ID
An EDR ID is used to obtain an access token for communicating with the AgileSec platform. This process is automatic: when a Scan runs, the configured EDR ID is presented to the Ingestion Service, which returns a Remote Sensor Token. The token is stored locally and used for subsequent authenticated communication with the Ingestion Service.
EDR IDs provide an implicit trust mechanism allowing approved endpoints to obtain a Remote Sensor Token without embedding long-lived credentials on the host. EDR IDs can be revoked at any time to immediately block token issuance for endpoints using that ID.
You can generate multiple EDR IDs and assign them to specific deployments (for example, by environment, business unit, or endpoint group) rather than using a single EDR ID across all endpoints. This segmented approach is recommended to limit blast radius and simplify revocation and rotation when access needs to be restricted.
-
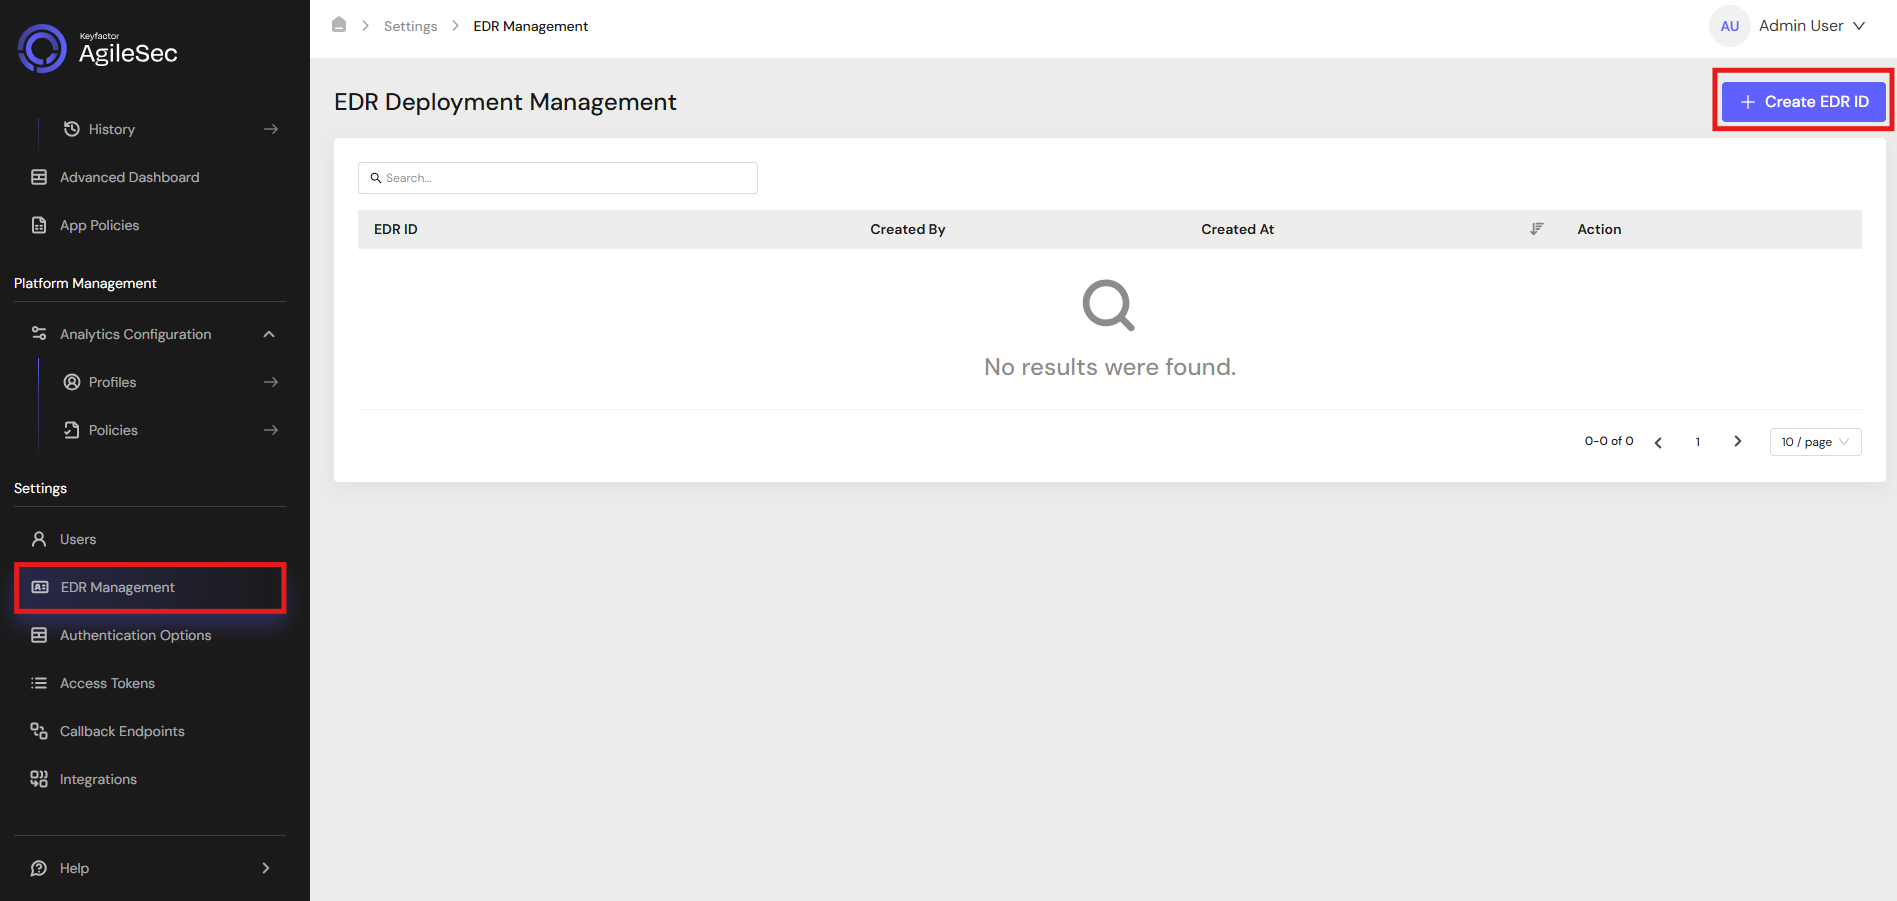
Log in to the AgileSec Platform UI, navigate to EDR Management, then click + Create EDR ID.
-
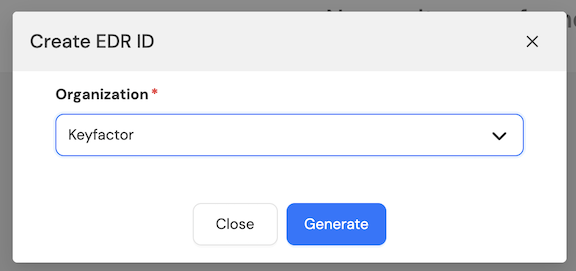
In the Create EDR ID dialog, select your organization and click Generate.
-
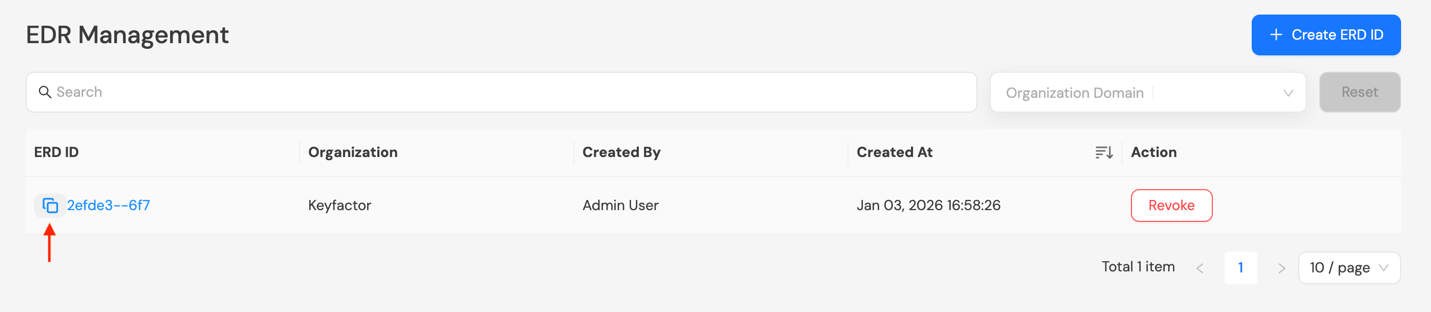
Copy the newly generated EDR ID by clicking the copy icon before the EDR ID.
Step 1: Download Remote Sensor Package from Keyfactor
Download the latest Remote Sensor package from AgileSec.
-
Open your browser and navigate to the Keyfactor AgileSec Platform Web URL
-
Log in with your credentials
-
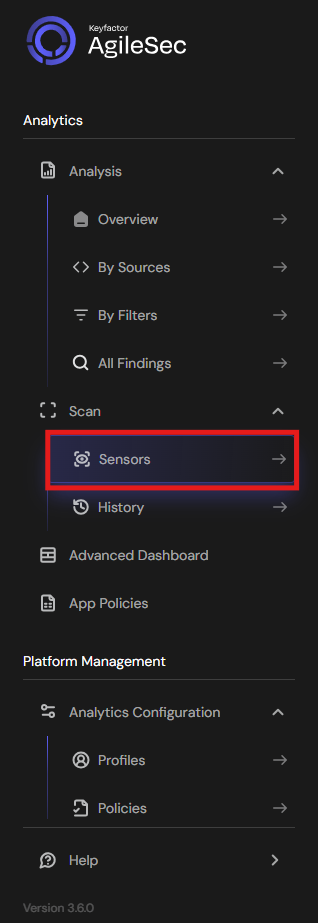
Click on "Sensors" in the left navigation menu under Scan
-
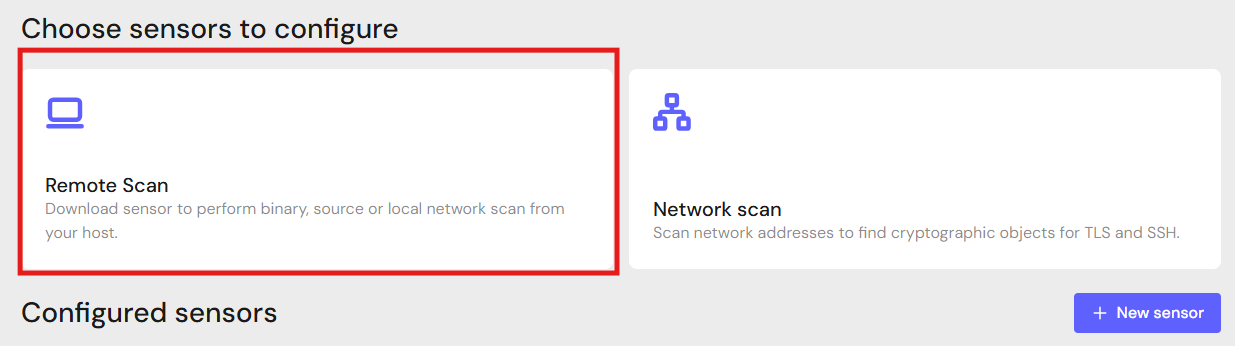
Click Remote Scan.
-
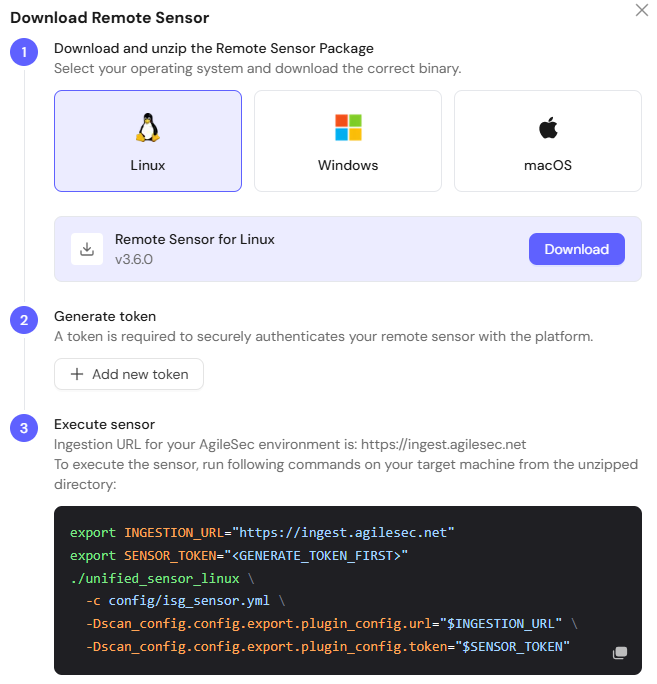
Click + Download Remote Sensor.

-
Download the sensor binary for your remote machine’s operating system
-
Unzip the Remote Sensor package. The folder
isg_agilescan_<platform>_sensorcontains acrowdstrikedirectory with the scripts and configuration files required to create the CrowdStrike workflow.
Step 2: Upload Sensor Package to CrowdStrike
-
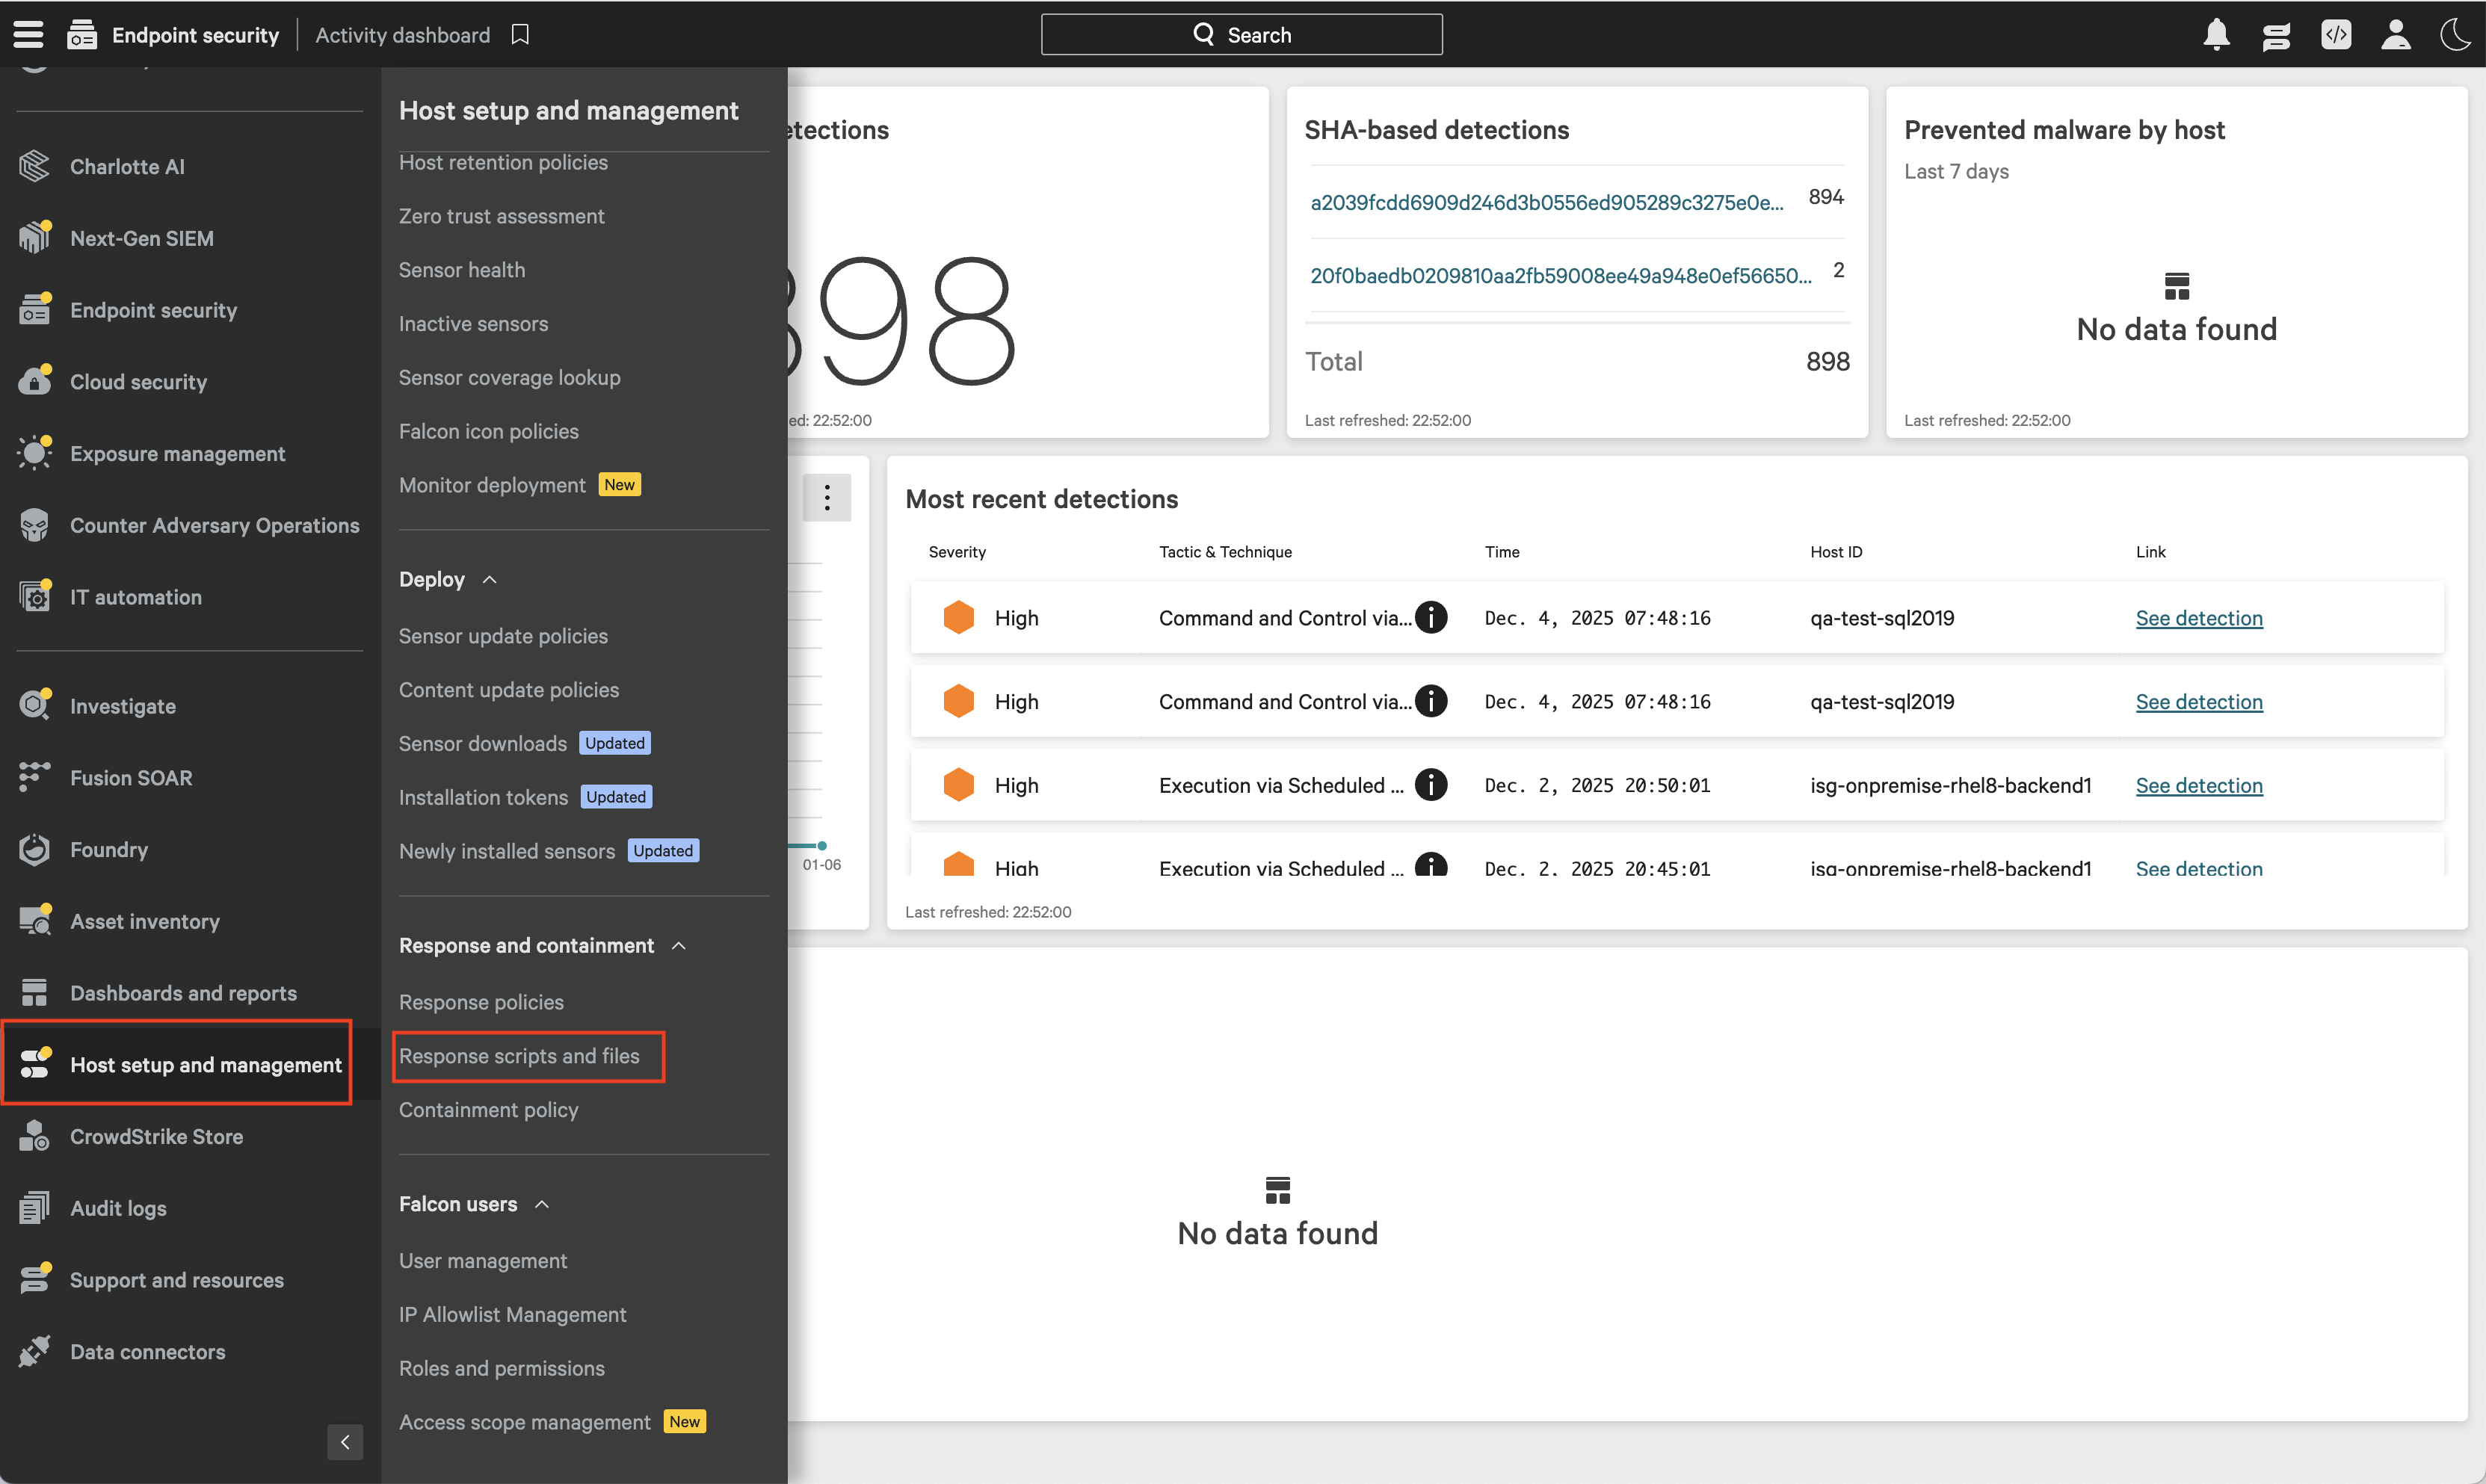
Log in to CrowdStrike and navigate to Host setup and management → Response scripts and files.
-
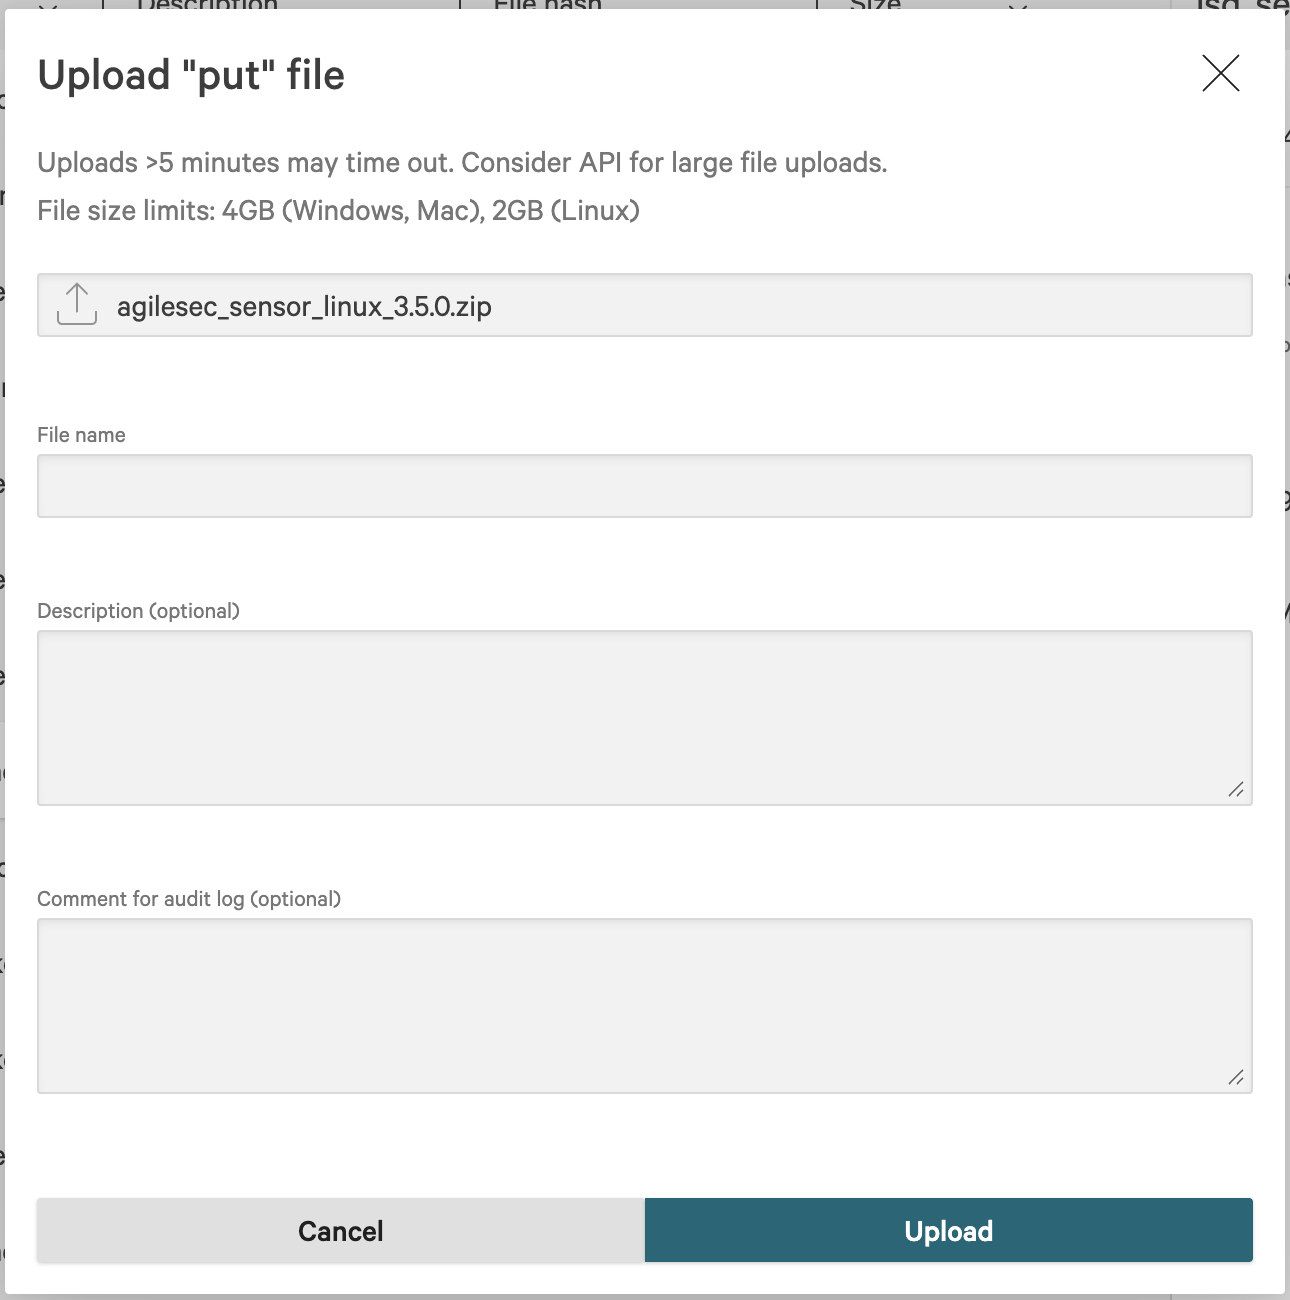
Select the "put" files tab and click Upload file. In the dialog, choose
agilesec_sensor_windows_<version>.zip|pkg, then click Upload.
Step 3: Create Scripts
Create scripts to perform the following tasks:
-
Check Sensor Zip: Check whether the Sensor Zip Exists
-
Run the Sensor: Deploy the Sensor and execute scans
-
Un-deploy the Sensor: Remove the Sensor
Check Sensor Zip Script
-
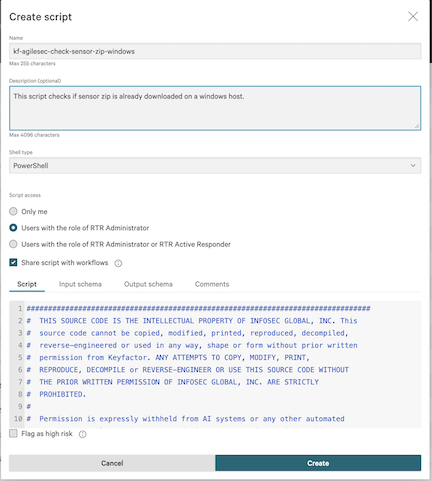
On the Response scripts and files screen, select the Custom scripts tab, then click Create script.
-
In the Create script dialog, complete the following fields:
|
Field |
Windows |
|---|---|
|
Name |
|
|
Shell type |
|
|
Script access |
Users with the role of RTR Administrator |
|
Share scripts with workflows |
Enabled |
|
Script Copy the contents of following Remote Sensor package file. |
|
|
Input schema Copy the contents of the following Remote Sensor Package file. |
|
|
Output schema Copy the contents of the following Remote Sensor Package file. |
|
-
Click Create.
Run Sensor Script
-
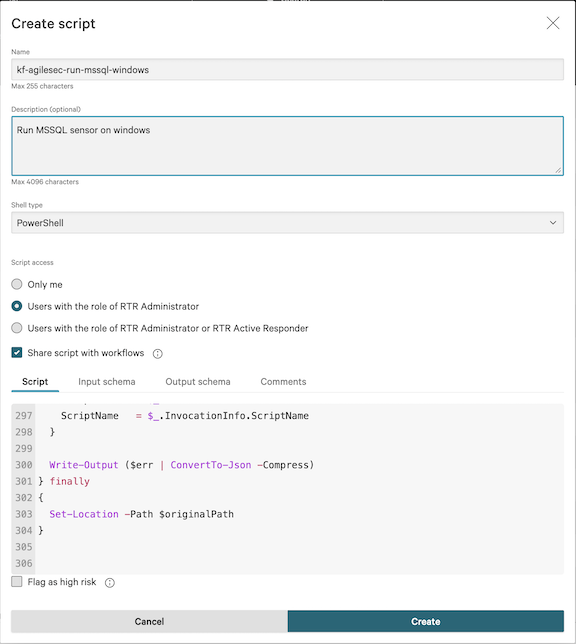
On the Response scripts and files screen, select the Custom scripts tab, then click Create script.
-
In the Create script dialog, complete the following fields:
|
Field |
Windows |
|---|---|
|
Name |
|
|
Shell type |
|
|
Script access |
Users with the role of RTR Administrator |
|
Share scripts with workflows |
Enabled |
|
Script Copy the contents of following Remote Sensor package file. |
|
|
Input schema Copy the contents of the following Remote Sensor Package file. |
|
-
Click Create
Undeploy Sensor Script
-
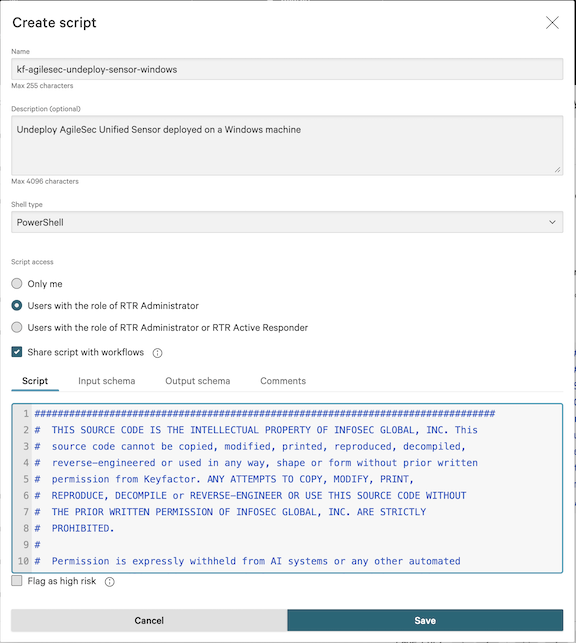
On the Response scripts and files screen, select the Custom scripts tab, then click Create script.
-
In the Create script dialog, complete the following fields:
|
Field |
Windows |
|---|---|
|
Name |
|
|
Shell type |
|
|
Script access |
Users with the role of RTR Administrator |
|
Share scripts with workflows |
Enabled |
|
Script Copy the contents of following Remote Sensor package file. |
|
|
Input schema Copy the contents of the following Remote Sensor Package file. |
|
-
Click Create.
Step 4: Create and Execute the Run Sensor Workflow
-
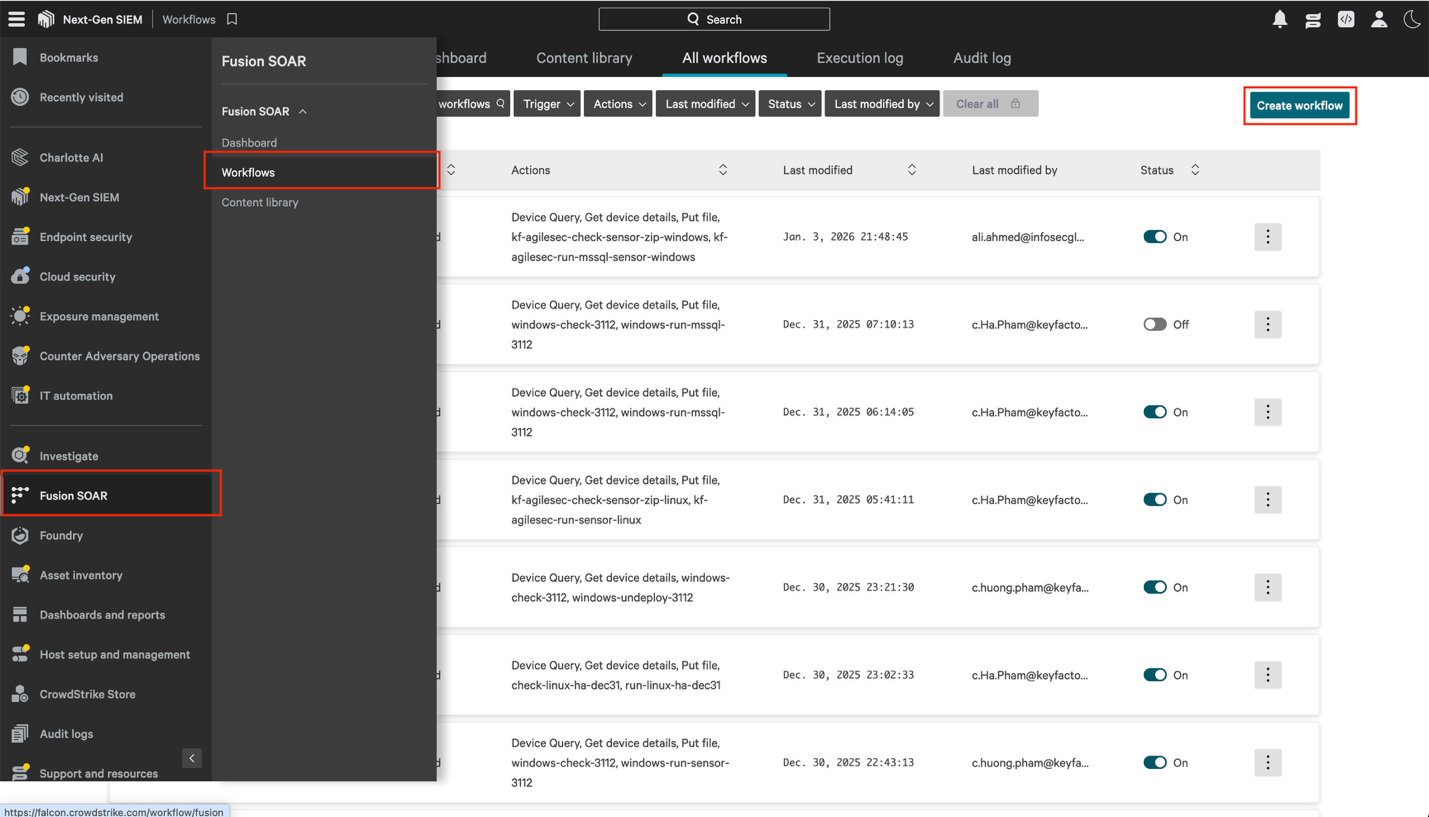
Navigate to Fusion SOAR -> Workflows, then click Create workflow to open the CrowdStrike workflow builder interface.
-
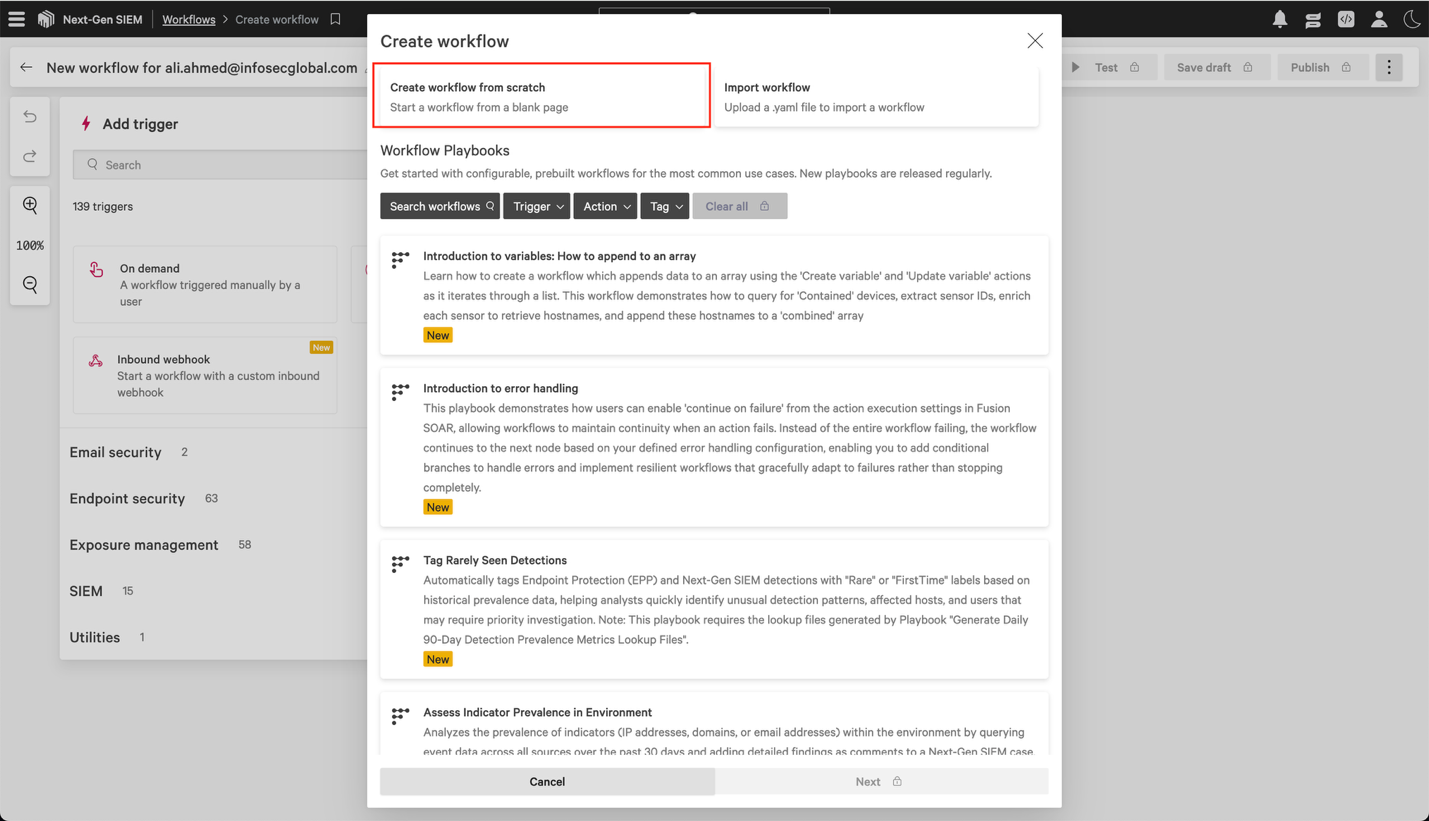
In the Create workflow dialog, select Create workflow from scratch.
-
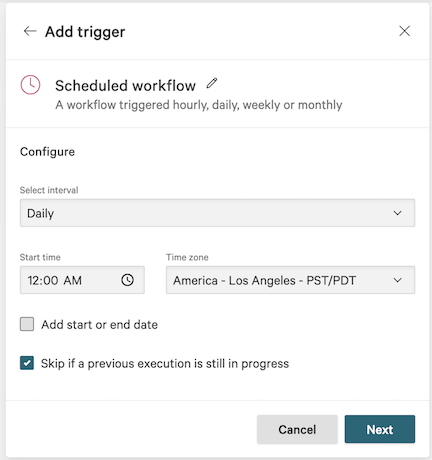
In the Add trigger dialog, select Scheduled workflow and configure the execution schedule.
-
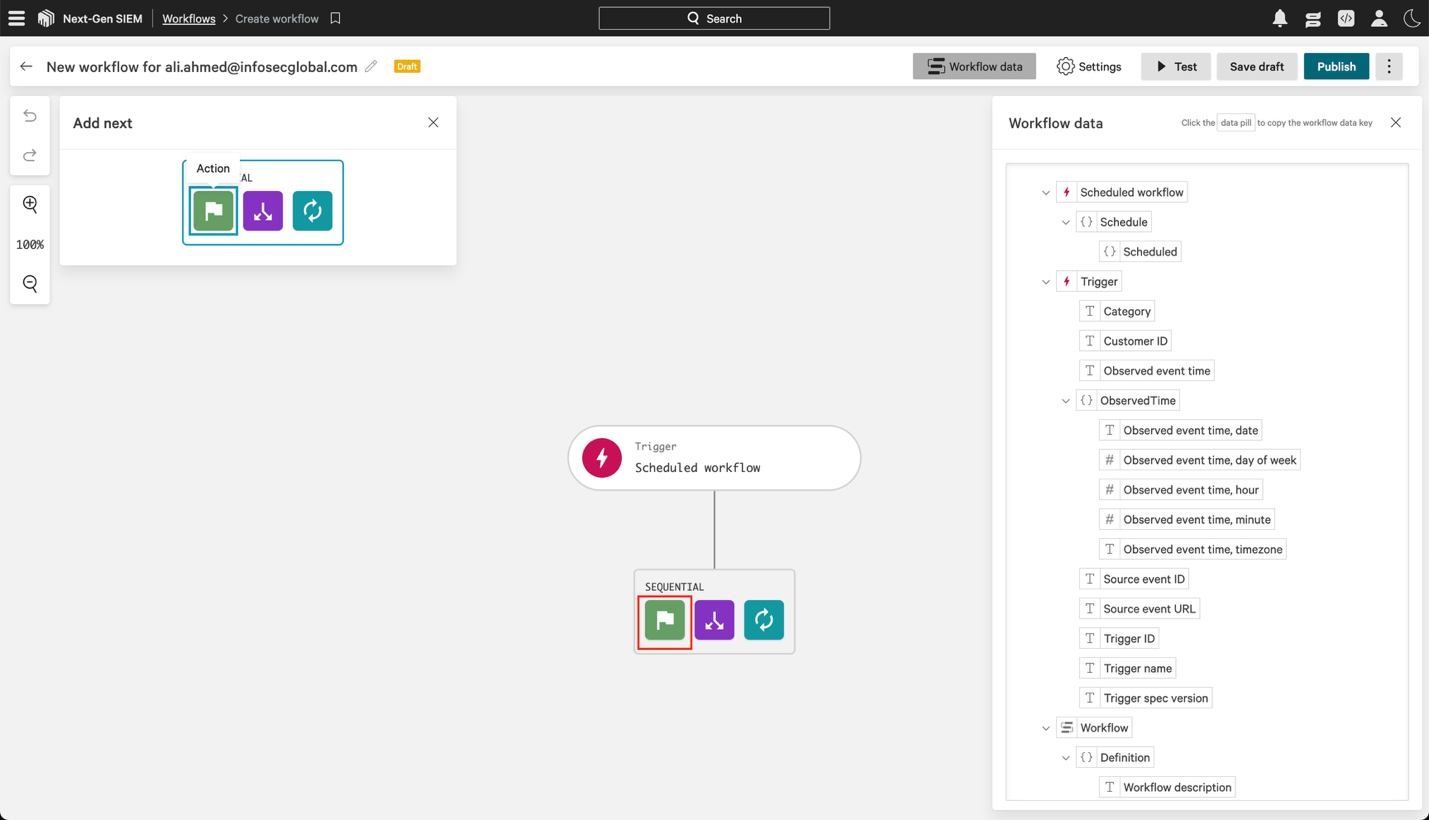
On the workflow builder, click Action.
-
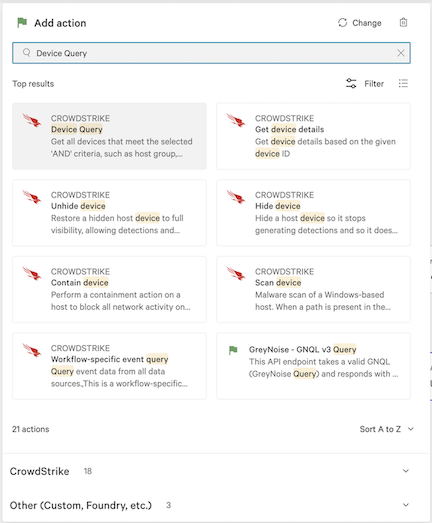
In the Add action dialog, search for and select Device Query.
-
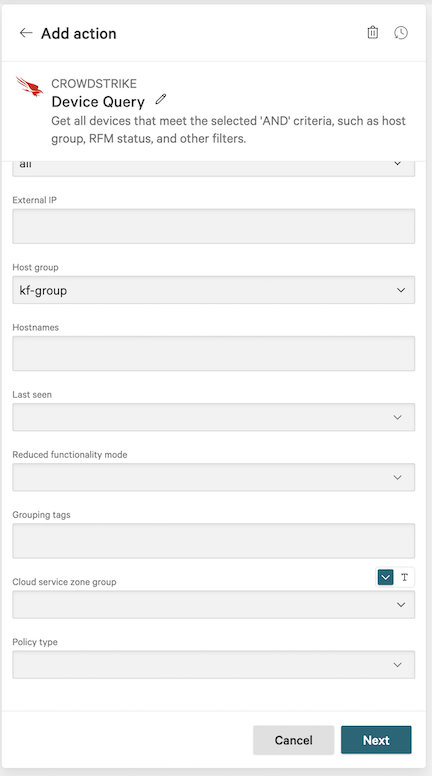
In the Device Query dialog, configure fields specific to your environment to select the devices where the SQL Server Database Sensor should run. At a minimum, the following fields are recommended:
-
Device status:
all -
Host group: as defined in your environment
-
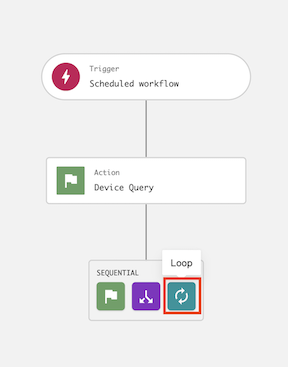
On the workflow builder, add a Loop after Device Query.
-
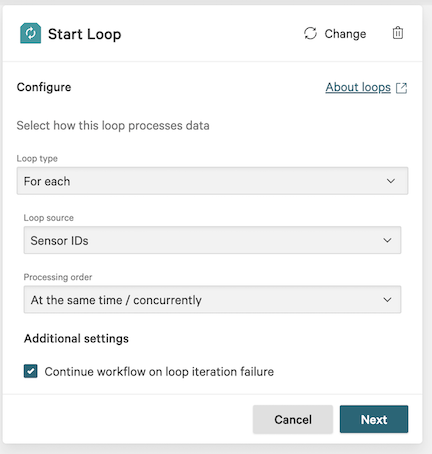
In the Start Loop dialog, enter the following and click Next:
-
Loop type:
For each -
Loop source:
Sensor IDs -
Processing order:
At the same time/concurrently -
Continue workflow on loop iteration failure: Enabled
-
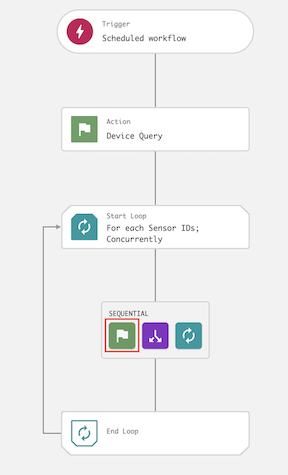
On the workflow builder, add an action inside the loop.
-
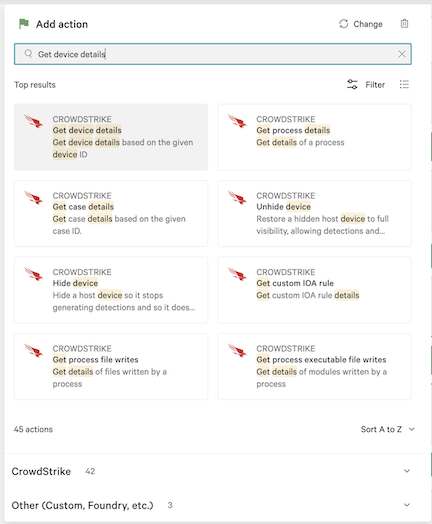
In the Add action dialog, search for and select Get device details.
-
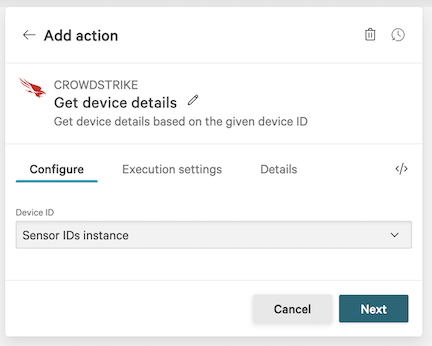
In the Device details dialog, set Device ID to Sensor IDs instance, then click Next.
-
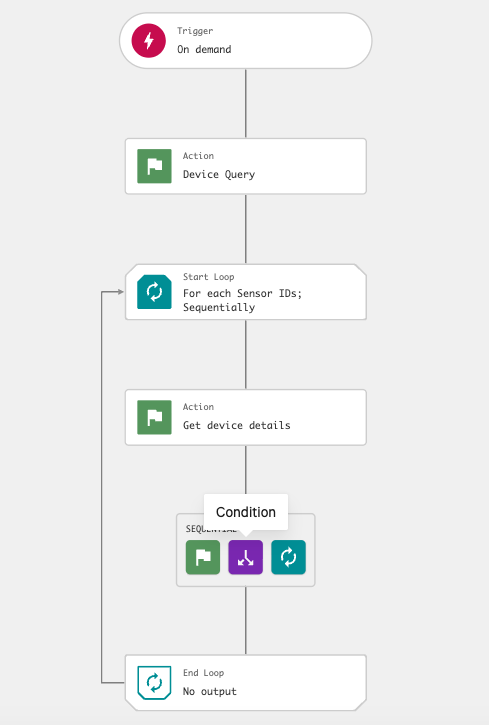
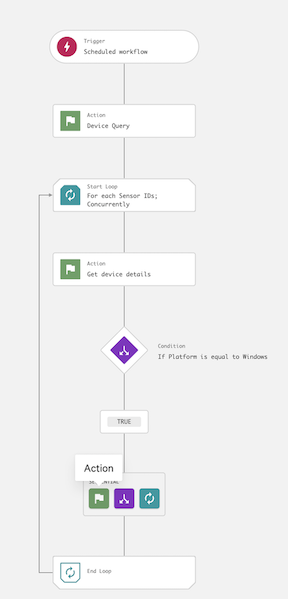
On the workflow builder, add a Condition after Get device details.
-
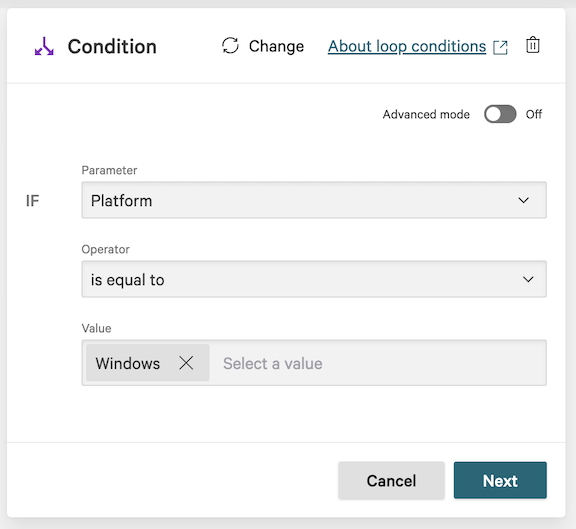
In the Condition dialog, enter the following and click Next:
-
Parameter:
Platform -
Operator:
is equal to -
Value:
Windows
-
On the workflow builder, add an action under the TRUE branch.
-
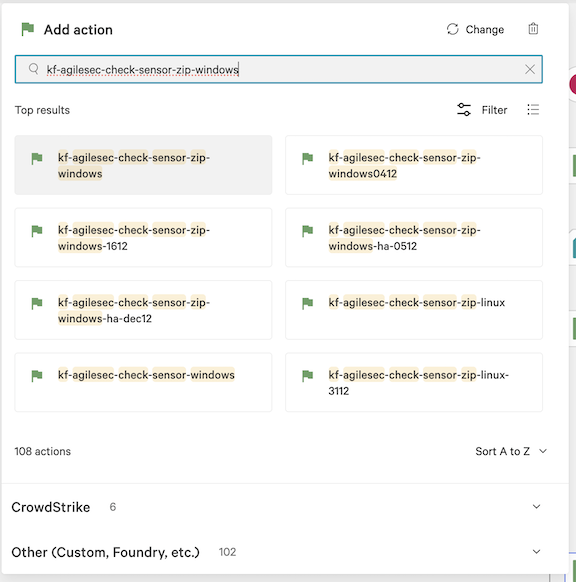
In the Add action dialog, search for and select the script kf-agilesec-check-sensor-zip-windows script.
-
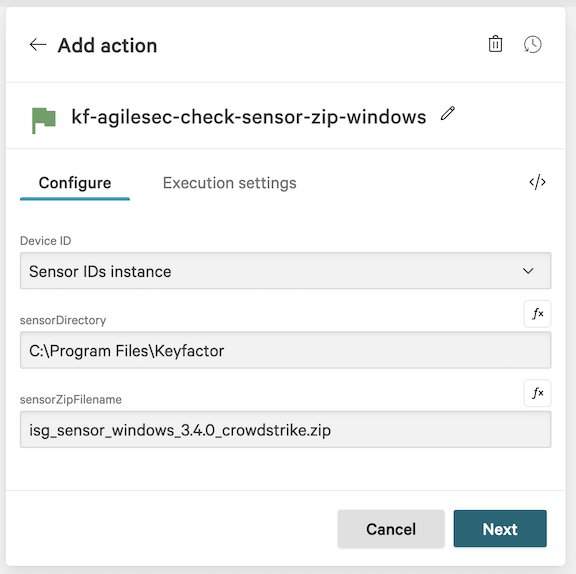
In the action configuration for kf-agilesec-check-sensor-zip-windows, enter the following recommended values and click Next:
-
Device ID:
Sensor IDs instance -
sensorDirectory:
C:\Program Files\Keyfactor -
sensorZipFilename:
isg_sensor_windows_3.4.0_crowdstrike.zip
-
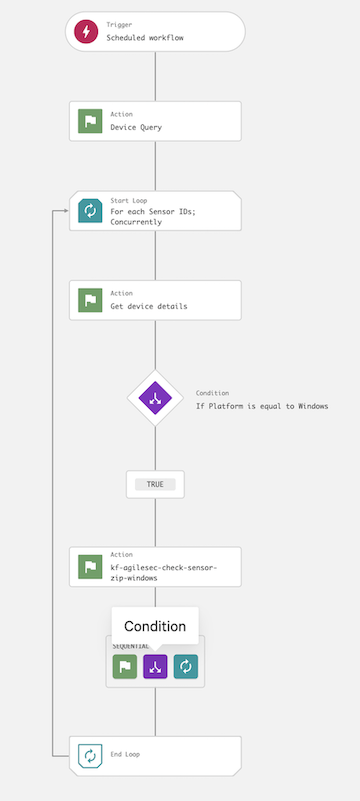
On the workflow builder, add a Condition after kf-agilesec-check-sensor-zip-windows.
-
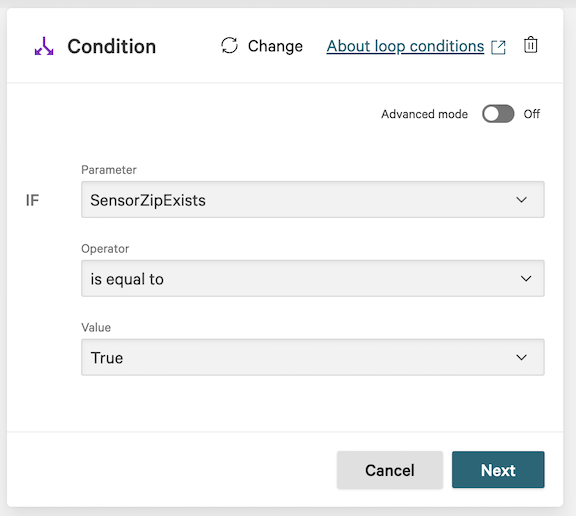
In the Condition dialog, enter the following and click Next:
-
Parameter:
SensorZipExists -
Operator:
is equal to -
Value:
True
-
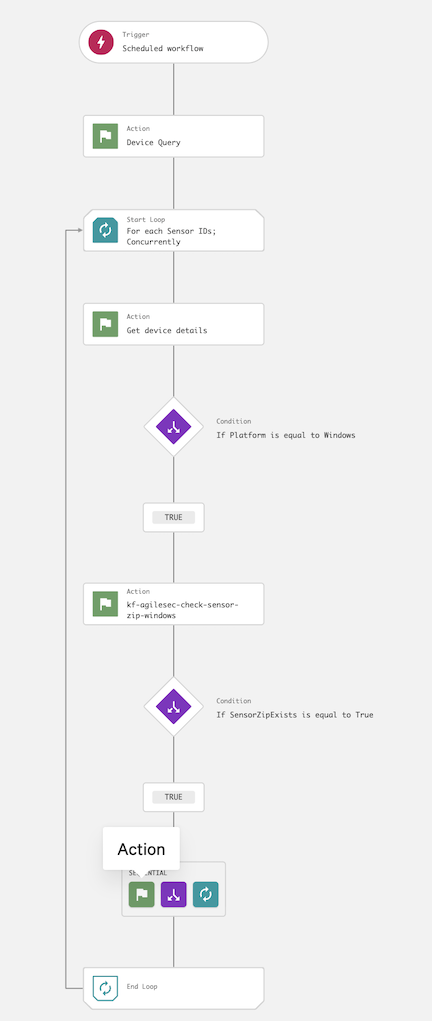
On the workflow build, add an action under the TRUE branch.
-
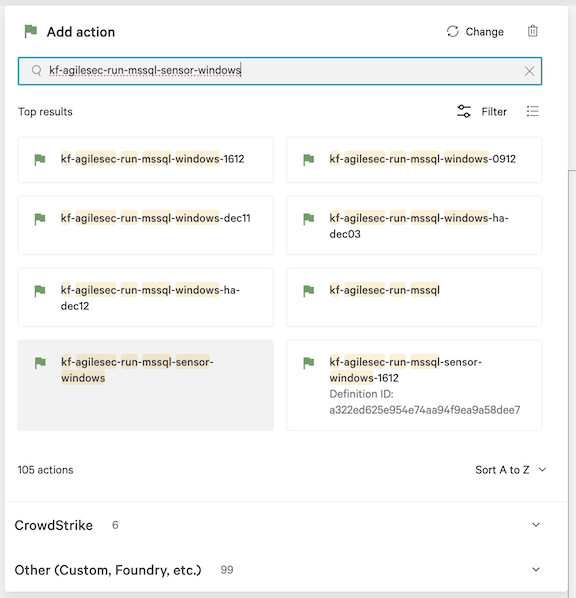
In the Add action dialog, search for and select the script kf-agilesec-run-mssql-sensor-windows.
-
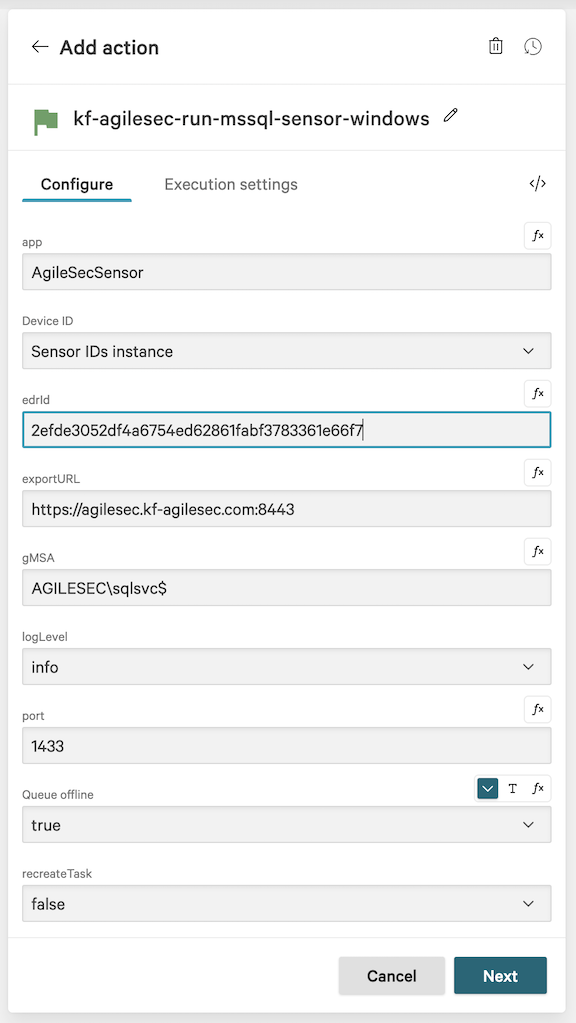
In the action configuration for kf-agilesec-run-mssql-sensor-windows, enter the following recommended values for your environment:
|
Field |
Value |
Description |
|
app |
|
App name used by the plugin. Leave default |
|
Device ID |
|
Device ID provided by Crowdstrike |
|
edrId |
See Prerequisites. |
Used to obtain an access token from AgileSec Platform. This access token is used for authenticating with the ingestion service. See Prerequisites. |
|
exportURL |
|
External facing AgileSec platform URL |
|
gMSA |
|
Group Managed Service Account used to authenticate to SQL Server |
|
log_level |
|
Log level for sensor logs |
|
port |
|
SQL Server port |
|
Queue offline |
|
Queues the action when the device is offline. |
|
recreateTask |
|
Recreates the Windows Task Scheduler task. Use if parameters change after first install |
|
sensorDirectory |
|
Sensor install directory. Set it to |
|
sensorZipPath |
|
Path to the sensor ZIP. Set it to |
|
server |
|
SQL Server hostname or IP address |
|
spn |
(leave empty) |
Reserved for future support. Leave this value blank. |
|
trust |
|
Trust self-signed certificates |
|
updateSensor |
|
Set to true to reinstall/upgrade the sensor |
-
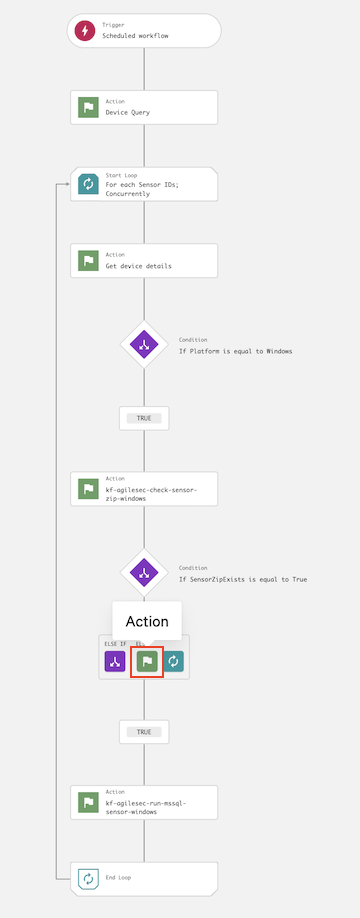
On the workflow builder, add an action under the ELSE branch for sensorZipExists.
-
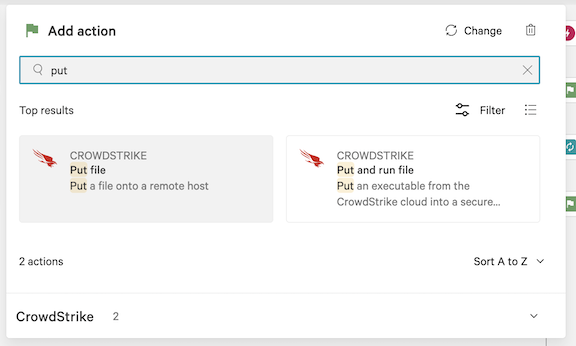
In the Add action dialog, search for and select Put file.
-
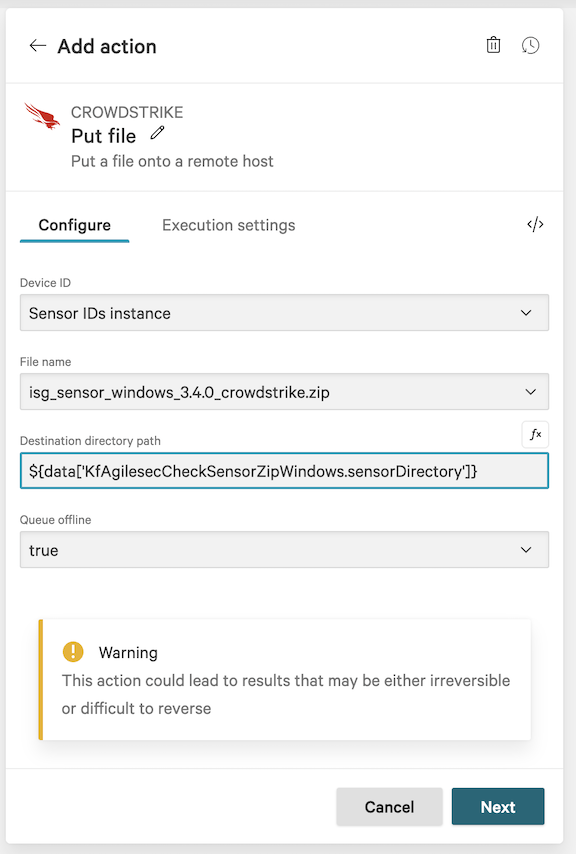
In the Put file dialog, enter the following values and click Next:
-
Device Id:
Sensor IDs instance -
File name:
isg_sensor_windows_3.4.0_crowdstrike.zip -
Destination directory path:
${data['KfAgilesecCheckSensorZipWindows.sensorDirectory']} -
Queue offline:
true
-
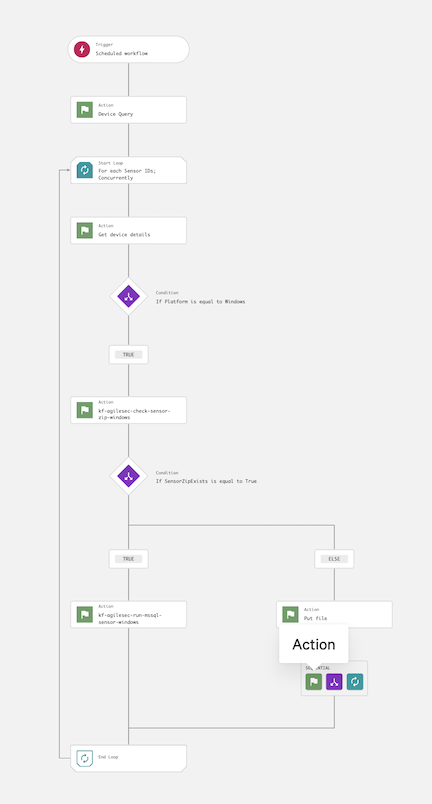
On the workflow builder, add action kf-agilesec-run-mssql-sensor-windows (same as 20) under the Put file.
-
Configure the action kf-agilesec-run-mssql-sensor-windows using information from Step 1.21.
-
The workflow is now complete and should resemble the following:
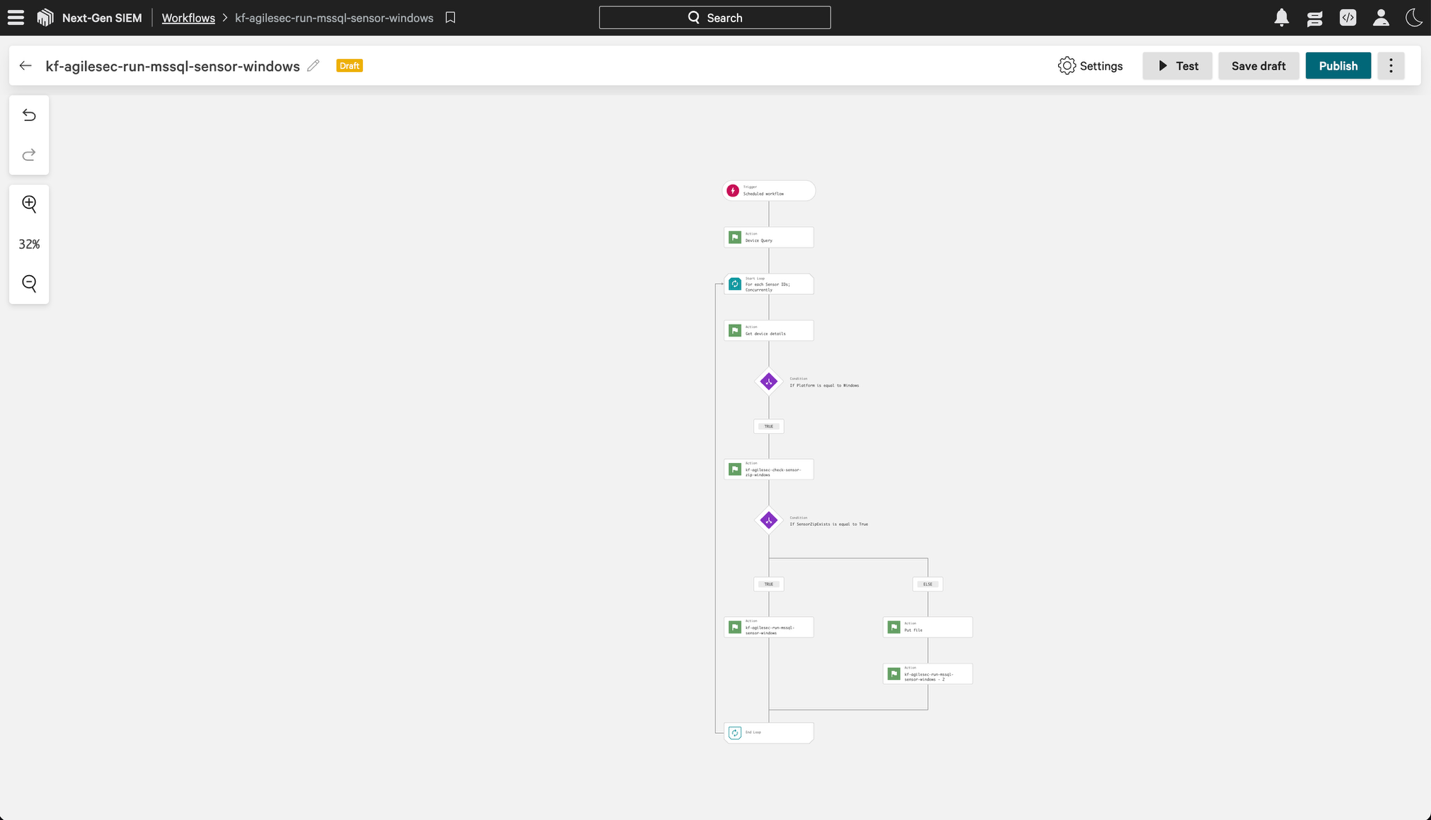
-
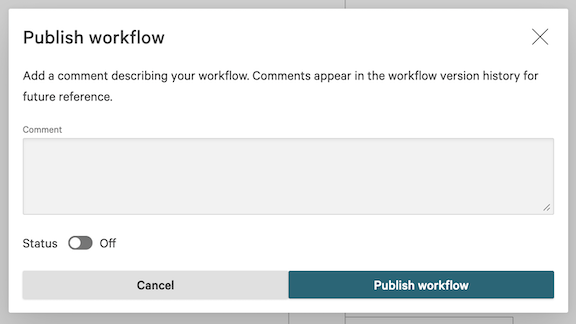
Click Publish, then in the Publish workflow dialog click Publish workflow. When you are ready to active the workflow, toggle Status to on.
Step 5: Execute Workflow to Run Host Scan Sensor
-
If your workflow trigger is on-demand, execute the workflow to test the sensor.
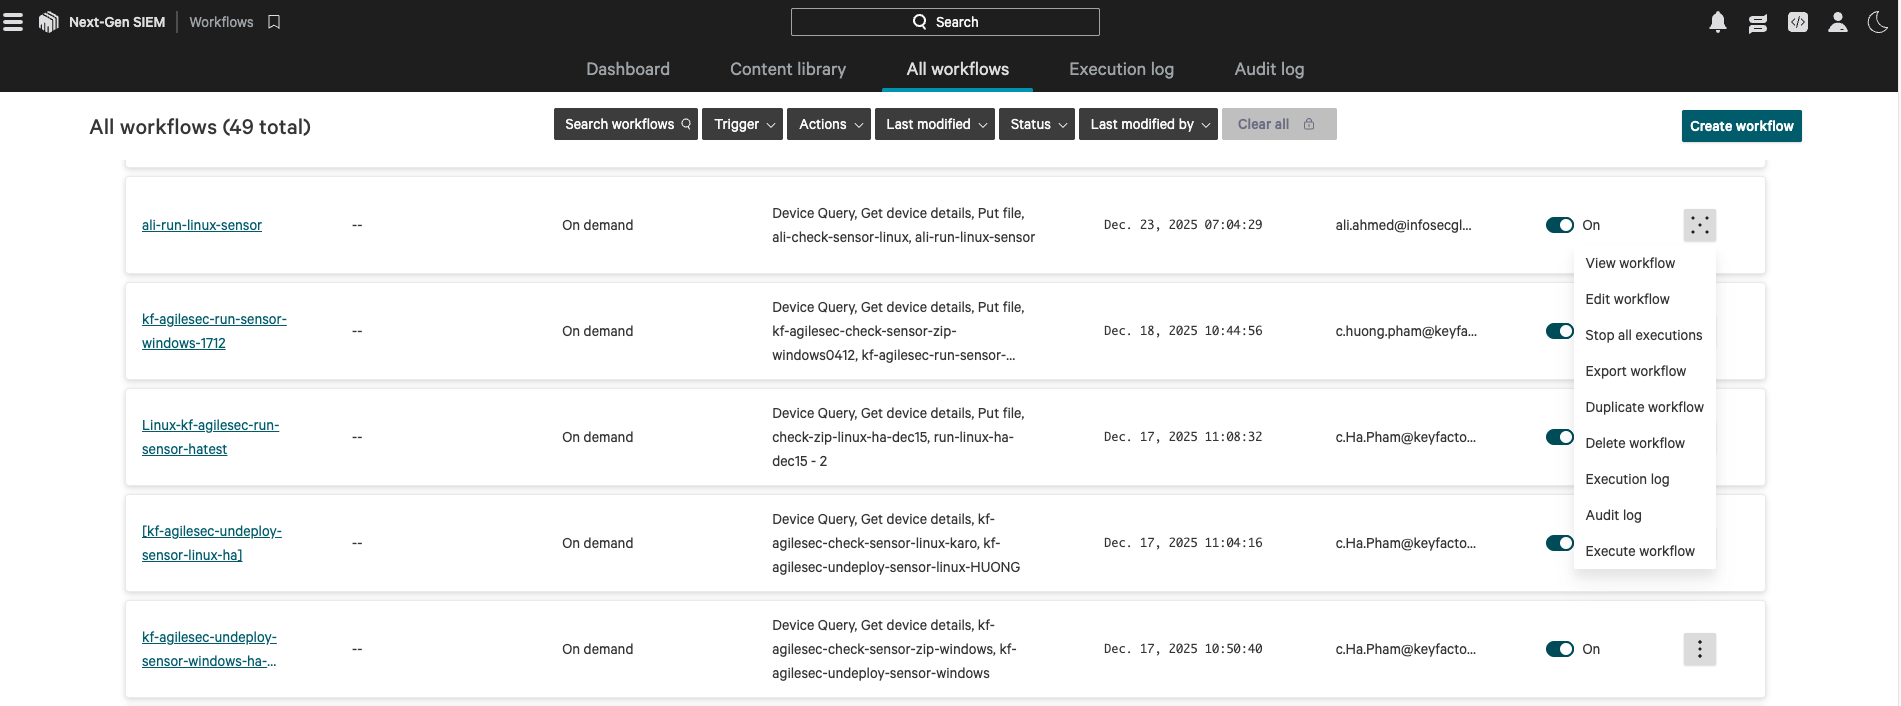
-
If your trigger is scheduled, wait for the configured interval for the sensor to run.
-
Check the scan output data
-
A SQL server database scan is initiated on all machines included in “Device Query” action.
-
Found findings are exported to the ingestion service.
-
Users can view scan history and results within the Keyfactor web application.
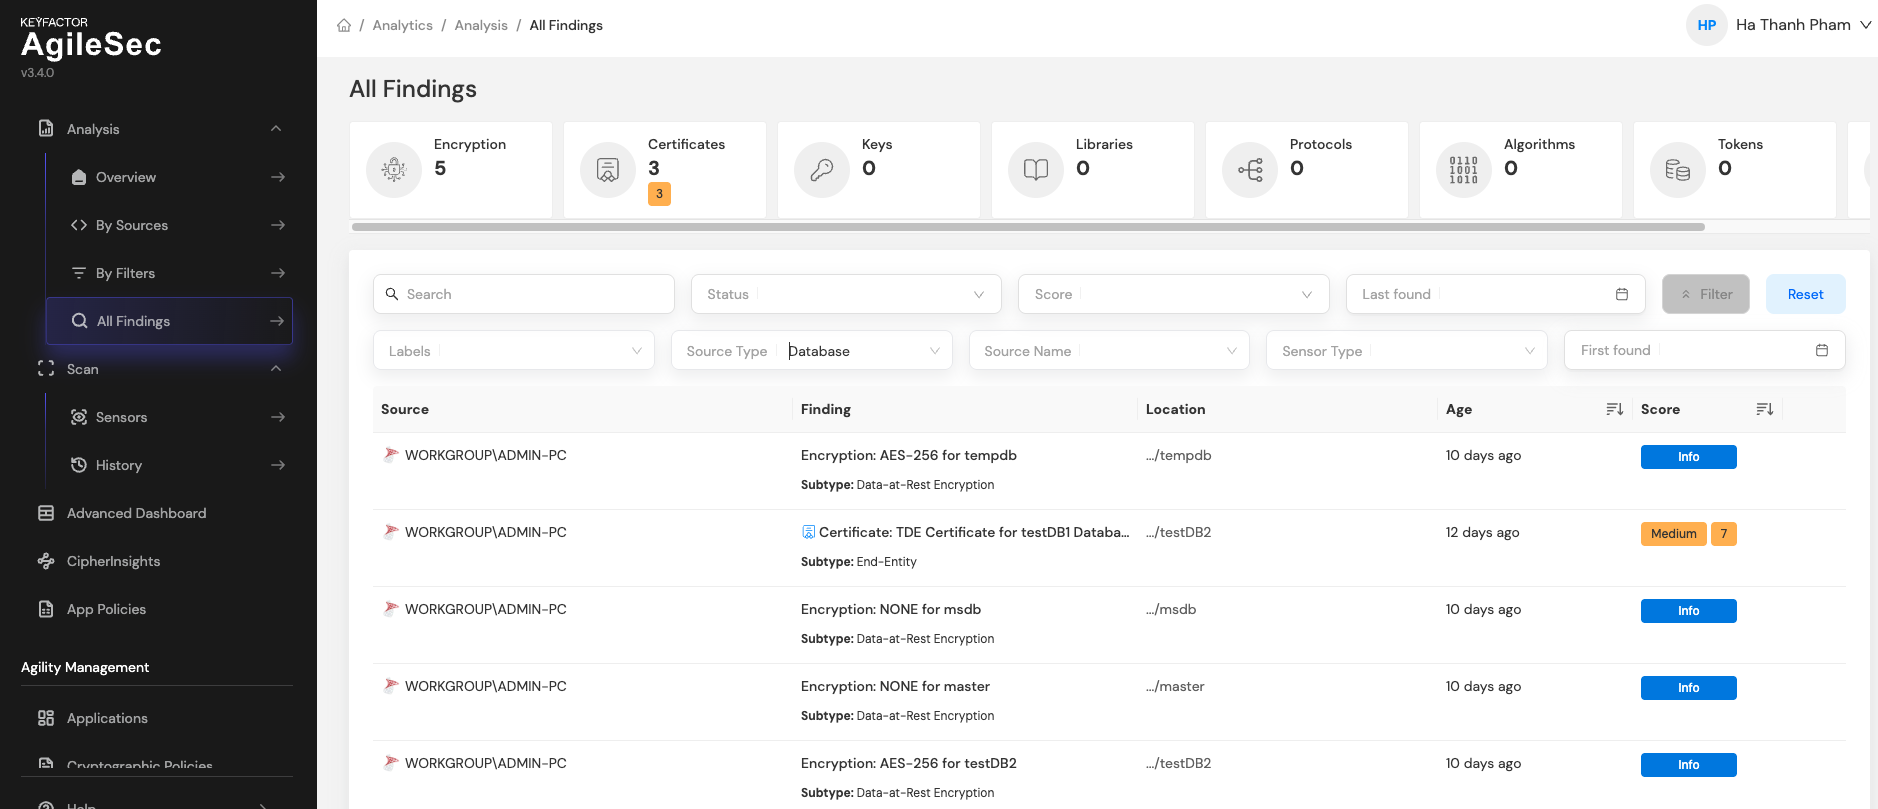
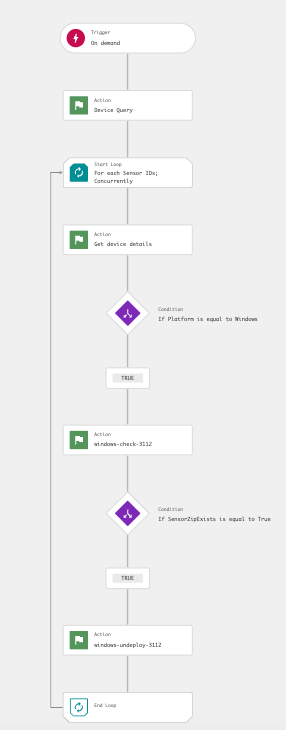
Step 6: Workflow To Undeploy Sensor
You may need to un-deploy the sensor to upgrade to a newer version or remove the sensor from an endpoint. The un-deployment workflow cleanly removes the deployed sensor components and associated execution artifacts so the sensor can be reinstalled or upgraded as needed.
Follow the same instructions used to create the "Run host sensor" workflow, with the following changes:
-
In the Add trigger dialog, select On-demand instead of Scheduled.
-
On the true branch of the sensorZipExists condition:
-
Windows: add action
kf-agilesec-undeploy-sensor-windows
-
-
In the action configuration, enter the following recommended values for your environment:
-
Device Id:
Sensor IDs instance -
Queue Offline:
true -
sensorDirectory:
-
Windows:
${data['KfAgilesecCheckSensorZipWindows.sensorDirectory']}
-
-
sensorZipPath:
-
Windows:
${data['KfAgilesecCheckSensorZipWindows.sensorZipPath']}
-
-
The undeploy sensor workflow should resemble the following:
Step 7: Deploy New Sensor Package
When a new version of the sensor package is released, follow these steps to deploy the update:
-
Execute the "Un-deploy Sensor" workflow to remove the old version.
-
Execute the "Run Host Sensor" workflow to install the new version.