This function is the recommended alternative for the Backup process to be performed via the VM.
It is advised to perform the Backup using this function in Webconf on the Software Appliance.
On the Backup page, you can configure the backup behavior of your system:
-
trigger a manual backup
-
or schedule an automated backup.
A backup is a snapshot of the system at a specific point in time. This makes it possible to restore the device to a stable state if necessary.
It is therefore advisable to create regular backups to ensure that an up-to-date backup is always available.
Backups can be restored, allowing the appliance to be returned to the same state it was in at a specific date/time.
A backup can be restored to the same device or to a different device to enable write-offs, disaster recovery, etc.
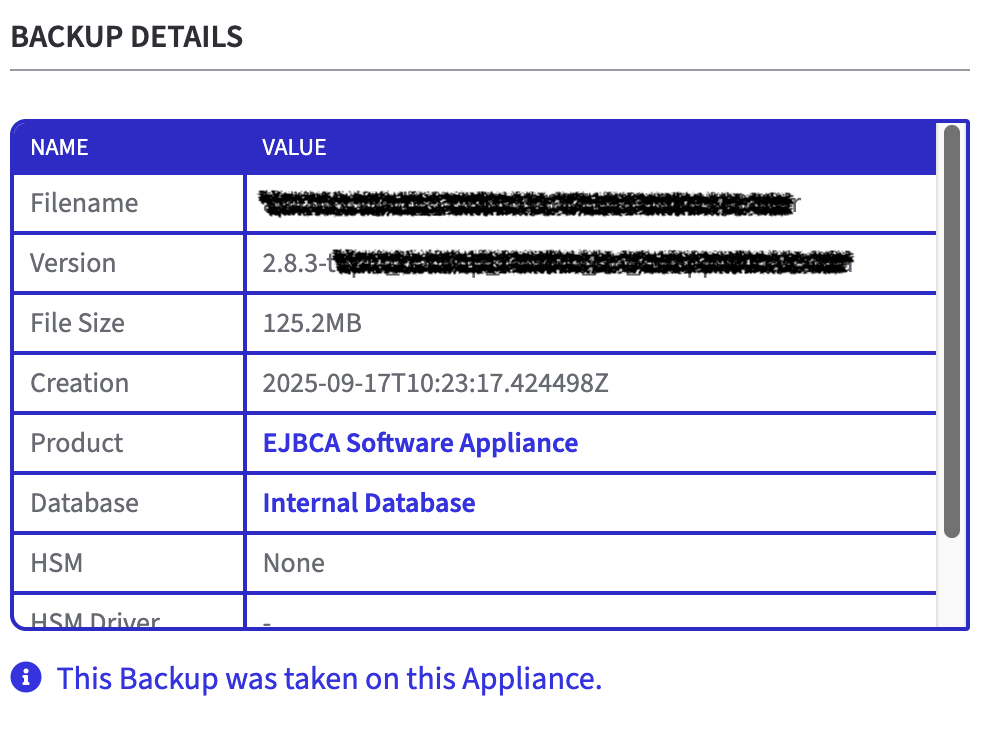
A backup contains the following data:
-
firmware configuration
-
system configuration (cluster, network, database, etc…)
-
database (internal)
-
database configuration only (external DB)
No backup of the HSM or external databases will be created!
To create a backup, make sure not to be logged into Webconf as an OTP User.
See create an OAuth user account to create an OAuth User account.
Log in as OAuth User and remove the OTP User.
Do not restart or shut down the Software Appliance while the Backup is running.
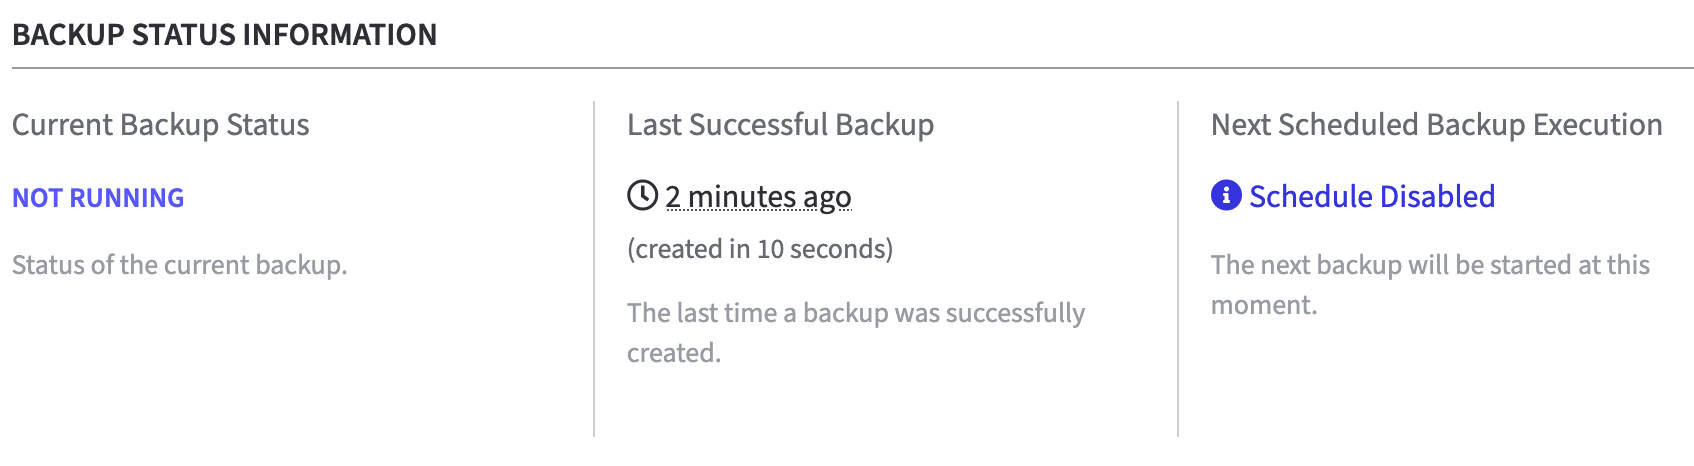
Backup Status
-
Log in to your Software Appliance and open the Backup page.
-
The Backup Status section hosts the Backup Status Information table with three columns providing information about the current backup status.
-
Current Backup Status
-
NOT RUNNING
-
BACKUP IN PROGRESS
-
-
Last Successful Backup
-
The time in minutes/hours/days, etc., since the last successful backup.
-
-
Next Scheduled Backup Execution
-
The time in minutes/hours/days at which the next backup will start.
-
-
Backup Settings
For the basic setup, refer to the following steps.
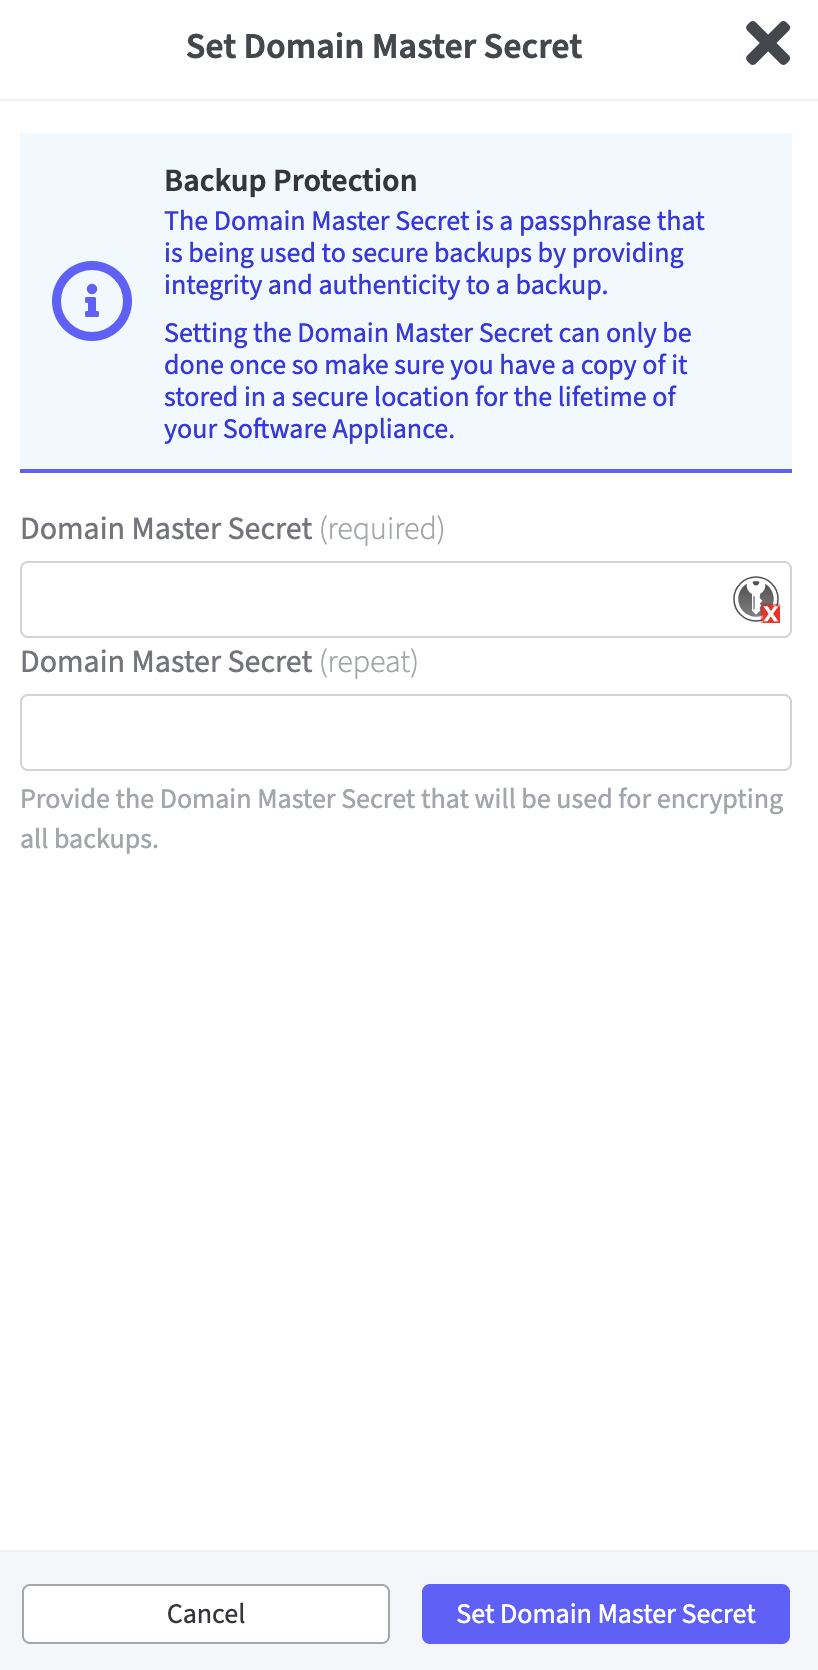
Backup Protection
For the Backup Protection it is mandatory to define a Domain Master Secret (DMS). The DMS is a passphrase used to ensure the integrity and authenticity of the backups via encryption and signing.
The Domain Master Secret can only be set once. Therefore, keep a copy of it in a safe place for the entire lifetime of your Software Appliance.
Once the DMS is set, it cannot be changed or deleted.
-
Log in to the Software Appliance.
-
Open the Backup page.
-
In the section Backup Settings
click Set Domain Master Secret to open the corresponding form.

-
Enter the Domain Master Secret. Domain Master Secret must be at least 8 characters long!
-
Repeat the Domain Master Secret.
-
Click Set Domain Master Secret to confirm your entries.
-
If the process was successful, the following message appears:
DOMAIN MASTER SECRET IS SET.
Backup Filename (optional)
Use this field to specify a Backup Filename Prefix for your backup filename if you want to customize it.
-
Log in to the Software Appliance.
-
Open the Backup page.
-
In the section Backup Settings under Backup Filename enter the prefix for the backup filename.
-
Click Save Settings to confirm your entries.

Automated Backup Schedule
To trigger an automated backup see Scheduled Backup.
Connect a USB Drive to the VM
GPT partitioned USB drives with partitions that are either ext4 or exFAT formatted are supported.
Attaching USB Drives to the ESXi VM
Attach an USB drive to the ESXi hypervisor.
-
Open the ESXi hypervisor in the browser
-
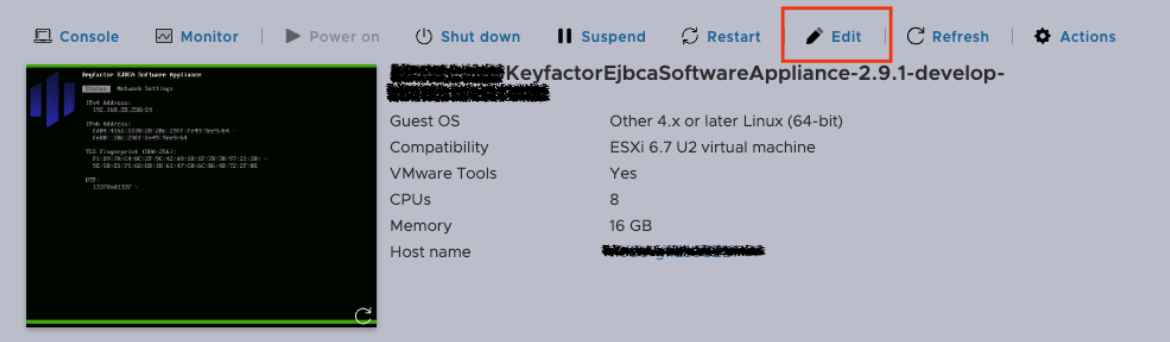
Open the dedicated VM to be used.
-
In the top command row click Edit.
-
In the Edit settings of the hypervisor click Add other device.
-
Select USB drive from the drop-down menu.
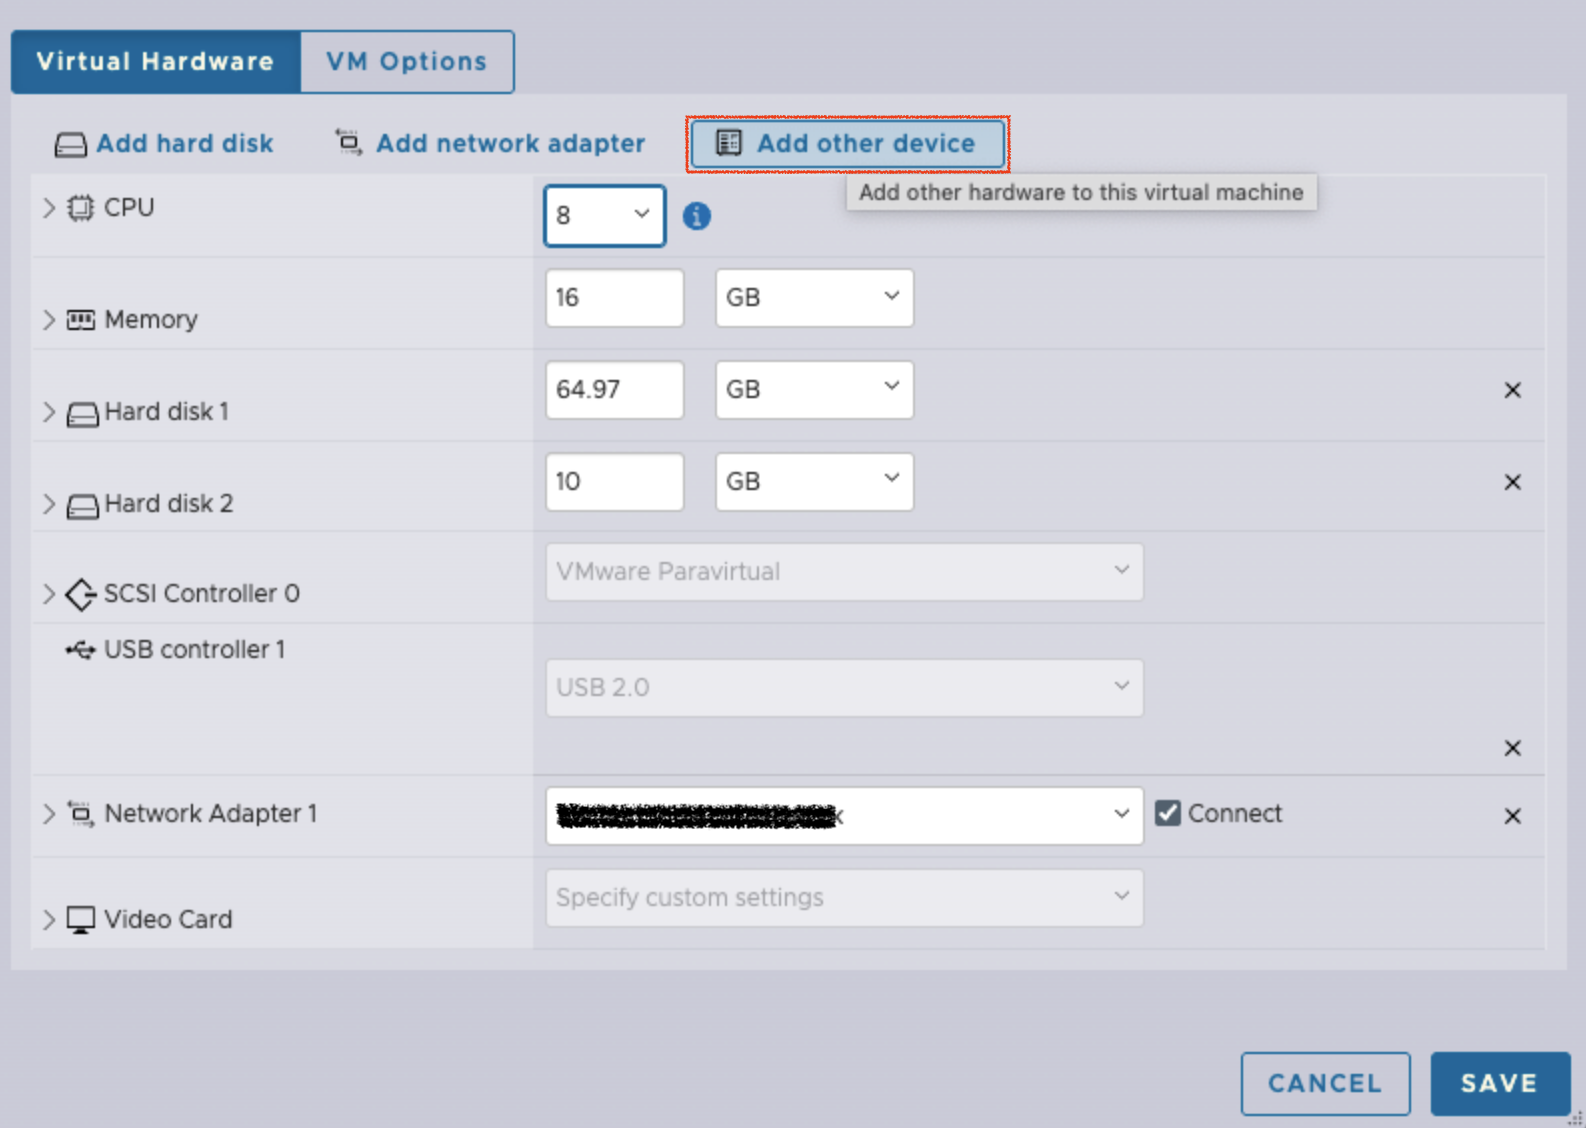
-
A new field appears: New USB Device.
The newly added drive is displayed.
If multiple USB drives have been added, they are displayed in a drop-down menu.
Select the USB drive to use.
Click Save.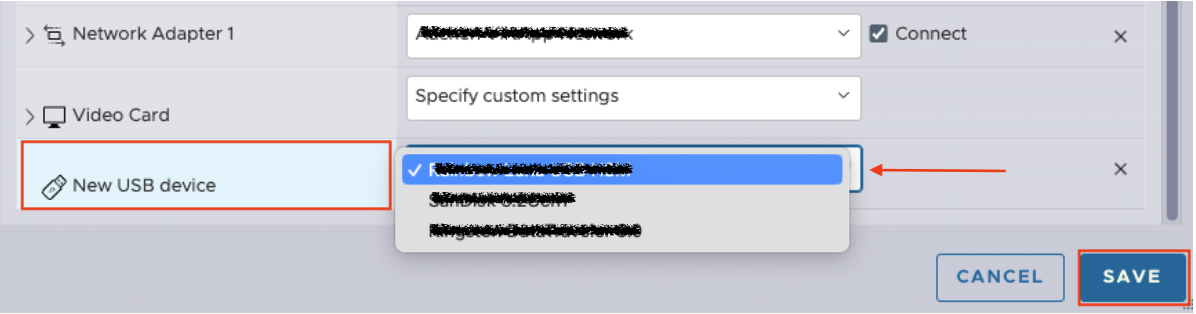
The USB drive is now connected to the ESXi VM.
The function will be visible in the Webconf under the Backup and Restore tab after a few minutes.
If the USB drive is full, it will not be displayed.
Webconf will fetch the USB drive every 3 minutes.
If the USB drive has storage capacity and is displayed in Webconf it is now ready to either perform a backup or restore data.
Attaching USB Drives to the KVM based Hypervisor
GPT partitioned USB drives with partitions that are either ext4 or exFAT formatted are supported.
-
Attach an USB drive to the KVM hypervisor.
-
Open the KVM hypervisor in the browser
-
Open the dedicated VM to be used.
-
Scroll down to Add host device.
-
Click Add Host Device.
-
In the new window Add host device verify that Type: USB is selected.
-
Select the USB to be used from the list.
-
Click Add to confirm.
The USB drive is now connected to the KVM hypervisor.
The function will be visible in the Webconf under the Backup and Restore tab after a few minutes.
If the USB drive is full, it will not be displayed.
Webconf will fetch the USB drive every 3 minutes.
If the USB drive has storage capacity and is displayed in Webconf it is now ready to either perform a backup or restore data.
It is not possible to configure a USB drives with Hyper-V.
Backup Storage
Configure the storage location for backups in the Backup Storage Settings section.
Network File System (NFS)
To store the backup to a NFS located in your network and reachable for the Software Appliance the following NFS versions are supported:
-
NFS Version 4
-
NFS Version 4.1
-
NFS Version 4.2
-
Log in to your Software Appliance.
-
Open the Backup page.
-
In the Backup Storage section, select the Storage Type for the backup from the drop down menu under Backup Storage Settings.
Available storage types:-
None (default)
-
Network File Setting (NFS)
-
USB drive
-
-
Select the storage type to be used from the drop down menu.
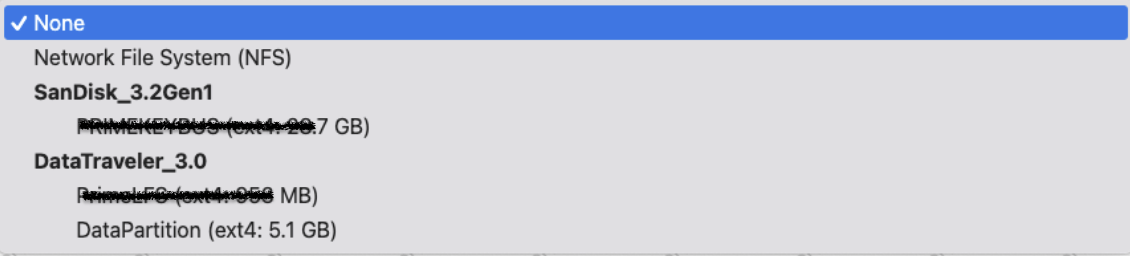
-
A new line appears for the selected path.
NFS URL = nfs://
USB drive URL = usb://
followed by a field for additional entries. -
Enter the full path for NFS URL or USB drive URL if known,
or click Browse Storage to browse the backup location. -
The storage browser opens.
-
Select/Navigate to the path where the backup is to be saved.
Using the Filter allows to narrow down search results.
Click Directories to navigate one level down or
click One level up to return to the previous level. -
Storage Information is displayed on the right hand side of the screen:
-
Permission: e.g. read, write
-
Used Disk Space: xx,x GB/TB
-
Remaining Disc Space: xx,x GB/TB
-
Total Disc Space: xx,x GB/TB
-
-
Click Use This Location to confirm your backup location.
-
A green banner at the top of the screen indicates:
Successfully updated backup storage configuration.
Remaining Disc Space below 20%
Automatic monitoring calculates how much storage space is already occupied.
If the free storage space is less than 20% of the total storage space, a warning appears.
These 20% may or may not be large enough to store further backups.
This depends on the total storage space of the selected storage drive. It is an indicator to consider cleaning up or replacing the storage drive.
If there is insufficient storage space, the backup process will fail.
After a backup has been created, just return to the Storage Browser Backup Location and click on the backup you saved. In the Storage Information section a table is displayed with all Backup Details.